
Popular categories
Looking for a yarn?


Comments / Questions (106)
![]() Josephina Cretier wrote:
Josephina Cretier wrote:
Oke, maar hoe bereken ik die? Dan moet ik de cm maten weten van de maten. Of kunt u mij helpen? Ik heb het garen wat geschikt was gesplitst omdat ik het vest te dik vond worden. Ik wil liever een fijner gehaakt vest. Maar ik zie geen lang gehaakt vest op nr 2-3.
01.06.2015 - 19:36DROPS Design answered:
Hoi Josephina. Ik kan helaas niet helpen met individuele aanpassingen op de gratis patronen. Maar als je hebt de stekenverhouding van het garen, die je nu gaat gebruiken, dan kan je berekenen hoeveel steken je moet opzetten voor de juiste afmetingen. Voorbeeld: je stekenverhouding is 22 st per 10 cm en het kledingstuk moet 54 cm breed worden: 22x5,4 = ca 118 st enzovoort.
02.06.2015 - 14:34
![]() Josephina Cretier wrote:
Josephina Cretier wrote:
Bedankt voor uw snelle antwoord. Ik heb nu toch ander garen gekozen. Het is wat dunner, dan het orginele. Die kan ik max met naald 3,5 haken. Helaas valt mijn proeflapje 1,5 cm te kort in de lengte. Vraag: ik heb maat s/m, als ik nu maat xxl haak, valt hij dan wat kleiner?
31.05.2015 - 22:50DROPS Design answered:
Hoi Josephina. Je moet niet een ander maat haken. Een verkeerde steekverhouding kan de proporties in het werk verkeerd maken. Je moet een naald kiezen voor de juiste stekenverhouding (dus ik zou zeggen een beetje dikker) of bereken het patroon voor de stekenverhouding, die je nu hebt.
01.06.2015 - 13:45
![]() Josephina wrote:
Josephina wrote:
Hoe haak ik het re en li voorpand? Het lijf lukt wel. Maar hoe moet ik verder? Haak ik door vanaf het lijfpand? Groetjes Josephina
10.05.2015 - 18:33DROPS Design answered:
Hoi Josephina. Je hebt het lijf (voorpanden en achterpand) gehaakt tot aan de armsgaten. Hier deel je het lijf in voorpand, achterpand, voorpand. Bij de beschrijving voor zowel het RECHTER als het LINKER VOORPAND staat beschreven in het patroon - ook hoeveel st je hebt voor elk pand.
11.05.2015 - 13:18
![]() Khabirah wrote:
Khabirah wrote:
I have a question about the gauge for the A.4 section. Does it mean that I have to crochet 6 rows of this section and then this will measure 10 cm? Or is it that the 17 stitches will measure 10cm?
03.05.2015 - 00:57DROPS Design answered:
Dear Khabirah, 17 sts in A.4 should measure 10 cm in width. Happy crocheting!
04.05.2015 - 09:09
![]() Khabirah wrote:
Khabirah wrote:
I looked at the list of yarn alternatives and I did not see 100% acrylic listed. Does this mean that I should not use this type of yarn for this project?
20.04.2015 - 08:28DROPS Design answered:
Dear Khabirah, under "yarn alternatives" you will find a selection of some of our yarns that can be used instead Karisma (ie group B of our yarns). Click here to calculate the amount of an alternative yarn - contact your DROPS Store for any tips & advice. Happy crocheting!
20.04.2015 - 10:23
![]() Khabirah wrote:
Khabirah wrote:
I have a question about the repetition measurements. If I am not mistaken it reads that the A.1 section with one repetition will measure 3.5cm. Does this mean that after I crochet this section for the first time I have to measure from the foundation row an it will measure 3.5cm? Or is it after I crochet this section for the second time? Also if I crochet this section for the second time is this considered the first repetition?
20.04.2015 - 05:55Khabirah answered:
Okay I now understand the measurements for the repetition but I still have the question about the acrylic yarn.
20.04.2015 - 10:17
![]() Melissa wrote:
Melissa wrote:
I need help with the right and left front piece. It doesn't make sense. I don't understand and it's very confusing I have crocheted for 22 years, taught crochet and write patterns and I can't understand this. Can someone explain the decrease section after "read all of the following 2 sections before continuing"
29.03.2015 - 05:56DROPS Design answered:
Dear Melissa, shaping neck will be done after dec for armhole will be done, so that you will have to follow both sections at the same time. First start dec for armhole at the end of every row from RS (left front piece), then, whe A.4 has been worked a total of 5-6 times (see size), start to dec for neck from RS as stated - do not forget to continue then dec for armhole at the same time as before. Happy crocheting!
30.03.2015 - 15:37
![]() Rita wrote:
Rita wrote:
Hey,Tine Deze patronen staan er ook in het Nederlands op hoor,klik gewoon op home en kies je taal
29.01.2015 - 11:12
![]() Lois wrote:
Lois wrote:
I am going to attempt to make this jacket for my daughter. I am new to this kind of pattern where it doesn't tell you how many balls of yarn to purchase. If I were making a size small, would I need 35 if each ball of yarn is 50g? that seems like a lot of yarn. Thanks for your help
22.01.2015 - 22:20DROPS Design answered:
Dear Loïs, in size small you need 700 g Karisma, 1 ball Karisma is 50 g, so that 700/50 = 14 balls are required in size S. Happy crocheting!
23.01.2015 - 13:38
![]() Tine wrote:
Tine wrote:
Hallo, ik ben net begonnen aan het haken van de mouw. ik heb de 8 patroonherhalingen van A.2 net gedaan. nu staat er dat ik 1dstk moet doen, is dit 1 steek? en in welke steek is dit dan? of is dit een hele rij?
11.01.2015 - 20:06DROPS Design answered:
Hoi Tine. Je herhaalt A.2 8 keer in de breedte en hebt dan 1 steken over, haak hier 1 dstk.
13.01.2015 - 13:51
|
|||||||||||||||||||||||||
Jaqueline#jaquelinejacket |
|||||||||||||||||||||||||
 |
 |
||||||||||||||||||||||||
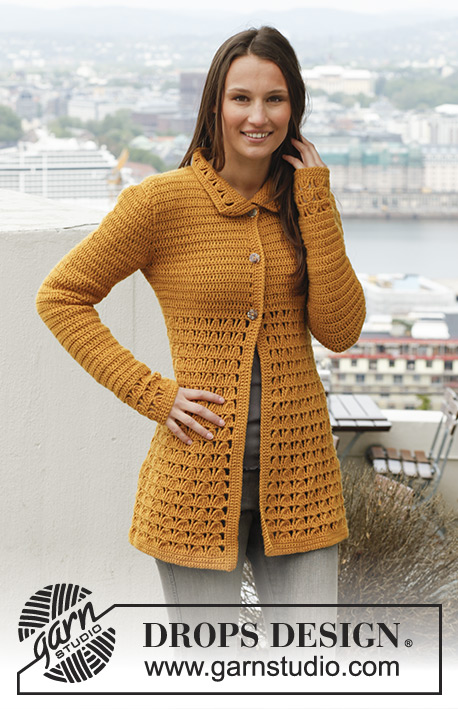
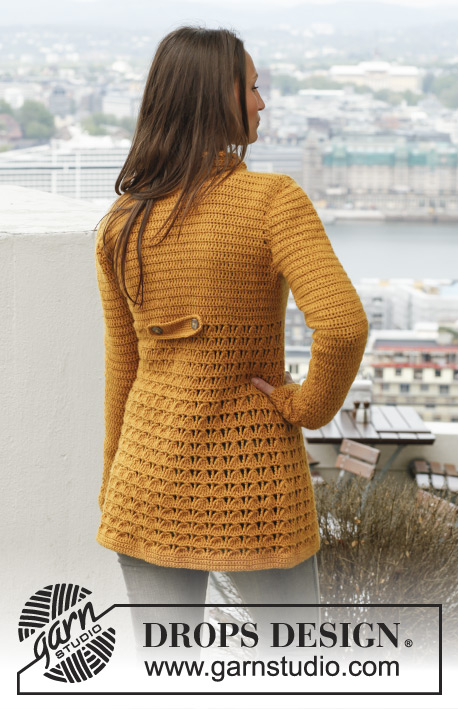
Crochet DROPS jacket with lace pattern in ”Karisma”. Size: S - XXXL.
DROPS 143-12 |
|||||||||||||||||||||||||
|
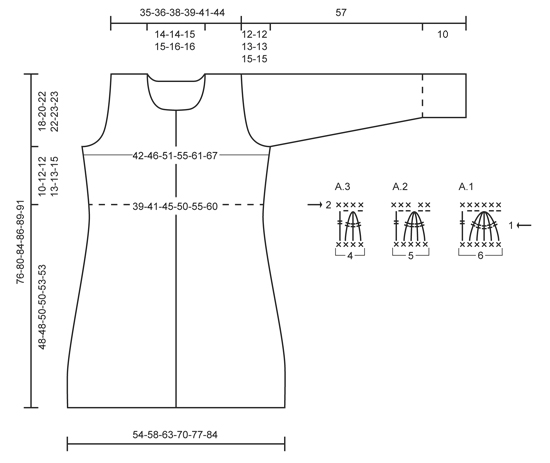
SC ROW: Beg every sc row with 1 ch (not counted as 1st sc), work 1 sc in every st the entire row, turn. PATTERN A.1 (divisible by 6 + 1): ROW 1 (= RS): Ch 4 (= 1 tr) in 1st sc, continue as follows – also see 1st row in diagram A.1: * ch 2, 1 bobble with 5 tr, ch 2, 1 tr in next sc *, repeat from *-* the entire row, turn piece. ROW 2 (= WS): ch 1, 3 sc in 1st ch-space, 1 sc in next bobble, 2 sc in next ch-space, continue as follows – also see 2nd row in diagram A.1: * 1 sc in next tr, 2 sc in next ch-space, 1 sc in next bobble, 2 sc in next ch-space *, repeat from *-* the entire row, finish with 1 sc more in last ch-space on row (= same no of sc as before). PATTERN A.2 (divisible by 5 + 1): ROW 1 (= RS): Ch 4 (= 1 tr) in 1st sc, continue as follows – also see 1st row in diagram A.2: * ch 2, work 1 bobble with 4 tr, ch 2, 1 tr in next sc *, repeat from *-* the entire row, turn. ROW 2 (= WS): ch 1, 3 sc in 1st ch-space, skip 1st bobble, 2 sc in next ch-space, continue as follows – also see 2nd row in diagram A.2: * 1 sc in next tr, 2 sc in next ch-space, skip next bobble, 2 sc in next ch-space *, repeat from *-* the entire row, finish row with 1 sc more last ch-space on row (= same no of sc as before). PATTERN A.3 (divisible by 4 + 1): ROW 1 (= RS): Ch 4 (= 1 tr) in 1st sc, continue as follows – also see 1st row in diagram A.3: * ch 1, work 1 bobble with 3 tr, ch 1, 1 tr in next sc *, repeat from *-* the entire row, turn. ROW 2 (= WS): ch 1, 2 sc in 1st ch-space, 1 sc in next bobble, 1 sc in next ch-space, continue as follows – also see 2nd row in diagram A.3: * 1 sc in next tr, 1 sc in next ch-space, 1 sc in next bobble, 1 sc in next ch-space *, repeat from *-* the entire row, finish with 1 sc more in last ch-space on row (= same no of sc as before). INCREASE TIP: Inc 1 st by working 2 sts in the same st. DC ROW: Work all dc rows from RS. Beg every dc row with 3 ch (= 1st dc), skip 1st sc from previous row, work 1 dc in every sc the entire row, turn. PATTERN A.4: ROW 1 (= RS): Work 1 dc row. ROW 2 (= WS): Work 1 sc row. DECREASE TIP - DC: Crochet 2 dc tog as follows: Work 1 dc in sc below but wait with last pull through (= 2 sts on hook), work 1 dc in next sc but on last pull through, pull thread through all sts on hook = 1 dc dec. Dec 3 dc at the beg or end of row by working the first 6 or last 6 dc tog 2 by 2. Dec 2 dc at the beg or end of row by working the first 4 or last 4 dc tog 2 by 2. Dec 1 dc at the beg or end of row by working the first 2 or last 2 dc tog. DECREASE TIP - SC: Insert hook in st below and pull thread through, insert hook in next st and pull thread through, make 1 YO and pull thread through all 3 loops on hook = 1 st dec. WORK IN THE ROUND IN A CIRCLE: After last sc on round do not finish with 1 sl st but continue on to next round with 1 sc in first sc on previous round. -------------------------------------------------------- BODY: Worked back and forth from mid front. Ch 188-200-218-242-266-290 LOOSELY with Karisma on hook size 4.5 mm/US 7, turn and work 1 sc in 2nd ch from hook, then 1 sc in every ch the entire row = 187-199-217-241-265-289 sc, turn piece (1st row = WS). Work 4 SC ROWS - read explanation above = a total of 5 sc rows, piece measures approx. 2½ cm / ⅞". Then work PATTERN A.1 - read explanation above = 31-33-36-40-44-48 repetitions + 1 tr. When 2ND ROW has been worked, there are 187-199-217-241-265-289 sc on row. REMEMBER THE CROCHET GAUGE! Work A.1 a total of 6-6-7-7-8-8 times vertically - but work last sc row from WS as follows: ch 1, 3 sc in 1st ch-space, skip 1st bobble, 2 sc in next ch-space, * 1 sc in next tr, 2 sc in next ch-space, skip next bobble, 2 sc in next ch-space *, repeat from *-* the entire row but finish with 3 sc in last ch-space = 156-166-181-201-221-241 sc, turn. Then work PATTERN A.2 - read explanation above. When 2ND ROW has been worked, there are 156-166-181-201-221-241 sc on row. Work A.2 a total of 6 times vertically - but work last sc row from WS as follows: ch 1, 2 sc in 1st ch-space, 1 sc in next bobble, 1 sc in next ch-space, * 1 sc in next tr, 1 sc in next ch-space, 1 sc in next bobble, 1 sc in next ch-space *, repeat from *-* the entire row, but finish with 2 sc in last ch-space = 125-133-145-161-177-193 sc. Then work PATTERN A.3 - read explanation above. When 2ND ROW has been worked, there are 125-133-145-161-177-193 sc on row. Work A.3 a total of 6 times vertically - but on last sc row from WS inc 10-12-14-16-18-20 sc evenly - READ INCREASE TIP = 135-145-159-177-195-213 sc, piece now measures approx. 48-48-50½-50½-53-53 cm / 19"-19"-20"-20"-21"-21". Continue to work PATTERN A.4 1 time - read explanation above - AT THE SAME TIME on sc row from WS inc 9-11-13-11-13-15 sts evenly = 144-156-172-188-208-228 sc. Work A.4 a total of 6-7-7-8-8-9 times vertically (last row = sc row from WS), piece now measures approx. 58-60-62-63-66-68 cm / 22¾"-23½"-24½"-24¾"-26"-26¾". Do not cut the thread. Insert 1 marker 36-39-43-47-52-57 sc in from each side on last sc row (= 72-78-86-94-104-114 sc between markers on back piece). RIGHT FRONT PIECE: = 36-39-43-47-52-57 sc. Continue with A.4 - AT THE SAME TIME dec for armholes on next row from RS as follows: Work dc until 3 sc remain before marker = 33-36-40-44-49-54 dc, turn (= skip 3 sts before marker) and work 1 sc row from WS. READ ALL OF THE FOLLOWING 2 SECTIONS BEFORE CONTINUING. Then dec for armhole at the end of every row from RS - READ DECREASE TIP - dc - as follows: Dec 3 dc 0-0-1-1-1-2 times, 2 dc 1-1-1-3-4-5 times, and 1 dc 1-3-3-2-3-1 time. AT THE SAME TIME when A.4 has been worked a total of 5-6-6-6-6-6 times vertically (counted from marker in last sc row before armhole dec), dec for neck on next dc row from RS as follows: Cut the thread, ch 3 (= 1 dc) in the 7th-7th-8th-8th-9th-9th sc from mid front (= skip 6-6-7-7-8-8 dc from mid front), work dc - AT THE SAME TIME continue armhole dec at the end of row if it is not done, turn and work 1 sc row from WS. Then dec at beg of every row from RS as follows: Dec 2 dc 2 times and 1 dc 2 times. When all dec are done, 18-19-19-20-21-23 sts remain for shoulder. Work A.4 a total of 11-12-13-13-14-14 times vertically (counted from marker in last sc row before armhole dec), piece measures approx. 76-80-84-86-89-91 cm / 30"-31½"-33"-34"-35"-35¾" (finish with 1 sc row), cut and fasten the thread. LEFT FRONT PIECE: = 36-39-43-47-52-57 sc. Continue with A.4 - AT THE SAME TIME dec for armholes on next row from RS as follows: Skip the first 3 sc from marker in the side, work 3 ch (= 1 dc) in next sc (= 4th sc from marker), work dc the entire row = 33-36-40-44-49-54 dc, turn and work 1 sc row from WS. READ ALL OF THE FOLLOWING 2 SECTIONS BEFORE CONTINUING. Then dec for armhole at beg of every row from RS as follows: Dec 3 dc 0-0-1-1-1-2 times, 2 dc 1-1-1-3-4-5 times, and 1 dc 1-3-3-2-3-1 time. AT THE SAME TIME when A.4 has been worked a total of 5-6-6-6-6-6 times vertically (counted from marker in last sc row before armhole dec), dec for neck on next dc row from RS as follows: Continue with armhole dec at beg of row if it is not done, work dc until 6-6-7-7-8-8 dc remain from mid front, turn and work 1 sc row from WS. Then dec at end of every row from RS as follows: Dec 2 dc 2 times and 1 dc 2 times. When all dec are done, 18-19-19-20-21-23 sts remain for shoulder. Work A.4 a total of 11-12-13-13-14-14 times vertically (counted from marker in last sc row before armhole dec), piece measures approx. 76-80-84-85-89-91 cm / 30"-31½"-33"-34"-35"-35¾" (finish with 1 sc row), cut and fasten the thread. BACK PIECE: = 72-78-86-94-104-114 sc. Continue with A.4 - AT THE SAME TIME dec for armholes on next row from RS as follows: Skip 3 sc from marker on right side of piece, work 3 ch in next sc (= 1st dc in 4th sc from marker), 1 dc in every sc until 3 sc remain from next marker = 66-72-80-88-98-108 dc, turn (= skip 3 sc in each side) and work 1 sc row from WS. Then dec for armhole at beg and end of every row from RS as follows: Dec 3 dc 0-0-1-1-1-2 times, 2 dc 1-1-1-3-4-5 times, and 1 dc 1-3-3-2-3-1 time = 60-62-64-66-70-74 sts remain. Work A.4 a total of 9-10-11-11-12-12 times vertically (counted from marker in last sc row before armhole dec). RIGHT SHOULDER: From RS work 19-20-20-21-22-24 dc, turn and work 19-20-20-21-22-24 sc from WS, turn. On next row from RS, dec 1 dc at the end of row for neck = 18-19-19-20-21-23 dc remain for shoulder. Work 1 sc row from WS = a total of 11-12-13-13-14-14 repetitions A.4 vertically (counted from marker in last sc row before armhole dec), cut and fasten the thread, piece measures approx. 76-80-84-85-89-91 cm / 30"-31½"-33"-34"-35"-35¾". LEFT SHOULDER: Now work from RS, beg from neck as follows: Count 19-20-20-21-22-24 sts in from left side and beg with 3 ch in this sc. Then work 1 dc in each of the 18-19-19-20-21-23 dc the entire row. (I.e. do not work over the middle 22-22-24-24-26-26 sts = neck.) Turn and work 1 sc in every dc, turn. On next row (= dc), dec 1 dc at the beg of row for neck = 18-19-19-20-21-23 dc. Work 1 row with sc, cut and fasten the thread, piece measures approx. 76-80-84-85-89-91 cm / 30"-31½"-33"-34"-35"-35¾". SLEEVE: Worked back and forth. Ch 37-37-42-42-47-47 LOOSELY with Karisma on hook size 4.5 mm/US 7, turn and work 1 sc in 2nd ch from hook, then 1 sc in every ch the entire row = 36-36-41-41-46-46 sc, turn (1st row = WS). Work 4 more sc rows = a total of 5 sc rows, piece measures approx. 2½ cm / ⅞". Then work PATTERN A.2 = 7-7-8-8-9-9 repetitions + 1 tr. When 2ND ROW has been worked, there are 36-36-41-41-46-46 sc on row. Work A.2 a total of 3 times vertically - but on last sc row from WS inc 0-4-2-4-6-8 sc evenly = 36-40-43-45-52-54 sc (piece now measures approx. 10 cm / 4"). Then work A.4 until finished measurements - AT THE SAME TIME inc 1 dc in the outermost sc in each side on 1st dc row - READ INCREASE TIP = 2 dc inc. Repeat inc in each side on every other dc row (i.e. every 4th row) 8-8-8-8-7-7 more times = 54-58-61-63-68-70 sts (= 9-9-9-9-8-8 times). Continue until A.4 has been worked a total of 21-21-20-20-19-19 times vertically (last row = sc row from WS), piece measures approx. 45-45-43½-43½-42-42 cm / 17¾"-17¾"-17"-17"-16½"-16½" (shorter measurements in the larger sizes because of longer sleeve cap and wider shoulders). Then dec for sleeve cap on next dc row from RS as follows: Sl sts until 4th sc, ch 3 in same sc (= 1st dc), 1 dc in every sc until 3 sc remain on row = 48-52-55-57-62-64 dc, turn and work 1 sc row from WS. Continue dec for sleeve cap in each side on every row from RS as follows: Dec 3 dc 1-2-2-2-2-2 times, 2 dc 2-2-2-3-4-4 times, 1 dc 1-0-1-1-1-1 time, 2 dc 2-2-2-1-1-1 time. On next row from RS, dec 3 dc in each side of piece = 18-18-19-21-22-24 sts remain. On next row from WS, dec 3 sc in each side of piece - READ DECREASE TIP - SC = 12-12-13-15-16-18 sc remain, cut and fasten the thread. The piece now measures approx. 57 cm / 22½" in all sizes. Work another sleeve the same way. ASSEMBLY: Sew shoulder seams in outermost sts with fine stitches. Sew in sleeves, sew sleeve seams tog. COLLAR: Work from RS approx. 80 - 100 sc along the entire neck edge (beg at the top of right front piece). Then work 1 sc row from WS while AT THE SAME TIME adjusting no of sts to 80-82-84-88-92-94 sc. Work 4 more sc rows = a total of 6 sc rows. On next row inc 3 sc evenly on row = 83-85-87-91-95-97 sc. Continue with sc rows until a total of 11 sc rows have been worked. On next sc row, inc 3-6-4-5-6-4 sc evenly = 86-91-91-96-101-101 sc. Then work A.2 (= 17-18-18-19-20-20 repetitions + 1 tr) 1 time vertically. Work 2 more sc rows, cut and fasten the thread, collar measures approx. 9 cm / 3½". FRONT BAND: Work from RS approx. 130 - 150 sc along the entire edge mid front on right front piece (incl short side of collar). Then work 1 sc row from WS while AT THE SAME TIME adjusting no of sts to 128-134-138-140-144-148 sc. On next row from RS work as follows: Work sc until 80-84-84-84-88-90 sc remain on row, * ch 2, skip 2 sc, work 13-14-16-17-17-18 sc *, repeat from *-* 1 more time, ch 2, skip 2 sc, work 12 sc, ch 2, skip 2 sc, work the last 2 sc on row = 4 buttonholes, turn. Then work 2 more sc rows (work 2 sc in every ch-space), cut and fasten the thread = 5 sc rows in total. Work band the same way mid front along left front piece but without buttonholes. Sew on 4 buttons on to left band. FLAP: Worked in the round. Ch 19 LOOSELY with Karisma on hook size 4.5 mm/US 7, turn and work 3 sc in 2nd ch from hook, then 1 sc in every ch until 1 ch remains on row, work 3 sc in last ch, turn piece and continue to work 1 sc in every ch on the other side of ch row - READ WORK IN THE ROUND IN A CIRCLE! On next round work 1 sc in every sc but in each short side inc 1 sc (by working 2 sc in same sc) in each of the middle 3 sc (= 3 inc sts in each short side). Continue in the round with inc in each short side the same way until flap measures approx. 14-14-15-15-16-16 cm / 5½"-5½"-6"-6"-6¼"-6¼" in width, work 1 sl st in next sc, cut and fasten the thread. Place flap in the middle of back piece where pattern A.3 goes over to A.4. Sew on 1 button on each side through both layers. |
|||||||||||||||||||||||||
Diagram explanations |
|||||||||||||||||||||||||
|
|||||||||||||||||||||||||
 |
|||||||||||||||||||||||||
Have you finished this pattern?Tag your pictures with #dropspattern #jaquelinejacket or submit them to the #dropsfan gallery. Do you need help with this pattern?You'll find 7 tutorial videos, a Comments/Questions area and more by visiting the pattern on garnstudio.com. © 1982-2026 DROPS Design A/S. We reserve all rights. This document, including all its sub-sections, has copyrights. Read more about what you can do with our patterns at the bottom of each pattern on our site. |
|||||||||||||||||||||||||


With over 40 years in knitting and crochet design, DROPS Design offers one of the most extensive collections of free patterns on the internet - translated to 17 languages. As of today we count 325 catalogs and 12298 patterns - 12288 of which are translated into English (US/in).
We work hard to bring you the best knitting and crochet have to offer, inspiration and advice as well as great quality yarns at incredible prices! Would you like to use our patterns for other than personal use? You can read what you are allowed to do in the Copyright text at the bottom of all our patterns. Happy crafting!
Post a comment to pattern DROPS 143-12
We would love to hear what you have to say about this pattern!
If you want to leave a question, please make sure you select the correct category in the form below, to speed up the answering process. Required fields are marked *.