
Popular categories
Looking for a yarn?


Comments / Questions (62)
![]() Sanna Laukkanen wrote:
Sanna Laukkanen wrote:
Kun olen neulonut a1 kertaalleen, miten jatkan "mallineuletta"? SIlmukkamääristä riippumatta samaa kaaviota A1 uudestaan, vai?
09.04.2015 - 18:40DROPS Design answered:
Aivan, jatkat vaan samaan tapaan tekemällä oikealla puolella kavennusten väliin langankiertoja.
13.04.2015 - 16:29
![]() Sabine Petersen wrote:
Sabine Petersen wrote:
Hallo! Ich bin irritiert, denn wenn ich, wie in der ersten Runden angegeben, gleichzeitig je 2 M. aus jeder Masche herausstricke sind es 21 M. und nicht 14 M. Liebe Grüße
22.03.2014 - 09:36DROPS Design answered:
Liebe Sabine, 2 M aus 1 M herausstricken heißt, die Anzahl der M zu verdoppeln. Normalerweise stricken Sie ja immer 1 M aus 1 M heraus, indem Sie die M auf der Nadel einfach abstricken, d.h. Sie stechen 1x in jede M ein. 2 M aus 1 M heißt, dass Sie 2x statt nur 1x in jede M einstechen (1x von vorne und 1x von hinten). Viel Spaß beim Stricken!
22.03.2014 - 10:40
![]() Martine wrote:
Martine wrote:
Bonjour, Je tricote ce modèle. Je commence les manches et j'ai voulu l'essayer. Malheureusement, l’empiècement "pointe" dans mon dos. Auriez vous une idée? Je ne voudrai^pas recommencer tout! Merci Cordialement
13.07.2013 - 11:22DROPS Design answered:
Bonjour Martine, aviez-vous bien la bonne tension tout du long, dès le début et après ? avez-vous mis le dos aux bonnes dimensions ? Il peut y avoir différentes raisons, et donc solutions. Bon tricot!
15.07.2013 - 08:41
![]() Maud Walther wrote:
Maud Walther wrote:
Ik heb het gebreid zonder kantpatroon, maar met meerkleurengaren, waarvan het verloop van de kleuren erg mooi uitkomt door het rondbreien. Voor grote maten heb je echter wel rondbreinaalden van 120 nodig op het laatst. Fijn dat jullie ook aan de grote maten hebben gedacht: dit model kleedt lekker af!
02.05.2013 - 17:09
![]() Sophia wrote:
Sophia wrote:
Hejsan, jag ska precis börja sticka efter A.1 men jag förstår inte vad som menas med " det stickas 1 rapport över de 4 m mellan varje markör " Vad menas med rapport?
01.12.2012 - 21:20DROPS Design answered:
1 rapport betyder att du stickar A.1 én gång mellan varje markör. Du har 4 m till att börja med enligt A.1
04.12.2012 - 09:53
![]() Tessa Slingerland wrote:
Tessa Slingerland wrote:
Bij de benodigdheden staat dat je naalden zonder knop van 7mm moet hebben. Vervolgens moet je daarmee een proeflapje breien (klopt bij mij precies), maar daarna moet je met nld 6mm opzetten! Die stonden helemaal niet bij de benodigdheden. ???
15.11.2012 - 14:26DROPS Design answered:
Jawel. Bij de benodigheden heb je ook nodig: DROPS RONDBREINLD (40 en 80 cm) 6 mm – voor de boordsteek en het kantpatroon.
16.11.2012 - 17:25
![]() Maria wrote:
Maria wrote:
Hei! forstår ikke hvordan jeg skal fortsette etter A1 for å øke 7 masker annenhver omgang..?
10.08.2012 - 13:04DROPS Design answered:
Fortset å strikke A.1 helt til du bytter til glastrikk. I A.1 øker du i mønsteret, altså det er ett kast på slutten av rapporten og ett kast på beg av rapporten. Økningene er tegnet inn i mønsteret, fortsett på samme måte til arb måler 27-28-29-30-31-32 cm. Nå strikk 2 RILLER, så videre i glstrikk - øk nå på høyre og venstre side av merketråden annenhver gang (= 7 økninger på hver 2.omg) – på neste omg strikk de økte m vridd rett, slik at det ikke blir hull.
28.08.2012 - 20:53
![]() Australe wrote:
Australe wrote:
Bonjour superbe modèle !je me suis lancée mais si on poursuite avec A1, on a bien plus de 7 augmentations tous les deux tours puisque le motif entre deux marqueurs se multiplie a chaque fois...on doit faire dans ce cas certains motif A1 sans augmentations mais comment faire cela ? Merci pour cette précision. Cdt,
29.07.2012 - 12:03DROPS Design answered:
Bonjour Australe, vous augmentez 1 m dans A1, et tricotez 7 fois A1, vous aurez donc 7 augmentations tous les 2 tours. Quand vous continuez A1 après le diagramme, continuez de la même façon pour augmenter toujours 1 m dans chacun des 7 rapports de A1 et continuer à augmenter 1 m entre les marqueurs, donc 7 marqueurs = 7 augmentations. Bon tricot !
30.07.2012 - 08:54
![]() Monica wrote:
Monica wrote:
Eè un modello bellissimo! Non vedo l'ora di vedere le istruzioni per provare a confezionarlo...
16.07.2012 - 16:36
![]() Gitte Jensen wrote:
Gitte Jensen wrote:
Det kunne være en ide at lave en del af ribben i perlestrik.
15.07.2012 - 22:14
|
|||||||||||||
Warm Circle#warmcirclejacket |
|||||||||||||
|
|
|||||||||||||
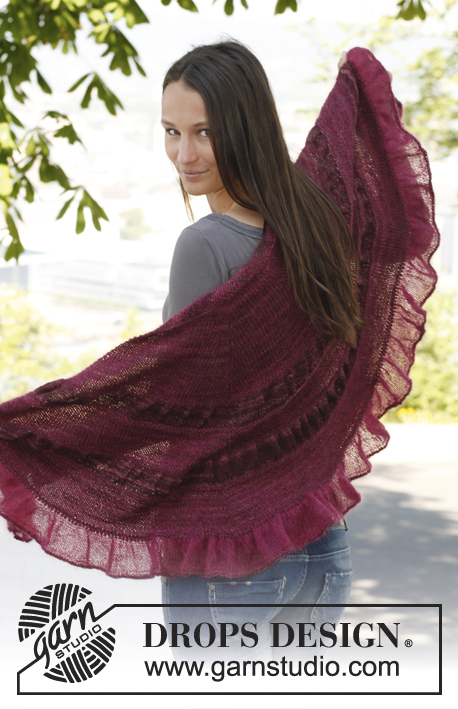
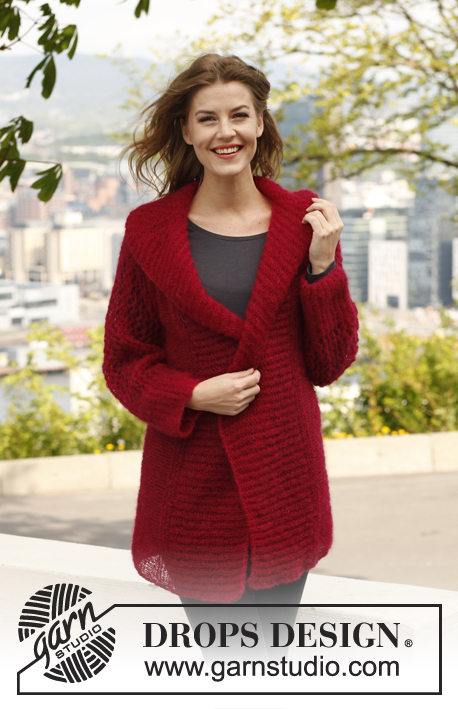
Knitted DROPS jacket worked in a circle with rib in ”Alaska”. Size: S - XXXL.
DROPS 140-35 |
|||||||||||||
|
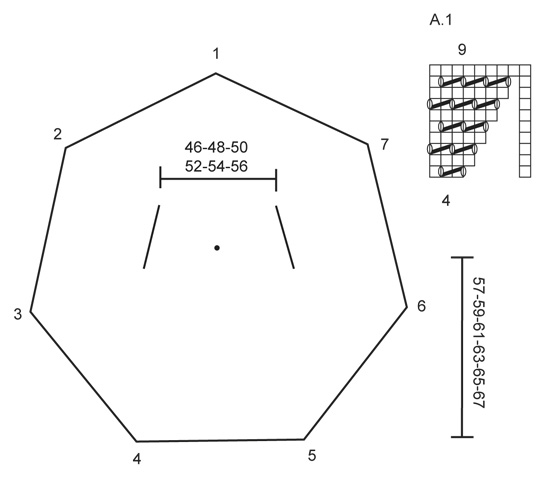
PATTERN: See diagram A.1. GARTER ST (in the round on circular needle): * K 1 round and P 1 round *, repeat from *-*. 1 ridge = 2 rounds --------------------------------------------------------- JACKET: Worked in the round in a circle from mid back. Cast on 7 sts with Alaska and distribute them on 4 double pointed needles size 6 mm / US 10. K 1 round while AT THE SAME TIME K 2 sts in every st = 14 sts. Insert 7 markers in the piece, 2 sts apart. 1st marker = at beg of round = back of neck. Continue with K, on next round work 2 sts in every other st = 21 sts. On next round work 2 sts in every 3rd st = 28 sts. Then work according to diagram A.1, work 1 repetition over the 4 sts between every marker. After A.1 continue the pattern with 7 inc every other row, work the inc sts in pattern. Switch to circular needle size 6 mm / US 10 when needed. REMEMBER THE GAUGE! When piece measures 27-28-29-30-31-32 cm / 10½"-11"-11½"-11¾"-12¼"-12½"" from the middle, work 2 ridges in GARTER ST – see explanation above - over all sts (there are now approx. 31-33-35-37-39-41 sts between every marker = 217-231-245-259-273-287 sts in total). K until the second marker. Bind off all sts between second and third marker (= approx. 31-33-35-37-39-41 sts). Work until 6th marker. Bind off all sts until 7th marker (= approx. 31-33-35-37-39-41 sts). Work until first marker. P 1 round while AT THE SAME TIME casting on same no of sts that was bind off over the bind off sts. Work 1 ridge. Switch to circular needle size 7 mm / US 10.75. Then work in stockinette st over all sts, AT THE SAME TIME every other round inc 1 st at every marker – inc alternately on the right and left side of marker (= 7 inc every other round) – on next round K the inc sts twisted to avoid holes. Continue in stockinette st and inc until piece measures 20-21-22-23-24-25 cm / 8"-8¼"-8¾"-9"-9½"-9¾" from armhole (there should be approx. 49-52-55-58-61-64 sts between every marker and approx. 343-364-385-406-427-448 sts in total). Switch back to circular needle size 6 mm / US 10, K 1 round while at the same time adjusting no of sts to be divisible by 6. Then work rib K 3/P 3. When rib measures 3 cm / 1⅛", inc all P-sections to 4 P sts, when rib measures 6 cm / 2⅜", inc all P-sections to 5 P sts. Continue rib K 3/P 5 until rib measures 10 cm / 4". Bind off sts with K over K and P over P. Piece measures approx. 57-59-61-63-65-67 cm / 22½"-23¼"-24"-24¾"-25½"-26⅜" in total from the middle. SLEEVE: Pick up 62-66-70-74-78-82 sts around the armhole on a short circular needle size 7 mm / US 10.75 and work in stockinette st in the round until sleeve measures 15 cm / 6". Switch to a short circular needle size 6 mm / US 10, work 1 round in stockinette st while at the same time inc 16-18-20-22-24-26 sts evenly = 78-84-90-96-102-108 sts. Continue with rib K 3/P 3 until sleeve measures 30-31-32-33-34-35 cm / 11¾"-12¼"-12½"-13"-13⅜"-13¾". Bind off sts with K over K and P over P. |
|||||||||||||
Diagram explanations |
|||||||||||||
|
|||||||||||||
 |
|||||||||||||
Have you finished this pattern?Tag your pictures with #dropspattern #warmcirclejacket or submit them to the #dropsfan gallery. Do you need help with this pattern?You'll find 10 tutorial videos, a Comments/Questions area and more by visiting the pattern on garnstudio.com. © 1982-2026 DROPS Design A/S. We reserve all rights. This document, including all its sub-sections, has copyrights. Read more about what you can do with our patterns at the bottom of each pattern on our site. |
|||||||||||||


With over 40 years in knitting and crochet design, DROPS Design offers one of the most extensive collections of free patterns on the internet - translated to 17 languages. As of today we count 324 catalogs and 12290 patterns - 12280 of which are translated into English (US/in).
We work hard to bring you the best knitting and crochet have to offer, inspiration and advice as well as great quality yarns at incredible prices! Would you like to use our patterns for other than personal use? You can read what you are allowed to do in the Copyright text at the bottom of all our patterns. Happy crafting!
Post a comment to pattern DROPS 140-35
We would love to hear what you have to say about this pattern!
If you want to leave a question, please make sure you select the correct category in the form below, to speed up the answering process. Required fields are marked *.