
Popular categories
Looking for a yarn?


|
||||||||||||||||
Passion |
||||||||||||||||
 |
 |
|||||||||||||||
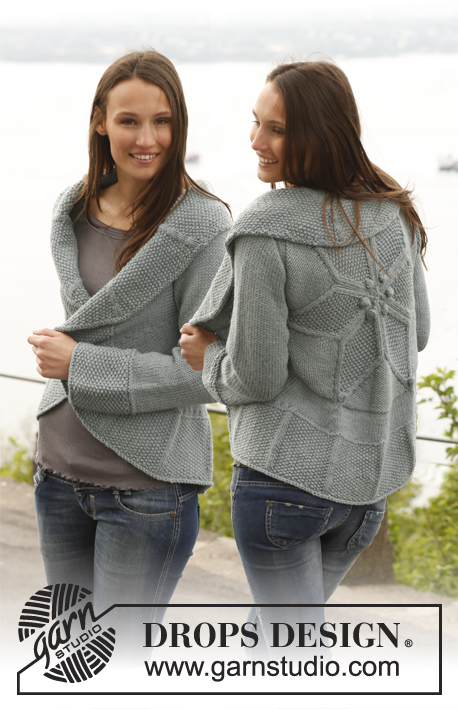
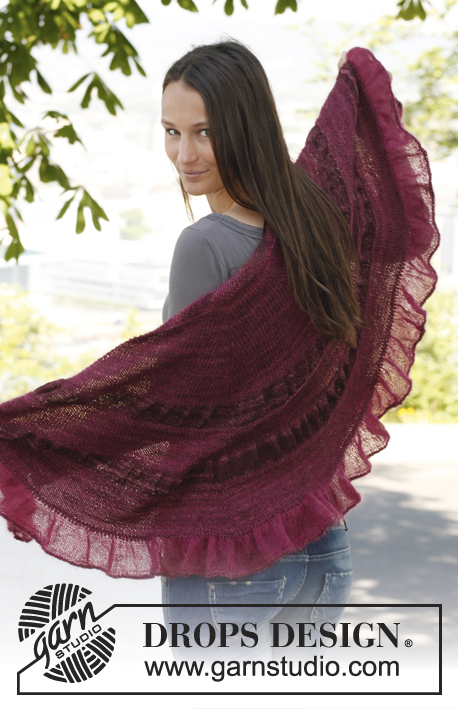
Knitted DROPS jacket with lace pattern on sleeves in ”Vivaldi”.
DROPS 140-24 |
||||||||||||||||
|
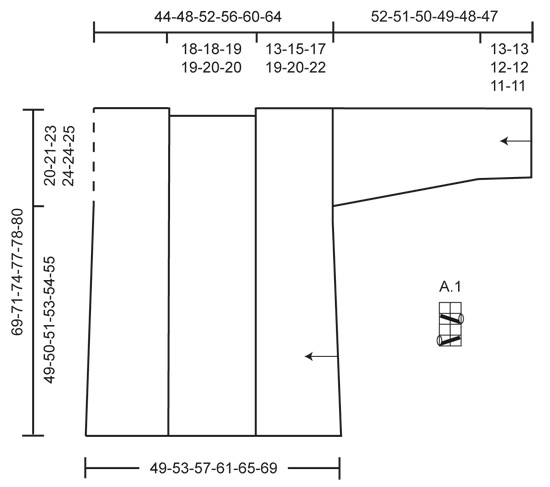
ENGLISH RIB (back and forth on needle): Row 1: * K 1, 1 YO, slip 1 st as if to P *, repeat from *-* and finish with K 1. Row 2: * 1 YO, slip 1 st as if to P, K YO and slipped st tog *, repeat from *-* until 1 st remains, finish with 1 YO, slip 1 st as if to P. Row 3: * K tog YO and slipped st, 1 YO, slip 1 st as if to P *, repeat from *-* until 2 sts remain, K tog YO and slipped st. Repeat 2nd and 3rd row upwards. ENGLISH RIB ST: When counting the sts, the YOs are not counted as sts. PATTERN: Work lace pattern on sleeves - see diagram A.1, diagram shows all rows in 1 pattern repetition seen from RS. GARTER ST (back and forth on needle): K all rows. 1 ridge = 2 K rows. INCREASE TIP: Inc 1 st by making 1 YO, on next row work YO twisted (i.e. work in back loop of st instead front) to avoid holes. -------------------------------------------------------- JACKET: Back piece and front pieces are work separately sideways and sewn tog afterwards. RIGHT SLEEVE: First work back part of right sleeve back and forth on needle. Cast on 19-21-21-23-23-25 sts on circular needle size 5 mm / US 8 with Vivaldi. Work ENGLISH RIB - read explanation above, with 1 edge st in GARTER ST - read explanation above - in each side. When piece measures 13-13-12-12-11-11 cm / 5⅛"-5⅛"-4¾"-4¾"-4⅜"-4⅜", inc 1 st on last row from WS - READ INCREASE TIP = 20-22-22-24-24-26 sts. On next row from RS switch to circular needle size 5.5 mm / US 9 and work A.1 with 1 edge st in garter st in each side - At the same time inc 1 st at end of 1st row from RS. Repeat inc - at the end of row seen from RS - every 3-3-2½-2½-2½-2½ cm/1⅛"-1⅛"-⅞"-⅞"-⅞"-⅞" 11-11-13-13-13-13 more times (= a total of 12-12-14-14-14-14 times) = 32-34-36-38-38-40 sts - NOTE: Work the new sts gradually in the pattern. When piece measures approx. 51-50-49-48-47-46 cm / 20"-19¾"-19¼"-19"-18½"-18" (shorter measurements in the larger sizes because of wider shoulders), work 3 ridges in garter st over all sts. Then slip all sts on a stitch holder, piece measures approx. 52-51-50-49-48-47 cm / 20½"-20"-19¾"-19¼"-19"-18½". BACK PIECE: Worked back and forth on needle from side to side from right side of body. Cast on 25-26-27-27-28-29 sts on circular needle size 5.5 mm / US 9. K 1 row from RS and P 1 row from WS - NOTE: Work last 2 sts on row (seen from RS) in garter st until finished measurements (= 2 edge sts at the bottom of jacket), at the end of row from WS cast on 25-26-27-27-28-29 new sts. K 1 row from RS and P1 row from WS, at the end of row from WS cast on 28-28-28-30-30-30 new sts = 78-80-82-84-86-88 sts. Cut the thread. Slip the 32-34-36-38-38-40 sts from sleeve back on same needle, K from RS first the sts from sleeve, then the new 78-80-82-84-86-88 sts from back piece = 110-114-118-122-124-128 sts on needle. Insert 1 marker at beg of row from RS - NOW MEASURE PIECE FROM HERE. Then work in stockinette st with 2 edge sts at the bottom in garter st. When piece measures 13-15-17-19-20-22 cm / 5⅛"-6"-6¾"-7½"-8"-8¾" from marker (= shoulder), bind off 3 sts at beg of next row from RS for neck = 107-111-115-119-121-125 sts. Work as before until piece measures 31-33-36-38-40-42 cm / 12¼"-13"-14¼"-15"-15¾"-16½", cast on 3 new sts at the end of next row from WS = 110-114-118-122-124-128 sts (neck = approx. 18-18-19-19-20-20 cm / 7"-7"-7½"-7½"-8"-8"). When piece measures 44-48-52-56-60-64 cm / 17¼"-19"-20½"-22"-23½"-25¼", slip the first 32-34-36-38-38-40 sts from RS on a stitch holder (= left sleeve) and work only over the last 78-80-82-84-86-88 sts. Now work as follows from RS: bind off the first 28-28-28-30-30-30 sts on row, work the rest of row, P 1 row. Bind off the first 25-26-27-27-28-29 sts on row, work the rest of row, P 1 row. Work the last 25-26-27-27-28-29 sts and loosely bind off all sts on next row from WS. Cut the thread. LEFT SLEEVE: Slip all sts on stitch holder back on circular needle size 5.5 mm / US 9 = 32-34-36-38-38-40 sts. Insert 1 marker at beg of row from RS - NOW MEASURE PIECE FROM HERE. Work 3 ridges in garter st, then A.1 with 1 edge st in garter st in each side. When piece measures 5-4-5-4-4-3 cm / 2"-1½"-2"-1½"-1½"-1⅛", bind off 1 st at beg of next row from WS. Repeat dec - at beg of row seen from WS - every 3-3-2½-2½-2½-2½ cm / 1⅛"-1⅛"-⅞"-⅞"-⅞"-⅞" 11-11-13-13-13-13 more times (= a total of 12-12-14-14-14-14 times) = 20-22-22-24-24-26 sts. When piece measures 39-38-38-37-37-36 cm / 15¼"-15"-15"-14½"-14½"-14¼", dec 1 st on last row from WS = 19-21-21-23-23-25 sts. On next row from RS switch to circular needle size 5 mm / US 8 and continue in English rib with 1 edge st in garter st in each side. Bind off when piece measures 52-51-50-49-48-47 cm / 20½"-20"-19¾"-19¼"-19"-18½", piece measures approx. 148-150-152-154-156-158 cm / 58"-59"-59¾"-60½"-61¼"-62" in total from cast on edge to bind off edge. LEFT FRONT PIECE: Cast on and work as RIGHT SLEEVE and BACK PIECE until piece measures 64-65-66-67-67-68 cm / 25¼"-25½"-26"-26⅜"-26⅜"-26¾" (1 cm / ½" before bind off for neck) = 110-114-118-122-124-128 sts on needle. Then work 3 ridges in garter st over all sts, slip all sts on a stitch holder. Piece now measures approx. 65-66-67-68-68-69 cm / 25½"-26"-26⅜"-26⅜"-26¾"-27⅛" in total from cast on edge (approx. 13-15-17-19-20-22 cm / 5⅛"-6"-6¾"-7½"-8"-8¾" after 1st marker). RIGHT FRONT PIECE: Cast on and work as left front piece but reversed. ASSEMBLY: Sew the shoulder and overarm seams inside 1 edge st. Sew underarm seams and side seams in one inside 1 edge st. BAND: Slip sts from right front piece back on circular needle size 5 mm / US 8, pick up new sts over neck on back piece as follows: Pick up 3 sts over the 3 sts bound off for neck, 28-28-30-30-32-32 sts at the back of neck, 3 sts over the 3 bound off sts, and slip sts from left front piece back on needle = 254-262-272-280-286-294 sts. K 1 row from WS while AT THE SAME TIME dec 33-33-35-37-37-39 sts evenly = 221-229-237-243-249-255 sts. Then work English rib with 2 sts in garter st in each side. Insert 3 markers in the piece as follows: 1 mid back of neck and 1 on each shoulder. Insert markers in a st which is worked YO + slipped st tog from RS. Continue with English rib - AT THE SAME TIME inc approx. every 3 cm / 1⅛" as follows: Row 1 (= RS): 1 YO on each side of st with marker (work st with marker as follows: K tog YO and slipped st). Row 2 (= WS): 1 YO, K the new YO from previous row twisted, st with marker (= 1 YO, slip st as if to P), K the new YO from previous row twisted, 1 YO. Row 3 (= RS): K the new YO from previous row twisted, 1 YO, slip next st as if to P, st with marker (= K tog YO and slipped st), 1 YO, slip next st, K the new YO from previous row twisted. = 2 sts inc on each side of st with marker Then continue with English rib over all sts. When band measures 18-18-20-20-22-22 cm / 7"-7"-8"-8"-8¾"-8¾", loosely bind off with K over K and P over P. NOTE: Make sure that the bind off edge is not too tight. CROCHET EDGE: Work an edge on hook size 6 mm / J/10 along the entire the bottom edge on jacket (incl bands) as follows: * 1 sc, ch 2, skip approx. 1 cm / ½" *, repeat from *-* and finish with 1 sc, cut and fasten the thread. NOTE: Make sure that the crochet edge is not too tight. |
||||||||||||||||
Diagram explanations |
||||||||||||||||
|
||||||||||||||||
|
||||||||||||||||
|
Have you made this or any other of our designs? Tag your pictures in social media with #dropsdesign so we can see them! Do you need help with this pattern?You'll find tutorial videos, a Comments/Questions area and more by visiting the pattern on garnstudio.com. © 1982-2024 DROPS Design A/S. We reserve all rights. This document, including all its sub-sections, has copyrights. Read more about what you can do with our patterns at the bottom of each pattern on our site. |
||||||||||||||||


With over 40 years in knitting and crochet design, DROPS Design offers one of the most extensive collections of free patterns on the internet - translated to 17 languages. As of today we count 304 catalogs and 11422 patterns - 11417 of which are translated into English (US/in).
We work hard to bring you the best knitting and crochet have to offer, inspiration and advice as well as great quality yarns at incredible prices! Would you like to use our patterns for other than personal use? You can read what you are allowed to do in the Copyright text at the bottom of all our patterns. Happy crafting!
Comments / Questions (22)
Hola. Quiero hacer esta chaqueta para mi hija en la calidad Big Merino. Sería una talla S-M. Mi duda es si la cantidad de lana que aparece en el patrón está bien o no, porque tengo que encargar la lana y no quiero equivocarme. Gracias por todo.
26.09.2017 - 21:06DROPS Design answered:
Hola Mari Jose. Esta prenda está hecha con Vivaldi (descontinuado) , que entra en el mismo grupo que Big Merino pero tiene diferentes caracteristicas, Con Big Merino no vas a conseguir la textura ligera de la prenda que ves en la foto, porque para hacer este modelo con Big Merino necesitamos aprox 15 ovillos de 50 gr.
29.09.2017 - 19:03Jag har försökt och klura ut hur den här ärmen ska räcka till, har alltså gjort halva höger arm. Men mudden blir bara ca 14 cm bred och efter vad jag utläst om stickfastigheten så borde det stämma?Alltså trodde jag ärmen stickades i två delar och sen syddes ihop, men så är inte fallet vad jag kan se? Det lär inte spela ngn större roll att gå upp en strl, så vad gör jag fel...?
27.01.2015 - 23:31DROPS Design answered:
Hej Hanna, Jo du stickar först baksidan på höger ärm, sedan början på bakst, sätter ärmen in på samma st och stickar klart bakst. Framsidan av ärmen kommer längre ner i beskrivningen. Lycka till!
29.01.2015 - 15:10Just finished it toady. The last part was very tough but it's worth it :)
07.03.2014 - 18:42Kan dit patrooon ook gebreid worden op 2 nld. En hoe moet je dat omzetten.Ik kan niet overweg met rondbreinaalden. BVD
02.03.2013 - 14:55DROPS Design answered:
Dit vest wordt heen en weer gebreid op de rondbreinld. Voor de panden en mouwen, zou je zonder problemen op rechte naalden kunnen breien. Het probleem ligt bij de bies. Hier moet je 254 ot 294 st op de nld hebben afhankelijk van je maat. Ik weet niet zeker of er genoeg ruimte op een rechte naald is, maar zie of het lukt. Succes.
03.03.2013 - 17:58Kathi wrote:
Hey, I am almost finished with the left sleeve and was wondering, what it means for the front part"Cast on and work as RIGHT SLEEVE and BACK PIECE". Will the front parts be knitted with English rib and the pattern? It doesn't look like it on the picture. Thanks for your help! PS: If someone could answer in German, that would be very much appreciated. English is fine too. :)
13.11.2012 - 17:29DROPS Design answered:
Dear Kathi, you work left front piece as right sleeve and back piece until piece measures 64...68 cm. The bands in english rib are worked at the end - see below. Happy knitting!
14.11.2012 - 09:38Waarom moet dit op een rondbreinaald gebreid worden? Ik kom dat best vaak tegen in de Drops patronen en vaak zet ik het dan gewoon op 2 pennen.
27.08.2012 - 11:20DROPS Design answered:
U kunt ten eerste veel meer steken kwijt op een rondbreinld. En deze patronen zijn oorspronkelijk Noors - en de rondbreitechniek is meer uitgebreid in buiten Nederland. Maar vaak kunt u het patroon ook aanpassen en op rechte naalden zetten.
27.08.2012 - 16:11Flor wrote:
Como puedo saber las medidas para este modelo en xl
13.08.2012 - 02:26DROPS Design answered:
Flor, el dibujo muestra las medidas de la pieza terminada, en centímetros, de lado a lado de la pieza.
13.08.2012 - 03:12Dans la légende du diagramme, il me semble que les indication du jeté et du sujet sont inversées?
09.08.2012 - 10:57DROPS Design answered:
Merci Tess, le diagramme a été ajusté. Bon tricot !
10.08.2012 - 15:27Schöne leichte Jacke!!
03.08.2012 - 10:12Jeg tror der byttet om på tag 1 m løs af, 1 r, løft den løse maske over og slå om mellem to masker i forklaring til diagram
18.07.2012 - 11:55