
Popular categories
Looking for a yarn?


Comments / Questions (64)
![]() Francesca wrote:
Francesca wrote:
I don’t understand the stitch count. If the finished measurement of the smallest size is 33” and the gauge is 4.25 stitches to 1”, how does it say cast on 188 stitches? 33” x 4.25 = 140.
17.02.2024 - 00:58DROPS Design answered:
Dear Francesca, the gauge was calculated in stocking stitch and 4mm needles. However, you cast on with 3mm needles and garter stitch. The gauge is different in this case and that is why you need 188 stitches. Also, the gauge is 5.25 stitches = 1", not 4.25 stitches. 5.25 stitches*33" = approx. 174 stitches. Happy knitting!
18.02.2024 - 21:49
![]() Sandra wrote:
Sandra wrote:
Das war leider nicht die Antwort auf meine Frage. Bei den Abnahmen sind ZUERST 5 Maschen links und dann rechts. A1 und A2 zeigt aber zuerst 5 Maschen rechts und dann links. Das ist nicht richtig.
19.01.2024 - 10:06DROPS Design answered:
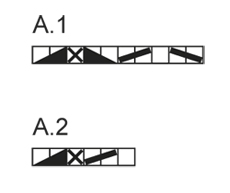
Liebe Sandra, Entschuldigung für das Misverständnis, aber A.1 wird über 5 M rechts, 5 M links gestrickt, dh genauso über das Rippenmuster und so: (1 M wie zum Rechtsstricken abheben, 1 M re, die abgehobene M überziehen, 1 M rechts, 2 M re zusammen, 2 M li verschränkt zusammen, 1 M links, 2 M li zusammen = es sind jetzt 3 M re, 3 M li auf der Nadel. So stricken Sie später A.2: 1 M re, 2 M re zusammen, 1 M li, 2 M li zusammen = es sind nur noch 2 M re, 2 m li. Viel Spaß beim stricken!
19.01.2024 - 15:57
![]() Sandra wrote:
Sandra wrote:
Wenn das Muster A1 sowie A2 von rechts nach links gelesen werden soll, stimmt die Reihenfolge nicht? Zuerst sind ja die Abnahmen bei den linken Maschen und danach bei den rechten. Also genau umgekehrt wie angegeben.
18.01.2024 - 21:39DROPS Design answered:
Liebe Sandra, Bein den Hinreihen strickt man (5 M rechts, 5 M links), so wenn A.1 bei einer HinReihe gestrickt wird stimmen die Abnahmen: die 5 rechte Maschen werden zu 3 Maschen abgenommen und die 5 linke Maschen zu 3 Maschen abgenommen (= 3 M rechts, 3 M links, von der Vorderseite gesehen) . Viel Spaß beim stricken!
19.01.2024 - 09:26
![]() Martina wrote:
Martina wrote:
Hallo, Ich bin jetzt an der Stelle angekommen, wo die Maschen für die Armausschnitte abgekettet werden. Es heißt dort: die nächste R ist eine Rück-R. Verstehe ich das richtig, dass in einer Hin-R abgekettet wird? Außerdem schlägt bei mir (Wie bei einer anderen Kundin, auf deren Frage ich aber keine Antwort gefunden habe) der untere Krausrippenrand immer nach oben um. Was tun? Besten Dank für Ihre Hilfe!
21.07.2022 - 14:33DROPS Design answered:
Liebe Martina, ja, du kettest auf der rechten Seite ab. Das Problem mit Krausrippen ist, dass sie möglicherweise enger als gewöhnlich gestrickt wurden. Sie können versuchen, es zu glätten, indem Sie es mit einem Bügeleisen dämpfen.
31.07.2022 - 20:19
![]() Luisa Paggi wrote:
Luisa Paggi wrote:
Per favore, posso eseguire il modello a ferri diritti? (non so lavorare con i ferri circolari). Vi ringrazio per la risposta.
25.03.2022 - 08:35DROPS Design answered:
Buongiorno Luisa, il modello è un cardigan lavorato in piano, quindi può utilizzare i ferri dritti. Buon lavoro!
26.03.2022 - 09:31
![]() Marianne Bergersen wrote:
Marianne Bergersen wrote:
Uffda! Etter å ha tenkt litt og regnet litt mer, tror jeg at jeg skjønner at det er jeg som har gjort feil 🙃 Beklager spørsmålet. Jeg skal nok finne ut av dette selv. Dere må gjerne slette innleggene mine. 😆
26.02.2020 - 20:52DROPS Design answered:
Hej Marianne, åh dejligt at høre at du har fundet ud af det. Rigtig god fornøjelse! :)
27.02.2020 - 09:17
![]() Marianne Bergersen wrote:
Marianne Bergersen wrote:
Hei! Jeg får ikke oppskriften til å stemme. Holder på med bolen, og er snart ferdig med de fire fellingsrundene. MEN så står det videre at det skal økes når arbeidet måler 20 cm, og mitt arbeid er over 25 cm langt før jeg er ferdig med alle fellingsrundene. Mener dere at det skal strikkes 20 cm ETTER at fellingsrundene er gjort før en begynner på økningene?
26.02.2020 - 17:44DROPS Design answered:
Hej Marianne, åh dejligt at høre at du har fundet ud af det. Rigtig god fornøjelse! :)
27.02.2020 - 09:17
![]() Oksana wrote:
Oksana wrote:
Ich suche eine änliche Anleitung für ein Pulli. Können sie mir bitte helfen?
05.08.2019 - 19:25DROPS Design answered:
Liebe Oksana, hier finden Sie alle unsere Anleitungen für Pullover mit Rundpasse. Viel Spaß beim stricken!
07.08.2019 - 11:12
![]() Evy Schultz wrote:
Evy Schultz wrote:
Er der andre der har problemer med at den "rulle" , og hvad kan jeg gøre ved det....?
25.01.2018 - 20:22DROPS Design answered:
Hej Evy, du kan dampe den let evt presse med et fugtigt håndklæde imellem. Prøv først på et lille stykke i hjørnet, så du ser at den ikke bliver ødelagt. :)
30.01.2018 - 11:57
![]() Kody Doisy wrote:
Kody Doisy wrote:
Bonsoir je ne comprend pas le premier rang du diagramme A.1svp. Est ce qu' il se tricote sur l'endroit où sur l'envers du tricot ? Est ce que les côtes 5/5 sont cassées ou pas ?car on ne voit pas bien le point sur la photo du modèle désolée ?
16.12.2015 - 19:46DROPS Design answered:
Bonjour Kody Doisy, A.1 se tricote sur l'endroit: glissez 1 m à l'end, 1 m end, passez la m glissée par-dessus la m tricotée, 1 m end, 2 m ens à l'end, 2 m ens torse à l'env, 1 m env, 2 m ens à l'env. À la fin du rang, tricotez seulement les 5 premières m de A.1. Bon tricot!
17.12.2015 - 10:22
|
|||||||||||||||||||
Abbey#abbeycardigan |
|||||||||||||||||||
 |
 |
||||||||||||||||||
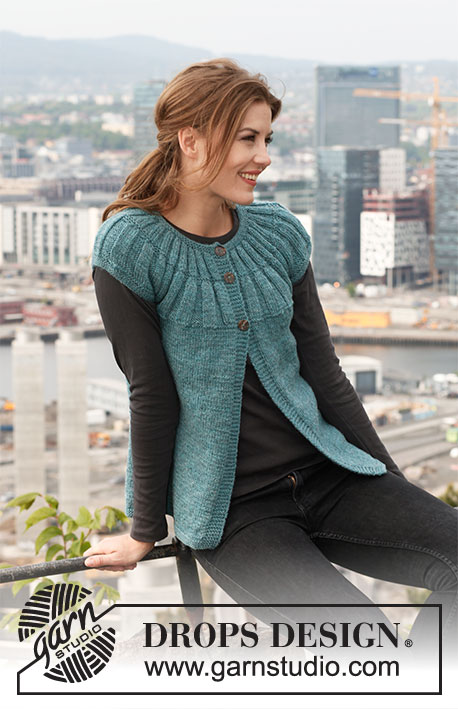
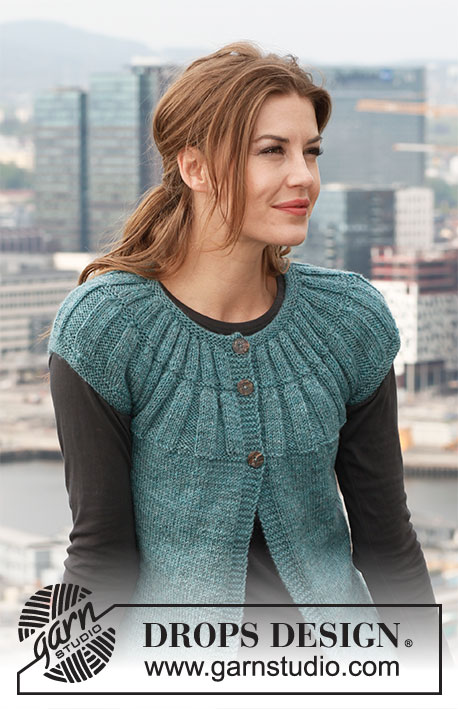
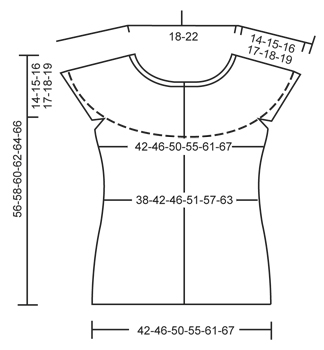
Knitted DROPS jacket with short sleeves and round yoke in ”Karisma”. Size: S - XXXL.
DROPS 142-14 |
|||||||||||||||||||
|
GARTER ST (back and forth on needle): K sts on all rows. DECREASE TIP: All dec are done from RS. Beg 2 sts before marker and work as follows: K 2 tog, slip 1 st as if to K, K 1, psso. DECREASE (applies to round yoke): See diagrams A.1 and A.2. Diagrams show pattern from RS. BUTTONHOLES: bind off for 3 buttonholes on right band as explained in pattern. 1 buttonhole = K tog third and fourth st from edge and make 1 YO. ---------------------------------------------------------- JACKET: Worked back and forth on circular needle from mid front. LOOSELY cast on 188-204-220-244-268-292 sts (includes 6 band sts in each side towards mid front) on circular needle size 3 mm / US 2.5 with Karisma. Work 6 rows in GARTER ST - see explanation above. Switch to circular needle size 4 mm / US 6 and work in St st - but continue the outermost 6 sts in each side in garter st (= bands). REMEMBER THE GAUGE! When piece measures 5 cm / 2", insert 2 markers in the piece; 50-54-58-64-70-76 sts in from each side (= 88-96-104-116-128-140 sts between markers on back piece). On next row from RS, dec 1 st on each side of both markers - Read DECREASE TIP (= 4 sts dec). Repeat dec every 3½ cm / 1¼" 3 more times = 172-188-204-228-252-276 sts. When piece measures 20 cm / 8", inc 1 st on each side of both markers (= 4 sts inc). Repeat inc every 6-6-6-7-7-7 cm / 2⅜"-2⅜"-2⅜"-2¾"-2¾"-2¾" 3 more times = 188-204-220-244-268-292 sts. When piece measures 42-43-44-45-46-47 cm / 16½"-17"-17¼"-17¾"-18"-18½" (make sure that next row is from WS), bind off 8-8-8-10-10-10 sts in each side for armholes (i.e. 4-4-4-5-5-5 sts on each side of both markers) = 46-50-54-59-65-71 sts on each front piece and 80-88-96-106-118-130 sts remain on back piece. Put piece aside and knit the sleeve edges. SLEEVE EDGE: Worked back and forth on circular needle. Cast on 62-64-66-70-72-74 sts on circular needle size 3 mm / US 2.5 with Karisma. Work 6 rows in garter st (1st row = RS). Work next row as follows from RS: bind off the first 4-4-4-5-5-5 sts, K the next 54-56-58-60-62-64 sts while AT THE SAME TIME inc 6 sts evenly over these (inc by working 2 sts in 1 st) and bind off the last 4-4-4-5-5-5 sts = 60-62-64-66-68-70 sts on needle. Put piece aside and knit another sleeve edge. YOKE: Slip sleeve edges on to same circular needle as body where armholes were bind off = 292-312-332-356-384-412 sts. Insert 1 marker – NOW MEASURE PIECE FROM HERE. K 1 row from RS AT THE SAME TIME bind off for 1 BUTTONHOLE on right band - see explanation above. K 1 row from WS, then K 1 row from RS while AT THE SAME TIME dec 5-5-5-9-7-5 sts evenly (do not dec over bands) = 287-307-327-347-377-407 sts. Work next row as follows from WS: 6 band sts in garter st, * P 5, K 5 *, repeat from *-* until 11 sts remain and finish with P 5 and 6 band sts in garter st. Continue rib like this. When piece measures approx. 6-7-7-8-9-10 cm / 2⅜"-2¾"-2¾"-3⅛"-3½"-4", work next row as follows from RS: 6 band sts as before, work diagram A.1 until 11 sts remain on needle, work the next 5 sts as the first 5 sts in A.1, and finish with 6 band sts as before. After A.1 there are 177-189-201-213-231-249 sts on needle. Work 1 row K over K and P over P (work bands in garter st as before). K 1 row from RS AT THE SAME TIME bind off for 1 buttonhole on right band. K 1 row from WS and K 1 row from RS. Then work next row as follows from WS: 6 band sts as before, * P 3, K 3 *, repeat from *-* until 9 sts remain and finish with P 3 and 6 band sts as before. Continue rib like this until piece measures approx. 13-14-15-16-17-18 cm / 5⅛"-5½"-6"-6¼"-6¾"-7". Work next row as follows from RS: 6 band sts as before, work diagram A.2 until 9 sts remain on needle, work the next 3 sts as the first 3 sts in A.2, and finish with 6 band sts as before. After A.2 there are 122-130-138-146-158-170 sts on needle. Work 1 row K over K and P over P (work bands in garter st as before). Switch to circular needle size 3 mm / US 2.5 and work 6 rows in garter st over all sts, AT THE SAME TIME on 1st row (i.e. RS) bind off for last buttonhole on right band and in addition dec 32-38-42-48-56-66 sts evenly (do not dec over bands) = 90-92-96-98-102-104 sts. After last row in garter st, loosely bind off with K from RS. Jacket measures approx. 56-58-60-62-64-66 cm / 22"-22¾"-23⅝"-24⅜"-25¼"-26" up to shoulder. ASSEMBLY: Sew sleeve edges tog mid under sleeve - sew edge to edge in outermost sts. Sew the openings under the sleeves. Sew on buttons. |
|||||||||||||||||||
Diagram explanations |
|||||||||||||||||||
|
|||||||||||||||||||
 |
|||||||||||||||||||
 |
|||||||||||||||||||
Have you finished this pattern?Tag your pictures with #dropspattern #abbeycardigan or submit them to the #dropsfan gallery. Do you need help with this pattern?You'll find 12 tutorial videos, a Comments/Questions area and more by visiting the pattern on garnstudio.com. © 1982-2026 DROPS Design A/S. We reserve all rights. This document, including all its sub-sections, has copyrights. Read more about what you can do with our patterns at the bottom of each pattern on our site. |
|||||||||||||||||||


With over 40 years in knitting and crochet design, DROPS Design offers one of the most extensive collections of free patterns on the internet - translated to 17 languages. As of today we count 324 catalogs and 12290 patterns - 12280 of which are translated into English (US/in).
We work hard to bring you the best knitting and crochet have to offer, inspiration and advice as well as great quality yarns at incredible prices! Would you like to use our patterns for other than personal use? You can read what you are allowed to do in the Copyright text at the bottom of all our patterns. Happy crafting!
Post a comment to pattern DROPS 142-14
We would love to hear what you have to say about this pattern!
If you want to leave a question, please make sure you select the correct category in the form below, to speed up the answering process. Required fields are marked *.