
Popular categories
Looking for a yarn?


Comments / Questions (113)
![]() Coline wrote:
Coline wrote:
Bonjour, je viens de terminer le sac, mais avant de le passer en machine je voudrais m'assurer que 200 est bien la taille du cordon avant feutrage. La longueur me paraît très bien pour l'instant, mais il va raccourcir, non ? En tout cas, merci pour votre merveilleux site !
14.04.2014 - 22:54DROPS Design answered:
Bonjour Coline, et merci. Le cordon mesure bien 200 cm avant feutrage, après feutrage il sera plus court. Bon tricot !
15.04.2014 - 09:13
![]() Ayo Adebiyi wrote:
Ayo Adebiyi wrote:
OK, I've felted the bag and am having to knit another strap. If (like me) you want one similar to the length shown in the picture, then 200cm is way too short. I'm going to go for 400cm this time.
08.04.2014 - 23:10
![]() Ayo wrote:
Ayo wrote:
I've noticed some comments expressing confusion with the instructions on how to knit the tube strap. I also had this, then I realised that the instructions are describing how to made a tube on DOUBLE-POINTED needles not circular ones. If you search on You Tube how to knit a tube on circular needles, it suddenly becomes so much clearer. Apart from this little hiccup I've enjoyed making the bag and learned some new techniques. I still need to felt it, so fingers crossed...
06.04.2014 - 11:15
![]() Montserrat Molinas wrote:
Montserrat Molinas wrote:
Buenas tardes! Tengo el bolso tejido y lavado. Realmente ha encogido mucho, quizás demasiado, de manera que han desaparecido los ojales. Como puedo pasar el botón? Muchas gracias
31.03.2014 - 18:57DROPS Design answered:
Hola Montserrat. El resultado del fieltrado depende de la calidad del agua, el programa de la lavadora, el detergente y tensión del tejido. Siguiendo las instrucciones obtenemos el mismo tamaño del bolso que en el patrón. Realmente después del fieltrado los agujeros son poco visibles, es recomendable abrirlos un poco antes de que se seque el bolso, en caso de estar muy cerrados puedes usar cierres magnéticos que se adaptan muy bien y el botón dejarlo como adorno.
02.04.2014 - 20:07
![]() Karin wrote:
Karin wrote:
Die Träger nur innen verknoten- das gibt doch einen dicken Wulst - gibt es eine alternative?
21.03.2014 - 08:15DROPS Design answered:
Liebe Karin, das Verknoten ist unserer Meinung nach die stabilste Befestigung und da es innen in der Tasche ist, sieht man es nicht. Aber vielleicht haben andere Strickerinnen noch einen Tipp für Sie.
23.03.2014 - 11:38
![]() Karin wrote:
Karin wrote:
Wie groß ist das Rechteck 20 M x 34 R in cm? Ist es ein Quadrat oder ein Rechteck?
15.03.2014 - 09:57DROPS Design answered:
Liebe Karin, 20 M x 34 R ergeben nach dem Filzen ein Quadrat (10 x 10 cm), siehe oberer Teil der Anleitung.
17.03.2014 - 12:39
![]() Luciana wrote:
Luciana wrote:
Vorrei sapere se si possono usare, in questo come in altri modelli, i ferri dritti e non solo i circolari, come voi consigliate.Grazie e complimenti per il vostro splendido e ricchissimo sito!!
18.01.2014 - 10:22DROPS Design answered:
Buongiorno Luciana, per la prima parte del modello è possibile lavorare con i ferri dritti, perchè si lavora avanti e indietro; quando poi si riprendono le maglie è meglio usare i circolari perchè il n° di m è elevato, ma può provare ad usare i ferri dritti stando attenta ad adattare le spiegazioni. Faccia una prova con i circolari e non tornerà ai ferri dritti!! Buon lavoro!!
18.01.2014 - 10:59
![]() Lilo wrote:
Lilo wrote:
Ich habe mir die Tasche gerade gestrickt! Die ist wirklich klasse geworden. Werde oft darauf angesprochen. Toll, eure Sachen!
16.01.2014 - 11:31
![]() Anita wrote:
Anita wrote:
Nå er vesken ferdig, men den skulle med en generell forklaring før start gjøres litt bedre forståelig! Slikt: Ved montering må på sidene 20 masker tilpasses 34. Det samme gjelder på toppen når 200 masker tas opp. Snoret strikkes hele tiden kun fra rettsiden,dvs istedet for å strikke tilbake, legges tråden bak og frem i begynnelsen, strammes og strikkes ny pinne rett hele tiden. Snoret tres inn slikt,at den på langssiden er på utsiden og knyttes eller syes sammen på innsiden.
19.10.2013 - 11:53Berta wrote:
Tube förklaras i en video!
18.10.2013 - 15:43
|
|||||||
Anatolia#anatoliabag |
|||||||
|
|
|||||||
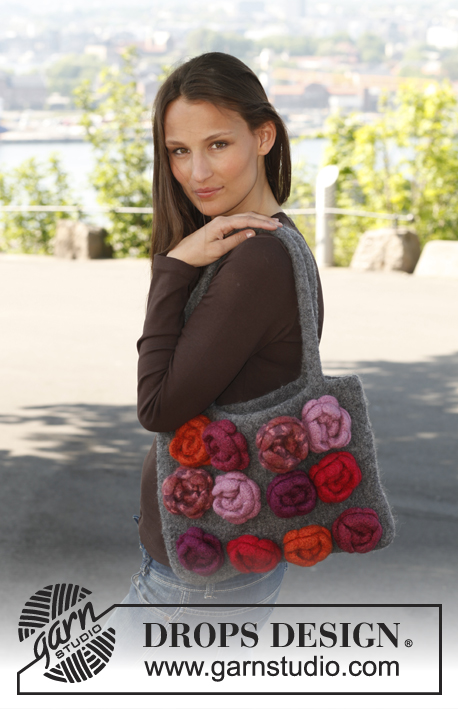
Felted DROPS bag in ”Alaska”.
DROPS 140-33 |
|||||||
|
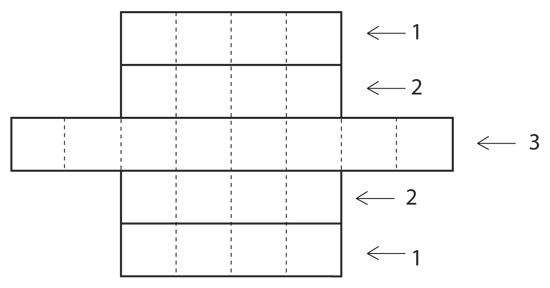
BAG: The entire bag is worked in stockinette st, work 5 strips that are sewn tog when finished. STRIP 1 (make 2): Worked back and forth on circular needle. Cast on 20 sts on circular needle size 5 mm / US 8 with color no 54 and work 34 rows in each color in the following order: Color no 54, 53, 58, 37, bind off. STRIP 2 (make 2): Worked back and forth on circular needle. Cast on 20 sts on circular needle size 5 mm / US 8 with color no 56 and work 34 rows in each color in the following order: Color no 56, 11, 57, 45, bind off. STRIP 3 (make 1): Worked back and forth on circular needle. Cast on 20 sts on circular needle size 5 mm / US 8 with color no 45 and work 34 rows in each color in the following order: Color no 45, 57, 37, 58, 53, 54, 11, 56, bind off. Sew strips tog sideways – see figure for placement. Sew the rest of strip 3 to short side on strip 1 and 2 in each side. Pick up 200 sts around the upper edge of bag with color no 23 on circular needle size 5 mm / US 8. Insert 1 marker in the middle st from one short side = beg of round. Work in stockinette st in the round. When 3 cm / 1" have been worked, work as follows: K 8, 2 YO, K 2 tog, K 18, 2 YO, K 2 tog, K 38, 2 YO, K 2 tog, * K 18, 2 YO, K 2 tog *, repeat from *-* 3 times, K 38, 2 YO, K 2 tog, K 18, 2 YO, K 2 tog, K 10. On next row slip one YO off the needle and K the other YO – make sure that holes are made. Continue in stockinette st. When piece measures 7 cm / 2¾", work as follows: bind off the first 40 sts on round, work 20 sts, bind off the remaining sts. Cut the thread. Work 28 rows in stockinette st over the 20 sts, work next row as follows: Work 9 sts, 2 YO, K 2 tog, work the rest of row. On next row slip one YO off the needle and K the other YO – make sure that a hole is made. Work 5 rows in stockinette st over all sts, bind off. TIE: Work a tube with 4 sts back and forth on circular needle size 5 mm / US 8 as follows: Cast on 4 sts with color no 23 and K 1 row. Then work as follows: * Slide all sts to the right side of needle without turning the piece, tighten thread and K over all sts *, repeat from *-* until tie measures 200 cm / 80". Cut and fasten the thread. FELTING: The piece can be felted either in the washing machine or the tumble dryer – read description below. Remember: Subsequent washes are as for a normal wool garment. IN WASHING MACHINE: Washing machines will vary when felting. If the piece is not felted enough, it can be felted again. If it is felted too much, it can be stretched to the correct size while still wet. DO THE FOLLOWING: Lay the piece in the washing machine, using a programme of approx. 40 minutes (not a wool programme). Wash at 40 degrees C = 104 degrees F without pre-wash, detergent is optional. After washing, shape the piece while it is still wet. IN TUMBLE DRYER: Felting in a tumble dryer gives good control over the degree of felting. The tumble dryer can be opened during drying to check the size of the piece. If it is not felted enough it can be thoroughly wetted and felted again. If it is felted too much it can be stretched to the correct size while still wet. DO THE FOLLOWING: Lay the piece in water so it becomes completely wet, then place it in the tumble dryer and begin the drying process. Dry to the desired size, checking regularly. Thread tie up and down the holes and tie ends tog inside the bag. Sew button on top of bag. |
|||||||
Diagram explanations |
|||||||
|
|||||||
 |
|||||||
Have you finished this pattern?Tag your pictures with #dropspattern #anatoliabag or submit them to the #dropsfan gallery. Do you need help with this pattern?You'll find 6 tutorial videos, a Comments/Questions area and more by visiting the pattern on garnstudio.com. © 1982-2026 DROPS Design A/S. We reserve all rights. This document, including all its sub-sections, has copyrights. Read more about what you can do with our patterns at the bottom of each pattern on our site. |
|||||||


With over 40 years in knitting and crochet design, DROPS Design offers one of the most extensive collections of free patterns on the internet - translated to 17 languages. As of today we count 324 catalogs and 12290 patterns - 12280 of which are translated into English (US/in).
We work hard to bring you the best knitting and crochet have to offer, inspiration and advice as well as great quality yarns at incredible prices! Would you like to use our patterns for other than personal use? You can read what you are allowed to do in the Copyright text at the bottom of all our patterns. Happy crafting!
Post a comment to pattern DROPS 140-33
We would love to hear what you have to say about this pattern!
If you want to leave a question, please make sure you select the correct category in the form below, to speed up the answering process. Required fields are marked *.