
Popular categories
Looking for a yarn?


Comments / Questions (266)
![]() Anke wrote:
Anke wrote:
Hallo, gibt es einen Grund, warum man die Teile nach dem Bündchen auf einer geraden Nadel anstatt einer Rundstricknadel stricken sollte? Vielen Dank, Anke
13.11.2014 - 11:54DROPS Design answered:
Sie können genauso gut eine Rundnadel verwenden, es ist beides möglich. Gutes Gelingen!
16.11.2014 - 11:42
![]() Claudia wrote:
Claudia wrote:
Liebes Dropsteam, danke schön für die Beantwortung und den Hinweis. Ich hatte vor, da ich ja die Blende schmaler stricken möchte, die entsprechenden Maschen im Muster anzufügen.
23.10.2014 - 20:26DROPS Design answered:
Liebe Claudia, ja das ist genau richtig, Sie sollten an der Maschenzahl nichts verändern. Als Muster bietet sich ja das große Perlmuster A.4 an. Den Schalkragen müssten Sie dann auch etwas kürzer stricken, passend zur Blende. Alternativ könnten Sie die Blende kraus re bis zur Schulter hochstricken, die Schulter-M bei der ensprechenden Länge abketten und mit den Blenden-M einen Schalkragen mit verkürzten R stricken.
23.10.2014 - 22:22
![]() Claudia wrote:
Claudia wrote:
Vielen Dank für ihre Hilfe:-)! Ich stricke sehr gerne nach ihrem Anleitungen. Viele Grüße
22.10.2014 - 22:29
![]() Claudia wrote:
Claudia wrote:
Hallo, ich möchte die Blende bei dieser Jacke höchstens halb so breit stricken wie angegeben. Muss ich trotzdem die verkürzten Reihen stricken?
22.10.2014 - 22:26DROPS Design answered:
Liebe Claudia, ja, Sie sollten dann auch verkürzte R stricken, auch bei einer Halbierung der M neigt die Blende ansonsten immer noch dazu, sich zusammenzuziehen. Viel weiter als um die Hälfte sollten Sie die Blenden-M übrigens nicht reduzieren, sonst wird die Jacke insgesamt enger.
23.10.2014 - 10:24
![]() Annika Rundström wrote:
Annika Rundström wrote:
Upptäckte felet i beskrivningen när jag redan stickat ena framstycket. Knapphålen skall vara på vänster sida.
04.10.2014 - 09:56
![]() DELAHAYE wrote:
DELAHAYE wrote:
Bonjour, Je ne vois pas le diagramme A4 pour ce modèle. Merci
29.09.2014 - 18:59DROPS Design answered:
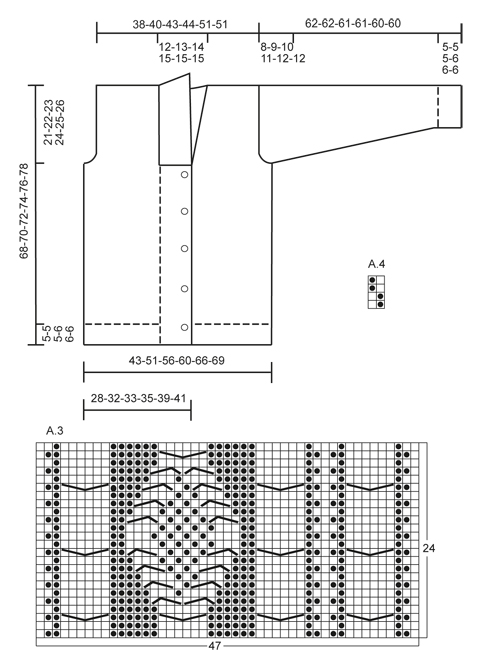
Bonjour Mme Delahaye, le diagramme A.4 se trouve à côté du schéma des mesures, c'est un petit diagramme de 2 m x 4 rangs, situé sous la manche du schéma. Bon tricot!
30.09.2014 - 10:09
![]() Leacoco wrote:
Leacoco wrote:
Achtung: Das 1. Knopfloch innerhalb des Bündchens und nicht, wie laut Anleitung, erst nach 16 cm stricken. Lieben Gruß aus Berlin, Leacoco
22.09.2014 - 10:11DROPS Design answered:
Liebe Leacoco, Ihr Einwand ist hier nicht angebracht - wenn Sie die Jacke wie abgebildet stricken möchten, beginnt das erste, unterste Knopfloch in Gr. L tatsächlich wie beschrieben bei einer Länge von 16 cm ab dem Anschlag. Sie stricken die Jacke ja von unten nach oben.
22.09.2014 - 10:46
![]() Lorelei wrote:
Lorelei wrote:
I am stuck on sleave length. I am knitting the men's cable sweater/coat. He doesn't live near me which makes the sleeves difficult. He is tall, thin, broad shoulders, and long arms. I will be doing the large for his chest size, but body and arm measurements I feel will need adjustments. Thank you.
10.08.2014 - 05:47
![]() Lorelei wrote:
Lorelei wrote:
I am stuck on sleave length. I am knitting the men's cable sweater/coat. He doesn't live near me which makes the sleeves difficult. He is tall, thin, broad shoulders, and long arms. I will be doing the large for his chest size, but body and arm measurements I feel will need adjustments. Thank you.
10.08.2014 - 03:58
![]() Tricia wrote:
Tricia wrote:
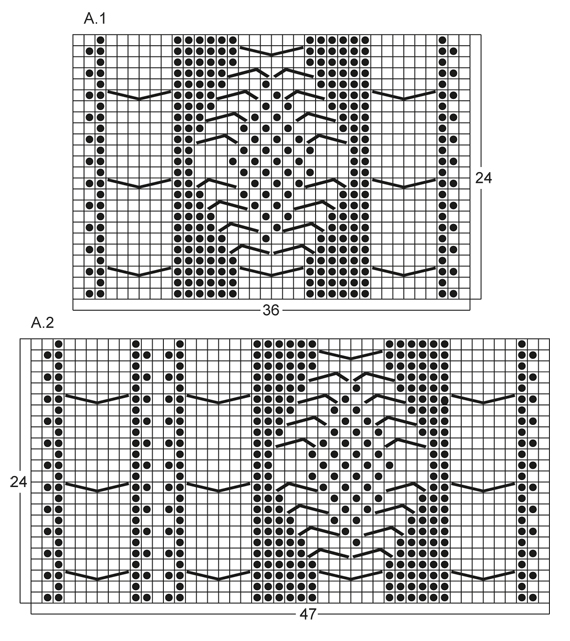
Working on the front panels and have a question about the short rows. It says "1 short row on 3rd row in every pattern repetition vertically." Is this ONLY the 3rd row of chart A.1...the third row of chart A.4? We are working on two patterns/charts at this point. Or do you mean short row EVERY 3rd row?? If it is every 3rd row of chart A.4 - then we are only doing a short row once every 24 rows?
01.06.2014 - 03:58DROPS Design answered:
Dear Tricia, you work a short row everytime you will work row 3 from both diagrams A.3 and A.4 (right front piece). Happy knitting!
03.06.2014 - 09:38
|
||||||||||||||||
Rambling Man#ramblingmancardigan |
||||||||||||||||
 |
 |
|||||||||||||||
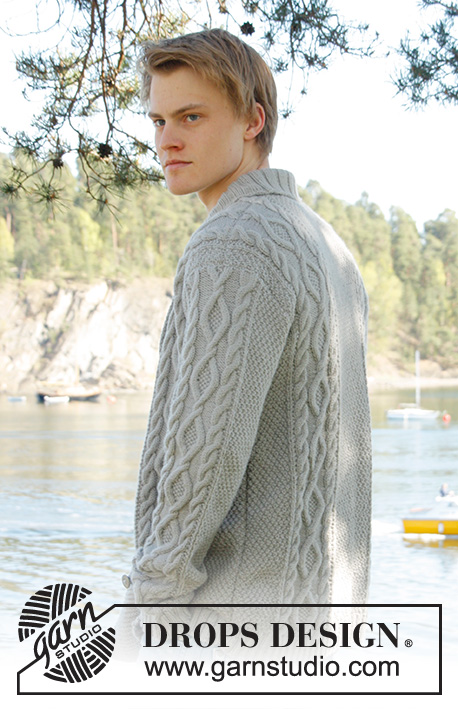
Men's knitted jacket in DROPS Lima, with cable pattern and shawl collar. Size: S - XXXL.
DROPS Extra 0-850 |
||||||||||||||||
|
KNITTING TIPS: This design is written with button holes on right front edge, if you wish standard button holes for men, you can make the button holes on left front edge. GARTER ST (back and forth on needle): K all rows. NOTE: All edge sts are worked in garter st. PATTERN: See diagram A.1 to A.4, diagrams show all rows in 1 pattern repetition from RS. SHORT ROWS: RIGHT FRONT PIECE: Work 1 short row on row 3 of every pattern repetition vertically until finished measurements as follows: On 3rd row in pattern (= RS), work 26-26-26-26-30-30 band sts, turn and K back. Then work over all sts on row as before. LEFT FRONT PIECE: Work 1 short row on row 2 of every pattern repetition vertically until finished measurements as follows: On 2nd row in pattern (= WS), work 26-26-26-26-30-30 band sts, turn and K back. Then work over all sts on row as before. BUTTON HOLES: Bind off for 5 button holes from RS on right band. 1 BUTTON HOLE = bind off 7th and 8th st from mid front and cast on 2 new sts on next row over these sts. Bind off for button holes when piece measures: SIZE S: 14, 22, 30, 38 and 46 cm / 5½",8¾",11¾",15" and 18" SIZE M: 15, 23, 31, 39 and 47 cm / 6",9",12¼",15¼" and 18½" SIZE L: 16, 24, 32, 40 and 48 cm / 6¼",9½",12½",15¾" and 19" SIZE XL: 17, 25, 33, 41 and 49 cm / 6¾",9¾",13",16⅛" and 19¼" SIZE XXL: 18, 26, 34, 42 and 50 cm / 7",10¼",13⅜",16½" and 19¾" SIZE XXXL: 19, 27, 35, 43 and 51 cm / 7½",10⅝",13¾",17" and 20" INCREASE TIP: Inc 1 st by making 1 YO, on next row work YO twisted (i.e. work in back loop of st instead front) to avoid holes. ---------------------------------------------------------- BACK PIECE: Worked back and forth on needle. Cast on 136-156-168-180-196-204 sts (includes 1 edge st in each side) on circular needle size 3.5 mm / US 4 with Lima. Work rib as follows (1st row = RS): 1 edge st in GARTER ST - see explanation above, * K 2, P 2 *, repeat from *-*, finish with K 2 and 1 edge st in garter st. Continue to work like this until rib measures 5-5-5-6-6-6 cm / 2"-2"-2"-2⅜"-2⅜"-2⅜". On last row from WS, P while AT THE SAME TIME dec 20-22-24-26-26-26 sts evenly = 116-134-144-154-170-178 sts. Then switch to needle size 4 mm / US 6 and work next row from RS as follows: 1 edge st in garter st, 8-16-20-24-20-24 sts in A.4, work A.1 one time in size S - XL, work A.2 one time in size XXL and XXXL, 26-28-30-32-34-34 sts in A.4, then work A.1 one time in size S - XL, work A.3 one time in size XXL and XXXL, finish with 8-16-20-24-20-24 sts in A.4 and 1 edge st in garter st. REMEMBER THE GAUGE! Continue to work like this until piece measures 47-48-49-50-51-52 cm / 18½"-19"-19¼"-19¾"-20"-20½". Then bind off for armholes at the beg of every row in each side as follows: bind off 3 sts 0-1-1-2-2-2 times, 2 sts 1-1-1-2-2-2 times, 1 st 4-7-9-8-4-8 times = 104-110-116-118-142-142 sts. Continue with pattern as before until piece measures 66-68-70-72-74-76 cm / 26"-26¾"-27½"-28⅜"-29⅛"-30". Now bind off the middle 20-22-24-26-28-28 sts for neck and finish each part separately. Bind off 2 sts on next row from neck = 40-42-44-44-55-55 sts remain on shoulder. Continue with pattern as before. When piece measures 68-70-72-74-76-78 cm / 26¾"-27½"-28⅜"-29⅛"-30"-30¾", loosely bind off sts with K over K and P over P. RIGHT FRONT PIECE: Worked back and forth on needle. Cast on 83-91-95-99-111-115 sts (includes 1 edge st in the side) on circular needle size 3.5 mm / US 4 with Lima. Work rib as follows (1st row = RS): 26-26-26-26-30-30 sts in garter st (= band sts), * K 2, P 2 *, repeat from *-*, finish with 1 edge st in garter st. Continue with rib and band sts in garter st until rib measures 5-5-5-6-6-6 cm / 2"-2"-2"-2⅜"-2⅜"-2⅜". On last row from WS, P over all sts in rib while AT THE SAME TIME dec 12-12-12-12-13-13 sts evenly (do not dec over band sts) = 71-79-83-87-98-102 sts. Then switch to needle size 4 mm / US 6 and work next row from RS as follows: 26-26-26-26-30-30 band sts, work A.1 one time in size S - XL, work A.3 one time in size XXL and XXXL, 8-16-20-24-20-24 sts in A.4 and 1 edge in garter st. On next row from RS (= 3rd row in pattern) work SHORT ROWS - read explanation above. Continue with pattern and band sts at the front - while AT THE SAME TIME work 1 short row on 3rd row in every pattern repetition vertically until finished measurement. When piece measures 14-15-16-17-18-19 cm / 5½"-6"-6¼"-6¾"-7"-7½", bind off for BUTTON HOLES on right band - see explanation above! Continue to work until piece measures 47-48-49-50-51-52 cm / 18½"-19"-19¼"-19¾"-20"-20½". Then bind off at beg of next row from RS as follows: bind off the first 25-25-25-25-29-29 sts, insert a marker (this marks where to beg the knit up for collar), work the rest of row. Then bind off for armhole on every row from WS as follows: 3 sts 0-1-1-2-2-2 times, 2 sts 1-1-1-2-2-2 times, 1 st 4-7-9-8-4-8 times = 40-42-44-44-55-55 sts remain on shoulder. Continue with pattern as before. When piece measures 68-70-72-74-76-78 cm / 26¾"-27½"-28⅜"-29⅛"-30"-30¾", loosely bind off sts with K over K and P over P. LEFT FRONT PIECE: Cast on and work rib as on right front piece but reversed (i.e. * P 2, K 2 *, repeat from *-*) with 26-26-26-26-30-30 band sts in garter st. Continue to work until rib measures 5-5-5-6-6-6 cm / 2"-2"-2"-2⅜"-2⅜"-2⅜". On last row from WS, P over all sts in rib while AT THE SAME TIME dec 12-12-12-12-13-13 sts evenly (do not dec over band sts) = 71-79-83-87-98-102 sts. Then switch to needle size 4 mm / US 6 and work next row from RS as follows: 1 edge st in garter st, 8-16-20-24-20-24 sts in A.4, work A.1 one time in size S - XL, work A.2 one time in size XXL and XXXL, 26-26-26-26-30-30 band sts in garter st. On next row from WS (= 2nd row in pattern) work SHORT ROWS - read explanation above. Continue to work the same way as on right front piece but without button holes. SLEEVE: Worked back and forth on needle. Cast on 74-78-82-86-90-90 sts (includes 1 edge st in each side) on circular needle size 3.5 mm / US 4 with Lima. Work rib as follows (1st row = RS): 1 edge st in garter st, * K 2, P 2 *, repeat from *-* and finish with 1 edge st in garter st. Continue to work like this until rib measures 5-5-5-6-6-6 cm / 2"-2"-2"-2⅜"-2⅜"-2⅜". On last row from WS, P while AT THE SAME TIME dec 12-14-16-18-18-18 sts evenly = 62-64-66-68-72-72 sts. Then switch to needle size 4 mm / US 6 and work next row from RS as follows: 1 edge st in garter st, 12-13-14-15-17-17 sts in A.4, work A.1 one time, 12-13-14-15-17-17 sts in A.4, finish with 1 edge st in garter st. AT THE SAME TIME when piece measures 6 cm / 2⅜", inc 1 st inside 1 edge st in each side - Read INCREASE TIP above. NOTE: Work the inc sts in A.4. Repeat inc every 3½-3-2½-2½-2½-2½ cm / 1¼"-1⅛"-⅞"-⅞"-⅞"-⅞" a total of 14-15-16-17-16-17 times = 90-94-98-102-104-106 sts. Continue until piece measures 54-53-51-50-48-48 cm / 21¼"-21"-20"-19¾"-19"-19" (shorter measurements in the larger sizes because of longer sleeve cap and broader shoulder width), bind off at beg of every row in each side: 3 sts 1-1-1-2-2-2 times, 2 sts 1-1-2-2-2-2 times and 1 st 2-2-3-3-4-4 times. Then bind off 2 sts in each side until piece measures 61-61-60-60-59-59 cm / 24"-24"-23⅝"-23⅝"-23¼"-23¼", then bind off 3 sts 1 time in each side. When piece measures approx. 62-62-61-61-60-60 cm / 24⅜"-24⅜"-24"-24"-23⅝"-23⅝", loosely bind off sts with K over K and P over P. ASSEMBLY: Sew shoulder seams and sew in sleeves inside 1 edge st. Sew sleeve and side seams in one inside 1 edge st. Sew buttons on to left front piece, approx. 2½ cm / ⅞" from last K st in pattern. SHAWL COLLAR: Pick up sts from RS inside 1 edge st on circular needle size 3.5 mm / US 4. Start mid front at marker on right front piece as follows: Pick up approx. 60-70 sts up to shoulder, then 30-40 sts along the neck and 60-70 sts down along left front piece until marker = 150-180 sts. K 1 row from WS while AT THE SAME TIME adjusting no of sts to 144-148-156-164-172-180. Then work rib on next row from RS as follows: 1 sts in garter st, * K 2, P 2 *, repeat from *-* and finish with K 2 and 1 st in garter st. Continue like this until collar measures approx. 5-5-5-6-6-6 cm / 2"-2"-2"-2⅜"-2⅜"-2⅜". Now inc 1 st in each of the middle 14-14-14-16-16-16 P-sections seen from RS (= back of neck) = 158-162-170-180-188-196 sts. Continue until collar measures approx. 12-12-12-12-14-14 cm / 4¾"-4¾"-4¾"-4¾"-5½"-5½", then loosely bind off with K over K and P over P. Fasten collar with fine stitches at the bottom in each side towards band from WS (so that the seam is not visible from RS) – sew edge to edge to avoid a chunky seam. |
||||||||||||||||
Diagram explanations |
||||||||||||||||
|
||||||||||||||||
 |
||||||||||||||||
 |
||||||||||||||||
Have you finished this pattern?Tag your pictures with #dropspattern #ramblingmancardigan or submit them to the #dropsfan gallery. Do you need help with this pattern?You'll find 22 tutorial videos, a Comments/Questions area and more by visiting the pattern on garnstudio.com. © 1982-2026 DROPS Design A/S. We reserve all rights. This document, including all its sub-sections, has copyrights. Read more about what you can do with our patterns at the bottom of each pattern on our site. |
||||||||||||||||


With over 40 years in knitting and crochet design, DROPS Design offers one of the most extensive collections of free patterns on the internet - translated to 17 languages. As of today we count 324 catalogs and 12290 patterns - 12280 of which are translated into English (US/in).
We work hard to bring you the best knitting and crochet have to offer, inspiration and advice as well as great quality yarns at incredible prices! Would you like to use our patterns for other than personal use? You can read what you are allowed to do in the Copyright text at the bottom of all our patterns. Happy crafting!
Post a comment to pattern DROPS Extra 0-850
We would love to hear what you have to say about this pattern!
If you want to leave a question, please make sure you select the correct category in the form below, to speed up the answering process. Required fields are marked *.