
Popular categories
Looking for a yarn?


Comments / Questions (4)
![]() Kirsten Mogensen wrote:
Kirsten Mogensen wrote:
Hvor mange masker der skal slåes op til ryggen (opskrift 77-9)Der står man skal slå op som til forstykket og strikke lige op i glatstrik efter ribben. Da jeg nåede til hals + skulder var der for lidt masker. Senere opdager jeg at der på forstykket står at man (efter 10 cm) skal tage ud på 1 m ud i hver side på hver 5 cm totalt 5 gange. Men det står jo ikke klart og tydeligt på ryg stk. Så er det muligt at få det nøjagtige maskeantal efter udtagningen?
29.08.2020 - 18:37Daniela wrote:
Good morning, is there a video tutorial fot the crochet flower? Thank u in advance
04.05.2018 - 09:55DROPS Design answered:
Dear Daniela, this video shows how to crochet this square (also used in another pattern). Happy crocheting!
04.05.2018 - 10:34
![]() Jacqueline Wijga wrote:
Jacqueline Wijga wrote:
In de beschrijving van het rugpand zijn de meerderingen na 10 cm niet opgenomen,anders houd ik te weinig steken over.
09.10.2014 - 17:14DROPS Design answered:
Hoi Jacqueline. Er was helaas iets niet goed gegaan met de vertaling van het achterpand. Het is nu correct. Veel breiplezier verder.
21.10.2014 - 15:08
![]() Deb wrote:
Deb wrote:
In working the "Crocheted Blossom" the pattern calls for "ddc". I'm unfamiliar with this stitch. Could you please explain?
14.08.2006 - 06:55
|
||||||||||||||||
DROPS 77-9 |
||||||||||||||||
|
|
||||||||||||||||
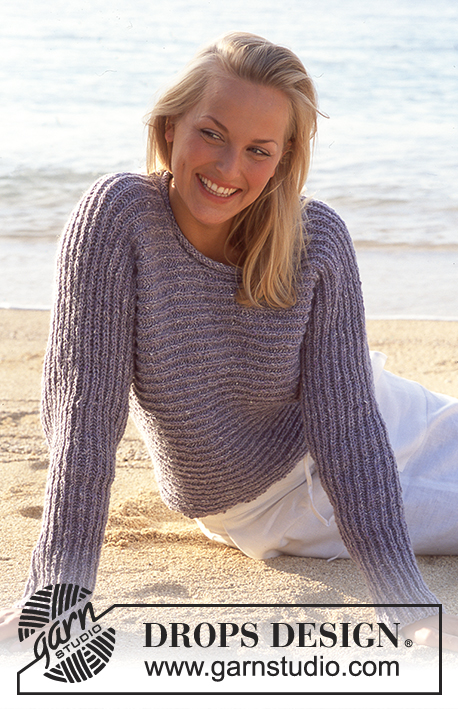
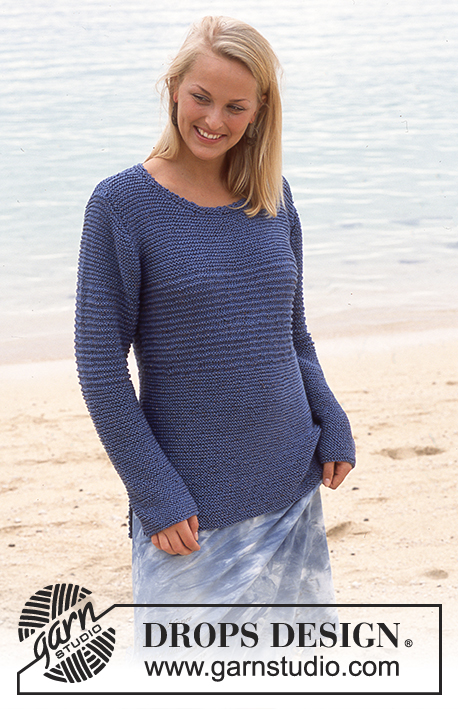
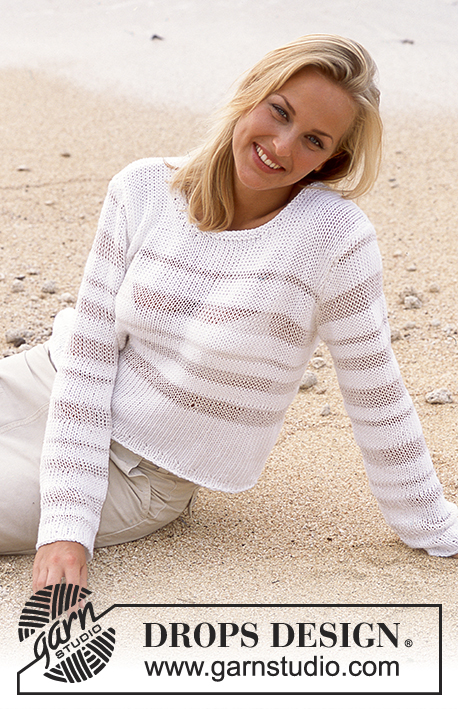
DROPS Pullover in Paris
DROPS 77-9 |
||||||||||||||||
|
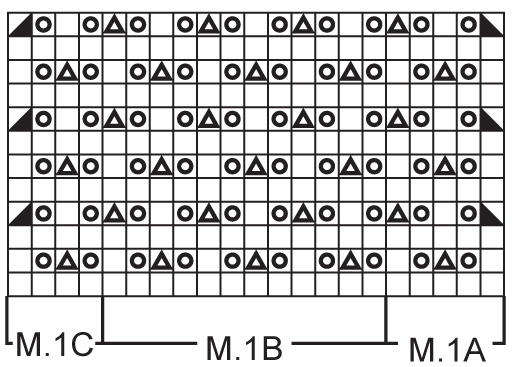
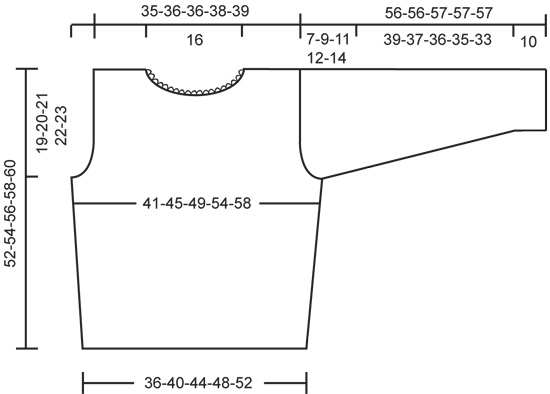
Gauge: Stockinette st: 17 sts x 22 rows on larger needles = 10 x 10 cm. Lace pattern: approx. 14 sts x 20 rows on larger needles = 10 x 10 cm. Rib: * K 1, P 1 *, repeat from * - *. Lace Pattern: See chart. The pattern is seen from the right side. Crocheted blossom: 1 square = 12 x 12 cm. Ch 8 and join together into a ring with 1 sl st. Round 1: ch 3 (= 1 dc), * ch 2, 1 dc in next st *, repeat from * - * a total of 7 times and end with ch 2, 1 sl st in ch 3 at beginning of row (= 8 dc). Round 2: ch 4, 3 ddc in 1st ch-loop, ch 2, * 4 ddc in next ch-loop, ch 2 *, repeat from * - * a total of 7 times, finish with 1 sl st in ch 4 at beginning of row. Round 3: * 4 ddc tog (the first ddc on the row is ch 4) - the last loop on hook is not worked for each ddc, then when all ddc have been worked, yo, pull yarn through all loops on hook (crochet 1 ddc in each ddc from previous row), ch 6, 1 dc in the ch 2 from previous row, ch 6 *, repeat from * - * a total of 8 times, finish with 1 sl st in first ddc-group. Round 4: Slip to the center of first ch-loop, ch 1, 1 sc in ch-loop, * ch 5, 1 sc in the next ch-loop, ch 5, 1 dc in the next ch-loop, ch 10, 1 dc in the next ch-loop (= corner), ch 5, 1 sc in the next ch-loop *, repeat from * - * a total of 3 times, then ch 5, 1 sc in the next ch-loop, ch 5, 1 dc in the next ch-loop, ch 10, 1 dc in the next ch-loop (= corner), ch 5, finish with 1 sl st in the 1st sc at beginning of row. Front: Read the entire Front section before knitting: Cast on 64-70-76-84-90 sts on smaller needles and knit 4 rows rib. Change to larger needles and stockinette st. When the piece measures 5-6-7-8-9 cm purl (right side row) over the center 22 sts - knit the remaining sts in stockinette st as before. On the next row bind off the center 20 sts (the crocheted squares will be sewn in here) and knit to end of row. Put sts for left side on a st holder. Right side: = 22-25-28-32-35 sts. Continue in stockinette st but keep the outermost st at the square opening in garter st throughout. Side incs: When the piece measures 10 cm inc 1 st at the side every 5 cm a total of 4-4-5-5-5 times = 26-29-33-37-40 sts. Armhole: When the piece measures 33-34-35-36-37 cm bind off for armhole at the side every other row: 3 sts 1-1-1-2-2 times, 2 sts 0-1-3-3-4 times and 1 st 3-3-3-3-3 times = 20-21-21-22-23 sts. When the piece measures 41-42-43-44-45 cm put sts on a st holder and work Left side. Left side: Put sts on st holder back on needles and knit the same as right side, reversing shaping. When the piece measures 41-42-43-44-45 cm cast on 20 new sts at the center front and put sts from st holder (right side) back on needles = 60-62-62-64-66 sts. On the next row, P over the 22 center sts (right side row) and K the remaining sts. Then continue in stockinette st over all sts. When the piece measures 44-46-47-49-51 cm put the center 14 sts on a st holder for the neck. Then bind off at each neck edge every other row: 2 sts 2 times and 1 st 3 times = 16-17-17-18-19 sts remain on each shoulder. Bind off when the piece measures 52-54-56-58-60 cm. Back: Cast on 64-70-76-84-90 sts on smaller needles and knit 4 rows rib. Change to larger needles and stockinette st. When the piece measures 33-34-35-36-37 cm bind off for armhole at the side every other row: 3 sts 1-1-1-2-2 times, 2 sts 0-1-3-3-4 times and 1 st 3-3-3-3-3 times = 52-54-58-60-64 sts. When the piece measures 50-52-54-56-58 cm bind off the center 26 sts for the neck. On the next row dec 1 st at each neck edge = 16-17-17-18-19 sts remain on each shoulder. Bind off when the piece measures 52-54-56-58-60 cm. Sleeve: Measure the sleeves when held up, not lying flat, or they will be too long when worn. Cast on 35-35-35-39-39 sts and establish Pattern on first row (wrong side) as follows: P 1 (edge st knit in stockinette st), Pattern 1A (= 5 sts), Pattern 1B over 24-24-24-28-28 sts, Pattern 1C (= 4 sts), P 1 (edge st knit in stockinette st). When the piece measures 10 cm inc 1 st at each side every 7-5-3.5-4.5-3.5 cm a total of 6-8-10-8-10 times - knit the increased sts in stockinette st until there are enough to knit in the pattern = 47-51-55-55-59 sts. When sleeve measures 49-47-46-45-43 cm bind off for sleeve cap at each side every other row: 3 sts 1 time and 2 sts 1 time, then dec 1 st at each side until the piece measures 54-54-55-55-55 cm, then bind off 3 sts at each side until the piece measures 56-56-57-57-57 cm. Bind off the remaining sts. Assembly: Sew right shoulder. Neckband: Pick up approx. 72-80 sts (incl. sts on st holder, divisible by 2) around the neck on smaller needles and knit 2 rows rib, then bind off in rib. Sew left shoulder and neckband. Then crochet around the neck as follows: 1 sc, * ch 4, skip over 1 st, 1 sc in the next st *, repeat from * - * and finish with 1 sl st in 1st sc at beginning of row. Crochet 3 squares - see instructions above - and sew into a strip with small sts edge to edge. Then sew into opening on front - sew with small sts edge to edge with the garter sts at edge of opening. Sew in sleeves. Sew sleeve and side seams using edge sts as a seam allowance. |
||||||||||||||||
Diagram explanations |
||||||||||||||||
|
||||||||||||||||
 |
||||||||||||||||
 |
||||||||||||||||
Have you finished this pattern?Tag your pictures with #dropspattern or submit them to the #dropsfan gallery. Do you need help with this pattern?You'll find 25 tutorial videos, a Comments/Questions area and more by visiting the pattern on garnstudio.com. © 1982-2026 DROPS Design A/S. We reserve all rights. This document, including all its sub-sections, has copyrights. Read more about what you can do with our patterns at the bottom of each pattern on our site. |
||||||||||||||||


With over 40 years in knitting and crochet design, DROPS Design offers one of the most extensive collections of free patterns on the internet - translated to 17 languages. As of today we count 324 catalogs and 12290 patterns - 12280 of which are translated into English (US/in).
We work hard to bring you the best knitting and crochet have to offer, inspiration and advice as well as great quality yarns at incredible prices! Would you like to use our patterns for other than personal use? You can read what you are allowed to do in the Copyright text at the bottom of all our patterns. Happy crafting!
Post a comment to pattern DROPS 77-9
We would love to hear what you have to say about this pattern!
If you want to leave a question, please make sure you select the correct category in the form below, to speed up the answering process. Required fields are marked *.