
Popular categories
Looking for a yarn?


Comments / Questions (102)
![]() Gourmelen wrote:
Gourmelen wrote:
Bonjour je viens de faire le diagramme 3 M2 en hauteur pour les moufles j ai 15 cm je dois refaire un peu ou je peux commencer les 4 tours de M3 merci
24.11.2025 - 15:40DROPS Design answered:
Bonjour Mme Gourmelen, M.3 représente la fin de la moufle, et se tricote sur 9 tours, vérifiez la hauteur qui vous manque par rapport à votre main et regardez ainsi si vous pouvez tricoter encore 1 fois M.2 en hauteur avant M.3 ou si vous pouvez tricoter directement M.3. Bon tricot!
25.11.2025 - 08:48
![]() Gourmelen wrote:
Gourmelen wrote:
Comment faire le diagramme M2 je tricote en rond mais les rangs paires representent toujours le 1er rang le 1rang 12 mailles endroit 3 envers on glisse 1 maille pour torsade 2 envers je glisse 1 maille pour torsade 3 envers 2 rangs je doit avoir 3 endroit etc et la non je dois travailler dans le sens inverse peu etre a chaque tour je suis sur 4 aigulles merci
18.11.2025 - 15:09DROPS Design answered:
Bonjour Mme Gourmelen, quand on tricote M.2 en rond, on lit tous les rangs du diagramme de droite à gauche - vous pouvez répartir les mailles de façon à ce que les 12 m de M.2 soient sur une seule aiguille par ex (pour que ce soit plus simple) divisez les 12 autres mailles sur 2 aiguilles (vous tricotez ainsi avec les mailles sur 3 aiguilles et vous tricotez avec la 4ème aiguille). Bon tricot!
18.11.2025 - 17:15
![]() Gourmeln wrote:
Gourmeln wrote:
Bon jour les 12 mailles endroit du début avant le diagrammeM2 se font sur l endroit à l endroit et sur l envers à l envers et c est bien 6cm de hauteur totale avant augm pouvez vous me conseiller un modelé d écharpe pour accompagner ce duo ............bonnet réussi trés joli...................
16.11.2025 - 11:38DROPS Design answered:
Bonjour Mme Gourmeln, sur la base de 16 rangs = 10 cm, les 24 rangs (3 x M.2 avant les augmentations) vont mesurer approximativement 15 cm. Nous n'avons de modèle d'écharpe assorti exactement à ce modèle, mais vous trouverez ici, toutes nos écharpes et là, les tours de cou - ajoutez des filtres pour affiner votre recherche. Bon tricot!
17.11.2025 - 08:19
![]() Gourmelen wrote:
Gourmelen wrote:
Bonjour j ai fini la fin du bonnet mais j obtiens 38cm au lieu de 40cm en hauteur je dois refaire avec des aiguilles plus grande 8 ou 9 ou je dois refaire un motif merci de me renseigner
04.11.2025 - 11:35DROPS Design answered:
Bonjour Mme Gourmelen, il est possible que votre tension en hauteur soit différente de la nôtre, dans ce cas, tricotez simplement les 2 cm supplémentaires en recommençant encore une fois le diagramme jusqu'à ce que vous ayez vos 40 cm. Bon tricot!
04.11.2025 - 17:15
![]() Julia wrote:
Julia wrote:
Dzień dobry. Mam pytanie odnośnie ostatniego powtórzenia schematu M.2. na nauszniku. Nie do końca rozumiem o co chodzi w tym zdaniu "*przer. 2 o., przełożyć 1-sze o. nad 2-gim, przer. rz. do końca*. Powt. od *-* jeszcze 5 rz., schemat M.2 został w ten sposób przer. 5 razy." Czyli mam zamykać oczka w każdym rzędzie czy tylko w tych na prawej stronie? Pozdrawiam i z góry dziękuję za odpowiedź
14.12.2024 - 17:55DROPS Design answered:
Witaj Julio, zamykasz po 1 oczku na początku każdego rzędu (na prawej i na lewej stronie robótki) łącznie 5 razy. To jest zwężenie nausznika na końcu. Powodzenia, to piękny projekt, koniecznie pokaż nam zdjęcie gotowej czapki: otaguj swoje zdjęcia #dropspattern lub prześlij je do dropsfan gallery. Pozdrawiamy!
16.12.2024 - 09:17
![]() Gourmelen wrote:
Gourmelen wrote:
Je suis à la fin du cache oreilles je rabat une maille que d un côté au 3eme rang et je dois bien rabattre une seule maille aussi au 4 5 6 7 8 rangs je dois toujours garder la maille lisiere je rabats donc 6 mailles au total avant le final merci
02.02.2024 - 14:50DROPS Design answered:
Bonjour Mme Gourmelen, vous allez rabattre 1 maille au début de chaque rang lors des 6 derniers rangs, autrement dit, vous tricotez encore 5 fois ce rang en rabattant 1 maille au début de chacun de ces 5 rangs - vous aurez ainsi rabattu 3 fois 1 maille de chaque côté. Au rang suivant sur l'endroit, rabattez toutes les mailles en les tricotant comme le 1er rang de M.2. Bon tricot!
05.02.2024 - 07:47
![]() Gourmelen wrote:
Gourmelen wrote:
Bonjour au niveau du cache oreilles combien d augmentations on doit faire au total et si je fais les augmentation que sur le 1er rang de M2 ou sur tous les rangs endroit de M2 merci d avanc
30.01.2024 - 20:11DROPS Design answered:
Bonjour Mme Gourmelen, on n'augmente qu'une seule fois, cette augmentation n'est pas répétée. Bon tricot!
31.01.2024 - 08:31
![]() Gourmelen wrote:
Gourmelen wrote:
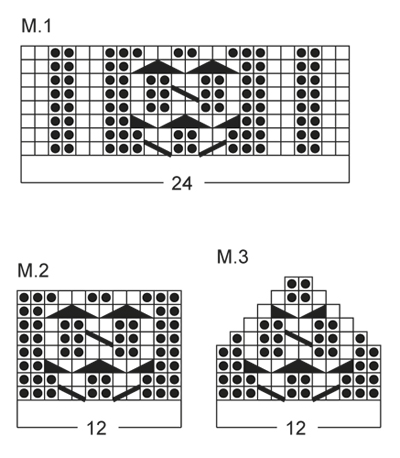
Bonjour pourriez vous m indiquer que représente le gros triangle noir sur le diagramme M1 il se trouve à la 11 mailles et au 3 ème rang la légende n indique pas ce symbole merci d avance
18.01.2024 - 17:47
![]() Gourmelen wrote:
Gourmelen wrote:
Bonjour sur le diagramme M1 que représente le grand triangle tout noir au 3eme rang du diagramme M1 il au milieu a la 11 mailles du début du diagramme il n'y a pas d indication sur la légende merci
18.01.2024 - 17:39DROPS Design answered:
Bonjour Mme Gourmelen, le triangle noir est en fait le dernier symbole puis l'avant-dernier symbole, autrement dit, ce triangle noir sur 4 cases se tricote en fait en 2 fois: d'abord une torsade sur 2 mailles puis une autre torsade sur 2 mailles. Bon tricot!
19.01.2024 - 08:59
![]() Sandra Viche Avila wrote:
Sandra Viche Avila wrote:
HOLA, PODRIAN DECIRME SI HACEN ENVIOS A MEXICO , ASI COMO LA FORMA DE PAGO Y EL MONTO DEL ENVÍO. ME INTERESAN LOS PRODUCTOS DE ESTE ROCKY MOUNTAIN Y OTROS. GRACIAS.
13.02.2022 - 22:44DROPS Design answered:
Hola Sandra, puedes ver en el siguiente link aquellas tiendas con envío a México: https://www.garnstudio.com/findastore.php?id=23&w=1&cid=23
19.02.2022 - 18:17
|
|||||||||||||||||||
Rocky Mountain#rockymountainset |
|||||||||||||||||||
 |
 |
||||||||||||||||||
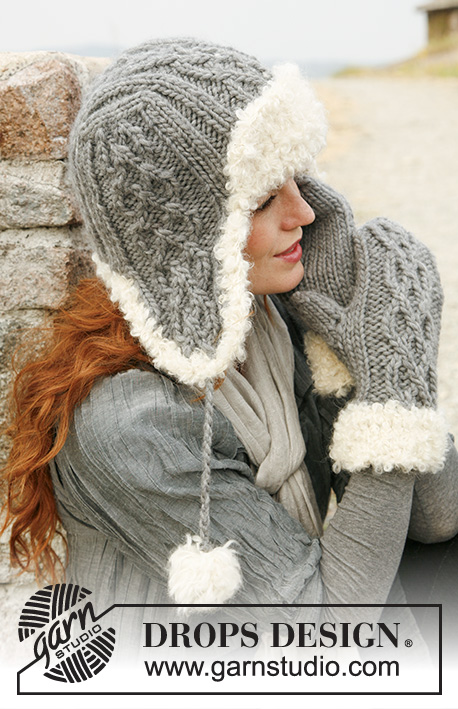
Set consists of: Knitted DROPS hat and mittens in ”Snow” or “Andes” with fur edge in “Puddel”.
DROPS 134-10 |
|||||||||||||||||||
|
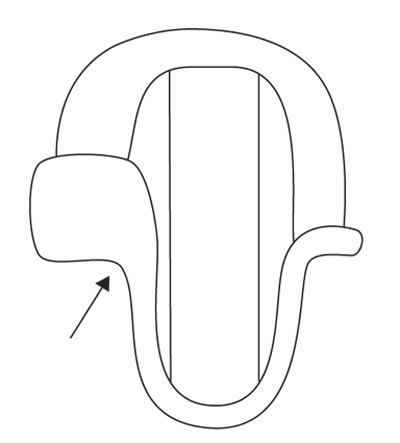
HAT: GARTER ST (back and forth on needle): K all rows. PATTERN: See diagram M.1. The diagram shows all rows in pattern seen from RS. -------------------------------------------------------- HAT: Worked back and forth on needle. Beg with middle part of the head and finish with the ear flaps in each side. Cast on 26 sts with Snow on needle size 7mm / US 10½ (includes 2 edge sts in garter st). Work 1st row (= RS) as follows: 1 st in garter st - See explanation above, work diagram M.1, finish with 1 st in garter st. Continue like this. When diagram M.1 has been worked 3 times vertically, insert a marker at the beg and end of next row (= 1st row in diagram M.1). When diagram M.1 has been worked 5 times vertically, insert another marker at the beg and end of next row (= 1st row in diagram M.1). Continue until diagram M.1 has been worked a total of 8 times vertically, piece should now measure 40 cm/15¾", loosely bind off all sts. EAR FLAP: Worked with Snow on needle size 5 mm / US 8 (to get a nicer row at the beg) as follows: Knit up 14 sts evenly from RS along the edge between the 2 markers in one side of piece. Work next row (= WS) as follows: 1 st in garter st, K 3, P 2, K 2, P 2, K 3, 1 st in garter st. On next row, switch to needle size 7mm / US 10½ and work: 1 st in garter st, work diagram M.2, finish with 1 st in garter st. Continue to work diagram M.2 (with 1 st in garter st in each side). When diagram M.2 has been worked 3 times vertically, inc 1 st in each side on next row from RS (1st row in diagram M.2) as follows: 1 st in garter st, make a YO, work diagram M.2, make a YO, finish with 1 st in garter st. On next row from WS, P the YOs twisted (i.e. in back loop of st instead of front to avoid holes). K the new sts from RS and P the new sts from WS in each side. Continue until diagram M.2 has been worked 4 times vertically. Then work 1st and 2nd row in diagram M.2, then bind off 1 st at beg of next row from RS (3rd row in diagram M.2) as follows: * work 2 sts, pass the first st over, work the rest of row *. Repeat from *-* 5 more rows, diagram M.2 has now been worked a total of 5 times. Then bind off all sts while AT THE SAME TIME working 1st row in diagram M.2. Work another ear flap the same way in the other side of piece. ASSEMBLY: Sew tog ear flaps and middle part in each side inside 1 edge st. FUR EDGE: Crochet along the bottom edge in outer loops of edge sts from RS. NOTE: Do not crochet too tight. Crochet with 2 strands Puddel with hook size 8 mm / L/11 as follows: ROW 1 (= RS): Beg in the corner where left ear flap beg (marked with arrow in diagram), work sc around left ear flap, around the back part and around the entire right ear flap, turn piece. ROW 2 (= WS): ch 1, then work 1 sc in every sc back to the beg. Then work 16 sc over the bottom edge mid front, finish row with 1 sl st in 1st sc on 2nd row (at right ear flap), turn piece. ROW 3-5: ch 1, sc in every sc mid front = 16 sc on row, turn piece. ROW 6: ch 1, skip 1st sc, 1 sc in next sc, 1 sc in every sc until 2 sc remain on row, skip next sc, 1 sc in last sc = 14 sc, turn piece. ROW 7: ch 1, skip 1st sc, 1 sc in next sc, 1 sc in every sc until 2 dc remain on row, skip next sc, 1 sc in last sc = 12 sc, turn piece. ROW 8: ch 1, skip 1st sc, 1 sc in next sc, 1 sc in every sc until 2 sc remain on row, skip next sc, 1 sc in last sc = 10 sc, finish with 1 sl st in the last sc. Fasten off. Fold the fur brim upwards over the hat and sew it tightly. Make 1 pompom of approx. 7 cm / 2¾" in diameter with Puddel. With Snow join at the bottom of the ear flap, make 1 tie by working ch for approx. 20 cm / 8". Place the end of the tie inside the pompom before cutting and tying around the pompom. Make another pompom and tie the same way in the other side. -------------------------------------------------------- MITTENS: INCREASE TIP: Inc 1 st by picking up the strand between 2 sts from previous round - K this st twisted, i.e. work in back loop of st instead of front to avoid hole. DECREASE TIP: Dec 1 st on each side of marker as follows: Work until 1 st remains before marker, slip next st on a cable needle behind the piece, slip next st (with marker) over to right needle, slip st from cable needle back on left needle, K 2 tog, psso = 2 sts dec. PATTERN: See diagram M.2 and M.3. The diagram shows the pattern from RS. -------------------------------------------------------- LEFT MITTEN: Worked in the round on double pointed needles. Cast on 24 sts on double pointed needles size 7mm / US 10½ with Snow. Work 1st round (= RS) as follows: K 12, work diagram M.2 (= 12 K sts and 12 sts from diagram M.2). REMEMBER THE GAUGE! Continue like this until piece measures 6 cm / 2⅜", then insert a marker in the 9th st. On next round, inc 1 st on each side of st with marker for thumb gusset - Read increase tip above. Repeat inc on each side of the inc sts on next round = 5 sts in thumb gusset. Work 2 rounds without inc. On next round slip the 5 thumb sts on a stitch holder - At the same time cast on 1 new st behind sts on stitch holder = 24 sts on round (12 K sts and 12 sts from diagram M.2). Insert 2 markers in the piece as follows (round beg with 1 K st): 1 marker in the 1st K st and 1 marker in the 12th K st. When diagram M.2 has been worked 3 times vertically, work next round as follows: K 12, work diagram M.3. After 4 rounds, dec 2 sts in each side of mitten - Read decrease tip above = 4 sts dec on round. Repeat dec on every round a total of 5 times = 4 sts remain. Cut the yarn and pull it through the remaining sts and tighten tog. THUMB: Slip the 5 thumb sts back on double pointed needles. Knit up 5 sts behind the thumb = 10 sts. Work in stockinette st in the round until thumb measures 5 cm / 2". Insert 2 markers in the thumb; one in the 1st st and one in the 6th st (= in each side). On next round, dec 2 sts in each side of thumb - Read decrease tip above = 4 sts dec on round. Repeat dec on next round = 2 sts remain. Cut the yarn and pull it through the remaining sts and tighten tog. RIGHT MITTEN: Cast on and work as left mitten but reversed. Insert marker in the 4th st for inc for thumb gusset. FUR EDGE: Crochet with 2 strands Puddel on crochet hook size 8mm / L/11. Work 1 sl st in cast on edge of mitten, ch 1, then work 18 sc around the edge, finish with 1 sl st in first sc. Then work 1 sc in every sc in the round until fur edge measures approx. 6 cm / 2½", fasten off. Work the same way on the other mitten. |
|||||||||||||||||||
Diagram explanations |
|||||||||||||||||||
|
|||||||||||||||||||
 |
|||||||||||||||||||
 |
|||||||||||||||||||
Have you finished this pattern?Tag your pictures with #dropspattern #rockymountainset or submit them to the #dropsfan gallery. Do you need help with this pattern?You'll find 16 tutorial videos, a Comments/Questions area and more by visiting the pattern on garnstudio.com. © 1982-2026 DROPS Design A/S. We reserve all rights. This document, including all its sub-sections, has copyrights. Read more about what you can do with our patterns at the bottom of each pattern on our site. |
|||||||||||||||||||


With over 40 years in knitting and crochet design, DROPS Design offers one of the most extensive collections of free patterns on the internet - translated to 17 languages. As of today we count 324 catalogs and 12290 patterns - 12280 of which are translated into English (US/in).
We work hard to bring you the best knitting and crochet have to offer, inspiration and advice as well as great quality yarns at incredible prices! Would you like to use our patterns for other than personal use? You can read what you are allowed to do in the Copyright text at the bottom of all our patterns. Happy crafting!
Post a comment to pattern DROPS 134-10
We would love to hear what you have to say about this pattern!
If you want to leave a question, please make sure you select the correct category in the form below, to speed up the answering process. Required fields are marked *.