
Popular categories
Looking for a yarn?


Comments / Questions (19)
![]() Marisa wrote:
Marisa wrote:
Hola, cómo hago ésto: cerrar los 13 pts centrales para el escote - cerrar dentro del patrón. Ahora dism 1 pt a cada lado de la cenefa del escote cada 2ª fila 3-3-4-4-5 vcs - ver tip para realizar el trabajo. Después de finalizar todas las dism para la sisa y el escote quedan 11 pts para cada hombro. Continuar trabajando en pt elástico sobre estos, como antes, dejando 1 pt a cada lado en pt musgo hasta que la labor mida 36-38-40-42-44 cm. Pasar los pts a un gancho aux.
03.05.2025 - 21:31DROPS Design answered:
Hola Marisa, cierras 13 puntos o 6 puntos a cada lado del punto central, incluyendo este. Estos puntos se cierran según el dibujo del patrón (de derecho o de revés según corresponda por el elástico). Ahora tienes dos hombros y vas a terminar cada hombro por separado. Sigues con las disminuciones de la sisa como antes y empiezas a disminuir 1 pt en la cenefa del escote, en cada hombro, en las filas que empiezan desde el escote. Después de todas las disminuciones deberías tener 11 puntos en cada hombro; sigue con 1 punto musgo en cada lado y 9 puntos de elástico hasta alcanzar las medidas indicadas y deslizar los pts a un hilo/gancho auxiliar, para usar luego.
04.05.2025 - 22:51
![]() Maike wrote:
Maike wrote:
Liebes Drops Team, leider verstehe ich überhaupt nicht, wie der Armsusschnitt gestrickt werden soll. Wieviele Maschen müssen in welchen Reihen abgekettet werden? Ich habe auch auf Facebook in Strickgruppen nachgefragt, leider konnte mir niemand helfen, keiner versteht, wie die Abnahmen gemacht werden müssen. Jetzt komme ich leider nicht mehr weiter. Bitte helfen Sie mir. Vielen Dank Maike Spicket
25.04.2025 - 16:57DROPS Design answered:
Liebe Maike, wenn alle Maschen für das Armloch sowie für den Halsausschnitt gestrickt sind, sind es nur noch 11 Maschen für jede Schulter übrig. Gerne können Sie uns die Größe hier schreiben, so kann man Ihnen am besten helfen. Danke im voraus für Ihr Verständnis.
28.04.2025 - 07:26
![]() Robin Kelly wrote:
Robin Kelly wrote:
Please clarify for the neck band to shoulder decrease. Instructions are: Then dec 1 st at each neck edge every other row 3-3-4-4-5 times - see knitting tips. Knitting tips indicate to K1k1p1k1p1 then decrease and decrease again before 5 edge at. But the neck band instructions say to decrease at the edge(meaning first stitch?) . Which do I follow? Thank you.
30.08.2024 - 19:48DROPS Design answered:
Dear Robin, at the edge means after/before the edge stitches, since you always the edge stitch in garter stitch for the border. So you would decrease before/after the 5 sts you now have at each side of the middle 13 cast off stitches. So work exactly from the edge as indicated in the Knitting Tip: 5 stitches (at one side of the middle cast off stitches) and then decrease as indicated after the stitches. Likewise for the other side. Happy knitting!
31.08.2024 - 23:33
![]() Audrey Coggeshall wrote:
Audrey Coggeshall wrote:
For some reason I am having a very difficult time figuring out your instructions. I am an intermediate knitter and am finding the directions a challenge to follow. Any advice would be very welcome. Thank you, Audrey
09.08.2024 - 06:11DROPS Design answered:
Dear Mrs Coggeshall, please let us know which part of the problem you have problem with and which size you are working so that we can try to help you further. Thanks for your comprehension.
09.08.2024 - 07:40
![]() Amandli wrote:
Amandli wrote:
Why is this a complex job?
25.05.2024 - 14:04DROPS Design answered:
Dear Amandli, this is a relatively simple piece but if you have problems with making it, you can always ask for help (either in person or over the phone) in the store where you bought your DROPS yarn from. Happy Knitting!
25.05.2024 - 20:17
![]() Jane wrote:
Jane wrote:
I am confused about the shoulder area "When the piece measures 29-30-32-33-35 cm bind off the center 13 sts for the neck - bind off in pattern. Then dec 1 st at each neck edge every other row 3-3-4-4-5 times - see knitting tips. After all armhole and neck shaping is complete 11 sts remain on each shoulder." Am I supposed to work the shoulders separately and cut the yarn after I finish one shoulder?
18.11.2023 - 02:20DROPS Design answered:
Dear Jane, when you cast off the middle 13 sts for neck, you will finish each shoulder separately, continuing to shape armhole as stated before and at the same time, cast off for neck as stated, ie decrease from RS at the beg of every row from RS on right shoulder front / at the end of every row from RS on left shoulder front. When first shoulder is done, cut the yarn and join it to the stitches unworked on the 2nd shoulder and work the same way. Happy knitting!
20.11.2023 - 09:45
![]() Debbie Brook wrote:
Debbie Brook wrote:
Hi, At the armhole, I have decreased 5 times every other row to 51 stitches remaining. When it says then every 4 rows 5 times, where do you begin the first decrease please? Is it the next row then every 4 rows after or four rows after the last decrease row which ensures you begin decreasing on the knit row? With thanks Debbie
18.10.2023 - 15:39DROPS Design answered:
Dear Mrs Brook, you first decrease 5 times on every other row then 5 times on every 4th row, so you will first work (1 row with dec, 1 row without dec) a total of 5 times, then work (1 row with dec, 3 rows without dec) a total of 5 times. Happy knitting!
18.10.2023 - 16:05
![]() Dani wrote:
Dani wrote:
Posso lavorare con i ferri circolari?
12.06.2023 - 07:36DROPS Design answered:
Buongiormo Dani, il modello è lavorato in piano, ma se preferisce può utilizzare i ferri circolari. Buon lavoro!
14.06.2023 - 08:42
![]() Marita wrote:
Marita wrote:
Hi I was wondering if I could knit the bottom part in the round? I would still increase as written in the pattern.
23.05.2023 - 21:35DROPS Design answered:
Hi, Marita! Yes, you can knit the bottom part in the round, just adjust the total number of sts - as 1 st on each side belongs to side seam, you can cast on 4 sts less for round. Happy knitting!
24.05.2023 - 07:01
![]() Kristine J wrote:
Kristine J wrote:
Når arb måler 19-20-21-22-23 cm strikkes det slik fra kanten (sett fra retten): 1 kantm, * 1 r, 1 vr *, gjenta fra *-* totalt 4 ganger, deretter glstrikk over de neste 45-51-57-63-69 m, avslutt med * 1 vr, 1 r *, gjenta fra *-* totalt 4 ganger, 1 kantm. Etter 2 p felles det av 4 m i hver side til ermhull - fell med r over r og vr over vr Strikkes det fortsatt *r-vr* etter dette oppover ermhullet? Eller er det videre glattstrikk?
31.12.2022 - 12:19
|
|
DROPS 77-3 |
|
|
|
|
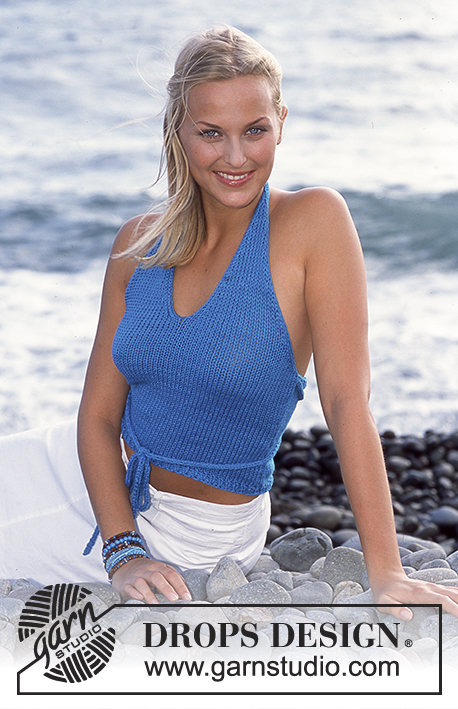
DROPS Short top in Paris
DROPS 77-3 |
|
|
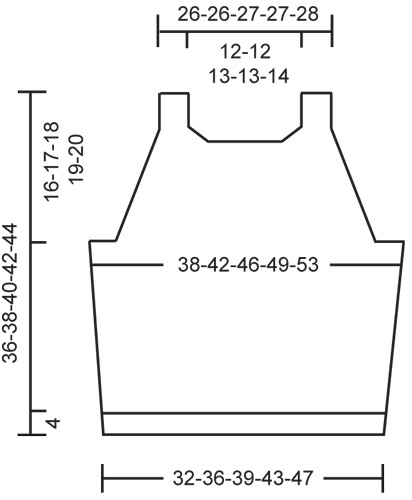
Gauge: 16 sts x 20 rows = 10 x 10 cm on larger needles in stockinette st. Rib-1: Row 1: * K 2, P 1 *, repeat from * - *. Row 2: * P 2, K 1 *, repeat from * - *. Rib-2: * K 1, P 1 *, repeat from * - *. Knitting tips (for armhole and neck): All decs are made from right side. Dec inside 5 edge sts knit as follows from edge (seen from the right side): K 1 (edge st knit in garter st), K 1, P 1, K 1, P 1. Dec 1 st as follows:After 5 edge sts: Slip 1 st as if to knit, K 1, psso. Before 5 edge sts: K 2 tog. Front: Cast on 53-59-65-71-77 sts on smaller needles. Knit Rib-1 keeping 1 st at each side in garter st. When the piece measures 3 cm change to larger needles and stockinette st. After the rib inc 1 st at each side every 3-3-3.5-3.5-4 cm a total of 5 times = 63-69-75-81-87 sts. When the piece measures 19-20-21-22-23 cm knit as follows from edge (seen from the right side): K 1 (edge st knit in garter st throughout), * K 1, P 1 *, repeat from * - * a total of 4 times, then stockinette st over the next 45-51-57-63-69 sts, finish with * P 1, K 1 *, repeat from * - * a total of 4 times, K 1 (edge st knit in garter st throughout). After 2 rows bind off 4 sts at each side for armhole - bind off in pattern. Read the entire armhole and neck shaping sections before knitting: Armhole: Dec 1 st at each side for armhole - see knitting tips - every other row 2-5-9-14-17 times and then every 4 rows 5-5-3-1-0 times. Neckband: When the piece measures 26-27-29-30-32 cm knit Rib-2 over the center 23 sts - start and end with P 1 (knit remaining sts the same as before). When the piece measures 29-30-32-33-35 cm bind off the center 13 sts for the neck - bind off in pattern. Then dec 1 st at each neck edge every other row 3-3-4-4-5 times - see knitting tips. After all armhole and neck shaping is complete 11 sts remain on each shoulder. Continue these in rib as before, keeping 1 st at each side in garter st until the piece measures 36-38-40-42-44 cm. Put sts on a st holder. Back: Cast on and knit the same as the front. Assembly: Join shoulders with 3-needle bind off. Sew side seams using edge sts as seam allowance. |
|
 |
|
Have you finished this pattern?Tag your pictures with #dropspattern or submit them to the #dropsfan gallery. Do you need help with this pattern?You'll find 16 tutorial videos, a Comments/Questions area and more by visiting the pattern on garnstudio.com. © 1982-2026 DROPS Design A/S. We reserve all rights. This document, including all its sub-sections, has copyrights. Read more about what you can do with our patterns at the bottom of each pattern on our site. |


With over 40 years in knitting and crochet design, DROPS Design offers one of the most extensive collections of free patterns on the internet - translated to 17 languages. As of today we count 324 catalogs and 12290 patterns - 12280 of which are translated into English (US/in).
We work hard to bring you the best knitting and crochet have to offer, inspiration and advice as well as great quality yarns at incredible prices! Would you like to use our patterns for other than personal use? You can read what you are allowed to do in the Copyright text at the bottom of all our patterns. Happy crafting!
Post a comment to pattern DROPS 77-3
We would love to hear what you have to say about this pattern!
If you want to leave a question, please make sure you select the correct category in the form below, to speed up the answering process. Required fields are marked *.