
Popular categories
Looking for a yarn?


Comments / Questions (7)
![]() Godin Cécile wrote:
Godin Cécile wrote:
Bonjour, Merci pour votre réponse si rapide et je vous soute un joyeux noël.
14.12.2023 - 08:42
![]() Godin Cécile wrote:
Godin Cécile wrote:
Bonsoir, Sur le model 78-6 Monter 76-84-92-100-108 m et tricoter au point mousse. A 2 cm de hauteur totale, augmenter 1 m de chaque côté 6 fois tous les 2-2-2-2,5-2,5 cm = 88-96-104-112-120 m. A l'assemblage du dos et des devants cela fait un bec Merci de me dire comment faire pour ne pas que cela se produit
13.12.2023 - 17:40DROPS Design answered:
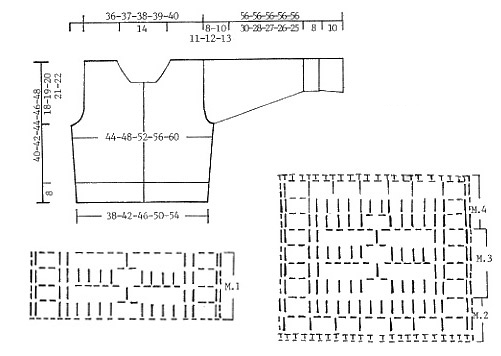
Bonjour Mme Godin, comme on augmente progressivement sur les côtés, on doit avoir une légère diagonale comme le montre le schéma (le bas du gilet est plus court en largeur qu'au niveau des emmanchures); En cas de doute n'hésitez pas à montrer votre ouvrage à votre magasin (même en photo par mail), on pourra certainement mieux vous aider en voyant votre ouvrage. Bonne continuation!
14.12.2023 - 08:08
![]() Christine Morgan wrote:
Christine Morgan wrote:
Please can you explain ‘ cast off 8 sts towards mid front for neck, do you mean at the beginning of the row where the band starts?
29.03.2023 - 20:50DROPS Design answered:
Hi Christine, Yes, the cast off stitches are at the beginning of the row where the band starts. Happy knitting!
30.03.2023 - 06:52
![]() DROPS Design DE wrote:
DROPS Design DE wrote:
Es ist jetzt ganz unten im Text erklärt.
23.09.2010 - 07:35
![]() Sasa Theis wrote:
Sasa Theis wrote:
Es fehlt leider die Beschreibung der Häkelschrift! Bitte hinzufügen. Vielen Dank! Sasa
23.09.2010 - 00:49
![]() DROPS Design wrote:
DROPS Design wrote:
Se virkskolan om detta :-)
05.02.2008 - 08:38
![]() Monica wrote:
Monica wrote:
Hur virkar man 1 stav, finns i diagrammet?
04.02.2008 - 18:32
|
||||||||||
DROPS 78-6 |
||||||||||
|
|
||||||||||
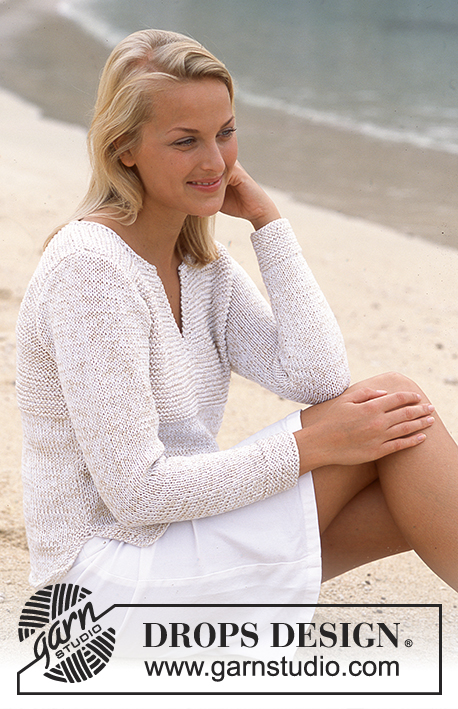
DROPS Cardigan in Muskat
DROPS 78-6 |
||||||||||
|
Gauge: Stockinette st: 20 sts x 26 rows = 10 x 10 cm. Garter st: 20 sts x 36 rows = 10 x 10 cm. Garter st, when knitting flat: Knit all sts, all rows. Knitting tips (for neck shaping): All decs are made from right side. Dec 1 st inside of 5 edge sts knit in the pattern as follows: After 5 edge sts: Slip 1 st as if to knit, K 1, psso. Before 5 edge sts: K 2 tog. Crocheted border: See charts. The pattern is seen from the right side. The patterns are marked on the right side of the chart (M.1 = Pattern 1, M.2 = Pattern 2, M.3 = Pattern 3, M.4 = Pattern 4). The body is knit in pieces and sewn together, then the border is crocheted and sewn onto the lower edge of body. On the sleeve, you knit the bottom part first, then crochet the border and sew on before knitting rest of sleeves. Back: Cast on 76-84-92-100-108 sts and knit garter st. When the piece measures 2 cm inc 1 st at each side every 2-2-2-2.5-2.5 cm a total of 6 times = 88-96-104-112-120 sts. When the piece measures 14-15-16-17-18 cm bind off for armhole at each side every other row: 4 sts 0-1-1-1-1 time, 3 sts 1-0-1-1-1 time, 2 sts 1-2-2-3-4 times and 1 st 3-3-3-4-5 times = 72-74-76-78-80 sts. When the piece measures 30-32-34-36-38 cm bind off the center 24 sts for the neck. Continue with garter st but P the 5 sts at neck edge on all rows (these sts will also be garter st, but will be offset half a row and will define the neck). At the same time dec 1 st at each neck edge every other row 2 times - see knitting tips = 22-23-24-25-26 sts remain on each shoulder. Bind off when the piece measures 32-34-36-38-40 cm. Left front: Cast on 42-46-50-54-58 sts and knit garter st, but P the 5 sts at center front edge on all rows (these sts will also be garter st, but will be offset half a row and will define the buttonband). When the piece measures 2 cm inc 1 st at the side as on back = 48-52-56-60-64 sts. When the piece measures 14-15-16-17-18 cm bind off for armhole at the side as on back = 40-41-42-43-44 sts. When the piece measures 22-24-26-28-30 cm bind off 8 sts at center front edge for neck. Continue in garter st and P the 5 sts at center front as before and dec 1 st for the neck - see knitting tips: every other row 4 times and then every 4 rows 6 times = 22-23-24-25-26 sts remain on shoulder. Bind off when the piece measures 32-34-36-38-40 cm. Right front: Cast on and knit the same as the left, reversing all shaping. Make buttonholes along buttonband. 1 buttonhole = bind off the 3rd st from center front edge and yo over the bound off st on the next row. Make buttonholes when the piece measures: Size S: 1, 6, 11, 16 and 21 cm. Size M: 1, 7, 12, 18, and 23 cm. Size L: 1, 7, 13, 19 and 25 cm. Size XL: 1, 8, 14, 21 and 27 cm. Size XXL: 1, 8, 15, 22 and 29 cm. Body: Sew side seams. Measure lower edge around Body (measure when the garment lies flat so that there is no pull), including buttonband. The lower edge should measure approx. 76-84-92-100-108 cm. Crocheted border: Ch 24 (incl. 1 ch for turning). Crochet Pattern 2, then repeat Pattern 3 until border is the 3 cm less than the width of the lower edge of body. Finish with Pattern 4. The border should look the same at each end. Sew border to lower edge on the cardigan as follows: Find the center of the border and start by sewing the center to center back on the cardigan. Stretch the border a little as it is sewn in place. Sew edge to edge with small sts. Sleeve - 1st piece: Cast on 50-52-54-56-58 sts and knit garter st. When the piece measures 9 cm dec 8 sts evenly distributed on the row (right side row) = 42-44-46-48-50 sts. When the piece measures 10 cm bind off all sts. Crocheted border: Ch 23, then crochet Pattern 1 until the border is the same length as the bound-off edge on the sleeve (= approx. 21-22-23-24-25 cm). Sew border to 1st piece at bound-off row, edge to edge with small sts. Sleeve - 2nd piece: Cast on 42-44-46-48-50 sts and knit 4 rows garter st. Sew the cast-on edge to the edge of the border. Note: On account of the pattern measure the sleeve when held up, otherwise the sleeves will be too long when worn. Continue as follows (seen from the right side): Row 1: knit Row 2: purl Rows 3-5: knit Row 6: purl Rows 7-9: knit Repeat rows 2-9 to finished measurements. At the same time when the piece measures 19 cm inc 1 st at each side every 2.5-2-2-1.5-1.5 cm a total of 11-12-13-15-16 times = 64-68-72-78-82 sts. When sleeve measures 48-46-45-44-43 cm bind off for sleeve cap at each side every other row: 3 sts 1 time, 2 sts 3 times, 1 st 2-5-6-8-9 times, then bind off 2 sts at each side until the piece measures 55 cm, then bind off 3 sts at each side 1 time. Bind off the remaining sts, the piece measures approx. 56 cm. Assembly: Sew shoulder seams. Sew sleeve seams and sew in sleeves. Sew on buttons. |
||||||||||
Diagram explanations |
||||||||||
|
||||||||||
 |
||||||||||
Have you finished this pattern?Tag your pictures with #dropspattern or submit them to the #dropsfan gallery. Do you need help with this pattern?You'll find 17 tutorial videos, a Comments/Questions area and more by visiting the pattern on garnstudio.com. © 1982-2026 DROPS Design A/S. We reserve all rights. This document, including all its sub-sections, has copyrights. Read more about what you can do with our patterns at the bottom of each pattern on our site. |
||||||||||


With over 40 years in knitting and crochet design, DROPS Design offers one of the most extensive collections of free patterns on the internet - translated to 17 languages. As of today we count 324 catalogs and 12290 patterns - 12280 of which are translated into English (US/in).
We work hard to bring you the best knitting and crochet have to offer, inspiration and advice as well as great quality yarns at incredible prices! Would you like to use our patterns for other than personal use? You can read what you are allowed to do in the Copyright text at the bottom of all our patterns. Happy crafting!
Post a comment to pattern DROPS 78-6
We would love to hear what you have to say about this pattern!
If you want to leave a question, please make sure you select the correct category in the form below, to speed up the answering process. Required fields are marked *.