
Popular categories
Looking for a yarn?


|
|
Naxos |
|
 |
 |
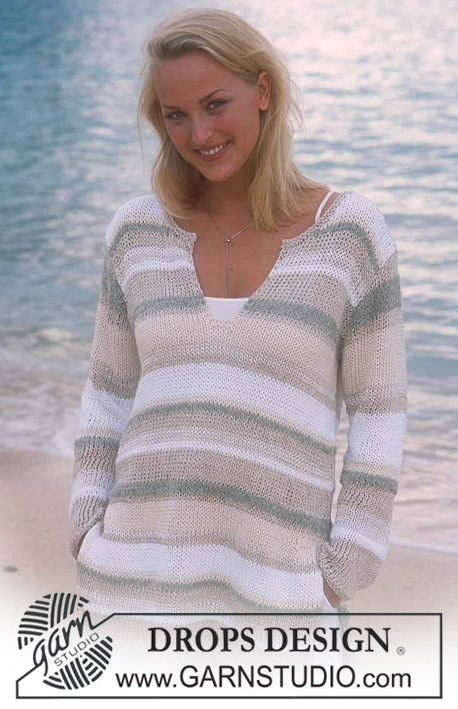
DROPS Pullover in Safran and Cotton Viscose
DROPS 78-8 |
|
|
Gauge: 17 sts x 22 rows with 1 strand Safran + 1 strand Cotton Viscose on larger needles in stockinette st = 10 x 10 cm. Garter st, when knitting flat: Knit all sts, all rows. Front: Cast on 72-78-84-92-100 sts on smaller needles with 1 strand Safran + 1 strand Cotton Viscose. Knit 4 rows garter st, change to larger needles and stockinette st, keeping 3 sts in garter st at each side (= edge of split). When the piece measures 7 cm end split. Cast on 1 new st at each side = 74-80-86-94-102 sts. Continue in stockinette st, keeping 4 sts in garter st at each side for 4 rows, then knit stockinette st over all sts. Read the entire next section before knitting: Side inc: When the piece measures 10 cm inc 1 st at each side every 10 cm a total of 3 times = 80-86-92-100-108 sts. Pattern: At the same time when the piece measures 25-26-27-28-29 cm knit garter st over all sts. Neck split: When the piece measures approx. 33-34-35-36-37 cm - adjust so that the next row is a wrong side row - purl the center 6 sts every row for 4 rows (knit the remaining sts as before). On the next row divide the piece at center front for neck split and put half the sts on a st holder. 1st side: Continue in garter st, and continue to P the 3 sts at neck edge on all rows. Armhole: At the same time when the piece measures 35-36-37-38-39 cm bind off for armhole at each side every other row: 4 sts 1 time, 3 sts 0-1-1-1-2 times, 2 sts 1-1-2-3-3 times and 1 st 4-3-3-4-4 times. Neckband: When the piece measures 46-48-50-52-54 cm bind off 7 sts at the center front edge for the neck. Then bind off at the neck edge every other row: 3 sts 1 time, 2 sts 1 time and 1 st 4 times = 14-15-16-17-18 sts remain on shoulder. Bind off when the piece measures 54-56-58-60-62 cm. 2nd side: Put sts on st holder back on needles and knit the same as the first side, reversing all shaping. Note: begin the row from center front. Start by picking up 1 st in the first st from the other side and K tog with the first st. This reinforces the lower edge of the neck split. Back: Cast on and knit the same as the front, but without neck split. Bind off for armhole as on front. When the piece measures 52-54-56-58-60 cm bind off the center 28 sts for the neck. Then bind off 2 sts at each neck edge on the next row = 14-15-16-17-18 sts remain on each shoulder. Bind off when the piece measures 54-56-58-60-62 cm. Sleeve: Cast on 36-38-40-42-44 sts on smaller needles with 1 strand Safran + 1 strand Cotton Viscose. Knit garter st for 5 cm. Change to larger needles and knit stockinette st to finished measurements. When the piece measures 6 cm inc 1 st at each side every 3.5-3-3-2.5-2.5 cm a total of 12-13-13-14-15 times = 60-64-66-70-74 sts. When sleeve measures 48-47-46-44-43 cm bind off for sleeve cap at each side every other row: 3 sts 1 time, 2 sts 2 times and 1 st 5-6-7-9-10 times, then bind off 2 sts at each side until the piece measures 57 cm, then bind off 3 sts at each side 1 time. The piece measures approx. 58 cm, bind off the remaining sts. Assembly: Sew shoulder seams. Neckband: Pick up approx. 80-86 sts around the neck on smaller needles with 1 strand Safran + 1 strand Cotton Viscose. Knit 4 rows garter st, bind off. Sew in sleeves. Sew sleeve and side seams using edge sts as a seam allowance down to side split. |
|

|
|
|
Have you made this or any other of our designs? Tag your pictures in social media with #dropsdesign so we can see them! Do you need help with this pattern?You'll find tutorial videos, a Comments/Questions area and more by visiting the pattern on garnstudio.com. © 1982-2024 DROPS Design A/S. We reserve all rights. This document, including all its sub-sections, has copyrights. Read more about what you can do with our patterns at the bottom of each pattern on our site. |
|


With over 40 years in knitting and crochet design, DROPS Design offers one of the most extensive collections of free patterns on the internet - translated to 17 languages. As of today we count 304 catalogs and 11422 patterns - 11417 of which are translated into English (US/in).
We work hard to bring you the best knitting and crochet have to offer, inspiration and advice as well as great quality yarns at incredible prices! Would you like to use our patterns for other than personal use? You can read what you are allowed to do in the Copyright text at the bottom of all our patterns. Happy crafting!
Comments / Questions (26)
Kan man sticka detta mönster i en tråd Drops Saffran och en tråd Drops Belle?
05.03.2023 - 11:54DROPS Design answered:
Hej Carina, DROPS Belle er lidt tykkere end DROPS Viscose, så den vil nok blive lidt mere kompakt. Husk at overholde strikkefastheden som står i opskriften for at få målene i den størrelse du vælger ifølge måleskitsen :)
08.03.2023 - 08:26Wat een rot draad is die Paris katoen . Heb hem gebreid breedte 50 cm en na een uur gedragen te hebben meet hij al 55 cm . Rekt uit en blijft maar uitrekken . Al dat werk voor niks .
27.04.2022 - 10:46I'm keen to knit this vee neck but can find knitting needle sizes nowhere! What am I missing? Thanks.
25.04.2022 - 00:26DROPS Design answered:
Dear Mrs Elder, you will find the needle size under the header, just below the sizes and yarn amount. Happy knitting!
25.04.2022 - 08:38Bonjour Je suis débutante dans le tricot et je suis bloquée au niveau de l’emmanchure. Vous notez: tous les 2 rangs : 1 fois 4 m, 0-1-1-1-2 fois 3 m, 1-1-2-3-3 fois 2 m et 4-3-3-4-4 fois 1 m. Ma question va peut être paraître ridicule mais pourriez vous plus me détailler svp car je suis bloquée et j’ai vraiment envis de Le finir. Merci pour votre retour Belle journée
15.03.2022 - 13:26DROPS Design answered:
Bonjour Celine, vous devez rabattre les mailles au début de chaque rang de chaque côté, autrement dit en début de rang sur l'endroit + en début de rang sur l'envers pour rabattre le même nombre de mailles de chaque côté: rabattez 4 mailles au début des 2 rangs suivants, 3 mailles au début des 0-2-2-2-4 rangs suivants (0-1-1-1-2 fois de chaque côté) etc... Bon tricot!
15.03.2022 - 13:37Pour les manches il est dit: " A 48-47-46-44-43 cm de hauteur totale, rabat de chaque côté tous les 2 rangs : 1 fois 3 m, 2 fois 2 m et 5-6-7-8-9-10 fois 1 m, puis 2 m jusqu'à 57 cm de hauteur totale, puis 1 fois 3 m". Quand vous dites : "puis 2m jusqu'à 57cm de hauteur totale", faut-il diminuer de 2m de chaque côté tous les 2 rangs jusqu'à 57 cm? Et combien de mailles doit-il rester: " La manche mesure environ 58 cm de hauteur totale, rabattre les mailles restantes". merci
19.12.2021 - 12:47DROPS Design answered:
Bonjour Mme Aubert, il faut rabattre 2 mailles au début de chaque rang de chaque côté (= sur l'endroit + sur l'envers) jusqu'à ce que la manche mesure 57c m de hauteur totale, le nombre de fois va dépendre de votre tension en hauteur, et la hauteur est ici plus importante que le nombre de mailles restantes, veillez juste à bien avoir rabattu le même nombre de mailles de chaque côté. Bon tricot!
20.12.2021 - 07:44Kan ik dit patroon ook breien met een v-hals? Is het eenvoudig aan te passen?
05.05.2021 - 13:02DROPS Design answered:
Dag Simone,
Je zou dan steken af kunnen kanten langs de halslijn om een V-vorm te maken in plaats van een split.
05.05.2021 - 13:37Bonjour.Explication devant : continuer avec 4 m au point mousse de chaque côté pendant 4 rangs. sur photos on se demande si ce n'est pas plutôt 4 rangs de point mousse ?? merci d'avance pour la réponse
21.04.2021 - 20:11DROPS Design answered:
Bonjour Mme Gauron, effectivement, il faut tricoter 4 côtes mousse et non 4 rangs point mousse, les explications vont être corrigées, merci pour l'info. Bon tricot!
22.04.2021 - 07:46Model naxos : u zegt dat het ook met drops Paris kan gemaakt worden maar deze heeft maar 75 meter op 50 gram en safran heeft 160 meter .moet ik dan 12 bollen bestellen ipv 6 welke zijn aangeven bij Paris ? Voor de maat large aub ?
12.04.2021 - 12:02DROPS Design answered:
Dag Liliane,
Ja dat klopt. Het is dikker garen, dus per 50 gram heb je minder meters en moet je dus meer bollen bestellen. Het totaal aantal meters geeft een goede indicatie en ik denk dat je met 12 bollen redelijk in de buurt komt, maar je kunt voor de zekerheid een extra bol bestellen. Je kunt ook kijken naar hoeveel bollen er in een vergelijkbare trui met Paris gebruikt worden, bijvoorbeeld patroon 221-36, daar heb je ook 600 gram, dus 12 bollen nodig voor maat L.
15.04.2021 - 11:46Moet deze trui met 2 draden gebreid worden vind ik niet lekker breien
10.02.2021 - 16:19DROPS Design answered:
Dag Hennie,
Ja, inderdaad met 2 draden. In plaats daarvan zou je ook met 1 draad uit garencategorie C kunnen breien. Bijvoorbeeld met DROPS Paris, dit is ook een katoengaren.
12.02.2021 - 13:13I would love to know what yarn I can replace this with in South Africa
06.02.2021 - 08:23DROPS Design answered:
Dear Mrs Mallett, you will find here the list of DROPS stores shipping worldwide - do not hesitate to contact them for any further information. Happy knitting!
08.02.2021 - 08:03