
Popular categories
Looking for a yarn?


Comments / Questions (40)
![]() Danielle Rouellé wrote:
Danielle Rouellé wrote:
Je suis en train de réaliser le modèle Praierie song 127-13 J'en suis rendue à l'empiècement. Je vois que si j'additionneM3A 24 rangs + M3B 24 rangs + M3C 108 rangs + M1 24 rangs, j'arrive à 180 rangs soit une hauteur de 40cm, c'est à dire le double de celle indiquée sur le schéma. Pourriez vous m'aider car si près de la fin , je bloque sur ce qui fait toute la beauté de cet ouvrage. Je compte donc sur vous et vous en remercie d'avance. Cordialement.
17.10.2017 - 15:38DROPS Design answered:
Bonjour Mme Rouellé, tous les rangs des points fantaisie sont indiqués dans le diagramme, c'est-à-dire que M.3A = 12 rangs et non 24 (idem pour les autres diagrammes). La tension pour le point fantaisie de l'empiècement doit être de 45 rangs = 10 cm (et 32 rangs jersey = 10 cm), si vous aviez/avez bien cette tension, vous devriez avoir la bonne hauteur pour empiècement. Bon tricot!
17.10.2017 - 15:52
![]() Ragnhild Norén wrote:
Ragnhild Norén wrote:
127-13 Hej! Jag är på oket nu. Undrar när och hur många maskor som ska minskas. I början minskas det 28 m 2 ggr. Och sen på slutet ska 168m bort. Men när och var ska dessa maskor minskas? Har upprepade ggr ringt Garnaffären men de vet inte heller. Frustrerad! Mvh Ragnhild.
08.09.2017 - 11:10DROPS Design answered:
Hej, det minskas maskor i varje rapport i mönstret. Följer du bara diagrammen så ska det bli riktigt maskantal.
08.09.2017 - 14:03
![]() Kristine Henriksen wrote:
Kristine Henriksen wrote:
Jeg kan ikke læse mig frem til, hvor mange pinde, der skal strikkes i M1 på hhv. jakke og ærme. Jeg synes bare der står "Efter M1..." Men hvornår er det?
30.06.2016 - 15:45DROPS Design answered:
Hej Kristine. Du skal afslutte M.1 = 12 pinde i höjden. Saa efter M.1 strikker du videre iflg. opskriften
06.07.2016 - 14:53
![]() Rosalynd Griffiths wrote:
Rosalynd Griffiths wrote:
Are the measurements for sizing always the same. Many of the patterns like this one do not say what measurement S, M, L etc are. Is there a standard?
01.03.2015 - 18:33DROPS Design answered:
Dear Mrs Griffiths, you will find at the end of each pattern a measurement chart with all measures for each size, taken flat, from side to side. Compare these to a similar garment you have and like the shape to find out the matching size. Happy knitting!
02.03.2015 - 10:06
![]() Charlotte Kjærulff wrote:
Charlotte Kjærulff wrote:
Tjek lige mønster forklaringen.. Ser ud til at i har blandet to symboler sammen cirklen og den sorte firkant.. Vil meget gerne have en rettelse på siden hvis det er rigtigt..
15.06.2014 - 13:21DROPS Design answered:
Hej Charlotte. Mönsterforklaringen er skam rigtig nok. Den sorte cirkel er vrang fra retsiden, ret fra vrangen og den sorte firkant er boblen.
17.06.2014 - 17:07
![]() Tatiana wrote:
Tatiana wrote:
Tusen takk skal du ha! Det var snilt av deg å forklare dette.
12.06.2014 - 09:49
![]() Tatiana wrote:
Tatiana wrote:
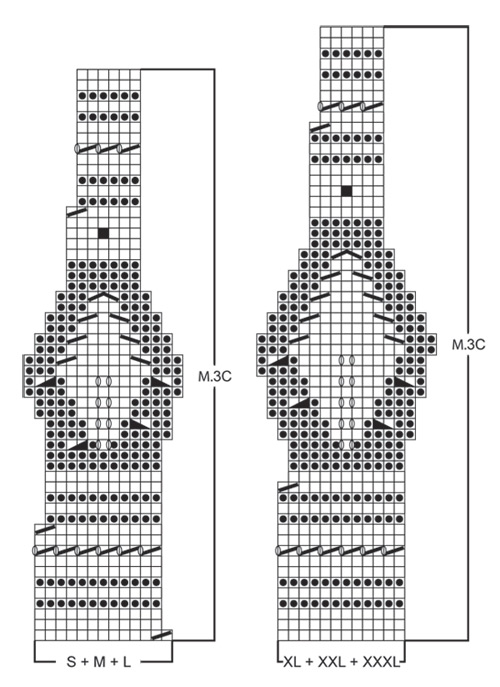
Mønster 3C- der midt i 3C (r.19) vi kaster 1m 2 ganger, men strikker 2m sammen bare en gang. Vi strikker vrang, kast, rett, kast, vrang-til sammen 5 masker. Tilbake er det bare 3 masker rett strikk. Hvordan skal jeg strikke over kastene?
09.06.2014 - 23:11DROPS Design answered:
Hei Tatiana. Du tager 2 masker ud i raekke 19. Du har 11 m per gentagelse og strikker 5 vr, 1 kast, 1 r, 1 kast og 5 vr. Naar du saa strikker tilbage over kastene strikker du 5 r (vr fra rettsiden), 3 vr (r fra rettsiden) og 1e og 3e af disse masker er dine kast og 5 r = du har nu 13 m per gentagelse.
10.06.2014 - 14:08
![]() Tove Jørgensen wrote:
Tove Jørgensen wrote:
Kan jeg strikke denne model i baby alpaca silk? med samme strikkefasthed?
26.11.2013 - 17:55DROPS Design answered:
Ja Baby Alpaca Silk og Alpaca tilhører samme garngruppe og kan strikkes på samme opskrifter med samme strikkefasthed. Men husk at lave en strikkeprøve så du kan se at du overholder strikkefastheden!
27.11.2013 - 11:19
![]() Ria Van Hoorn wrote:
Ria Van Hoorn wrote:
Ik ben met de pas van het vest bezig. maar het is me niet helemaal duidelijk. Als ik M.3A over 405 st. brei, dat er dan nade 7e nld.nog 377 st. over zijn. Moet er geminderd worden? Mvrgr.
18.08.2013 - 18:30DROPS Design answered:
Hoi Ria. In de 7e nld moet je de laatste 3 st van M.3A voor de voorbies recht breien. Pas in de 11e nld van M.3A wordt er 1 st geminderd per herhaling door 2 st r samen te breien = 28 st minder over de hele nld = 377 st over op de nld.
19.08.2013 - 12:51
![]() Kerry wrote:
Kerry wrote:
The instructions don't say whether the charts are for both RS and WS or whether they are just RS instructions with WR being purl. Please clarify.
29.03.2013 - 14:08DROPS Design answered:
Dear Kerry, pattern shows all rows of the pattern, from RS as well as from WS, but both shown from RS, ie a white square is K from RS but from WS you will have to P this st. Happy knitting!
29.03.2013 - 14:48
|
||||||||||||||||||||||||||||
Prairie Song#prairiesongcardigan |
||||||||||||||||||||||||||||
 |
 |
|||||||||||||||||||||||||||
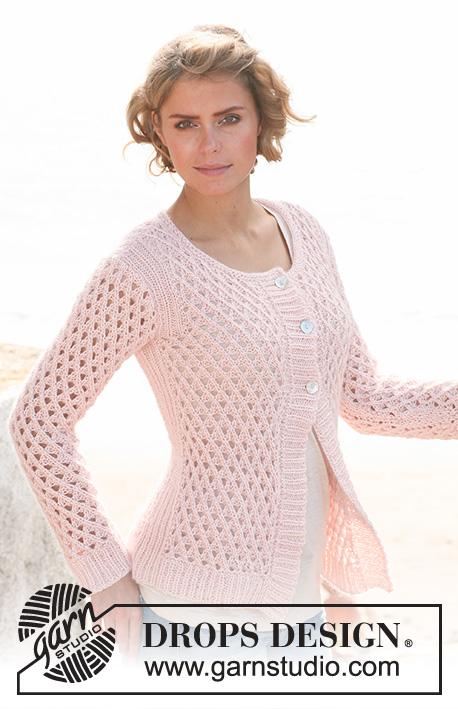
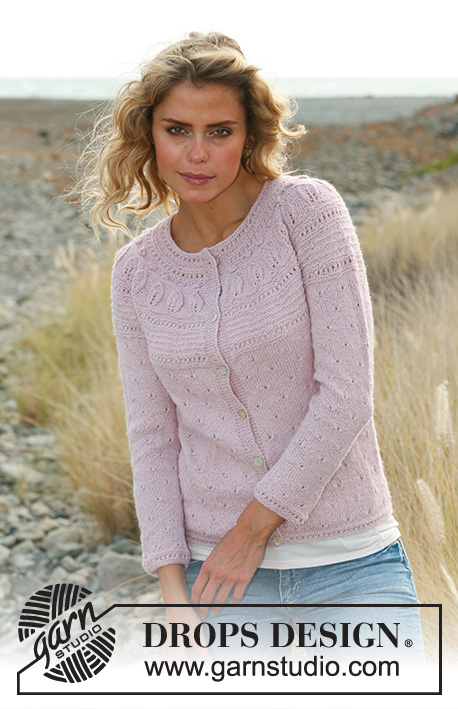
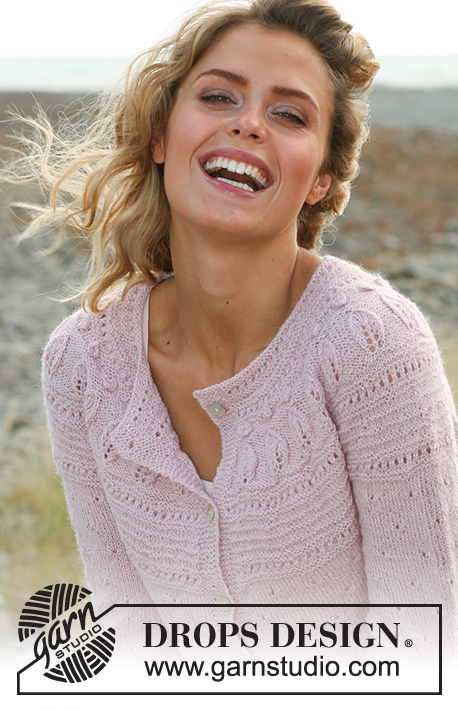
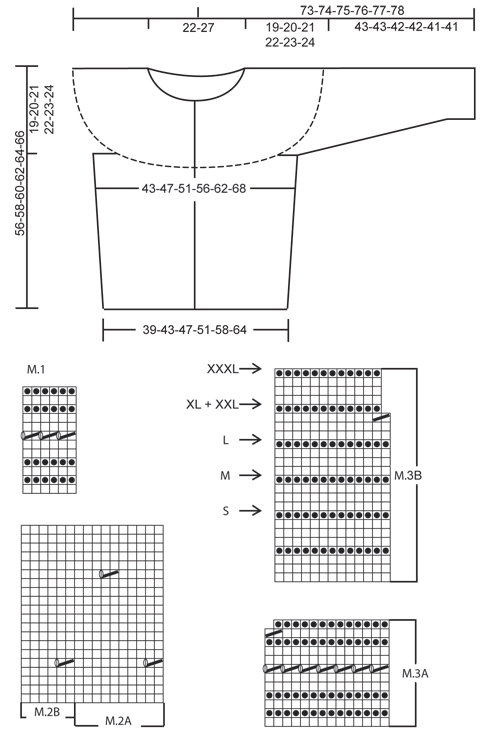
Knitted DROPS jacket with lace pattern and round yoke in "Alpaca". Size: S - XXXL.
DROPS 127-13 |
||||||||||||||||||||||||||||
|
GARTER ST (back and forth on needle): K all rows. PATTERN: See diagram M.1 to M.3. The diagram shows the pattern from RS. NOTE! See diagram M.3C for size! BUTTON HOLES: Bind off for button holes on right front band. 1 BUTTON HOLE = bind off 4th st from edge. On next row cast on 1 new st over the bind off st. Bind off for button holes when piece measures: SIZE S: 2, 11, 19, 28, 36, 45, 54 cm / ¾",4⅜",7½",11",14¼",17¾",21¼". SIZE M: 2, 11, 20, 29, 38, 47, 56 cm / ¾",4⅜",8",11⅜",15",18½",22". SIZE L: 2, 10, 18, 26, 34, 42, 50, 58 cm / ¾",4",7",10¼",13⅜",16½",19¾",22¾". SIZE XL: 2, 10, 18, 27, 35, 43, 51, 60 cm / ¾",4",7",10⅝",13¾",17",20",23⅝". SIZE XXL: 2, 11, 19, 28, 36, 45, 53, 62 cm / ¾",4⅜",7½",11",14¼",17¾",21",24⅜". SIZE XXXL:2, 11, 20, 29, 38, 47, 56, 64 cm / ¾",4⅜",8",11⅜",15",18½",22", 25¼". I.e. approx. 2 cm / ¾" remain until finished measurements after last button hole. -------------------------------------------------------- JACKET: Worked back and forth on circular needle from mid front. Cast on 199-219-239-259-289-319 sts (includes 6 band sts each side towards mid front) on circular needle 2.5 mm/ US 1or2 with Alpaca. Work first row from RS as follows: 6 band sts in GARTER ST - see explanation above, repeat diagram M.1 and finish with 6 band sts in GARTER ST. Continue the pattern like this - NOTE: On 7th row in M.1 K last st before band sts. REMEMBER BUTTON HOLES ON BAND - see explanation above. After M.1 switch to circular needle size 3 mm / US 2or3 and work next row from RS as follows: 6 band sts as before, 1 st in stockinette st, M.2A until 12 sts remain, finish with M.2B (= 6 sts) and 6 band sts as before. Continue the pattern like this. REMEMBER THE GAUGE! Insert 2 markers in the piece after 53-58-63-68-75-83 sts each side = 93-103-113-123-139-153 sts between markers on back piece. When piece measures 8-8-9-9-10-10 cm / 3⅛"-3⅛"-3½"-3½"-4"-4", inc 1 st each side of both markers (= 4 sts inc). Repeat the inc every 6 cm / 2⅜" a total of 5 times = 219-239-259-279-309-339 sts - NOTE: Work inc sts in stockinette st until they can be worked in pattern each side. When piece measures approx. 37-38-39-40-41-42 cm / 14½"-15"-15¼"-15¾"-16⅛"-16½" - adjust so that next row is worked from RS and so that 3 or 5 rows in stockinette st are worked after 1 row with lace pattern - bind off 10-10-10-12-12-12 sts each side for armholes (i.e. 5-5-5-6-6-6 sts both sides of markers) = 93-103-113-121-137-151 sts on back piece and 53-58-63-67-74-82 sts on each front piece. Put piece aside and knit the sleeves. SLEEVE: Cast on 56-56-58-60-62-64 sts on double pointed needles size 2.5 mm / US 1or2 with Alpaca. Work M.1. Insert a marker at beg of round (= mid under sleeve). After M.1 switch to double pointed needles size 3 mm / US 2or3 and work next round as follows: 0-0-1-2-3-4 sts in stockinette st, M.2A until 6-6-7-8-9-10 sts remain, finish with M.2B (= 6 sts) and 0-0-1-2-3-4 sts in stockinette st. Continue like this. When piece measures 8-9-8-9-7-12 cm / 3⅛"-3½"-3⅛"-3½"-2¾"-4¾", inc 2 sts mid under sleeve. Repeat inc every 3½-2½-2½-2-2-1½ cm / 1¼"-⅞"-⅞"-¾"-¾"-½" a total of 10-13-14-16-17-18 times = 76-82-86-92-96-100 sts - NOTE: Work inc sts in stockinette st until they can be worked in pattern. When piece measures approx. 43-43-42-42-41-41 cm / 17"-17"-16½"-16½"-16⅛"-16⅛" (NOTE! Shorter measurements in the larger sizes because of longer sleeve cap and wider shoulder width) - adjust so that same no of rounds in stockinette st have been worked after 1 round with lace pattern as on body - bind off 10-10-10-12-12-12 sts mid under sleeve (i.e. 5-5-5-6-6-6 sts each side of marker) = 66-72-76-80-84-88 sts. Slip sts on a stitch holder and knit another sleeve. YOKE: Slip sleeves on to same circular needle as body where armholes were bind off = 331-363-391-415-453-491 sts. Work 1-1-1-1-1-3 rows in stockinette st (1st row = P from WS and work bands in garter st as before until finished measurements) while AT THE SAME TIME dec 10-14-14-10-6-2 sts evenly (do not dec over bands) = 321-349-377-405-447-489 sts. Work next row from RS as follows: 6 band sts, M.3A over the next 308-336-364-392-434-476 sts (1 repetition = 14 sts), finish with first st in M.3A and 6 band sts. Continue the pattern like this. NOTE: On 7th row in M.3A K last st before band. After M.3A, 299-325-351-377-416-455 sts remain on needle. Now work M.3B with 6 band sts each side - finish with row before arrow in your size (i.e. finish after K 1 row from WS). After M.3B, 299-325-351-349-385-421 sts remain on needle. Work next row from RS as follows - see diagram for correct size: 6 band sts, M.3C until 7 sts remain (1 repetition = 13-13-13-12-12-12 sts), finish with first st in M.3C and 6 band sts - NOTE: On the rows that start with K 2 tog at beg of 1 repetition, K last st before band. Continue the pattern like this. After M.3C, 145-157-169-181-199-217 sts remain on needle. NECKLINE: Switch to circular needle 2.5 mm/ US 1or2 and work M.1 with 6 band sts each side (on 7th row K last st before band sts) - AT THE SAME TIME on 1st row dec 26-34-42-50-64-76 sts evenly (do not dec over bands) = 119-123-127-131-135-141 sts. After M.1 loosely bind off with K from RS. ASSEMBLY: Sew the openings under the sleeves. Sew on buttons. |
||||||||||||||||||||||||||||
Diagram explanations |
||||||||||||||||||||||||||||
|
||||||||||||||||||||||||||||
 |
||||||||||||||||||||||||||||
 |
||||||||||||||||||||||||||||
Have you finished this pattern?Tag your pictures with #dropspattern #prairiesongcardigan or submit them to the #dropsfan gallery. Do you need help with this pattern?You'll find 21 tutorial videos, a Comments/Questions area and more by visiting the pattern on garnstudio.com. © 1982-2026 DROPS Design A/S. We reserve all rights. This document, including all its sub-sections, has copyrights. Read more about what you can do with our patterns at the bottom of each pattern on our site. |
||||||||||||||||||||||||||||


With over 40 years in knitting and crochet design, DROPS Design offers one of the most extensive collections of free patterns on the internet - translated to 17 languages. As of today we count 324 catalogs and 12290 patterns - 12280 of which are translated into English (US/in).
We work hard to bring you the best knitting and crochet have to offer, inspiration and advice as well as great quality yarns at incredible prices! Would you like to use our patterns for other than personal use? You can read what you are allowed to do in the Copyright text at the bottom of all our patterns. Happy crafting!
Post a comment to pattern DROPS 127-13
We would love to hear what you have to say about this pattern!
If you want to leave a question, please make sure you select the correct category in the form below, to speed up the answering process. Required fields are marked *.