
Popular categories
Looking for a yarn?


Comments / Questions (49)
![]() Marine wrote:
Marine wrote:
1️⃣ Rabattre 4 m de chaque côté 1 fois.ok c’est claire 2️⃣ Puis rabattre 2 m seulement au début de chaque rang (pas à la fin) ? tous les rangs jusqu’à 57 cm. 3️⃣ Ensuite, rabattre 4 m au début des 2 rangs suivants (pas des deux côtés ) Pouvez vous m’éclairer je vous remercie d’avance
12.02.2026 - 13:11DROPS Design answered:
Bonjour Marine, procédez ainsi: rabattez 4 m en début de rang sur l'endroit, terminez le rang, tournez, rabattez 4 m en début de rang sur l'envers, terminez le rang, tournez. Rabattez 2 m en début de rang sur l'endroit, terminez le rang, tournez, rabattez 2 m en début de rang sur l'envers, terminez le rang, tournez. Répétez ces 2 derniers rangs jusqu'à ce que la manche mesure 57 cm. Rabattez 4 m en début de rang sur l'endroit, terminez le rang, tournez, rabattez 4 m en début de rang sur l'envers, terminez le rang, tournez. Rabattez les mailles restantes. Bon tricot!
12.02.2026 - 18:17
![]() Rita Vella wrote:
Rita Vella wrote:
I am knitting the front pcs. Now beginning to incorporate more stitches on front band for collar. Can you please explain to me what \'work 1 st from front piece into the garter stitch means?\' I found it a bit confusing. Thankyou Rita
06.11.2024 - 15:25DROPS Design answered:
Dear Rita, this means you will work 1 stitch from the front piece (= worked previously in pattern) in garter stitch instead to increase the number of stitches worked in garter stitch, but then the number of stitches worked in pattern will decrease. Happy knitting!
06.11.2024 - 16:13
![]() Jane Widström wrote:
Jane Widström wrote:
Finns det något knep vid uppläggningen (resårkanten och rätmaskorna) för att nerkanten ska bli jämn och lika lång ? Som det är nu blir ” knappkanten” kortare. Sen vill jag tillägga att det vore bättre om det stod i mönstret att man ska sticka vänster framstycke först. Då blir det mycket lättare att räkna ut var knapphålen ska göras, då man vill ha ett precis i mitten på den rätstickade delen. Jag fick repa upp 😥
14.09.2023 - 20:10DROPS Design answered:
Hei Jane. LItt problemer med å skjønne hva du mener. Husk at venstre forstykke strikkes som høyre forstykke men motsatt. Så når du har lagt opp til venstre forskykket strikkes det 1 pinne vrang fra vrangen, men for å få det motsatt enn høyre forstykke, startes det med å strikke 6 stolpemasker i riller (rett på hver pinne). mvh DROPS Design
18.09.2023 - 13:30
![]() Diane Castonguay wrote:
Diane Castonguay wrote:
J'ai besoin de 33 rangs pour élargir la bande de et de51 rang pour les augmentation. Comment passer de47 à 52cm ? Je fait le L. Je tasse 1m tout les 4rang set j'augmente tout les 6 rangs J'ai 9 aug. X 6rang=54-5=49 49÷22= au moins 20 cm et il me dit de diminuer pour la manche à 50cm. Je ne peut aug. Et dimanche. Sur le même côté ?? Je viens de terminer mes 9m. Tassé pour le bord et j'ai déjà 60 pouce????
26.08.2023 - 14:19DROPS Design answered:
Bonjour Mme Castonguay, nous ne sommes malheureusement pas en mesure de pouvoir adapter chacun de nos modèles à chaque demande. Si votre échantillon est juste en largeur, vous devriez obtenir les mesures du schéma avec les indications, sinon merci de bien vouloir contacter votre magasin pour toute assistance personnalisée pour adapter ce modèle à votre échantillon. Merci pour votre compréhension.
28.08.2023 - 13:48
![]() Karin Verwoerd wrote:
Karin Verwoerd wrote:
Als ik met m1 aan het breien bent ziet er bij mij anders uit dan op de foto weet eerlijk gezegd niet wat ik verkeerd doet bij de foto ligt direct ver zo mooi bovenop
30.12.2022 - 08:49DROPS Design answered:
Dag Karin,
In het telpatroon zijn de steken zowel aan de goede als de verkeerde kant weergegeven. Dus alle naalden staan in de telpatronen. Heb je hier rekening mee gehouden?
01.01.2023 - 10:56
![]() Erna wrote:
Erna wrote:
Bonjour, Où sont les explications pour le placement des boutonnière ? J'ai beau lire et relire les explications et les boutonnières ne sont mentionnées nulle part. Pouvez- vous compléter cela svp. D'avance merci
08.10.2022 - 15:08DROPS Design answered:
Bonjour Erna, vous les trouverez au tout début des explications sous BOUTONNIÈRES . Bon tricot!
10.10.2022 - 08:45
![]() Robyn Gibbs wrote:
Robyn Gibbs wrote:
HI, Can you use alpaca wool for this pattern? Thanks.
08.10.2022 - 05:41DROPS Design answered:
Dear Robyn, you could work this pattern with 2 threads of DROPS Alpaca (group A yarn) to substitute a group C yarn, like Nepal. Happy knitting!
09.10.2022 - 19:30
![]() Anne Knickmann wrote:
Anne Knickmann wrote:
Hallo , ich habe eine Frage zu Drops 124-4 Ich habe die 20 Maschen für den Kragen aufgenommen und komme oben bei der Schulter nicht weiter. Haben sie den Kragen über 26 Maschen gestrickt? Oder aus den bestehenden Maschen vom Vorderteil genommen Habe jetzt mehr Maschen auf der Nadel wie Inder der Anleitung steht. Mfg anne
08.11.2020 - 10:33DROPS Design answered:
Liebe Frau Knickmann, welche Größe stricken Sie? So können wir Ihnen erklären, wie es bei dieser Größe läuft. Danke im voraus!
09.11.2020 - 10:55
![]() Asma wrote:
Asma wrote:
Hej, Mønsteret skal starte og slutte med 1 vrang (set fra vrangen) indenfor kantm i hver side, gælder det også for ærme? Tak!
29.03.2019 - 11:31DROPS Design answered:
Hei Asma. På grunn av økningene vil du ikke alltid avslutte M.1 på ermene med den samme masken. Du skal ikke nødvendigvis avslutte M.1 med en rett fra retten/vrang fra vrangen. De økte maskene strikkes fortløpende inn i mønsteret. M.1 strikkes altså over alle maskene (med unntak av de 2 kantmaskene). God fornøyelse
03.04.2019 - 09:51
![]() Sawnuy wrote:
Sawnuy wrote:
Hallo, ich habe jetzt 24 M (Grösse L) auf der Nadel für die Kragen. Ich verstehe nicht, was das bedeutet... Weiter der Kragen wie folgt (1. R. = Vorderseite): * über alle M. hin und zurück stricken, nur über die ersten 10-10-12-12-14-14 M. hin und zurück stricken *, von *-* wiederholen bis der Kragen ca. 7-7-7-8-8-9 cm misst. Danach abk. Danke schön Mit freundlichen Grüßen
16.10.2018 - 15:42DROPS Design answered:
Liebe Sawnuy, jetzt stricken Sie verkürzten Reihen über diese 24 M: *2 Reihen über alle Maschen, 2 Reihen über die ersten 12 Maschen*, diese 4 Reihen (= von *bis*) wiederholen Sie bis der Kragen ca 7 cm (am kürzeststen misst). Viel Spaß beim stricken!
16.10.2018 - 15:57
|
||||||||||
Mandy#mandyjacket |
||||||||||
|
|
||||||||||
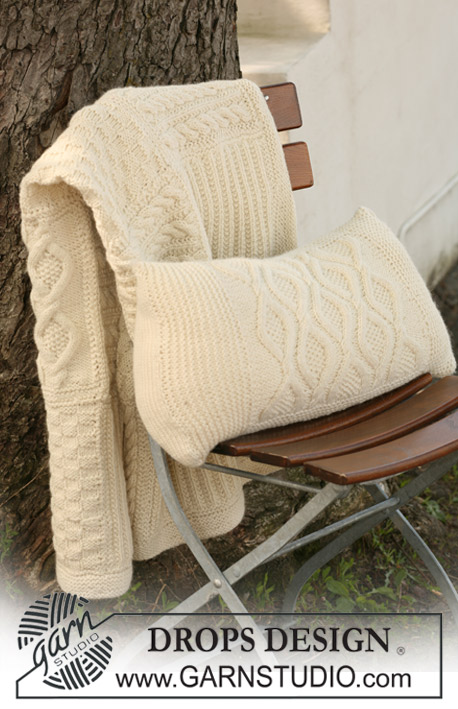
Knitted DROPS jacket with textured pattern and pockets in ”Nepal”. Sizes S to XXXL
DROPS 124-4 |
||||||||||
|
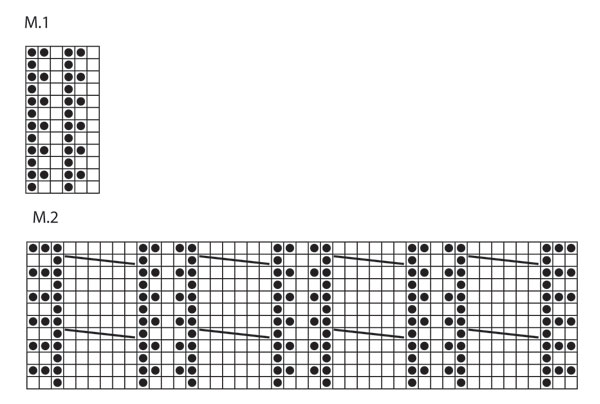
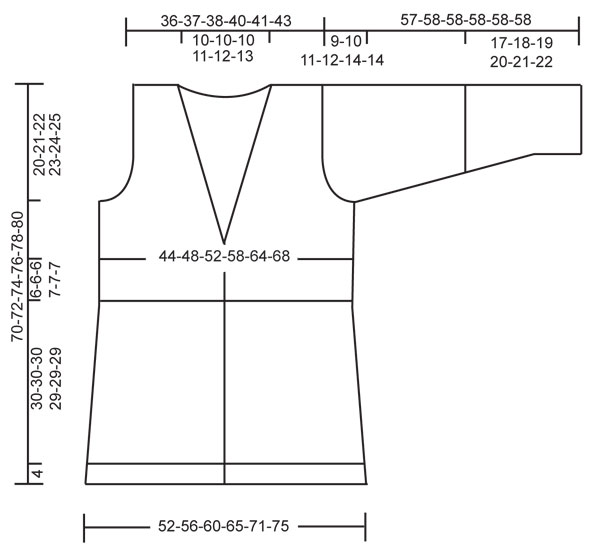
PATTERN: See diagram M.1 and M.2. Diagram shows the pattern from RS. GARTER ST (back and forth on needle): K all rows. MEASUREMENT TIP: Due to the weight of the yarn all measurements should be made whilst the garment is hanging, otherwise it will be too long when worn. BUTTONHOLES: Make buttonholes on right front band. 1 buttonhole = K tog 3rd and 4th st from the edge and make 1 YO. Make buttonholes when piece measures: SIZE S: 12, 20, 28, 36 and 44 cm / 4¾", 8", 11", 14¼" and 17¼". SIZE M: 13, 21, 29, 37 and 45 cm / 5⅛", 8¼", 11⅜", 14½" and 17¾". SIZE L: 14, 22, 30, 38 and 46 cm / 5½", 8¾",11¾", 15" and 18". SIZE XL: 12, 19, 26, 33, 40 and 47 cm / 4¾", 7½", 10¼", 13", 15¾" and 18½". SIZE XXL: 13, 20, 27, 34, 41 and 48 cm / 5⅛", 8", 10⅝", 13⅜", 16⅛" and 19". SIZE XXXL: 14, 21, 28, 35, 42 and 49 cm / 5½", 8¼", 11" 13¾", 16½" and 19¼". -------------------------------------------------------- JACKET: Worked in parts back and forth on circular needle. BACK PIECE: See MEASUREMENT TIP! Cast on 107-119-125-137-149-155 sts (includes 1 edge st each side) on circular needle size 4.5 mm / US 7 with Nepal. P 1 row from WS and continue in rib as follows from RS: 1 edge st, * K3, P3 *, repeat from *-* until 4 sts remain and finish with K3 and 1 edge st. When rib measures 4 cm / 1½" change to circular needle size 5 mm / US 8. K 1 row from RS, AT THE SAME TIME dec 17-21-21-25-27-25 sts evenly = 90-98-104-112-122-130 sts. P 1 row from WS and continue in stockinette st. When piece measures 9 cm / 3½" dec 1 st each side, repeat the dec each side on every 4-4-4-4.5-4.5-4.5 cm / 1½"-1½"-1½"-1¾"-1¾"-1¾" a total of 7-7-7-6-6-6 times = 76-84-90-100-110-118 sts. When piece measures 34-34-34-33-33-33 cm / 13⅜"-13⅜"-13⅜"-13"-13"-13" change back to circular needle size 4.5 mm / US 7. Now continue in GARTER ST - see above - on all sts. When garter st section measures approx 6-6-6-7-7-7 cm / 2⅜"-2⅜"-2⅜"-2¾"-2¾"-2¾" (piece measures a total of approx 40 cm / 15¾" for all sizes – REMEMBER MEASUREMENT TIP) change back to circular needle size 5 mm / US 8. K 1 row from RS, AT THE SAME TIME inc 11-12-12-14-16-17 sts evenly = 87-96-102-114-126-135 sts. Now continue in M.1 with 1 edge st each side (first row = from WS) – NOTE: Beg and finish pattern with P1 (as seen from WS) inside edge st each side. Continue in M.1 until piece measures 50-51-52-53-54-55 cm / 19¾"-20"-20½"-21"-21¼"-21⅝". Now bind off for armhole at the beg of every row each side as follows: 3 sts 1-1-1-2-3-3 times, 2 sts 1-3-4-4-5-6 times and 1 st 3-3-3-4-4-5 times = 71-72-74-78-80-83 sts. Continue in pattern as before until piece measures 68-70-72-74-76-78 cm / 26¾"-27½"-28⅜"-29⅛"-30"-30¾" – REMEMBER MEASUREMENT TIP. Now bind off the middle 17-18-18-20-22-23 sts for neck and complete each shoulder separately. Bind off 1 st on neckline on next row = 26-26-27-28-28-29 sts left on shoulder. Bind off when piece measures 70-72-74-76-78-80 cm / 27½"-28⅜"-29⅛"-30"-30¾"-31½. RIGHT FRONT PIECE: Worked back and forth on circular needle. Cast on 55-61-67-73-79-85 sts (includes 1 edge st at the side and 6 front band sts towards front edge) on circular needle size 4.5 mm / US 7 with Nepal. P 1 row from WS with 6 front band sts towards front edge in garter st (front band worked in garter st until finished measurements). Now continue in rib as follows from RS: 6 front band sts, * K3, P3 *, repeat from *-* and finish with 1 edge st. When rib measures 4 cm / 1½" change to circular needle size 5 mm / US 8. K 1 row from RS, AT THE SAME TIME dec 4-6-9-11-12-14 sts evenly (do not dec on front band) = 51-55-58-62-67-71 sts. P 1 row from WS (front band in garter st) and continue in stockinette st with 6 front band sts towards front edge. When piece measures 9 cm / 3½" dec at the side as described for back piece = 44-48-51-56-61-65 sts. When piece measures 34-34-34-33-33-33 cm / 13⅜"-13⅜"-13⅜"-13"-13"-13" change back to circular needle size 4.5 mm / US 7. Now work garter st on all sts. When garter st section measures approx 6-6-6-7-7-7 cm / 2⅜"-2⅜"-2⅜"-2¾"-2¾"-2¾" (adjust to back piece) change back to circular needle size 5 mm / US 8. K 1 row from RS, AT THE SAME TIME inc 6-5-5-6-7-9 sts evenly = 50-53-56-62-68-74 sts. Now work M.1 with 1 edge st at the side and 6 front band sts towards front edge (first row = from WS) – NOTE: Beg and finish pattern with P1 (as seen from WS) inside edge st and front band. Continue in M.1 until piece measures 45-46-47-48-49-50 cm / 17¾"-18"-18½"-19"-19¼"-19¾". Now beg incorporating more sts in in the garter st on front band for collar as follows: work 1 st from front piece into the garter st on front band on every 4th row a total of 10-9-9-10-11-13 times. AT THE SAME TIME inc 1 st inside the outermost st on front band (inc by making 1 YO, on next row K YO into back of loop to avoid a hole). Repeat the inc on every 8-8-6-6-6-6 row a total of 6-7-9-8-9-7 times. AT THE SAME TIME when piece measures 50-51-52-53-54-55 cm / 19¾"-20"-20½"-21"-21¼"-21⅝" bind off for armhole at the beg of every row from the side as described for back piece. After all dec for armhole and inc for collar are complete there are 48-48-51-52-54-55 sts on needle. Continue in garter st and pattern until piece measures 70-72-74-76-78-80 cm / 27½"-28⅜"-29⅛"-30"-30¾"-31½ – REMEMBER MEASUREMENT TIP. On next row from the side (= from WS) bind off 26-26-27-28-28-29 sts for shoulder = 22-22-24-24-26-26 front band sts left on needle. Work remaining sts on row. Continue for collar as follows (row 1 = RS): * work back and forth on all sts, work back and forth on the first 10-10-12-12-14-14 sts only *, repeat from *-* until collar measures approx 7-7-7-8-8-9 cm / 2¾"-2¾"-2¾"-3⅛"-3⅛"-3½" from shoulder (measured where shortest). Bind off. LEFT FRONT PIECE: Like right front piece, but mirrored. SLEEVE: Worked back and forth on circular needle. Cast on 50-50-50-56-56-56 sts (includes 1 edge st each side) on circular needle size 4.5 mm / US 7 with Nepal. P 1 row from WS and continue in rib as follows from RS: 1 edge st, * K3, P3 *, repeat from *-* and finish with 1 edge st. When rib measures 6 cm / 2⅜" change to circular needle size 5 mm / US 8. K 1 row from RS, AT THE SAME TIME dec 8-8-6-12-10-10 sts evenly = 42-42-44-44-46-46 sts. P 1 row from WS and continue in stockinette st. When piece measures 9-7-9-8-6-8 cm / 3½"-2¾"-3½"-3⅛"-2⅜"-3⅛" inc 1 st each side (inc by making 1 YO inside edge st, on next row K YO into back of loop to avoid a hole). Repeat the inc on every 3.5-3-2.5-2-2-1.5 cm / 1¼"-1⅛"-⅞"-¾"-¾"-½" a total of 11-14-15-18-19-22 times. AT THE SAME TIME when piece measures 17-18-19-20-21-22 cm / 6¾"-7"-7½"-8"-8¼"-8¾" inc 6 sts evenly on row (this inc is in addition to the inc each side). On next row from RS continue in M.1 with 1 edge st each side. Incorporate inc sts at the sides in pattern as you go along. After all inc are complete there are 70-76-80-86-90-96 sts on needle. When piece measures 48-48-47-46-44-44 cm /19"-19"-18½"-18"-17¼"-17¼" - NOTE! Less for the larger sizes because of longer sleeve cap and wider shoulder - bind off for sleeve cap at the beg of every row each side as follows: 4 sts 1 time, then 2 sts at the beg of every row until piece measures approx 56-57-57-57-57-57 cm / 22"-22½"-22½"-22½"-22½"-22½". Bind off 4 sts at beg of the next 2 rows, and then bind off remaining sts. Piece measures approx 57-58-58-58-58-58 cm / 22½"-22¾"-22¾"-22¾"-22¾"-22¾". ASSEMBLY: Sew shoulder seams. Set in sleeves. Sew sleeve and side seams inside 1 edge st. Sew collar tog mid back – sew in outer loops of sts to avoid a chunky seam. Sew collar to neckline on back piece with neat sts. Sew on buttons. POCKETS: Cast on 31 sts on circular needle size 5 mm / US 8 with Nepal and work back and forth on needle as follows: K 1 row from RS and K 1 row from WS. Now K 1 row from RS, AT THE SAME TIME inc 14 sts evenly (do not inc on the outermost 2 sts each side) = 45 sts. P 1 row from WS. Continue in M.2 until pocket measures approx 18-18-20-20-22-22 cm / 7"-7"-8"-8"-8¾"-8¾" – finish after 1 or 3 rows after a cable. K 1 row from RS, AT THE SAME TIME dec 14 sts evenly (not on the 2 sts each side) = 31 sts. K 1 row from WS and K 1 row from RS. Now bind off with K sts from WS. Make 2. Place the pockets on front piece approx 7-9 cm / 2¾"-3½" from mid front with the bottom of pocket just covering the rib. Sew the pockets on with neat sts. |
||||||||||
Diagram explanations |
||||||||||
|
||||||||||
 |
||||||||||
 |
||||||||||
Have you finished this pattern?Tag your pictures with #dropspattern #mandyjacket or submit them to the #dropsfan gallery. Do you need help with this pattern?You'll find 19 tutorial videos, a Comments/Questions area and more by visiting the pattern on garnstudio.com. © 1982-2026 DROPS Design A/S. We reserve all rights. This document, including all its sub-sections, has copyrights. Read more about what you can do with our patterns at the bottom of each pattern on our site. |
||||||||||


With over 40 years in knitting and crochet design, DROPS Design offers one of the most extensive collections of free patterns on the internet - translated to 17 languages. As of today we count 324 catalogs and 12290 patterns - 12280 of which are translated into English (US/in).
We work hard to bring you the best knitting and crochet have to offer, inspiration and advice as well as great quality yarns at incredible prices! Would you like to use our patterns for other than personal use? You can read what you are allowed to do in the Copyright text at the bottom of all our patterns. Happy crafting!
Post a comment to pattern DROPS 124-4
We would love to hear what you have to say about this pattern!
If you want to leave a question, please make sure you select the correct category in the form below, to speed up the answering process. Required fields are marked *.