
Popular categories
Looking for a yarn?


Comments / Questions (63)
![]() Frøydis wrote:
Frøydis wrote:
Hei. Jeg er akkurat ferdig med fellingen i bolen, der vrangborden slutter. Men nå er jeg veldig usikker på om felling tips 2 (der man strikker sammen og gjør kast) bør gjøres på en RETT rad eller en VRANG rad i rillene videre? Det burde stått tips om, for det påvirker hvilken rad man feller på. Dessuten hadde det vært fint om det i stedet for "fell jevnt fordelt" faktisk stod en anbefalt fordeling. Når man lager oppskriften har man jo allerede gjort utregningen...
13.01.2022 - 22:37DROPS Design answered:
Hej, når du tager ind jævnt fordelt tager du maskeantallet der skal tages ind over og deler med det antal masker som skal tages ind (eks 60/6=10 da strikker du hver 9og10 maske sammen). Tag ind på retsiden, og sørg for at ribben stemmer fra retsiden. God fornøjelse!
27.01.2022 - 10:09
![]() Lelletta wrote:
Lelletta wrote:
Grazie mille!
20.04.2021 - 18:36
![]() Lelletta wrote:
Lelletta wrote:
Buonasera, non riesco a far combaciare i punti dove ci sono le diminuzioni -1 e gli aumenti, dove devo lavorare le 6 maglie a dritto nel ferro di ritorno, quindi legaccio o rasato? E per le diminuzioni? Grazie mille!
20.04.2021 - 00:41DROPS Design answered:
Buonasera Lelletta, durante la diminuzioni le 6 maglie centrali vanno lavorate a diritto sul ferro successivo. Buon lavoro!
20.04.2021 - 18:17
![]() Sandra May wrote:
Sandra May wrote:
I am going to knit this sweater, however my tension 24 stitches only measures 9 cm. As Alpaca is a fine wool I prefer to knit on the 3mm needle. Do you think it would work if I made it a size or maybe 2 bigger than normal.
30.01.2020 - 13:09DROPS Design answered:
Dear Mrs May, you can first block your swatch and check measurements afterwards - should your tension still not work, rather try again with another needle size otherwise you would have to recalculate the pattern to match your tension - read more about tension here. Happy knitting!
30.01.2020 - 13:23
![]() Lia wrote:
Lia wrote:
Ik heb een probleem. Brei maat M. Moet na de eerste 8 cm 21 keer meerderen. D.i. 21 X 2,5 cm = 52,5 cm., dus in totaal 60,5 cm. wat doe ik fout
28.09.2019 - 11:43DROPS Design answered:
Dag Lia,
Bij een stekenverhouding van 48 naalden in de hoogte = 10 cm, zou je, als je op elke 8e naald meerdert, om de 1,7 cm. meerderen, en dan kom je op een kleine 36 cm. Met de eerst 8 cm erbij is dat 44 cm.
29.09.2019 - 18:04
![]() Lia wrote:
Lia wrote:
Bij de mouwen heb ik een probleem. Na de eerste 8 cm (maat M) moet ik 21 X meerderen elke 8e naald. D.i. 21 X 8 nld. = 168 nld. 168:32=41 cm + de 8 cm van het begin is 49 cm.. Wat gaat er fout
28.09.2019 - 11:37
![]() Sylvana wrote:
Sylvana wrote:
Bonjour Je me pose une question, à la fin des augmentations des manches : ... Commencer sur l'endroit au milieu sous la manche et tricoter 16-16-18-18-20-20 m après le marqueur, tourner , glisser la 1ère m à l'end, serrer le fil et tricoter 32-32-36-36-40-40 m. ... Est-ce bien SOUS la manche qu'il faut faire ces rangs supplémentaires ou au niveau du dessin, la manche, du fait du biais, étant déjà moins haute sur le dessus de celle-ci ? Merci de votre aide/
24.09.2019 - 08:32DROPS Design answered:
Bonjour Sylvana, les rangs raccourcis commencent bien au milieu sous la manche (= début des tours). Bon tricot!
24.09.2019 - 10:53
![]() Kay wrote:
Kay wrote:
I love the look of this jumper but would like to knit with an Australian 8ply Bendigo Wool. Could you please tell me if there is a conversion from 5 to 8 ply available. Many thanks Kay
27.04.2019 - 00:24DROPS Design answered:
Dear Kay, We are able to provide free patterns thanks to our yarns sold throughout the world. You will therefore understand that we can only recomand you to contact your DROPS Store for any further help & assistance. Thank you for your comprehension.
29.04.2019 - 08:12
![]() Vera wrote:
Vera wrote:
Werden die Ärmel auch in Runden gestrickt? Ist das Muster der Ärmel dann nicht glatt rechts sondern kraus rechts?
03.10.2018 - 17:42DROPS Design answered:
Liebe Vera, die Ärmel sind kraus rechts in Runden gestrickt, dh Sie stricken 1 Runde rechts/1 Runde links für 1 Kraussrippe. Viel Spaß beim stricken!
04.10.2018 - 09:59
![]() Sylvana wrote:
Sylvana wrote:
Bonjour Je suis d'accord avec Sophie, j'ai le même problème. Si je continue les augmentations, la manche va être au-moins 1,5 fois trop longue. Pourtant, j'ai vérifié l'échantillon, il est ok. D'ailleurs pour le corps du pull, je n'ai pas de problème. Merci de vos conseils Sylvana
06.09.2017 - 15:58DROPS Design answered:
Bonjour Sylvana, si votre tension est juste en hauteur (= 32 rangs jersey = 10 cm), votre manche aura la bonne longueur finale. Les manches se tricotent en biais, augmentez bien tous les tours indiqués pour votre taille, et le nombre de fois indiqué pour obtenir la bonne longueur totale. Bon tricot!
07.09.2017 - 09:01
|
|
Rib Romance#ribromancesweater |
|
|
|
|
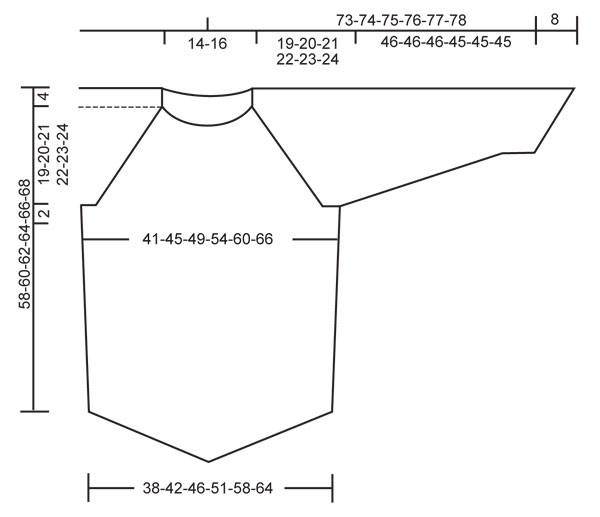
Knitted DROPS jumper in rib and garter st in ”Alpaca”. Size S - XXXL.
DROPS 122-18 |
|
|
GARTER ST (in the round): K 1 round, P 1 round. MEASUREMENT TIP: Because of the weight of the yarn make all measurements while the garment is hanging. INCREASING TIP: Inc 1 st each side of the 2 K sts each side on body piece and each side of the 2 K sts mid under sleeve. Inc 1 st by making 1 YO, on next row work YO into back of loop to avoid a hole – incorporate inc sts in rib/garter st as you go along. DECREASING TIP-1 (applies to the rib mid front and mid back on body piece): Beg 4 sts before marker and dec as follows: Slip 1 st as if to K, K2 tog, psso, 1 YO, K2 (marker sits mid between these 2 sts), 1 YO, K3 tog. On next round K the middle 6 sts. DECREASING TIP-2 (applies to garter st mid front and mid back on body piece and at top of sleeves – hole pattern): Beg 3 sts before marker and dec as follows: slip 1 st as if to K, K1, psso, 1 YO, K2 (marker sits mid between these 2 sts), 1 YO, K2 tog. On next round work the 6 middle sts as follows: K2, P2, K2. DECREASING TIP-3 (applies to garter st on bottom part of sleeve): Dec as described under DECREASING TIP-1, but work the 6 sts as follows on next round: K2, P2, K2 (instead of K6). DECREASING TIP-4 (applies to raglan): Dec as follows in each transition between body piece and sleeves (beg 3 sts before marker): K2 tog, K2 (marker sits mid between these 2 sts), slip 1 st as if to K, K1, psso. -------------------------------------------------------- JUMPER: Worked in the round. BODY PIECE: Cast on 272-304-336-368-416-464 sts on circular needle size 3 mm / US 2or3 with Alpaca. Work 2 rounds rib as follows: K1, * P2, K2 *, repeat from *-* to end and finish with P2 and K1. Now insert 4 markers in piece with 68-76-84-92-104-116 sts between each (insert first marker at beg of round). Continue in rib AT THE SAME TIME inc 1 st each side of 1st and 3rd marker (= at the sides) - See INCREASING TIP - and dec 1 st each side of 2nd and 4th marker (= mid front/mid back) - See DECREASING TIP-1. Continue the inc and dec on every other round (no of sts will be constant). When piece measures 33-34-35-36-37-38 cm / 13"-13⅜"-13¾"-14¼"-14½"-15" - See MEASUREMENT TIP (measured along the side) – K 1 round AT THE SAME TIME dec 76-88-104-112-128-148 sts evenly – NOTE: 19-22-26-28-32-37 sts on left front piece, 19-22-26-28-32-37 sts on right front piece, 19-22-26-28-32-37 sts on right back piece and 19-22-26-28-32-37 sts on left back piece (i.e. 38-44-52-56-64-74 sts in total on front piece and on back piece) – do not dec on the 6 sts mid front and mid back = 196-216-232-256-288-316 sts. Continue in GARTER ST - see above - AT THE SAME TIME continue the hole pattern mid front and mid back - See DECREASING TIP-2 (the side inc are now complete). REMEMBER THE GAUGE! When piece measures 35-36-37-38-39-40 cm / 13¾"-14¼"-14½"-15"-15¼"-15¾" bind off 12-12-12-16-16-16 sts each side for armhole (i.e. 6-6-6-8-8-8 sts each side of marker 1 and 3) = 86-96-104-112-128-142 sts left on front and back piece. Put piece aside and knit the sleeves. SLEEVE: Cast on 64-66-68-68-70-70 sts on double pointed needles size 3 mm / US 2or3 with Alpaca. Insert a marker after 32-33-34-34-35-35 sts (= mid upper sleeve), and let the marker follow the piece as you go along. Work first round as follows: K 29-30-31-31-32-32, slip 1 st as if to K, K1, psso, K2 (marker sits mid between these 2 sts), K2 tog and K 29-30-31-31-32-32. P 1 round. Now work next round as follows: K 29-30-31-31-32-32, slip 1 st as if to K, K1, psso, K2 tog and K 29-30-31-31-32-32. There are now 60-62-64-64-66-66 sts on needle. P 1 round and now continue in garter st. AT THE SAME TIME inc 2 sts mid under sleeve - See INCREASING TIP - and dec 1 st each side of marker mid upper sleeve - See DECREASING TIP-3. Continue the inc and dec on every other round (no of sts will be constant). When piece measures 9-8-8-8-6-9 cm / 3½"-3⅛"-3⅛"-3⅛"-2⅜"-3½" inc 2 extra sts mid under sleeve – NOTE: inc these each side of the middle 6 sts under sleeve. Repeat this inc a total of 19-21-22-24-26-28 times in SIZE S: on every 9th round, SIZE M + L: on every 8th round, SIZE XL + XXL: on every 7th round and SIZE XXXL: on every 6th round = 98-104-108-112-118-122 sts. When piece measures 46-46-46-45-45-45 cm / 18"-18"-18"-17¾"-17¾"-17¾", measured mid under sleeve – see MEASUREMENT TIP and adjust to the same no of garter st rows as on body piece – work shortened rows back and forth as follows (NOTE: K every row and continue the hole pattern mid upper sleeve on every row from RS acc to DECREASING TIP-2 – discontinue the inc mid under sleeve): Beg from RS mid under sleeve and work 16-16-18-18-20-20 sts past marker, turn piece, slip first st as if to K, tighten thread and work 32-32-36-36-40-40 sts. Turn piece, slip 1 st as if to K, tighten thread and work 48-48-54-54-60-60 sts, turn piece, slip 1 st as if to K, tighten thread and work 64-64-72-72-80-80 sts. Turn piece, slip first st as if to K, tighten thread and work 80-80-90-90-100-100 sts, turn piece, slip first st as if to K, tighten thread and work row back to mid under sleeve. Now bind off the first 6-6-6-8-8-8 sts at beg of round, work 86-92-96-96-102-106 sts and bind off the remaining 6-6-6-8-8-8 sts. Put piece aside and knit the other sleeve. YOKE: Slip sleeves on the same circular needle as body piece where bind off for armholes = 344-376-400-416-460-496 sts. Insert a marker in each transition between body piece and sleeves (= 4 markers). READ ALL OF THE FOLLOWING SECTION BEFORE CONTINUING! Continue in garter st and hole pattern as before (on sleeves continue hole pattern acc to DECREASING TIP-2 as on body piece, i.e. the hole pattern continues mid front/mid back and mid upper sleeves, but no inc are made). AT THE SAME TIME dec for raglan as follows - See DECREASING TIP-4: Beg on the first K round and then dec on every 4th round (i.e. on every other K-round) a total of 13-13-13-16-15-15 times and then on every other round (i.e. on every K-round) a total of 20-23-25-22-26-28 times. AT THE SAME TIME when piece measures 53-54-56-57-59-60 cm / 21"-21¼"-22"-22½"-23¼"-23⅝" – measured along the side - slip the middle 6-6-10-12-12-24 sts on a stitch holder for neck. Continue back and forth on circular needle from mid front, AT THE SAME TIME bind off for neck at beg of row each side as follows: 2 sts 1-1-2-3-3-4 times and 1 st until piece measures 58-60-62-64-66-68 cm / 22¾"-23⅝"-24⅜"-25¼"-26"-26¾" - measured along the side all the way to shoulder - REMEMBER MEASUREMENT TIP. After all dec for raglan and neck there are approx 64 to 100 sts left on needle, bind off loosely. NECKLINE: Pick up approx 80-100 sts round neck (includes sts on stitch holder at front) on small circular needle size 3 mm / US 2or3 with Alpaca. K 1 round AT THE SAME TIME dec evenly to 78-82-86-90-94-96 sts. P 1 round. Then K 1 round, AT THE SAME TIME inc evenly to 120-128-132-132-136-140 sts. Work rib, K2/P2 - make sure to have K2 mid front. When rib measures 8-8-9-9-10-10 cm / 3⅛"-3⅛"-3½"-3½"-4"-4" bind off loosely with K over K and P over P. ASSEMBLY: Sew openings under sleeves. |
|
 |
|
Have you finished this pattern?Tag your pictures with #dropspattern #ribromancesweater or submit them to the #dropsfan gallery. Do you need help with this pattern?You'll find 23 tutorial videos, a Comments/Questions area and more by visiting the pattern on garnstudio.com. © 1982-2026 DROPS Design A/S. We reserve all rights. This document, including all its sub-sections, has copyrights. Read more about what you can do with our patterns at the bottom of each pattern on our site. |


With over 40 years in knitting and crochet design, DROPS Design offers one of the most extensive collections of free patterns on the internet - translated to 17 languages. As of today we count 325 catalogs and 12298 patterns - 12288 of which are translated into English (US/in).
We work hard to bring you the best knitting and crochet have to offer, inspiration and advice as well as great quality yarns at incredible prices! Would you like to use our patterns for other than personal use? You can read what you are allowed to do in the Copyright text at the bottom of all our patterns. Happy crafting!
Post a comment to pattern DROPS 122-18
We would love to hear what you have to say about this pattern!
If you want to leave a question, please make sure you select the correct category in the form below, to speed up the answering process. Required fields are marked *.