
Popular categories
Looking for a yarn?


Comments / Questions (137)
![]() Maria wrote:
Maria wrote:
Hi, I love this pattern a lot, and as this is a knitting from the bottom up, is it possible to knit in the round, keeping markers on the sides for decreases, until the moment comes to split for armholes? I suppose that after the sweater separates from the armholes for front and back, the rest of the instructions continue as they are. Would that be correct?
26.04.2026 - 15:43DROPS Design answered:
Dear Maria, yes, you can knit it in the round up to the armholes; then you need to remove the edge stitches when knitting in the round and add them when splitting at the armholes, to make the seam neater later on. The rest of the instructions should be almost identical. Happy knitting!
27.04.2026 - 01:55
![]() Birgit wrote:
Birgit wrote:
Hallo, ich bin jetzt am Vorderteil, habe bis 21 cm gestrickt wie das Rückenteil, laut Plan angenommen und soll jetzt bei 35 cm mit dem Muster angefangen bin aber mit meiner Arbeit weiter als 35 cm. Das Rückenteil passt von den Maßen wie in der Anleitung. Wo ist mein Fehler? Ich freue mich über eine Rückmeldung. VG
25.01.2026 - 13:39DROPS Design answered:
Liebe Birgit, Sie müssten rechnerisch genau bei 35 cm herauskommen, wenn Sie alle 3,5 cm zunehmen. Die erste Zunahme machen Sie bei 21 cm, dann noch weitere 4 x alle 3,5 cm = insgesamt 14 cm bis zur letzten Zunahme, also 21 cm + 14 cm = 35 cm. Gutes Gelingen weiterhin!
29.01.2026 - 11:20
![]() Magda wrote:
Magda wrote:
Ik kan het telpatroon perfect lezen maar als men overbreid word het patroon veel te lang dus is mijn vraag overbreien of niet. Dank u
16.06.2025 - 20:00DROPS Design answered:
Dag Magda,
In het telpatroon zijn alle naalden weergegeven, dus zowel de naalden aan de goede kant als aan de verkeerde kant.
16.06.2025 - 21:41
![]() Nadia wrote:
Nadia wrote:
Ho fatto il dietro del lavoro seguendo la misura XL, chiudendo il lavoro a 63 cm (= ferro 197). Nel fare il davanti mi trovo che il ferro 197 (quindi a 63 cm dall' inizio) si ferma a 5 quadretti (= 10 ferri) PRIMA del segno A . Quindi se proseguo fino al segno A e al segno B il davanti mi viene più lungo del dietro. Mi potete dare un consiglio? Grazie
15.11.2024 - 21:12
![]() Petra wrote:
Petra wrote:
Beim Abketten für den Armausschnitt am Rücken- und Vorderteil sollen in Größe S 4 Maschen und dann in jeder 2. Reihe 0 mal 4 Maschen, 2 mal 2 Maschen und 0 mal 1 Maschen abgenommen. Werden für 0 mal 4 Maschen zwei Reihen ohne Abnahme gestrickt?
28.06.2024 - 22:16DROPS Design answered:
Liebe Petra, nein Sie sollen einfach direkt (und nur) 2 Maschen 2 Mal abketten . Viel Spaß beim Stricken!
01.07.2024 - 13:50
![]() Janis wrote:
Janis wrote:
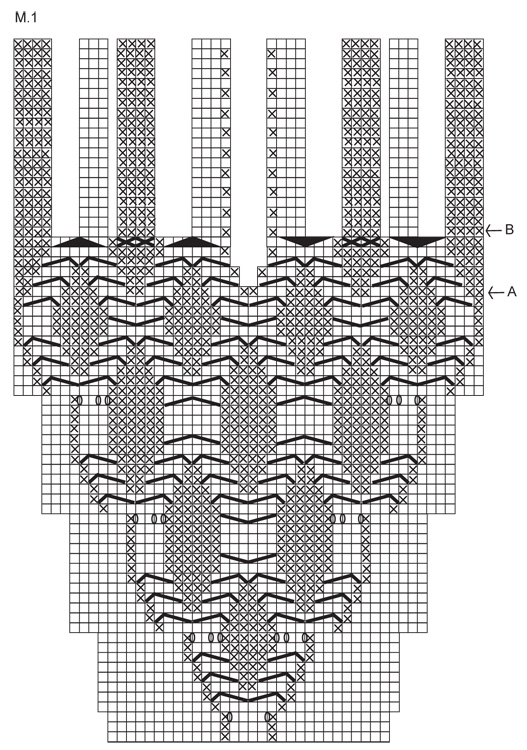
I love the cabled knots but am struggling to understand the instructions. I am working the front piece and have reached arrow-B in diagram M1. I am making size 4 and had 88st before dividing for the neck - as per the instructions for the back piece. After the last cable row I now have 34st on the left sided piece (15 pattern st and 19 stocking st). I am confused as the pattern says to decrease for the neck until 39st remain?? Can you help please?
27.09.2023 - 15:54
![]() Valerie wrote:
Valerie wrote:
Thank you for your help. It makes sense now.
04.04.2023 - 04:35
![]() Valerie wrote:
Valerie wrote:
Hi I emailed a question and realize I’d like an email as to when you’ve answered please
01.04.2023 - 23:02DROPS Design answered:
Dear Valerie, please see answer below.
02.04.2023 - 22:11
![]() Valerie wrote:
Valerie wrote:
Hi I’m knitting the front but am confused about page 3 left front piece saying remember to cast off for armhole. I thought I’d finished the armhole castoffs on page 2. I’m enjoying the pattern a lot so far. Thank you.
01.04.2023 - 22:32DROPS Design answered:
Dear Valerie, on the front piece you start casting off for the armholes as indicated in the back piece. However, you may reach the point where you cast off for the neck before finishing the armholes. So you need to continue casting off for the armholes when working each piece separately. Happy knitting!
02.04.2023 - 22:11
![]() Guedon Odette wrote:
Guedon Odette wrote:
A quelle hauteur de ce modèle doit on commencer les dessins devant.merci
26.01.2023 - 16:50DROPS Design answered:
Bonjour Mme Guedon, vous commencez à tricoter le diagramme M.1 quand le devant mesure 33-34-35-36-39-40 cm de hauteur totale. Bon tricot!
27.01.2023 - 09:01
|
||||||||||||||||||||||||||||||||||
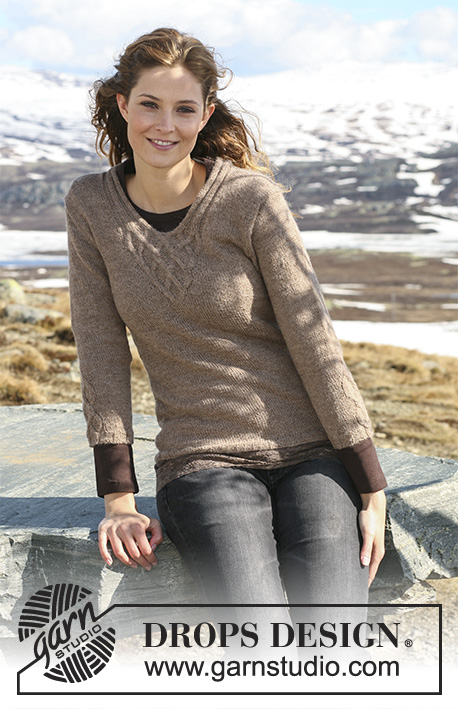
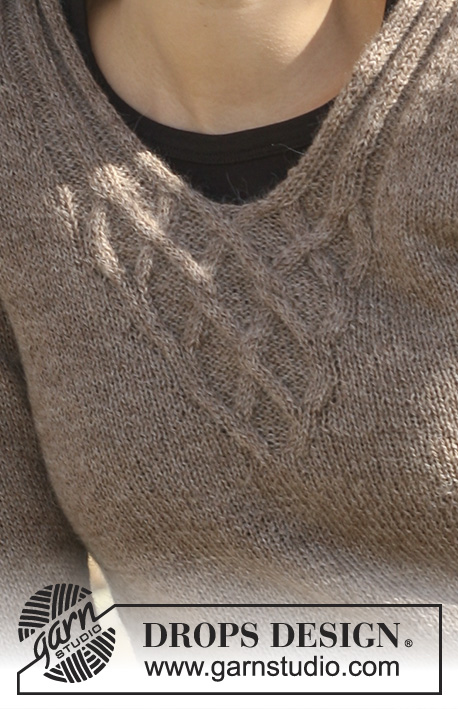
Viking Knots#vikingknotssweater |
||||||||||||||||||||||||||||||||||
 |
 |
|||||||||||||||||||||||||||||||||
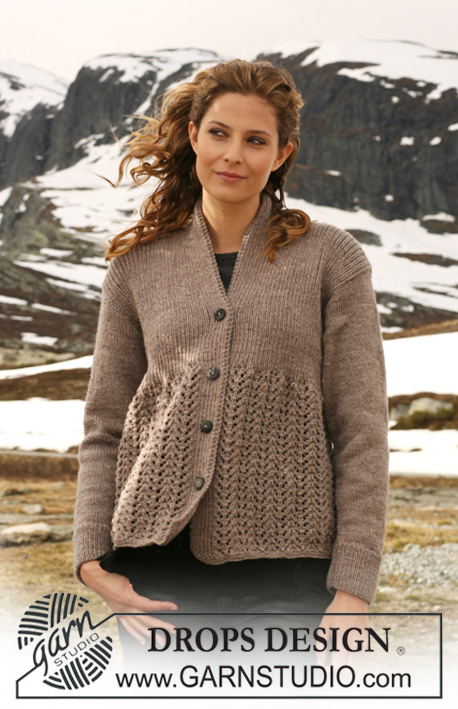
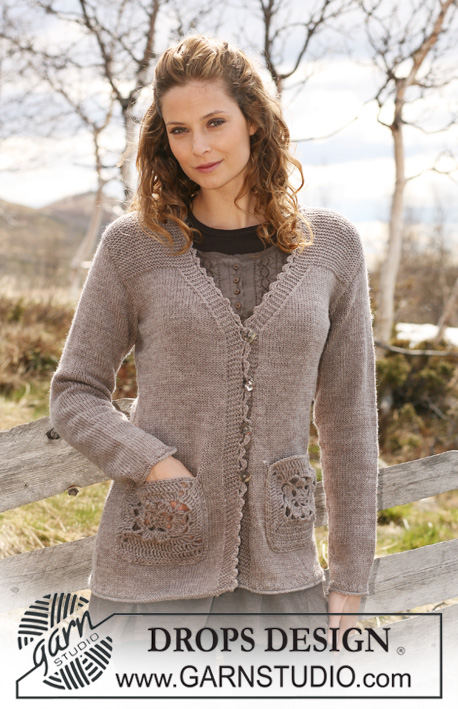
DROPS jumper with cables in ”Alpaca” with 3/4 sleeves or long sleeves. Size S - XXXL.
DROPS 114-8 |
||||||||||||||||||||||||||||||||||
|
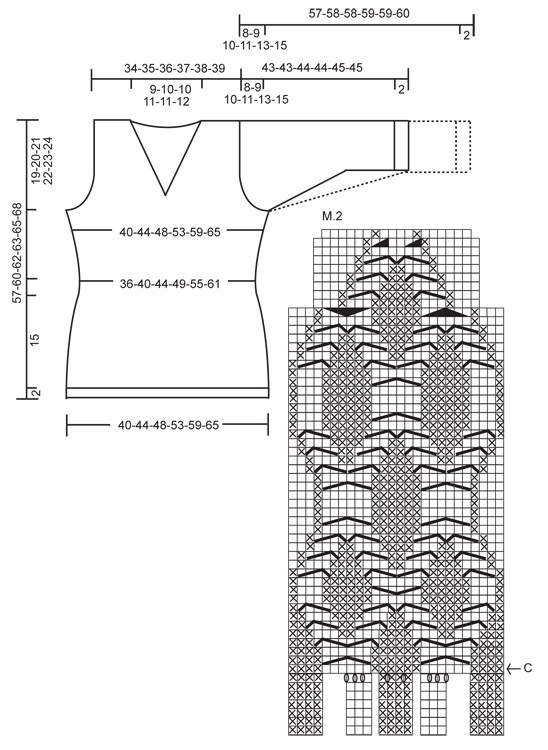
PATTERN: See diagram M.1 and M.2. Diagram shows the pattern from RS. -------------------------------------------------------- -------------------------------------------------------- BACK PIECE: Worked back and forth on needle. Cast on 107-121-135-142-163-177 sts (includes 1 edge st each side) on needle size 2.5 mm / US 1 with Alpaca. Work rib as follows (first row = RS): 1 edge st, * K3, P4 *, repeat from *-* and finish with 1 edge st. When rib measures 2 cm / ¾" K 1 row from RS, AT THE SAME TIME dec 9-13-17-12-19-19 sts evenly = 98-108-118-130-144-158 sts. Change to needle size 3 mm / US 2or3. P 1 row from WS and continue in stockinette st with 1 edge st each side. When piece measures 9 cm / 3½" dec 1 st each side, repeat the dec on every 2 cm / ¾" a total of 5 times = 88-98-108-120-134-148 sts. When piece measures 20-21-21-20-20-21 cm / 8"-8¼"-8¼"-8"-8"-8¼" inc 1 st each side, repeat the inc on every 3-3-3.5-4-4.5-4.5 cm / 1⅛"-1⅛"-1¼"-1½"-1¾"-1¾" a total of 5 times = 98-108-118-130-144-158 sts. When piece measures 38-40-41-41-42-44 cm / 15"-15¾"-16⅛"-16⅛"-16½"-17¼" bind off 4 sts each side for armhole and bind off for armhole each side on every other row: 4 sts 0-0-0-1-1-2 times, 2 sts 2-3-5-6-8-9 times and 1 st 0-2-2-1-2-2 times = 82-84-86-88-92-94 sts. Continue in stockinette st on all sts. When piece measures 54-57-59-60-62-65 cm / 21¼"-22½"-23¼"-23⅝"-24⅜"-25½" bind off the middle 32-34-34-36-38-40 sts for neck and complete each shoulder separately. Bind off 1 st on neckline on every other row 2 times = 23-23-24-24-25-25 sts left on shoulder. Bind off loosely when piece measures 57-60-62-63-65-68 cm / 22½"-23⅝"-24⅜"-24¾"-25½"-26¾". FRONT PIECE: Cast on and work like back piece until piece measures 20-21-21-20-20-21 cm / 8"-8¼"-8¼"-8"-8"-8¼". On next row inc 1 st each side, repeat the inc on every 3-3-3.5-4-4.5-4.5 cm / 1⅛"-1⅛"-1¼"-1½"-1¾"-1¾" a total of 5 times = 98-108-118-130-144-158 sts. Continue in stockinette st with 1 edge st each until piece measures 33-34-35-36-39-40 cm / 13"-13⅜"-13¾"-14¼"-15¼"-15¾". Now continue as follows (from RS): 1 edge st, 33-38-43-49-56-63 stockinette sts, M.1 (= 30 sts), 33-38-43-49-56-63 stockinette sts and 1 edge st. AT THE SAME TIME when piece measures 38-40-41-41-42-44 cm / 15"-15¾"-16⅛"-16⅛"-16½"-17¼" bind off for armhole each side as described for back piece. Continue up to arrow-A in M.1. On next row from RS bind off for neck as follows: work the first 24 sts of M.1, bind off 2 sts (= mid front) and work the remaining 24 sts of M.1 (work remaining sts in stockinette st as before). Insert a marker in piece, and now complete each side separately. LEFT FRONT PIECE: Continue back and forth on needle in stockinette st and M.1 as before – remember to bind off for armhole at the side! AT THE SAME TIME on next row from mid front dec 1 st for neck. Continue to arrow-B in diagram for M.1. Now continue with 15 sts rib as shown in M.1, work remaining sts in stockinette st as before. AT THE SAME TIME dec 1 st for neck inside the 15 sts in rib, and repeat the dec on every 4th row 3-4-4-5-6-7 times = 38-38-39-39-40-40 sts. Continue until piece measures 11-12-12-13-13-14 cm / 4⅜"-4¾"-4¾"-5⅛"-5⅛"-5½" from marker (adjust to length of armhole on back piece). Now bind off 23-23-24-24-25-25 sts from shoulder towards neckline = 15 sts left on needle. Continue back and forth on needle in rib as before on these 15 sts. Bind off loosely with K over K and P over P after approx 7-7-7-8-8-8 cm / 2¾"-2¾"-2¾"-3⅛"-3⅛"-3⅛" (measured from shoulder). RIGHT FRONT PIECE: Like left front piece but mirrored. ASSEMBLY: Sew shoulder seams. 3/4 SLEEVES: Worked back and forth on needle. LEFT SLEEVE: Cast on 65-65-72-72-72-79 sts on needle size 2.5 mm / US 1 with Alpaca. Work rib as follows (first row = RS): 1 edge st, * P4, K3 *, repeat from *-* on 21-21-28-28-28-28 sts, M.2 (= 18 sts), K3, *P4, K3 *, repeat from *-* on the next 21-21-21-21-21-28 sts and 1 edge st. Continue like this up to Arrow-C in M.2. There are now 73-73-80-80-80-87 sts on needle. Change to needle size 3 mm / US 2or3. Continue as follows (from RS): 1 edge st, 21-21-28-28-28-28 stockinette sts, M.2 (= 26 sts), 24-24-24-24-24-31 stockinette sts and 1 edge st. Work 1 vertical repeat of M.2 like this = 65-65-72-72-72-79 sts on needle. Insert a marker, and now measure piece from here. Continue in stockinette st with 1 edge st each side. AT THE SAME TIME when piece measures approx 2 cm / ¾" from marker inc 1 st each side, repeat the inc on every 1.5-1-1-0.5-0.5-0.5 cm / ⅝"-⅜"-⅜"-¼" -¼" -¼" a total of 8-11-11-14-17-17 times = 81-87-94-100-106-113 sts. When piece measures 17-16-16-15-14-12 cm / 6¾"-6¼"-6¼"-6"-5½"-4¾" from marker (less for the larger sizes because of longer sleeve cap and wider shoulder) bind off 4 sts each side. Bind off for sleeve cap at the beg of every row: 2 sts 4-5-5-5-4-4 times each side and 1 st 3-3-5-5-11-14 times each side, then 2 sts each side until piece measures 24-24-25-25-26-26 cm / 9½"-9½"-9¾"-9¾"-10¼"-10¼", now bind off 4 sts each side 1 time, and bind off remaining sts. Piece measures a total of approx 43-43-44-44-45-45 cm / 17"-17"-17¼"-17¼"-17¾"-17¾". RIGHT SLEEVE: Cast on 65-65-72-72-72-79 sts on needle size 2.5 mm / US 1 with Alpaca. Work rib as follows (first row = from RS): 1 edge st, * K3, P4 *, repeat from *-* on 21-21-21-21-21-28 sts, K3, M.2 (= 18 sts), * K3, P4 *, repeat from *-* on the next 21-21-28-28-28-28 sts and 1 edge st. Continue like this up to Arrow-C in M.2. There are now 73-73-80-80-80-87 sts on needle. Change to needle size 3 mm / US 2or3 and continue as follows (from RS): 1 edge st, 24-24-24-24-24-31 stockinette sts, M.2 (= 26 sts), 21-21-28-28-28-28 stockinette sts and 1 edge st. Work 1 vertical repeat of M.2 like this = 65-65-72-72-72-79 sts on needle. Insert a marker, and now measure piece from here. Continue as described for Left Sleeve. LONG SLEEVES: Worked back and forth on needle. LEFT SLEEVE: Cast on 58-58-65-65-65-72 sts on needle size 2.5 mm / US 1 with Alpaca. Work rib as follows (first row = RS): 1 edge st, * P4, K3 *, repeat from *-* on 21-21-21-21-21-28 sts, M.2 (= 18 sts), K3, * P4, K3 *, repeat from *-* on the next 14-14-21-21-21-21 sts and 1 edge st. Continue like this up to Arrow-C in M.2. There are now 66-66-73-73-73-80 sts on needle. Change to needle size 3 mm / US 2or3 and continue as follows (from RS): 1 edge st, 21-21-21-21-21-28 stockinette sts, M.2 (= 26 sts), 17-17-24-24-24-24 stockinette sts and 1 edge st. Work 1 vertical repeat of M.2 like this = 58-58-65-65-65-72 sts on needle. Insert a marker, and now measure piece from here. Continue in stockinette st with 1 edge st each side. AT THE SAME TIME when piece measures approx 1-2-2-1-1-1 cm / ⅜"-¾"-¾"-⅜"-⅜"-⅜" from marker inc 1 st each side, repeat the inc on every 2.5-1.5-1.5-1.5-1-1 cm / ⅞"-½"-½"-½"-⅜"-⅜" a total of 12-15-15-18-21-21 times = 82-88-95-101-107-114 sts. When piece measures 31-31-30-30-28-27 cm / 12¼"-12¼"-11¾"-11¾"-11"-10⅝" from marker (less for the larger sizes because of longer sleeve cap and wider shoulder) bind off for 4 sts each side for sleeve cap and bind off for sleeve cap at the beg of every row: 2 sts 4-5-5-5-4-4 times each side and 1 st 3-3-5-5-11-14 times each side, then bind off 2 sts each side until piece measures 38-39-39-40-40-41 cm / 15"-15¼"-15¼"-15¾"-15¾"-16⅛", now bind off 4 sts each side 1 time, and bind off remaining sts. Piece measures a total of approx 57-58-58-59-59-60 cm / 22½"-22¾"-22¾"-23¼"-23¼"-23⅝". RIGHT SLEEVE: Cast on 58-58-65-65-65-72 sts on needle size 2.5 mm / US 1 with Alpaca. Work rib as follows (first row = RS): 1 edge st, * K3, P4 *, repeat from *-* on 14-14-21-21-21-21 sts, K3, M.2 (= 18 sts), * K3, P4 *, repeat from *-* on the next 21-21-21-21-21-28 sts and 1 edge st. Continue like this up to Arrow-C in M.2. There are now 66-66-73-73-73-80 sts on needle. Change to needle size 3 mm / US 2or3 and continue as follows (from RS): 1 edge st, 17-17-24-24-24-24 stockinette sts, M.2 (= 26 sts), 21-21-21-21-21-28 stockinette sts and 1 edge st. Work 1 vertical repeat of M.2 like this = 58-58-65-65-65-72 sts on needle. Insert a marker, and now measure piece from here. Continue as described for Left Sleeve. ASSEMBLY: Sew shoulder seams. Set in sleeves. Sew sleeve and side seams inside 1 edge st. Sew rib on neck tog mid back and sew to back piece. |
||||||||||||||||||||||||||||||||||
Diagram explanations |
||||||||||||||||||||||||||||||||||
|
||||||||||||||||||||||||||||||||||
 |
||||||||||||||||||||||||||||||||||
 |
||||||||||||||||||||||||||||||||||
Have you finished this pattern?Tag your pictures with #dropspattern #vikingknotssweater or submit them to the #dropsfan gallery. Do you need help with this pattern?You'll find 17 tutorial videos, a Comments/Questions area and more by visiting the pattern on garnstudio.com. © 1982-2026 DROPS Design A/S. We reserve all rights. This document, including all its sub-sections, has copyrights. Read more about what you can do with our patterns at the bottom of each pattern on our site. |
||||||||||||||||||||||||||||||||||


With over 40 years in knitting and crochet design, DROPS Design offers one of the most extensive collections of free patterns on the internet - translated to 17 languages. As of today we count 325 catalogs and 12298 patterns - 12288 of which are translated into English (US/in).
We work hard to bring you the best knitting and crochet have to offer, inspiration and advice as well as great quality yarns at incredible prices! Would you like to use our patterns for other than personal use? You can read what you are allowed to do in the Copyright text at the bottom of all our patterns. Happy crafting!
Post a comment to pattern DROPS 114-8
We would love to hear what you have to say about this pattern!
If you want to leave a question, please make sure you select the correct category in the form below, to speed up the answering process. Required fields are marked *.