
Popular categories
Looking for a yarn?


Comments / Questions (56)
![]() Christine wrote:
Christine wrote:
Est-ce que ces points peuvent être expliqués en français ? merci
01.12.2021 - 13:40DROPS Design answered:
Bonjour Christine, le modele en francais est disponible ICI. Bon tricot!
01.12.2021 - 13:51
![]() Matilda wrote:
Matilda wrote:
Hej! Jag jobbar på första framstycket nu, vid instruktionerna "[...] ökas det 1 m i yttersta m mot mitt fram på varje v totalt 7 ggr och på vartannat v totalt 4 ggr [...] SAMTIDIGT när arb mäter 12-12-13-14-14-15 cm minskas 1 m mot mitt fram, upprepa [...]". Mitt problem är att jag har nått 14 cm och jag ska nu börja minsta antalet maskor i framkant MEN jag har bara hunnit öka varannat varv 2 gånger, inte 4. Har jag gjort något fel? Hur fortsätter jag? Tack på förhand, M
10.07.2019 - 19:44
![]() M. Bauer wrote:
M. Bauer wrote:
Gibt es auch bei Perlmuster eine spezielle Variante, den Faden zu vernähen?
28.03.2014 - 16:26DROPS Design answered:
Liebe Frau Bauer, wir haben beim Vernähen keine spezielle Technik benutzt.
03.04.2014 - 16:34
![]() Grethe wrote:
Grethe wrote:
Denne ser kjempefin ut. Har sett en lik i butikken for 5-600 kroner...
06.11.2009 - 18:54Asencion wrote:
Este tambien me gusta para mi hija
18.10.2009 - 03:15
![]() DROPS Design wrote:
DROPS Design wrote:
Du feller i starten av hver pinne.
07.10.2009 - 11:56
![]() Astrid wrote:
Astrid wrote:
Hei. Har problemer med felling til ermhull på bakstykket. Skal det felles både i begynnelsen og på slutten av pinnen, for å få ermhull på begge sider? Eller feller man bare i begynnelsen av pinnen som oppskriften sier, slik at man feller på annenhver pinne høyre/venstre ermhull? Forstår ikke oppskriften helt på dette punktet.
07.10.2009 - 11:54
![]() Lissi Bech wrote:
Lissi Bech wrote:
Hej Jeg vil gerne have opskrift på denne model i børneopskrift. Med venlig hilsen Lissi Bech
28.09.2009 - 16:20
![]() Drops Design wrote:
Drops Design wrote:
Bonjour Descamps, effectivement le schéma est légèrement différent, en suivant les explications, vous obtiendrez le résultat comme sur la photo. bon tricot !
23.09.2009 - 09:38
![]() Descamps wrote:
Descamps wrote:
Il me semble que le patron ne correspond pas aux explications, les devants sont droits alors que sur la photo, les devants sont en forme de boléro, mais très mode j'aimerais le faire . merci de me répondre amicalement D.DESCAMPS
22.09.2009 - 11:19
|
|
Strawberry Foam |
|
|
|
|
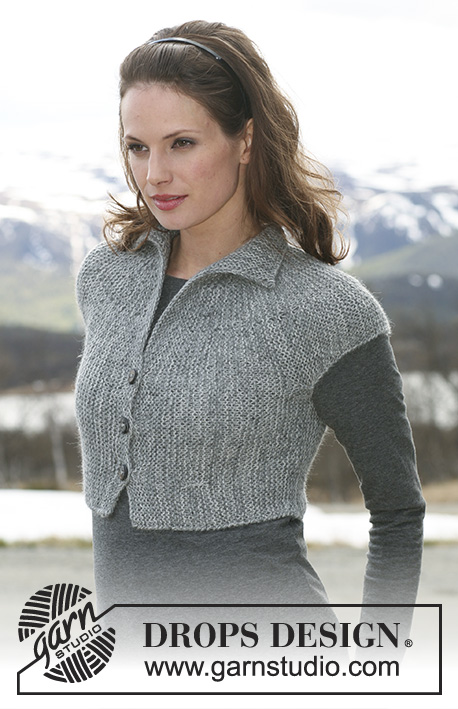
DROPS short waistcoat in seed st in ”Snow”. Size S-XXXL
DROPS 115-9 |
|
|
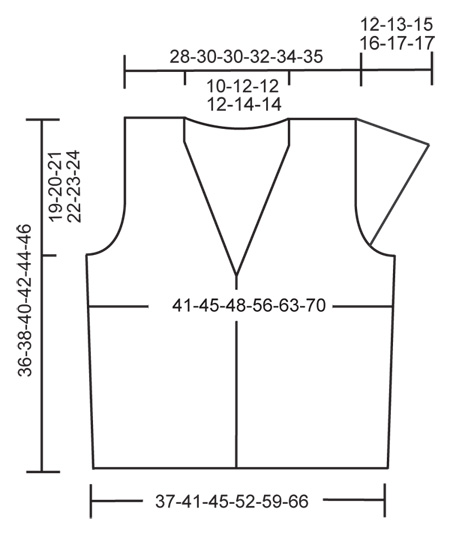
SEED ST: Row 1: * K1, P1 *, repeat from *-*. Row 2: K over P and P over K. Repeat row 2. INCREASING TIP: Make all inc in the outermost st by K 2 sts in this st. DECREASING TIP: Make all dec at beg of row by K/P 2 tog. -------------------------------------------------------- -------------------------------------------------------- BACK PIECE: Worked back and forth on circular needle. Cast on 43-47-51-59-67-75 sts (includes 1 edge st each side) on circular needle size 8 mm / US 11 with Snow. Work seed st – see above. REMEMBER THE GAUGE! When piece measures 8-8-9-9-10-10 cm / 3⅛"-3⅛"-3½"-3½"-4"-4" inc 1 st each side – SEE INCREASING TIP – and repeat the inc when piece measures 13-13-14-14-15-15 cm / 5⅛"-5⅛"-5½"-5½"-6"-6" = 47-51-55-63-71-79 sts. When piece measures 17-18-19-20-21-22 cm / 6¾"-7"-7½"-8"-8¼"-8¾" bind off for armhole each side – SEE DECREASING TIP. Bind off at the beg of every row: 3 sts 1-1-1-2-2-2 times, 2 sts 1-1-2-2-3-4 times and 1 st 3-4-4-4-5-6 times = 31-33-33-35-37-39 sts. When piece measures 34-36-38-40-42-44 cm / 13⅜"-14¼"-15"-15¾"-16½"-17 ¼" bind off the middle 9-11-11-11-13-13 sts for neck and complete each shoulder separately. Bind off 1 st on neckline on next row = 10-10-10-11-11-12 sts left on shoulder. Bind off when piece measures 36-38-40-42-44-46 cm / 14¼"-15"-15¾"-16½"-17¼"-18". LEFT FRONT PIECE: Worked back and forth on circular needle. Cast on 13-16-18-22-27-31 sts (includes 1 edge st at the side) on circular needle size 8 mm / US 11 with Snow. READ ALL OF THE FOLLOWING SECTION BEFORE CONTINUING!. Work seed st, AT THE SAME TIME inc 1 st towards mid front – see INCREASING TIP – on every row a total of 7 times and on every other row a total of 4 times. AT THE SAME TIME when piece measures 8-8-9-9-10-10 cm / 3⅛"-3⅛"-3½"-3½"-4"-4" inc 1 st at the side, and repeat the inc when piece measures 13-13-14-14-15-15 cm / 5⅛"-5⅛"-5½"-5½"-6"-6". AT THE SAME TIME when piece measures 12-12-13-14-14-15 cm / 4¾"-4¾"-5⅛"-5½"-5½"-6" dec 1 st towards mid front for neckline and repeat the dec on every 4-4-5-5-5-6 row a total of 8-10-10-10-12-12 times. AT THE SAME TIME when piece measures 17-18-19-20-21-22 cm / 6¾"-7"-7½"-8"-8¼"-8¾" bind off for armhole at the side as described for back piece = 10-10-10-11-11-12 sts left on shoulder. Continue until piece measures 36-38-40-42-44-46 cm / 14¼"-15"-15¾"-16½"-17¼"-18" and bind off in seed st. RIGHT FRONT PIECE: Like left front piece, but mirrored. SLEEVE: Worked back and forth on circular needle. Cast on 28-30-32-36-38-40 sts (includes 1 edge st each side) on circular needle size 8 mm / US 11 with Snow and continue in seed st. When piece measures 3-3-3-4-4.5-4.5 cm / 1⅛"-1⅛"-1⅛"-1½"-1¾"-1¾" dec 1 st each side for sleeve cap, and repeat the dec on every 4th row a total of 4-4-5-5-5-5 times = 20-22-22-26-28-30 sts left on needle. Now dec 1 st each side at the beg of every row until piece measures 13-13-15-16-17-17 cm / 5⅛"-5⅛"-6"-6¼"-6¾"-6¾". Bind off in seed st. ASSEMBLY: Sew shoulder seams. Sew side seams inside 1 edge st and set in sleeves. Sew buttons to left front band – use crochet border as buttonholes. CROCHET BORDER: Crochet a border with crochet hook size 7 mm/US K/10½ and Snow along the opening of waistcoat as follows: *1 sc, 3 ch, 1 dc in first ch, skip approx 2 cm / ¾"*, repeat from *-*, and finish with 1 sl st in first sc from beg of round. Crochet a border round sleeve edges as follows: *1 sc, 2 ch, skip approx 2 cm / ¾"*, repeat from *-*, and finish with 1 sl st in first sc from beg of round. |
|
 |
|
Have you finished this pattern?Tag your pictures with #dropspattern or submit them to the #dropsfan gallery. Do you need help with this pattern?You'll find 19 tutorial videos, a Comments/Questions area and more by visiting the pattern on garnstudio.com. © 1982-2026 DROPS Design A/S. We reserve all rights. This document, including all its sub-sections, has copyrights. Read more about what you can do with our patterns at the bottom of each pattern on our site. |


With over 40 years in knitting and crochet design, DROPS Design offers one of the most extensive collections of free patterns on the internet - translated to 17 languages. As of today we count 324 catalogs and 12290 patterns - 12280 of which are translated into English (US/in).
We work hard to bring you the best knitting and crochet have to offer, inspiration and advice as well as great quality yarns at incredible prices! Would you like to use our patterns for other than personal use? You can read what you are allowed to do in the Copyright text at the bottom of all our patterns. Happy crafting!
Post a comment to pattern DROPS 115-9
We would love to hear what you have to say about this pattern!
If you want to leave a question, please make sure you select the correct category in the form below, to speed up the answering process. Required fields are marked *.