
Popular categories
Looking for a yarn?


Comments / Questions (69)
Marta wrote:
Buenos días podría decirme para la talla L con cuantos puntos y como se dividen no entiendo algunas abreviaciones y no se puede visualizar bien por el cuello lo tapa ademas se podría mostrar la parte de atras porfavor tengo todo para empezar me encanta el modelo seria su agradecida marta.
28.07.2016 - 15:10DROPS Design answered:
Hola Marta, la talla L comienza con 119 puntos. Todas las abreviaciones se pueden consultar en el apartado Tips y Ayuda en la parte superior de la página en la pestaña Glosario. Al ser un patrón antiguo no se pueden añadir más fotos, diagramas o comentarios de los diseñadores.
31.07.2016 - 15:39
![]() Osmont wrote:
Osmont wrote:
Pourriez-vous m'expliquer comment réaliser le rang après les 20cm de cotes, pour moi il n'y a pas assez de mailles pour effectuer ce point 66 fois à la suite ? S'agit-il d'un nombre de rang ? Donc à quel endroit du tricot réalise t-on ce point ?
20.04.2016 - 18:36DROPS Design answered:
Bonjour Mme Osmont, effectivement, il s'agissait d'une erreur, on répète de *-* sur les 66 m suivantes et non 66 fois au total. Merci. Bon tricot!
21.04.2016 - 08:38SILVIA OLAYA wrote:
Buenas noches desde Colombia, me gusta mucho la ruana , tengo una inquietud ya que la estoy realizando, llegue a la disminución parte delantera y no se como realizarla hacia ambos lados. le agradezco su aclaración.
04.03.2016 - 01:12DROPS Design answered:
Hola Silvia, las dism se hacen a ambos lados de los marcapuntos como te dice en el tip para las disminuciones antes de empezar el patrón y siempre por el Lado Derecho de la labor: la disminución se comienza 2 pts antes del MP y se trabaja deslizando 1 pt como de derecho, trabajando 1 d. y pasando el pt deslizado por encima. Después del MP se trabajan 2 pts juntos de derecho (así se han disminuido 2 pts a la altura del MP)
06.03.2016 - 10:49
![]() RGC wrote:
RGC wrote:
Hola, He llegado a los 20 cm de labor y estoy bloqueada. La labor empieza con 111 puntos ( talla L) y al final de los 20 cm, el patrón dice que debe haber 101. Sin embargo, no he visto disminuciones indicadas en el patrón. Y como tengo los mismos puntos que al principio, los marcadores tampoco me coinciden. Alguien puede ayudarme? Gracias
30.01.2016 - 23:28DROPS Design answered:
Hola. No hay dism y seguimos trabajando con 111 pts, es decir, para la talla L colocamos el 1er MP después de 18 pts, 2º MP - después de 42 pts ( contados desde el principio de la fila), 3er MP - después de 69 pts y 4º MP - después de 93 pts, quedan 18 pts restantes después del último MP hasta final de la fila ( 93 + 18 = 111 pts)
01.02.2016 - 10:22
![]() Maartje wrote:
Maartje wrote:
Vriendelijk bedankt!
11.01.2016 - 16:33
![]() Maartje wrote:
Maartje wrote:
Hallo, is de omslag tussen de drie recht samen breien en de drie averecht een meerdering? Vriendelijk bedankt.
30.12.2015 - 21:22DROPS Design answered:
Hoi Maartje. Ja, dat klopt
05.01.2016 - 16:01
![]() Paola wrote:
Paola wrote:
Grazie mille per la risposta. È stata molto gentile. Buona giornata
23.11.2015 - 14:33
![]() Paola wrote:
Paola wrote:
Buongiorno, sono la Paola che ha scritto prima. Vorrei fare questo bellissimo modello, mi può consigliare anche una lana che si possa lavorare con i ferri del numero 5 oppure 6. La ringrazio tantissimo. Buona giornata
23.11.2015 - 05:52DROPS Design answered:
Buongiorno Paola, questo modello è stato disegnato apposta per essere lavorato con dei ferri grossi e portato sopra le giacche: lavorandolo con dei ferri più piccoli e lana più sottile non darebbe lo stesso effetto, in ogni caso può provare ad usare dei filati che appartengono al gruppo C come Nepal, Big Merino o Alaska, ma in ogni caso dovrebbe rifare il campione e riprogettare tutto il modello. Buon lavoro!
23.11.2015 - 13:48
![]() Paola wrote:
Paola wrote:
Salve, mi piacerebbe fare questo magnifico scialle per la mia mamma. Però lo vorrei fare con la lana più fine. Con ferri del numero 5 oppure 6. Come posso calcolare le maglie occorrenti? La ringrazio anticipatamente e la saluto cordialmente. Buona giornata
22.11.2015 - 08:41DROPS Design answered:
Buongiorno Paola, questo modello è stato disegnato apposta per essere lavorato con dei ferri grossi e portato sopra le giacche: lavorandolo con dei ferri più piccoli e lana più sottile non darebbe lo stesso effetto, in ogni caso può provare ad usare dei filati che appartengono al gruppo C come Nepal, Big Merino o Alaska, ma in ogni caso dovrebbe rifare il campione e riprogettare tutto il modello. Buon lavoro!
23.11.2015 - 13:48
![]() Els Goessen Hilders wrote:
Els Goessen Hilders wrote:
Ik heb hem in gebruik vanwege de rolstoel erg handig groetjes els
11.11.2015 - 19:45
|
|
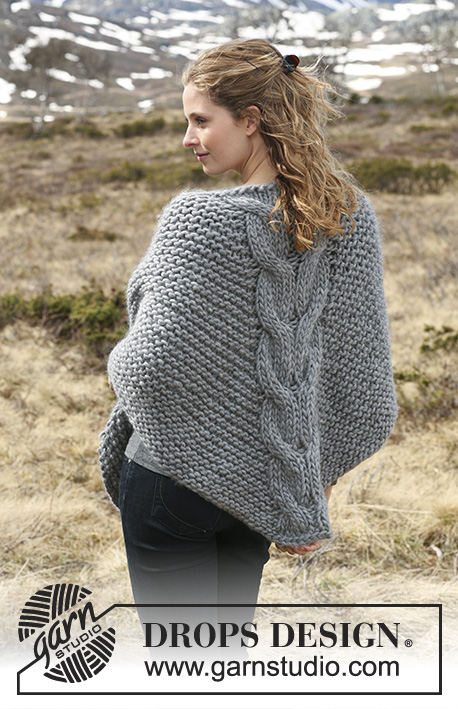
Novelette |
|
|
|
|
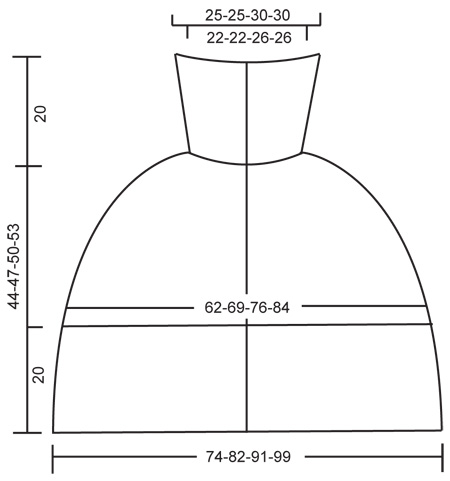
Short DROPS poncho in ”Polaris” with buttons at front, large collar and rib. Size S – XXXL.
DROPS 116-19 |
|
|
GARTER ST (back and forth on needle): K all rows. DECREASING TIP: Make all dec from RS. Dec as follows BEFORE marker: Slip 1 st as if to K , K1, psso. Dec as follows AFTER marker: K2 tog. -------------------------------------------------------- -------------------------------------------------------- PONCHO: Worked back and forth on circular needle from mid front. Cast on 107-119-131-143 sts (includes 4 front band sts each side towards mid front) on circular needle size 15 mm / US 19 with Polaris. P 1 row from WS and continue in rib as follows: 4 front band sts in GARTER ST – see above, * K3, P3 *, repeat from *-* and finish with K3 and 4 front band sts in garter st. Continue like this until piece measures approx 20 cm / 8". Now work next row from RS as follows: 4 front band sts in garter st, * K3 tog, 1 YO, P3 *, repeat from *-* on a total of 48-54-60-66 sts, 1 YO, K3 tog, 1 YO, * P3, 1 YO, K3 tog * repeat from *-* on a total of 48-54-60-66 sts, and finish with 4 front band sts in garter st. There are now 91-101-111-121 sts on needle. Insert 4 markers in piece as follows: MARKER-1 after 14-16-18-20 sts, MARKER-2 after a total of 34-38-42-46 sts, MARKER-3 after a total of 57-63-69-75 sts, MARKER-4 after a total of 77-85-93-101 sts, = 14-16-18-20 sts left after last marker. Continue in stockinette st with front bands in garter st. REMEMBER THE GAUGE! When piece measures approx 28 cm / 11" dec 1 sts each side of all markers on next row from RS – SEE DECREASING TIP! (= 8 dec). Repeat the dec on every other row a total of 6-7-8-9 times = 43-45-47-49 sts. When piece measures approx 44-47-50-53 cm / 17¼"-18½"-19¾"-21" dec 4-6-1-3 sts evenly on next row from RS (do not dec on front bands) = 39-39-46-46 sts. P 1 row from WS and continue in rib as follows (as seen from RS): 4 front band sts in garter st, * P3, K4 *, repeat from *-* and finish with P3 and 4 front band sts in garter st. Continue with K over K and P over P - AT THE SAME TIME on next row from RS dec all K4 to K3 by K tog the 2 middle sts = 35-35-41-41 sts. Continue with K over K and P over P. When rib measures approx 12 cm / 4¾" inc all K3 to K4 (as seen from RS) by K 2 sts in the middle st = 39-39-46-46 sts. Continue until rib measures approx 20 cm / 8" and bind off loosely with K over K and P over P. ASSEMBLY: Sew buttons to left front band evenly distributed – place the top one at the start of collar and the bottom one in transition between rib and stockinette st. As the sts are so large, use sts on right front band as buttonholes. |
|
 |
|
Have you finished this pattern?Tag your pictures with #dropspattern or submit them to the #dropsfan gallery. Do you need help with this pattern?You'll find 15 tutorial videos, a Comments/Questions area and more by visiting the pattern on garnstudio.com. © 1982-2026 DROPS Design A/S. We reserve all rights. This document, including all its sub-sections, has copyrights. Read more about what you can do with our patterns at the bottom of each pattern on our site. |


With over 40 years in knitting and crochet design, DROPS Design offers one of the most extensive collections of free patterns on the internet - translated to 17 languages. As of today we count 325 catalogs and 12298 patterns - 12288 of which are translated into English (US/in).
We work hard to bring you the best knitting and crochet have to offer, inspiration and advice as well as great quality yarns at incredible prices! Would you like to use our patterns for other than personal use? You can read what you are allowed to do in the Copyright text at the bottom of all our patterns. Happy crafting!
Post a comment to pattern DROPS 116-19
We would love to hear what you have to say about this pattern!
If you want to leave a question, please make sure you select the correct category in the form below, to speed up the answering process. Required fields are marked *.