
Popular categories
Looking for a yarn?


Comments / Questions (67)
![]() Duanenor wrote:
Duanenor wrote:
Naturally, you do should do some heavy lifting yourself: search our photos in this Nude Granny Pictures category, open them in new windowpane, maybe search a bit for a particular photo - but since they’re all organized and categorized right here, it’s safe to state that the worst component is already over!
20.07.2024 - 22:32
![]() Magdalena wrote:
Magdalena wrote:
Buenas tardes el.poncho se comienza de arriba para abajo o lo contrario de abajo para arriba lo busque el paso a paso pero no lo encuentro para orientarme me gusta este poncho gracias
29.04.2024 - 21:25DROPS Design answered:
Hola Magdalena, comienzas el patrón montando en la parte inferior del poncho y trabajando de ida y vuelta y terminas con los 20cm del elástico del cuello. Por lo tanto, el poncho se trabaja de abajo arriba.
05.05.2024 - 20:10
![]() De Los Angeles Vergara Manzano wrote:
De Los Angeles Vergara Manzano wrote:
Hola, me gustó mucho el poncho, nunca he seguido instrucciones escritas, las leí y parece fácil, si algo me falla me pueden Ayudar?
21.04.2024 - 10:07
![]() María Dolores wrote:
María Dolores wrote:
Me gusta para mí yo tengo talla 54 cuanto puntos necesito
06.04.2022 - 12:10DROPS Design answered:
Hola María Dolores, nosotros no trabajamos por las tallas numeradas, sino que por las medidas en cm, que asignamos a una talla con letra. En principio, para una talla 54 podrías usar las instrucciones para la tercera talla (XL-XXL). Si quisieras un poncho más ancho podrías trabajar la última talla (3XL). Para esto, tendrías que montar o 131 puntos (XL-XXL) o 143 puntos (3XL), siempre y cuando tengas la tensión correcta. Comprueba que la talla tiene tu tamaño deseado, mirando las medidas en el diagrama bajo el patrón.
06.04.2022 - 20:11
![]() Maria wrote:
Maria wrote:
Las agujas 15mm viene siendo cuanto en medidas peruana?
10.06.2021 - 06:29DROPS Design answered:
Hola María, se usan agujas de 15mm o US19.
13.06.2021 - 19:10
![]() Wise Mary wrote:
Wise Mary wrote:
Can I get crochet instructions for this pattern please
01.03.2021 - 15:51DROPS Design answered:
Dear Mrs Wise, this pattern is only available as a knitted version - please find all our crocheted patterns for ponchos here. Happy crocheting!
01.03.2021 - 16:10
![]() Silvia wrote:
Silvia wrote:
Hola si quiero hacerlo para niña de 3 _4 años cuantos puntos tengo que meter?? Y cuanto tiene que medir el cuello??!
06.12.2020 - 21:27DROPS Design answered:
Hi Sulvia, to get a smaller poncho you will have to adjust the number of stitches to the new size. Should you need any individual assistance, please contact the store where you bought the yarn, even per mail or telephone. Happy knitting!
07.12.2020 - 09:35
![]() Isabel wrote:
Isabel wrote:
Hola soy Isabel. Me gustaría ayuda para hacerlo en 2 agujas xq no sé usar las circulares
24.07.2020 - 01:03DROPS Design answered:
Hola Isabel. Por su elevado número de puntos, se recomienda usar una aguja circular. Con la aguja circular, los puntos se trabajan de la misma manera que con las agujas rectas. Si no tienes posibilidad de comprar una aguja circular, puedes intentar hacer el modelo con agujas rectas (en este caso hay que dividir los puntos para los delanteros y la espalda y añadir los puntos orillo para las costuras). Aquí tienes un tutorial: https://www.garnstudio.com/lesson.php?id=13&cid=23
16.08.2020 - 16:40
![]() Susana wrote:
Susana wrote:
Quiero hacerla en talle L pero no encuentro la explicación o patron. Me encanta.
04.07.2020 - 03:56DROPS Design answered:
Hola Susana. Todos los modelos de DROPS está preparados para varias tallas. Para la talla L tienes que comenzar con 119 puntos. Si hay varios números de puntos/veces, esto significa que para la talla S/M (en este modelo) es el primer número, para la talla L el 2º, etc. Cuando solo hay un número es igual para todas las tallas.
16.08.2020 - 16:56
![]() Andreia Aparecida De Almeida Da Cruz wrote:
Andreia Aparecida De Almeida Da Cruz wrote:
Olá sou iniciante gostaria de receber um gráfico desta peça do início ao fim. Obrigada
07.06.2020 - 21:56
|
|
Novelette |
|
|
|
|
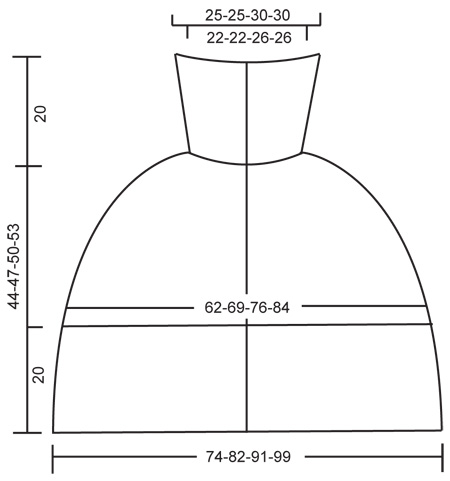
Short DROPS poncho in ”Polaris” with buttons at front, large collar and rib. Size S – XXXL.
DROPS 116-19 |
|
|
GARTER ST (back and forth on needle): K all rows. DECREASING TIP: Make all dec from RS. Dec as follows BEFORE marker: Slip 1 st as if to K , K1, psso. Dec as follows AFTER marker: K2 tog. -------------------------------------------------------- -------------------------------------------------------- PONCHO: Worked back and forth on circular needle from mid front. Cast on 107-119-131-143 sts (includes 4 front band sts each side towards mid front) on circular needle size 15 mm with Polaris. P 1 row from WS and continue in rib as follows: 4 front band sts in GARTER ST – see above, * K3, P3 *, repeat from *-* and finish with K3 and 4 front band sts in garter st. Continue like this until piece measures approx 20 cm. Now work next row from RS as follows: 4 front band sts in garter st, * K3 tog, 1 YO, P3 *, repeat from *-* on a total of 48-54-60-66 sts, 1 YO, K3 tog, 1 YO, * P3, 1 YO, K3 tog * repeat from *-* on a total of 48-54-60-66 sts, and finish with 4 front band sts in garter st. There are now 91-101-111-121 sts on needle. Insert 4 markers in piece as follows: MARKER-1 after 14-16-18-20 sts, MARKER-2 after a total of 34-38-42-46 sts, MARKER-3 after a total of 57-63-69-75 sts, MARKER-4 after a total of 77-85-93-101 sts, = 14-16-18-20 sts left after last marker. Continue in stocking st with front bands in garter st. REMEMBER THE KNITTING TENSION! When piece measures approx 28 cm dec 1 sts each side of all markers on next row from RS – SEE DECREASING TIP! (= 8 dec). Repeat the dec on every other row a total of 6-7-8-9 times = 43-45-47-49 sts. When piece measures approx 44-47-50-53 cm dec 4-6-1-3 sts evenly on next row from RS (do not dec on front bands) = 39-39-46-46 sts. P 1 row from WS and continue in rib as follows (as seen from RS): 4 front band sts in garter st, * P3, K4 *, repeat from *-* and finish with P3 and 4 front band sts in garter st. Continue with K over K and P over P - AT THE SAME TIME on next row from RS dec all K4 to K3 by K tog the 2 middle sts = 35-35-41-41 sts. Continue with K over K and P over P. When rib measures approx 12 cm inc all K3 to K4 (as seen from RS) by K 2 sts in the middle st = 39-39-46-46 sts. Continue until rib measures approx 20 cm and cast off loosely with K over K and P over P. ASSEMBLY: Sew buttons to left front band evenly distributed – place the top one at the start of collar and the bottom one in transition between rib and stocking st. As the sts are so large, use sts on right front band as buttonholes. |
|
|
|
Have you finished this pattern?Tag your pictures with #dropspattern or submit them to the #dropsfan gallery. Do you need help with this pattern?You'll find 15 tutorial videos, a Comments/Questions area and more by visiting the pattern on garnstudio.com. © 1982-2025 DROPS Design A/S. We reserve all rights. This document, including all its sub-sections, has copyrights. Read more about what you can do with our patterns at the bottom of each pattern on our site. |


With over 40 years in knitting and crochet design, DROPS Design offers one of the most extensive collections of free patterns on the internet - translated to 17 languages. As of today we count 314 catalogues and 11822 patterns translated into English (UK/cm).
We work hard to bring you the best knitting and crochet have to offer, inspiration and advice as well as great quality yarns at incredible prices! Would you like to use our patterns for other than personal use? You can read what you are allowed to do in the Copyright text at the bottom of all our patterns. Happy crafting!
Post a comment to pattern DROPS 116-19
We would love to hear what you have to say about this pattern!
If you want to leave a question, please make sure you select the correct category in the form below, to speed up the answering process. Required fields are marked *.