DROPS Snow
DROPS Snow
100% Wool
from 2.65 $ /50g
DROPS Puddel
DROPS Puddel
94% Mohair, 6% Polyester
Discontinued
find alternatives
DROPS SS24
DROPS 116-13
DROPS design: Pattern no EE-274.

Size: S/M - L - XL/XXL - XXXL
Finished measurements:
Hem: 126-142-158-182 cm / 49½"-55¾"-62"-71½"
Length: 44-47-50-53 cm / 17¼"-18½"-19¾"-21"

Materials: DROPS SNOW from Garnstudio
250-300-350-400 g color no 14, dark gray.
And use: DROPS PUDDEL from Garnstudio
200-250-300-350 g color no 08, dark gray.

DROPS CIRCULAR NEEDLE (80 cm / 32") size 9 mm/US 13 – or size needed to get 10 sts x 14 rows in stockinette st with Snow = 10 x 10 cm / 4" x 4".
DROPS CIRCULAR NEEDLE (80 cm / 32") size 7 mm/US 10½ – or size needed to get 10 sts x 14 rows in stockinette st with Puddel = 10 x 10 cm / 4" x 4".

DROPS Buffalo horn buttons no 538: 5 pcs.

-------------------------------------------------------

Alternative Yarn – See how to change yarns here
Yarn Groups A to F – Use the same pattern and change the yarn here
Yarn usage using an alternative yarn – Use our yarn converter here

-------------------------------------------------------

DROPS Snow
DROPS Snow
100% Wool
from 2.65 $ /50g
DROPS Puddel
DROPS Puddel
94% Mohair, 6% Polyester
Discontinued
find alternatives

Pattern instructions

NOTE: This pattern is written in American English. All measurements in charts are in cm. For conversion from inches to cm - click here. There are different terms for crocheting in American and British English. If this pattern includes crochet, click for "crochet terms" here. For this pattern in British English, please click here.
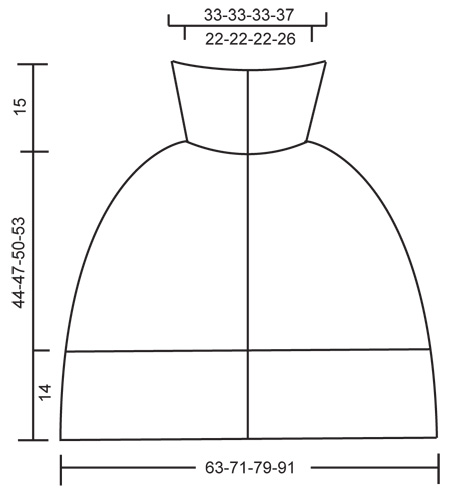
GARTER ST (back and forth on needle): K all rows.
--------------------------------------------------------
--------------------------------------------------------
PONCHO:
Worked back and forth on circular needle from mid front. Cast on 131-147-163-186 sts (includes 5 front band sts each side towards mid front) on circular needle size 9 mm / US 13 with Puddel. Change to circular needle size 7 mm / US 10 ½ and continue in GARTER ST – see above – for 14 cm / 5½". Now slip 5 front band sts each side on a stitch holder = 121-137-153-176 sts left on needle. Change to circular needle size 9 mm / US 13 and Snow and continue in stockinette st. REMEMBER THE GAUGE!
When piece measures 18 cm / 7" insert 8 markers in piece as follows: First marker after 8-9-10-11 sts, then 15-17-19-22 sts between each marker, = 8-9-10-11 sts left after the last marker. On next row from RS dec 1 st after all markers by K2 tog. Repeat the dec on every 6th row a total of 3 times, then on every 4th row a total of 3 times and then on every other row a total of 4-6-8-10 times – NOTE: Dec alternately before and after all markers = 41-41-41-48 sts. When piece measures 44-47-50-53 cm / 17¼"-18½"-19¾"-21" slip sts on a stitch holder.

LEFT FRONT BAND:
Slip sts from stitch holder on left front band back on circular needle size 7 mm / US 10½. Work garter st back and forth with Puddel until front band fits poncho – now slip sts on the same stitch holder as sts at the top of piece.

RIGHT FRONT BAND:
Like left front band, but make 4 buttonholes. 1 BUTTONHOLE = bind off middle sts and cast on 1 new st on next row. Make buttonholes when piece measures (from cast on row):
SIZE S/M: 15, 23, 31 and 39 cm / 6", 9" 12¼" and 15¼".
SIZE L: 15, 24, 32 and 41 cm / 6", 9½", 12½" and 16⅛".
SIZE XL/XXL: 15, 24, 33 and 42 cm / 6", 9½", 13" and 16½".
SIZE XXXL: 15, 25, 34 and 44 cm / 6", 9½", 13⅜" and 17¼".
The last buttonhole is made on collar.

COLLAR:
Slip all sts from stitch holder on circular needle size 7 mm / US 10½ = 51-51-51-58 sts. Work garter st back and forth on needle with Puddel. When collar measures 2 cm / ¾" make 1 buttonhole in line with the others on front band. When collar measures 5 cm / 2" inc 10 sts evenly = 61-61-61-68 sts. When collar measures 10 cm / 4" inc 10 sts again = 71-71-71-78 sts. Bind off loosely when collar measures 15 cm / 6".

ASSEMBLY:
Sew front bands to poncho in outer loops of sts. Sew on buttons.

Diagram

All measurements in charts are in cm.

diagram measurements
Do you have a question? See a list of frequently asked questions (FAQ)

Knitting tension is what determines the final measurements of your work, and is usually measured per 10 x 10 cm. It is provided like so: number of stitches in width x number of rows in height - eg: 19 stitches x 26 rows = 10 x 10 cm.

The knitting tension is very individual; some people knit/crochet loosely while others work tightly. You adjust the knitting tension with the needle size, which is why the suggested needle size only serve as a guide! You need to adjust this (up or down) to ensure that YOUR knitting tension matches the knitting tension provided in the pattern. If you work with a different knitting tension than provided you will have a different yarn consumption, and your work will have different measurements than what the pattern suggests.

The knitting tension also determines which yarns can replace each other. As long as you achieve the same knitting tension you can replace one yarn with another.

See DROPS lesson: How to measure your tension/gauge

See DROPS video: How to make a gauge tension swatch

The required amount of yarn is provided in grams, eg: 450 g. To calculate how many balls you’ll need you first need to know how many grams are in 1 ball (25g, 50g or 100g). This information is available if you click on the individual yarn quality on our pages. Divide the amount required with the amount of each ball. For example, if each ball is 50g (the most common amount), the calculation will be as follows: 450 / 50 = 9 balls.

The important thing when changing from one yarn to another is that the knitting/crochet tension remains the same. This is so that the measurements of the finished piece will be the same as on the sketch provided. It is easier to achieve the same knitting tension using yarns from the same yarn group. It is also possible to work with multiple strands of a thinner yarn to achieve the knitting tension of a thicker one. Please try our yarn converter. We recommend you to always work a test swatch.

Please NOTE: when changing yarn the garment might have a different look and feel to the garment in the photo, due to individual properties and qualities of each yarn.

See DROPS lesson: Can I use a different yarn than the one mentioned in the pattern?

All our yarns are categorised into yarn groups (from A to F) according to thickness and knitting tension – group A contains the thinnest yarns and group F the thickest. This makes it easier for you to find alternative yarns to our patterns, should you wish to switch yarn. All yarns within the same group have a similar knitting tension and can easily replace each other. However, different yarn qualities have different structures and properties which will give the finished work a unique look and feel.

Click here for an overview of the yarns in each yarn group

At the top of all our patterns you’ll find a link to our yarn converter, which is a helpful tool should you wish to use a different yarn than suggested. By filling in the yarn quality you wish to replace, the amount (in your size) and number of strands, the converter will present good alternative yarns with the same knitting tension. Additionally it will tell you how much you’ll require in the new qualities and whether you’ll need to work with multiple strands. Most skeins are 50g (some are 25g or 100g).

If the pattern is worked with multiple colours, every colour will have to be converted separately. Similarly, if the pattern is worked with several strands of different yarns (for example 1 strand Alpaca and 1 strand Kid-Silk) you will have to find alternatives for each, individually.

Click here to see our yarn converter

Since different yarns have different qualities and textures we have chosen to keep the original yarn in our patterns. However, you can easily find options among our available qualities by using our yarn converter, or simply pick a yarn from the same yarn group.

It is possible that some retailers still have discontinued yarns in stock, or that someone has a few skeins at home that they would like to find patterns for.

The yarn converter will provide both alternative yarn as well as required amount in the new quality.

If you think it's hard to decide what size to make, it can be a good idea to measure a garment you own already and like the size of. Then you can pick the size by comparing those measures with the ones available in the pattern's size chart.

You'll find the size chart at the bottom of the pattern.

See DROPS lesson: How to read size chart

The needle size provided in the pattern serves only as a guide, the important thing is to follow the knitting tension. And since knitting tension is very individual, you will have to adjust the needle size to ensure that YOUR tension is the same as in the pattern – maybe you’ll have to adjust 1, or even 2 needle sizes, up or down to achieve the correct tension. For this, we recommend that you work test swatches.

Should you work with a different knitting tension than the one provided, the measurements of the finished garment might deviate from the measurement sketch.

See DROPS lesson: How to measure your tension/gauge

See DROPS video: How to make a gauge tension swatch

Working a garment top-down provides more flexibility and room for personal adjustment. For example it is easier to try the garment on while working, as well as making adjustments to length of yoke and shoulder caps.

The instructions are carefully explaining every step, in the correct order. Diagrams are adjusted to the knitting direction and are worked as usual.

The diagram depicts all rows/rounds, and every stitch seen from the right side. It is read from bottom to top, from right to left. 1 square = 1 stitch.

When working back and forth, every other row is worked from the right side and every other row is worked from the wrong side. When working from the wrong side, the diagram will have to be worked reversed: from left to right, knit stitches are purled, purl stitches are knit etc.

When working in the round every round is worked from the right side and the diagram are worked from right to left on all rounds.

See DROPS lesson: How to read knitting diagrams

The diagram depicts all rows/rounds, and every stitch seen from the right side. It is worked from bottom to top, from right to left.

When working back and forth every other row is worked from the right side: from right to left and every other row is worked from the wrong side: from left to right.

When working in the round, every row in the diagram are worked from the right side, from right to left.

When working a circular diagram you start in the middle and work your way outwards, counter clockwise, row by row.

The rows usually start with a given number of chain stitches (equivalent to the height of the following stitch), this will either be depicted in the diagram or explained in the pattern.

See DROPS lesson: How to read crochet diagrams

Instructions for working several diagrams after each other on the same row/round, will often be written like so: “work A.1, A.2, A.3 a total of 0-0-2-3-4 times". This means you work A.1 once, then A.2 is worked once, and A.3 is repeated (in width) the number of times provided for your size – in this case like so: S = 0 times, M = 0 times, L=2 times, XL= 3 times and XXL = 4 times.

The diagrams are worked as usual: begin with the first row in A.1, then work the first row in A.2 etc.

See DROPS lesson: How to read knitting diagrams

See DROPS lesson: How to read crochet diagrams

The total width of the garment (from wrist-to-wrist) will be larger in the larger sizes, despite the actual sleeves being shorter. The larger sizes have longer sleeve caps and wider shoulders, so there will be a good fit in all sizes.

The measurement sketch/schematic drawing provides information regarding the full length of the garment. If it’s a jumper or a jacket the length is measured from the highest point on the shoulder (usually closest to the neckline), and straight down to the bottom of the garment. It is NOT measured from the tip of shoulder. Similarly, the length of yoke is measured from the highest point on the shoulder and down to where yoke is split into body and sleeves.

See DROPS lesson: How to read a schematic drawing

Diagrams are often repeated on the round or in height. 1 repeat is the diagram the way it appears in the pattern. If it says to work 5 repeats of A.1 in the round, then you work A.1 a total of 5 times after/next to each other in the round. If it says to work 2 repeats of A.1 vertically/in height you work the entire diagram once, then begin again at the start and work the entire diagram one more time.

Chain stitches are slightly narrower than other stitches and to avoid working the cast-on edge too tight, we simply chain more stitches to begin with. The stitch count will be adjusted on the following row to fit the pattern and measurement sketch.

The rib edge is more elastic and will contract slightly compared to, for example, stocking stitch. By increasing before the rib edge, you avoid a visible difference in width between the rib edge and the rest of the body.

It’s very easy to cast off too tightly, and by making yarn overs while casting off (and simultaneously casting these off) you avoid a too tight cast off edge.

See DROPS video: How to bind off with yarn overs (yo)

To achieve an even increase (or decrease) you can increase on, for example: every 3rd and 4th row alternately, like so: work 2 rows and increase on the 3rd row, work 3 rows and increase on the 4th. Repeat this until the increase is complete.

See DROPS lesson: Increase or decrease 1 st on every 3rd and 4th row alternately

Should you prefer to work in the round instead of back and forth, you may of course adjust the pattern. You’ll need to add steeks mid-front (usually 5 stitches), and follow the instructions. When you would normally turn and work from the wrong side, simply work across the steek and continue in the round. At the end you’ll cut the piece open, pick up stitches to work bands, and cover the cut edges.

See DROPS video: How to knit steeks and cut open

Should you prefer to work back and forth instead of in the round, you may of course adjust the pattern so you work the pieces separately and then assemble them at the end. Divide the stitches for the body in 2, add 1 edge stitch in each side (for sewing) and work the front and back pieces separately.

See DROPS lesson: Can I adapt a pattern for circular needles into straight needles?

Pattern repeats can vary slightly in the different sizes, in order to get the correct proportions. If you’re not working the exact same size as the garment in the photo, yours might deviate slightly. This has been carefully developed and adjusted so that the complete impression of the garment is the same in all sizes.

Make sure to follow instructions and diagrams for your size!

If you have found a pattern you like which is available in women’s size it’s not very difficult to convert it to men’s size. The biggest difference will be the length of sleeves and body. Start working on the women size that you think would fit across the chest. The additional length will be worked right before you cast off for the armhole/sleeve cap. If the pattern is worked top-down you can add the length right after the armhole or before the first decrease on sleeve.

Regarding additional yarn amount, this will depend on how much length you add, but it is better with a skein too many than too few.

All yarns will have excess fibres (from production) that might come off as lint or shedding. Brushed yarns (ie hairier yarns) have more of these loose, excess fibres, causing more shedding.

Shedding also depends on what is worn under or over the garment, and whether this pulls at the yarn fibres. It’s therefore not possible to guarantee that there will be no shedding

Below are some tips on how to get the best result when working with hairier yarns:

1. When the garment is finished (before you wash it) shake it vigorously so the looser hairs come off. NOTE: do NOT use a lint roller, brush or any method that pulls at the yarn.

2. Place the garment in a plastic bag and put it in your freezer - the temperature will cause the fibres to become less attached to each other, and excess fibres will come off easier.

3. Leave in the freezer for a few hours before taking it out and shaking it again.

4. Wash the garment according to the instructions on the yarn label.

Pilling is a natural process that happens to even the most exclusive of fibers. It's a natural sign of wear and tear that is hard to avoid, and that is most visible in high friction areas of your garment like a sweater's arms and cuffs.

You can make your garment look as new by removing the pilling, using a fabric comb or a pill/lint remover.

Still can't find the answer you need? Then scroll down and leave your question so one of our experts can try to help you. This will be done normally within 5 to 10 working days.
In the meantime, you can read the questions and answers that others have left to this pattern or join the DROPS Workshop on Facebook to get help from fellow knitters/crocheters!

Post a comment to pattern DROPS 116-13

We would love to hear what you have to say about this pattern!

If you want to leave a question, please make sure you select the correct category in the form below, to speed up the answering process. Required fields are marked *.

Comments / Questions (23)

country flag Fraülein Von S wrote:

Tycker mönstret ska heta Highlands (alternativt (cosy) in /for the Highlands)

01.03.2024 - 10:01

country flag Noëlle Kirscher wrote:

Bonjour, Juste une précision : pour tricoter le pull "lavender smiles" en taille 2 ans il me faut bien 2 pelotes de laine drops air, et pour la taille 5/6ans, 2 pelotes également Merci pour votre reponse Cordialement

31.01.2024 - 11:31

country flag Inge wrote:

Hallo, Ich stricke dieses Teil mit zwei Farben Snow. Darum sind beide Maschenproben mit Nadel 9 korrekt. Soll ich dann mit Nadel 11 aufsetzen und dann auf 9 wechseln? Oder die Anleitung folgen: mit 9 aufsetzen und dann auf 7 wechseln? Danke und Grüße, Inge

11.10.2023 - 17:20

DROPS Design answered:

Liebe Inge, behalten Sie Nadel 9, so stimmt die Maschenprobe (Nadelgröße bei Paddel ist verschieden um die gleiche Maschenprobe wie mit Snow zu haben). Viel Spaß beim stricken!

12.10.2023 - 09:09

country flag Marie wrote:

Bonjour, est-ce qu'il faut alterner les diminution avant et après chaque marqueur a tous les 6 rangs ou sur un même rang.

20.03.2018 - 16:29

DROPS Design answered:

Bonjour Marie, vous diminuez la 1ère fois après chaque marqueur, la 2ème fois avant chaque marqueur, la 3ème fois après chaque marqueur, la 4ème fois avant chaque marqueur et ainsi de suite. Vous diminuez 8 m à chaque rang de diminutions et tricotez 5 rangs entre chaque rang de diminutions. Bon tricot!

20.03.2018 - 16:39

country flag Marie-France wrote:

Bonjour, a 18 cm est- ce qu'on commence toute suite les diminutions ou on fait encore 6 rangs avant de commencer les diminutions.??

20.03.2018 - 10:08

DROPS Design answered:

Bonjour Marie-France, à 18 cm, on place les marqueurs (sans tricoter) et au rang suivant sur l'endroit on commence les diminutions, et on les répètes encore 2 fois tous les 6 rangs (= 3 fois au total) puis 3 fois tous les 4 rangs et 4-10 fois (cf taille) tous les 2 rangs. On diminue d'abord après chaque marqueur (1ères diminutions) puis avant chaque marqueur (2èmes diminutions) et on répète ainsi une fois avant, une fois après. Bon tricot!

20.03.2018 - 10:38

country flag Marie-France wrote:

Bonjour , comment laver ce modèle pour ne pas qu'il feutre. merci

11.03.2018 - 14:46

DROPS Design answered:

Bonjour Marie-France, lisez attentivement les indications des étiquettes et vous trouverez ici quelques informations complémentaires sur l'entretien. Votre magasin saura également vous conseiller si nécessaire. Bon tricot!

12.03.2018 - 09:46

country flag Stephanie Hutton wrote:

Hi, just trying to decide which size to knit and struggling to find a size conversion on your site. What would a s/m be in UK terms. I'm a size 10 to 12. Best regards, Stephanie

05.11.2015 - 15:38

DROPS Design answered:

Dear Mrs Hutton, you will find at the bottom of the pattern a measurement chart with all measurements taken flat from side to side (in cm) - compare these to a similar garment you have and like the shape to find out the matching size - read more about sizing here. Happy knitting!

05.11.2015 - 18:53

country flag Bonny McCormick wrote:

This reminds me of "From Russia with Love" movie - hurry up with this one

13.09.2009 - 18:11

country flag Gabriele wrote:

Sehr schön. Mit einem Blazer darunter wird das Cape wintertauglich. Strick ich mir!

12.08.2009 - 16:23

country flag Marit Rasmussen wrote:

Hello Irene. I can help. You Can use regulars needles, but I have a circular needle that I dont use (80 cm). You can get it. Give me your adress, and I send it to you.

09.08.2009 - 14:52