
Popular categories
Looking for a yarn?


Comments / Questions (53)
![]() Marie-Chantal wrote:
Marie-Chantal wrote:
Ik ben begonnen met dit patroon. Ik ben nu 8 cm ver als ik de fantasiesteek meet, maar bij de ribbelsteek ben ik nog maar 7 cm hoog. Als je dat maal 10 doet tot aan de armsholte, dan scheelt dat toch 10 cm. Hoe kan je dit oplossen?? Moet ik om de zoveel naalden eens een extra ribbelsteek rij in verkorte naald breien? Om de hoeveel naalden zou dat dan ongeveer zijn? Dank je wel
09.07.2025 - 11:06DROPS Design answered:
Dag Marie-Chantal,
De fantasiesteek drukt in de breedte in elkaar, waardoor hij hoger lijkt te worden. Je hoeft niets te doen. Als het kledingstuk af is en in elkaar zit, zou het weg moeten trekken.
11.07.2025 - 20:51
![]() Poli Christine wrote:
Poli Christine wrote:
Peut on faire le dos et devant séparément merci
02.03.2023 - 02:52DROPS Design answered:
Bonjour Mme Poli, tout à fait, il vous faudra juste recalculer pour votre taille le nombre de mailes à monter pour chaque pièce (en ajoutant les mailles lisières pour les coutures). Bon tricot!
02.03.2023 - 11:08
![]() Poli Chr5w wrote:
Poli Chr5w wrote:
Peùt on faire le dos et devant séparément sur ce modèle merci
02.03.2023 - 02:46
![]() Clarisa Eugenia Bello wrote:
Clarisa Eugenia Bello wrote:
Me encanta el modelo, lo estoy empezando. Me gustaria saber si cuando se refiere a la labor se refiere a todo el trabajo realizado o a la ultima parte que se esta ejecutando
21.11.2022 - 15:28DROPS Design answered:
Hola Clarisa, si no se indica nada más, se refiere a toda la labor, midiendo desde el borde de montaje. Si se ha colocado un marcapuntos desde el que medir (indicado en el patrón), entonces la medida se hace desde ese marcapuntos.
27.11.2022 - 13:15
![]() Karolien Van Rijn wrote:
Karolien Van Rijn wrote:
Hallo, Graag wil ik de mouwen met een korte rondbreinaald breien. Moet ik het patroongedeelte in de mouwen dan telkens met de eerste naald van M1 breien? Alvast bedankt voor het antwoord.
16.07.2021 - 14:02
![]() Germana wrote:
Germana wrote:
Trovato grazie non mi aveva stampato la prima pagina😅😅😅
15.04.2020 - 17:29
![]() Germana wrote:
Germana wrote:
Giorno ma il diagramma dove è? non lo trovo.....
15.04.2020 - 17:06
![]() Marisa Picolotte wrote:
Marisa Picolotte wrote:
Descrição de m1 está errada *2 pontos em meia não 2pontos juntos em meia
24.11.2019 - 19:16
![]() Janet wrote:
Janet wrote:
Thank you. With such a prompt answer and help I will no longer be afraid of DROPS patterns.
02.07.2019 - 16:14
![]() J Povall wrote:
J Povall wrote:
Am i crazy? I’ve always been afraid of DROPS patterns but I love the look of this sweater so much I want to try it. I see the lace instructions at the top of the pattern but not in the step-by-step directions! Just eight rows of garter stitch and then straight stockinette. How do I put the lace into the body of the sweater?
02.07.2019 - 15:25DROPS Design answered:
Dear Mrs Povall, the M.1 pattern is explained with written instructions in this pattern, you have then to work this pattern when it says to work M.1, ie on 1st row, work from RS: 9 front band sts in garter st, row 1 from M.1 over the next stitches until 9 sts remain and finish with 9 sts in garter stitch. Then on next row (from WS), work row 2 from pattern. When working stocking stitch and M.1 pattern, work row 1 in pattern M.1 from RS and row 2 in pattern M.1 from WS. Happy knitting!
02.07.2019 - 16:00
|
|
Sand Ripples#sandripplescardigan |
|
|
|
|
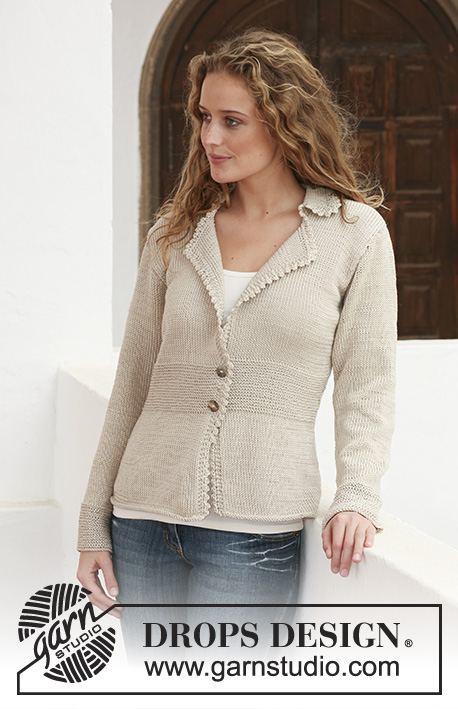
Knitted DROPS jacket with lace pattern in ”Cotton Viscose”. Size S - XXXL.
DROPS 111-27 |
|
|
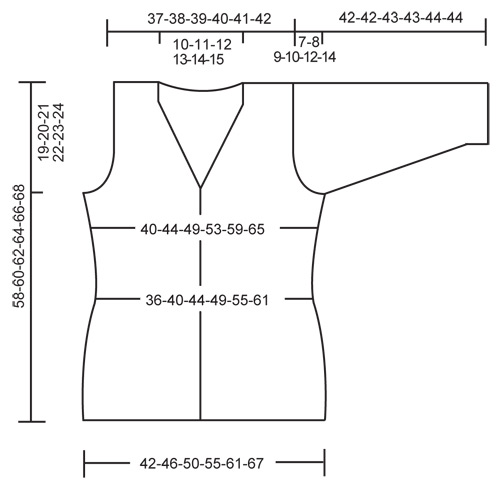
GARTER ST (back and forth on needle): K all rows. PATTERN, M.1: Row 1 (RS): K3 *, 1 YO, slip 1 st as if to K, K1, psso, K2 *, repeat from *-* until 3 sts remain, 1 YO, slip 1 st as if to K, K1, psso, K1. Row 2 (WS): P3, * 1 YO, P2 tog, P2 *, repeat from *-* until 3 sts remain, 1 YO, P2 tog, P1. Repeat row 1 and 2. BUTTONHOLES: Make buttonholes on right front band. 1 buttonhole = bind off 4th st from mid front and cast on 1 new st on return row. Make buttonholes when piece measures: SIZE S: 8, 16, 24 and 32 cm / 3⅛", 6¼", 9½"and 12½" . SIZE M: 10, 18, 26 and 34 cm / 4", 7", 10¼" and 13⅜". SIZE L: 8, 15, 22, 29 and 36 cm / 3⅛", 6", 8¾", 11⅜" and 14¼" SIZE XL: 9, 16, 23, 30 and 37 cm / 3½", 6¼", 9", 11¾" and 14½". SIZE XXL: 9, 16, 23, 31 and 39 cm / 3½", 6¼", 9", 12¼" and 15¼" SIZE XXXL: 9, 17, 25, 33 and 41 cm / 3½", 6¾", 9¾", 13" and 16⅛". DECREASING TIP (applies to neckline): Make all dec from RS. Dec as follows after front band + 18 pattern sts: slip 1 st as if to K, K1, psso. Dec as follows before front band + 18 pattern sts: K2 tog. ------------------------------------------------------------ BODY PIECE: Worked back and forth on circular needle from mid front. Cast on 208-228-248-268-296-324 sts on circular needle size 3.5 mm / US 4 with Cotton Viscose. Insert 2 markers in piece, 56-61-66-71-78-85 sts in from each side (back piece = 96-106-116-126-140-154 sts). Work 8 rows garter st– see above. Continue as follows from RS: 9 garter sts (= front band), M.1 on the next 190-210-230-250-278-306 sts and finish with 9 garter sts (= front band). Remember BUTTONHOLES on right front band – see above. When piece measures 8 cm / 3⅛" continue as follows from RS: 9 garter sts, M.1 on the next 18 sts, stockinette st on the next 154-174-194-214-242-270 sts, M.1 on the next 18 sts, 9 garter sts. Continue in pattern like this. When piece measures 9 cm / 3½" dec 1 st on each side of both markers and repeat the dec on every 1.5 cm / ½" a total of 7 times (= 4 dec per row) = 180-200-220-240-268-296 sts. NOW READ ALL OF THE FOLLOWING SECTION BEFORE CONTINUING! When piece measures 24 cm / 9½" inc 1 st on each side of both markers and repeat the inc on every 3-3-3-3.5-3.5-4 cm / 1⅛"-1⅛"-1⅛"-1¼"-1¼"-1½" a total of 5 times = 200-220-240-260-288-316 sts. AT THE SAME TIME when piece measures 33-35-37-38-40-42 cm / 13"-13¾"-14½"-15"-15¾"-16½" work 2 rows garter st on the 9 front band sts on the right side of piece only, work 1 row on all sts and now work 2 rows garter st on the 9 front band sts the other side only. Work 1 row on all sts. (to make the neckline neater). Now dec for neckline inside front band and pattern sts each side – SEE DECREASING TIP: 1 st on every 1 cm / ⅜" a total of 20-21-22-23-24-25 times. AT THE SAME TIME when piece measures 39-40-41-42-43-44 cm / 15¼"-15¾"-16⅛"-16½"-17"-17¼" bind off 3-3-3-3-4-4 sts on each side of both markers for armhole and now complete each piece separately. BACK PIECE: = 86-96-106-116-128-142 sts. Bind off for armhole each side at the beg of every row as follows: 3 sts 0-0-0-0-1-1 times, 2 sts 0-2-3-5-5-7 times and 1 st 0-0-2-2-4-6 times = 86-88-90-92-94-96 sts. When piece measures 54-56-58-60-62-64 cm / 21¼"-22"-22¾"-23⅝"-24⅜"-25¼" work garter st on the middle 42-44-46-48-50-52 sts with remaining sts as before. When piece measures 56-58-60-62-64-66 cm / 22"-22¾"-23⅝"-24⅜"-25¼"-26" bind off the middle 22-24-26-28-30-32 sts for neck and complete each shoulder separately. Bind off 1 st on neckline on next row = 31-31-31-31-31-31 sts left on shoulder. Continue with 9 garter sts towards neckline. Bind off when piece measures 58-60-62-64-66-68 cm / 22¾"-23⅝"-24⅜"-25¼"-26"-26¾". RIGHT FRONT PIECE: Continue dec for neck and bind off for armhole as described for back piece. When all dec are complete there are 31-31-31-31-31-31 sts left on shoulder. Bind off when piece measures 58-60-62-64-66-68 cm / 22¾"-23⅝"-24⅜"-25¼"-26"-26¾". LEFT FRONT PIECE: Like right front piece, but mirrored. SLEEVE: Worked back and forth on needle. Cast on 60-60-64-64-68-68 sts (includes 1 edge st each side) on needle size 3.5 mm / US 4 with Cotton Viscose. Work 8 rows garter st and continue in M.1 with 1 edge st each side. When piece measures 7 cm / 2¾" continue in stockinette st, AT THE SAME TIME inc 1 st each side and repeat the inc on every 3.5-2-2-1.5-1.5-1 cm / 1¼"-¾"-¾"-½"-½"-⅜" a total of 8-11-13-16-16-19 times = 76-82-90-96-100-106 sts. When piece measures 35-34-34-33-32-30 cm / 13¾"-13⅜"-13⅜"-13"-12½"-11¾" – less for the larger sizes because of longer sleeve cap and wider shoulder – bind off for sleeve cap each side at the beg of every row: 3 sts 1 time, 2 sts 5 times, 1 st 0-0-2-3-6-9 times, then 2 sts each side until piece measures 41-41-42-42-43-43 cm / 16⅛"-16⅛"-16½"-16½"-17"-17", now bind off 3 sts each side 1 time and bind off remaining sts. Piece measures approx 42-42-43-43-44-44 cm / 16½"-16½"-17"-17"-17¼"-17¼". ASSEMBLY: Sew shoulder seams. Sew sleeve seams and set in sleeves. Sew on buttons. |
|
 |
|
Have you finished this pattern?Tag your pictures with #dropspattern #sandripplescardigan or submit them to the #dropsfan gallery. Do you need help with this pattern?You'll find 18 tutorial videos, a Comments/Questions area and more by visiting the pattern on garnstudio.com. © 1982-2026 DROPS Design A/S. We reserve all rights. This document, including all its sub-sections, has copyrights. Read more about what you can do with our patterns at the bottom of each pattern on our site. |


With over 40 years in knitting and crochet design, DROPS Design offers one of the most extensive collections of free patterns on the internet - translated to 17 languages. As of today we count 324 catalogs and 12290 patterns - 12280 of which are translated into English (US/in).
We work hard to bring you the best knitting and crochet have to offer, inspiration and advice as well as great quality yarns at incredible prices! Would you like to use our patterns for other than personal use? You can read what you are allowed to do in the Copyright text at the bottom of all our patterns. Happy crafting!
Post a comment to pattern DROPS 111-27
We would love to hear what you have to say about this pattern!
If you want to leave a question, please make sure you select the correct category in the form below, to speed up the answering process. Required fields are marked *.