
Popular categories
Looking for a yarn?


Comments / Questions (145)
![]() Esther wrote:
Esther wrote:
Kann ich die Mütze auch rund stricken?
15.01.2017 - 16:05DROPS Design answered:
Liebe Esther, die Mütze wird hier hin und zurück gestrickt. Viel Spaß beim stricken!
16.01.2017 - 10:22
![]() Simone Schön wrote:
Simone Schön wrote:
Danke für die schnelle Antwort! Muss ich diese Maschenmarkierer dann bei jeder Hinrunde in die aktuelle Reihe versetzen? Sonst sehe ich nicht, welche in der aktuellen Reihe die markierte Masche sein soll! ?
14.11.2016 - 11:52DROPS Design answered:
Liebe Frau Schön, ja lieber die Markierer immer in die neue Reihe versetzen, so verlieren Sie nicht diese markierten Maschen. Viel Spaß beim stricken!
14.11.2016 - 16:50
![]() Simone wrote:
Simone wrote:
Ich habe grosse Probleme mit den Markierungsfäden! Wie macht man das mit dem Einziehen? Dass man nach der Rückrunde wieder weiss, welche die markierte Masche ist?
14.11.2016 - 11:34DROPS Design answered:
Liebe Simone, Sie können lieber dann solche Maschenmarkierer benutzen, so ist jeder in eine Masche. Viel Spaß beim stricken!
14.11.2016 - 11:43
![]() Silje Hølland wrote:
Silje Hølland wrote:
Hei, jeg skjønner ikke helt starten på oppskriften. Det står "legg opp (...) og strikk 1 p rett fra vrangen". Betyr det at første p jeg strikker blir fra vrangen? Slik at trådstubben etter opplegging er til venstre når jeg holder arbeidet med retten mot meg?
02.11.2016 - 21:48DROPS Design answered:
Hej Silje. Ja, din förste p skal taelles fra vrangen.
03.11.2016 - 16:18
![]() Janine wrote:
Janine wrote:
Is the gauge 21 x 48 correct? According to the pattern this is the gauge used with with yarn on 4mm needles, but the yarn information itself says it averages 21 x 28 on 4mm.
30.09.2016 - 13:52DROPS Design answered:
Dear Janine, the gauge on the label and on the shadecard is worked in stocking st, the gauge to the hat is worked here in garter st, that's why you need more rows = 48 rows (= 24 ridges). Happy knitting!
30.09.2016 - 15:15
![]() Ingebjørg Helén Sæthre wrote:
Ingebjørg Helén Sæthre wrote:
Hvordan kan jeg felle av luen? Det står i oppskriften at det skal strikkes fra retten*1r,2 r sammen * SAMTIDIG som det felles av. Klarer ikke å få dette til. M.v.h. Ingebjørg Helén Sæthre
25.01.2016 - 16:52DROPS Design answered:
Hej Ingebjørg, Jo du strikker 1r, 2r sammen, nu har du 2 m på højre pind som du lukker af som du plejer (løft den bagerste over den forreste). Strik 1r nu har du 2 m igen hvor du lukker den yderste af. Fortsæt således!
27.01.2016 - 15:41
![]() Lilliams wrote:
Lilliams wrote:
Para tejer el gorro del bebé cuantos puntos monto?
12.01.2016 - 10:02DROPS Design answered:
Hola Lilliams, para saber el número de pts que debes montar tienes que tener en cuenta la talla que quieres hacer de estas 5 opciones: 1/3 – 6/9 – 12/18 meses (2 – 3/4) años y sabiendo la talla coger siempre el número correspondiente de la sucesión de números dada, en este caso nos pone: "Montar 97-105-109 (113-121) pts en ag tamaño 4 mm...", cada numero de esta sucesión se corresponde con una de las 5 tallas indicadas arriba: para la talla 1/3 meses = 97 pts; para la talla 6/9 meses = 105 pts ...etc
14.01.2016 - 09:56
![]() Anna-Liisa Niikkonen wrote:
Anna-Liisa Niikkonen wrote:
Hei, miten tapahtuu päättäminen ohjeessa Little Acorn by Drops Design. BabyDROPS 18-1 Myssyn päättämistä en ymmärrä? "1o,2s oikein yhteen",toista #-" SAMALLA kun päätät silmukat. Miten tuo tapahtuu??
08.12.2015 - 18:53DROPS Design answered:
Hei! Kavennat silmukoita samalla kun päätät ne. Eli neulot 1 silmukan oikein, sitten 2 s oikein yhteen (oikealla puikolla on nyt kaksi silmukkaa). Vedä oikean käden puikon takimmainen silmukka etummaisen silmukan yli. Neulo 1 s oikein, vedä taas takimmainen silmukka etummaisen yli. Neulo 2 s oikein yhteen, vedä takimmainen silmukka etummaisen silmukan yli jne.
10.12.2015 - 16:30
![]() Gloria wrote:
Gloria wrote:
Je ne comprend pas le premier rang tricote 1ragend sur l env alors que le 1er rang se ai l androit du travaille merci
18.09.2015 - 20:10DROPS Design answered:
Bonjour Gloria, le 1er rang tricoté peut être au choix sur l'endroit ou sur l'envers, pour ce bonnet, le 1er rang sera sur l'envers, tous les rangs pairs seront tricotés sur l'endroit. Bon tricot!
19.09.2015 - 09:59
![]() Anna wrote:
Anna wrote:
Minskningen blir 2 m varje gång? Så vartannat varv blir 4 m plus o 8m minus. Var fjärde 6 plus o 12 minus? Eller har jag fel?
14.02.2015 - 19:35DROPS Design answered:
Hej Anna, Om du skriver ut skissen nederst i beskrivningen och markerar varje "hörn" så blir det tydligt var du skall minska och var du skall öka. Lycka till!
18.02.2015 - 15:59
|
|||||||||||||
Little Acorn#littleacornset |
|||||||||||||
|
|
|||||||||||||
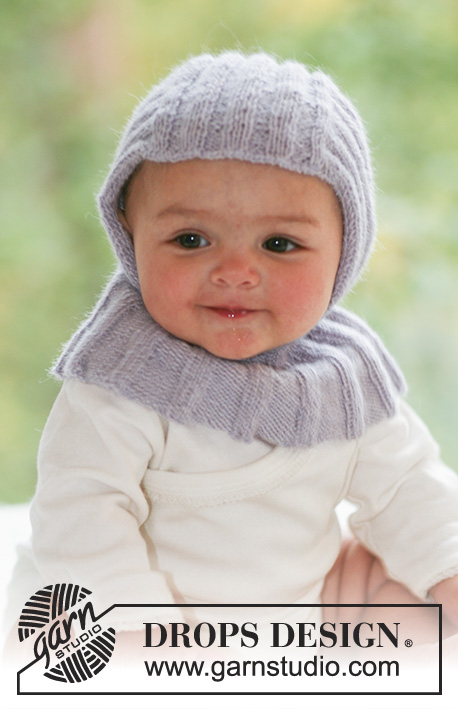
Knitted helmet hat and scarf in garter st with crochet edges, for baby and children in DROPS Merino Extra Fine
DROPS Baby 18-1 |
|||||||||||||
|
BONNET GARTER ST (back and forth on needle): K all rows. INCREASING TIP: Make all inc from RS. Inc 1 st by making 1 YO. Work YO into back of loop on return row to avoid a hole. DECREASING TIP: Make all dec from RS. Dec 1 st on each side of st with marker. Beg 1 st before st with marker, slip 1 st on cable needle behind piece, slip next st as if to K (st with marker), K tog next st and st from cable needle, psso. ------------------------------------------------------------ BONNET: Worked back and forth on needle in garter st – SEE ABOVE. Cast on 97-105-109 (113-121) sts on needle size 4 mm [US 6] with light beige. K 1 row from WS Then insert 7 markers in piece from RS (without knitting the row) as follows: Marker 1 in first st on row Marker 2 in st no 18-20-21 (22-24) Marker 3 in st no 35-39-41 (43-47) Marker 4 in st no 49-53-55 (57-61) Marker 5 in st no 63-67-69 (71-75) Marker 6 in st no 80-86-89 (92-98) Marker 7 in last st on row Continue in garter st, AT THE SAME TIME on row 1 begin inc and dec as follows – SEE INCREASING AND DECREASING TIP: INC 1 st after Marker 1 on every other row DEC 1 st on each side of Marker 2 on every other row INC 1 st before Marker 3 on every other row INC 1 st after Marker 3 on every 4th row DEC 1 st on each side of Marker 4 on every 4th row 5-7-8 (10-11) times and then on every other row to finished measurements (i.e. when dec on every other row no of sts will dec) INC 1 st before Marker 5 on every 4th row INC 1 st after Marker 5 on every other row DEC 1 st on each side of Marker 6 on every other row INC 1 st before Marker 7 on every other row. Continue like this. When piece measures 13-15-16 (18-19) cm [5⅛"-6"-6¼" (7"-7½")] (measured from lowest point by Marker 2 or Marker 6) work next row as follows from RS: * K1, K2 tog *, repeat from *-*, AT THE SAME TIME as binding off. ASSEMBLY: Back of hat = bind off row, i.e. 2 whole points and 2 half points. The middle of the 3 whole points on the opposite side of piece = cast on row, sits at middle of forehead. Sew hat tog, edge to edge along bind off row as follows: Sew first half point to one side of the first whole point. Sew the other side of first whole point to one side of second whole point. Then the other side of second whole point to the last half point. Now sew hat tog mid back – make sure to sew edge to edge to avoid a chunky seam CROCHET BORDER: Beg at bottom of point on one side. Crochet with crochet hook size 4 mm [G/6] and off-white as follows: 1 sc in point, a string of ch measuring 20-22-24 (26-28) cm [8"-8¾"-9½" (10¼"-11")], turn piece and work 1 sl st in each ch on return row, finish with 1 sl st in sc in point (= tie string). Continue round the bonnet as follows: * 3 ch, 1 dc in the first of these 3 ch, skip approx 1 cm [3/8"], 1 sc in next st *, repeat from *-* to point at the other side. Work a tie string as described above and continue round the bonnet as follows: * 3 ch, 1 dc in the first of these 3 ch, skip approx 1 cm [3/8"], 1 sc in next st *, repeat from *-* to the first point and finish with 1 sl st in first sc from beg of round. ------------------------------------------------------------ SCARF: Worked in garter st back and forth on needle. Cast on 18-20-22 (24-26) sts on needle size 4 mm [US 6] with light beige and work garter st back and forth on needle until piece measures approx 8-9-10 (11-12) cm [3⅛"-3½"-4" (4⅜"-4¾")]. Now divide the piece in the middle and slip half the sts on a stitch holder = 9-10-11 (12-13) sts left on needle. Continue on these sts for 4-5-5 (6-6) cm [1½"-2"-2" (2⅜"-2⅜")] (piece measures 12-14-15 (17-18) cm [4¾"-5½"-6" (6¾"-7")] in total). Slip sts on a stitch holder and slip sts from the first stitch holder back on needle. Work garter st back and forth on needle for 4-5-5 (6-6) cm [1½"-2"-2" (2⅜"-2⅜")]. Now slip all sts back on needle and continue in garter st until piece measures approx 44-47-51 (55-60) cm [17 ¼"-18½"-20" (21½"-23½")]. Bind off. CROCHET BORDER: Crochet a border round scarf with crochet hook size 4 mm [G/6] and off-white as follows: * 1 sc, 3 ch, 1 dc in the first of these 3 ch, skip approx 1 cm [3/8"] *, repeat from *-* and finish with 1 sl st in first sc from beg of round. |
|||||||||||||
Diagram explanations |
|||||||||||||
|
|||||||||||||
 |
|||||||||||||
Have you finished this pattern?Tag your pictures with #dropspattern #littleacornset or submit them to the #dropsfan gallery. Do you need help with this pattern?You'll find 11 tutorial videos, a Comments/Questions area and more by visiting the pattern on garnstudio.com. © 1982-2026 DROPS Design A/S. We reserve all rights. This document, including all its sub-sections, has copyrights. Read more about what you can do with our patterns at the bottom of each pattern on our site. |
|||||||||||||


With over 40 years in knitting and crochet design, DROPS Design offers one of the most extensive collections of free patterns on the internet - translated to 17 languages. As of today we count 325 catalogs and 12298 patterns - 12288 of which are translated into English (US/in).
We work hard to bring you the best knitting and crochet have to offer, inspiration and advice as well as great quality yarns at incredible prices! Would you like to use our patterns for other than personal use? You can read what you are allowed to do in the Copyright text at the bottom of all our patterns. Happy crafting!
Post a comment to pattern DROPS Baby 18-1
We would love to hear what you have to say about this pattern!
If you want to leave a question, please make sure you select the correct category in the form below, to speed up the answering process. Required fields are marked *.