
Popular categories
Looking for a yarn?


Comments / Questions (24)
![]() TJ Baker wrote:
TJ Baker wrote:
I tried to knit this, the instructions are very confusing. Your explanation of the garter stockinette stitch do not differentiate between the two. Should read garter 1st 6 stitches then follow stockinette stitch. Where pattern states P4 K2 at the beginning on page 2 is also confusing, the next row they do not line up and looked very messy. I ripped it all out and will be moving on, now I know why it is free.
08.01.2026 - 00:16DROPS Design answered:
Dear Mrs Baker, at the very beginning you knit 2 rows then start working stocking stitch with 6 stitches in garter stitch on each side, which means you will knit all stitches from right side and from work side, knit 6, purl until 6 stitches remain, then knit 6 Work like this for 6 cm, then work decreasing row. Hope it can help. Happy knitting!
09.01.2026 - 07:44
![]() Laura Baxter wrote:
Laura Baxter wrote:
I realized after reading it that it was worded strangely. k6 garter k1, work k2 k2 tog to the last 7 stitches then work button band or k1 then 6 in garter. I have used Drops patterns many times and this was just strange.
31.05.2025 - 09:06
![]() Laura Baxter wrote:
Laura Baxter wrote:
For some reason this pattern makes no sense to me. cast on 325 stitches the 6 stitches are garter for the button band etc. that part I get. stockinette for 2.5 inches. but now comes the fishy part knit 1 k2 together until 7 stitches remain and somehow, I'm supposed to have 220 stitches remaining. this is not a very well written pattern and I've been knitting for 60 years.
30.05.2025 - 08:01DROPS Design answered:
Dear Mrs Baxter, work the decrease round as follows: 6 stitches in garter stitch as before, then repeat (knit 1, knit 2 together) a total of 104 times, 7 stitches remain, knit 1 and work the last 6 stitches in garter stitch as before, you have decreased 104 stitches: 325 -104 =221 sts. Work next row from the wrong side. On next row from RS work 6 sts in garter stitch, k2 tog, knit to the end of the row = 220 sts left. Work next row from WS then start working rib and pattern. Happy knitting!
30.05.2025 - 09:46
![]() Saury wrote:
Saury wrote:
Bonjour, est il possible de faire ce modèle en taille XL (pour homme)? Comment dois je faire pour transposer le vu modèle? Merci
29.01.2025 - 21:44DROPS Design answered:
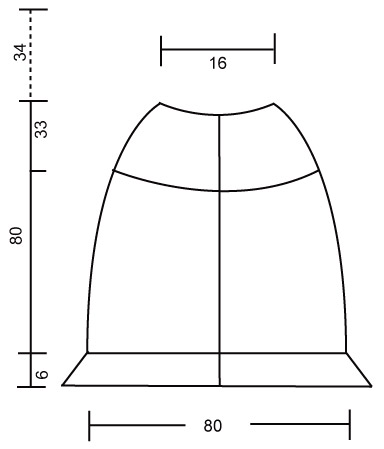
Bonjour Mme Saury, ce modèle est uniquement disponible en taille M, vous pouvez vous aider du schéma des mesures pour ajuster à la taille souhaitée, ou bien consulter nos modèles de poncho en taille XL ici. Bon tricot!
30.01.2025 - 10:09
![]() Jozereau wrote:
Jozereau wrote:
Bonjour pour les diminutions 4m de chaque côté en répartissant 4 diminutions dans les mailles je peux avoir plus d explications car je ne comprends pas comment les faire je vous remercie par avance
04.12.2024 - 13:44DROPS Design answered:
Bonjour Mme Jozereau, vous tricotez 41 mailles au point mousse fantaisie de chaque côté de l'ouvrage (et en côtes, avant, entre et après); cette leçon explique comment diminuer à intervalles réguliers. Bon tricot!
04.12.2024 - 16:22
![]() Jozereau wrote:
Jozereau wrote:
Bonsoir les diminutions que l on doit faire à 10 cm de hauteur après le marqueur diminuer 4m de chaque côté c est au niveau du point mousse fantaisie,?
03.12.2024 - 22:29DROPS Design answered:
Bonjour Mme Jozereau, ces diminutions se font dans les mailles point mousse, cf Diminutions au tout début des explications. Bon tricot!
04.12.2024 - 07:43
![]() Terri Willams wrote:
Terri Willams wrote:
This pattern mentions both garter stitch and "garter stitch pattern". They don't appear to be the same. Are they? Thank you, Terri
25.06.2022 - 19:09DROPS Design answered:
Dear Terri, no, they are not the same. Normal garter stitch is knit all rows, working back and forth. The garter stitch pattern is explained at the beginning of the pattern instructions. Here, you combine knitted and purled rows, to make the space between ridges wider. Happy knitting!
26.06.2022 - 12:59
![]() Anne R wrote:
Anne R wrote:
Hvor mange meter garn må jeg beregne for denne oppskriften?
31.01.2022 - 12:57DROPS Design answered:
Hei Anne. Til denne må du bruke 350 gram DROPS Melody. 50 gram Melody = 140 meter. Så 350 gram = 7 nøster x 140 meter = 980 meter. Så da trenger du 980 meter garn til denne ponchoen. mvh DROPS Design
31.01.2022 - 15:02
![]() Nicole Lagasse wrote:
Nicole Lagasse wrote:
I noticed this is for a size medium. I woyl like to try to make it for a plus size. Do you have a modified pattern or suggestions?
22.09.2021 - 16:23DROPS Design answered:
Dear Nicole, please understand that we cannot modify our patterns to each individual request. However, please note that this is a cape, for which exact sizing is not that important. Furthermore, you might try to knit this with a thicker yarn, and / or with a bigger needle. (You might try adding a thin yarn, like kidsilk, or Alpaca silk, Alpaca,and use a bigger size needle. Or you can recalculate the stitch numbers. However, please always make a swatch and calculate the modifications accordingly. Happy Knitting!
22.09.2021 - 17:14
![]() Sylvie wrote:
Sylvie wrote:
Bonjour, sur le patron il est noté ce qui suit: Point mousse fantaisie – voir ci-dessus – sur les 41 m suivantes Mais sur les explications le point mousse fantaisie ce fait sur 6 rangs. Je suis un peu mélangé. Merci à l'avance pour votre réponse
07.11.2020 - 21:23DROPS Design answered:
Bonjour Sylvie, vous tricotez les 41 mailles suivantes en suivant le point mousse fantaisie autrement dit, ces mailles vont se tricoter comme indiqué sur 6 rangs, mais vous les tricotez au 1er rang à l'endroit (et les autres mailles comme indiqué), puis au 2ème rang, vous les tricoterez à l'envers etc... en même temps, tricotez les mailles en côtes, à l'endroit ou à l'envers comme indiqué.
09.11.2020 - 10:33
|
|
Elven Dance |
|
 |
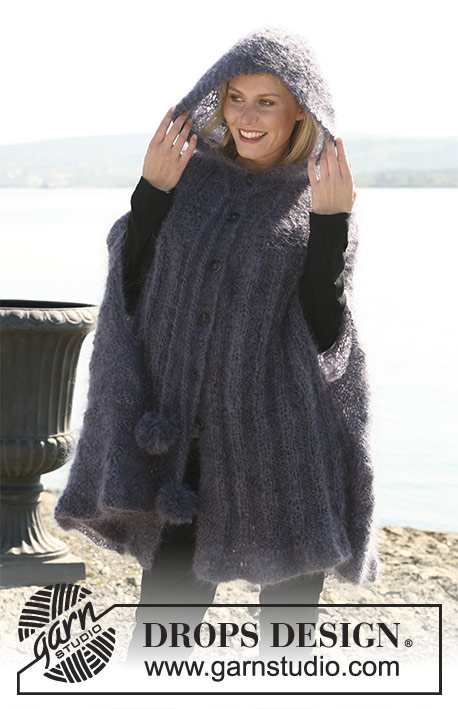 |
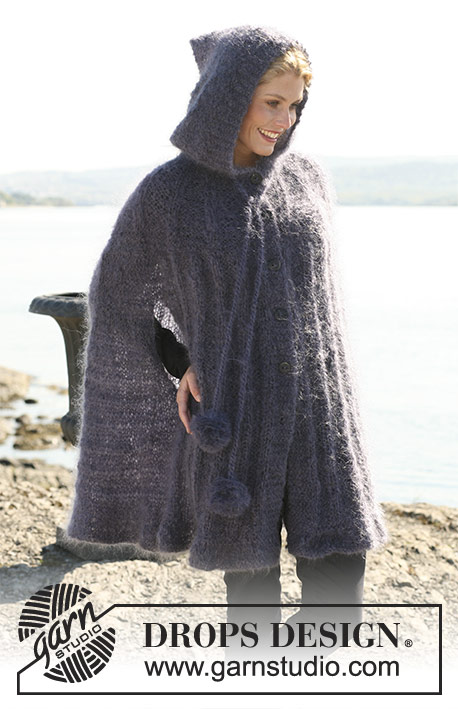
DROPS cape with hood in ”Vienna” eller "Melody". Size M.
DROPS Extra 0-450 |
|
|
Garter st, back and forth on needle: K all rows. Decreasing tip: Dec 4 sts each side by dec 4 sts evenly on sts worked in Garter st pattern. Dec on rows from RS. Garter st pattern: Row 1: K from RS Row 2: P from WS Row 3: K from RS Row 4: P from WS Row 5: P from RS Row 6: K from WS Repeat row 1 to 6. Double seed st: Row 1: * K2, P2 *, repeat from *-* and finish with K2. Row 2: K over K and P over P. Row 3: P over K and K over P. Row 4: K over K and P over P. Repeat row 3 and 4. Buttonholes: Bind off for buttonholes on right front piece. 1 buttonhole = bind off 3rd front band st from mid front and cast on 1 new st on return row. bind off for buttonholes when piece measures (measured from the first marker): 34, 43, 52, 61, 70 and 79 cm / 13½", 17", 20½", 24", 27½" and 31" CAPE Worked back and forth on circular needle from mid front. Cast on 325 sts (includes 6 front band sts each side towards mid front) on circular needle size 7 mm / US 10 ½ with Vienna. K 2 rows. Continue in stockinette st with 6 front band sts each side in garter st. REMEMBER THE GAUGE! When piece measures 6 cm / 2½'' work next row as follows from RS: 6 front band sts in garter st, * K1, K2 tog *, repeat from *-* until 7 sts remain, K1, 6 front band sts in garter st. K 1 row from WS. Insert a marker and now measure piece from here. K 1 row from RS, at the same time dec 1 st after the 6 front band sts = 220 sts. K from row from WS. Continue as follows from RS: 6 front band sts in garter st, K2, * P4, K2 *, repeat from *-* on the next 30 sts, Garter st pattern – see above - on the next 41 sts, K2, repeat from *-* on the next 60 sts, Garter st pattern on the next 41 sts, K2, repeat from *-* on the next 30 sts and finish with 6 front band sts in garter st. At the same time when piece measures 10 cm / 4'' from marker dec 4 sts each side – see Decreasing tip! Repeat the dec on every 7 cm / 2¾'' a total of 6 times. At the same time when piece measures 27 cm / 10½'' from marker (after 3 dec = 196 sts on row) continue as follows from RS: 6 front band sts in garter st, K2, * P4, K2 *, repeat from *-* on the next 30 sts, 6 garter sts, Garter st pattern on the next 23 sts, K2, repeat from *-* on the next 60 sts, Garter st pattern on the next 23 sts, 6 garter sts, K2, repeat from *-* on the next 30 sts and finish with 6 front band sts in garter st. When piece measures 29 cm / 11½'' from marker divide the piece as follows: keep the first 41 sts on needle and slip the remaining 155 sts on a stitch holder. Right front piece: Continue back and forth on needle on the 41 sts as follows: 6 front band sts in garter st, K2, * P4, K2 * repeat from *-* on the next 30 sts, 3 garter sts. Continue like this until piece measures 18 cm / 7'' from where piece was divided. Note! Remember to bind off for buttonholes – see above. Slip the 41 sts on a stitch holder. Back piece: Slip the next 114 sts back on needle and work pattern as before back and forth on needle. Note! Remember dec at sides. Continue like this until piece measures 18 cm / 7'' from where piece was divided (= 47 cm / 18½'' from marker). All dec are now complete = 90 sts. Slip the 90 sts on a stitch holder. Left front piece: Slip the last 41 sts back on needle and continue back on forth on needle as follows: 3 garter sts, * P4, K2 *, repeat from *-* on the next 30 sts, K2, 6 front band sts in garter st. Continue like this until piece measures 18 cm / 7'' from where piece was divided. Yoke: Slip all sts back on needle = 172 m. Insert a marker and now measures piece from here. Continue as follows from RS: 6 front band sts in garter st, K2, * P4, K2 *, repeat from *-* on the next 30 sts, 6 garter sts, Garter st pattern on the next 11 sts, K2, repeat from *-* on the next 60 sts, m, Garter st pattern on the next 11 sts, 6 garter sts, K2, repeat from *-* on the next 30 sts and finish with 6 front band sts in garter st. Continue like this until piece measures 2 cm / 3/4'' from marker. Continue as follows: 6 front band sts in garter st, K2, * P4, K2 *, repeat from *-* on the next 30 sts, Garter st pattern on the next 17 sts, K2, repeat from *-* over de next 60 sts, Garter st pattern on the next 17 sts, K2, repeat from *-* on the next 30 sts and finish with 6 front band sts in garter st. Continue like this until piece measures 7 cm / 2¾'' from marker. K 1 row from RS on all sts at the same time dec 14 sts evenly = 158 sts. K 1 row from WS. K 1 row from RS, at the same time dec 14 sts evenly = 144 sts. K 1 row from WS. Now continue as follows: 6 front band sts, K2, * P8, K2 *, repeat from *-* on the next 130 sts and finish with 6 front band sts. When piece measures 11 cm / 4½'' from marker dec 1 st in each P section and repeat the dec on every 3.5 cm / 1 1/4'' a total of 6 times = 66 sts. Continue with K over K and P over P (with front bands in garter st as before) until piece measures 31 cm / 12'' from marker and now K 6 rows on all sts. Hood: K 1 rows from RS, at the same time inc 4 sts evenly = 70 sts. Insert a marker and now measure piece from here. Continue in Double seed st – see above – with 6 front band sts in garter st each side. Continue like this until hood measures approx 34 cm / 13½'' from marker and bind off loosely. Assembly: Sew tog hood at the top, edge to edge with neat sts. Sew on buttons. Twisted ribbon: Cut 4 strands measuring 3 meters/ 3.2 yds each. Twist them until they resist, fold strands double and let them twist again. Tie a knot each end and thread the ribbon around neckline. Make 2 pompoms with a diameter of approx 8 cm / 3'' and attach to the ends of ribbon. |
|
 |
|
Have you finished this pattern?Tag your pictures with #dropspattern or submit them to the #dropsfan gallery. Do you need help with this pattern?You'll find 19 tutorial videos, a Comments/Questions area and more by visiting the pattern on garnstudio.com. © 1982-2026 DROPS Design A/S. We reserve all rights. This document, including all its sub-sections, has copyrights. Read more about what you can do with our patterns at the bottom of each pattern on our site. |
|


With over 40 years in knitting and crochet design, DROPS Design offers one of the most extensive collections of free patterns on the internet - translated to 17 languages. As of today we count 324 catalogs and 12290 patterns - 12280 of which are translated into English (US/in).
We work hard to bring you the best knitting and crochet have to offer, inspiration and advice as well as great quality yarns at incredible prices! Would you like to use our patterns for other than personal use? You can read what you are allowed to do in the Copyright text at the bottom of all our patterns. Happy crafting!
Post a comment to pattern DROPS Extra 0-450
We would love to hear what you have to say about this pattern!
If you want to leave a question, please make sure you select the correct category in the form below, to speed up the answering process. Required fields are marked *.