
Popular categories
Looking for a yarn?


Comments / Questions (64)
![]() Solfrid wrote:
Solfrid wrote:
Vendingene skal være på samme sted rundt hele jakkens bærestykke. Så i min str M blir det slik: den første vendingen er 12 m fra øverste kanten, så da blir vendingene for arm i str M slik: *Strikk over alle masker med fabel. Strikk over 96 m med fabel, snu og strikk tilbake. Strikk over 82 m med fabel, snu. Strikk over 61 m med fabel, snu. Strikk over alle m med alpakka.* Riktig??
14.05.2010 - 21:57
![]() Solfrid wrote:
Solfrid wrote:
Ser det er ei som har spurt om det samme i 2008, men ikke fått noe svar enda :D
14.05.2010 - 21:17
![]() Solfrid wrote:
Solfrid wrote:
Jeg skal nå begynne med vendingene i ermet. jeg strikker str M. har totalt 108 m nå, og da stemmer det jo ikke helt med vendingene...? skal det bare snues to ganger da? først strikker man jo over hele, så over 108m så over 94m og så over 73 m på forstykket. Og nå har jeg jo bare 108 m på pinnen. Forklaring?
14.05.2010 - 21:13
![]() Drops Design wrote:
Drops Design wrote:
Jo men vendingerne foregår oppe i selve bærestykket, og det skal være ens hele vejen rundt.
06.04.2010 - 09:57
![]() Kitty wrote:
Kitty wrote:
Hej! kan altså bare ikke finde ideen med de vendinger på ærmerne, kan du? så skriv: strikke hilsner Kitty
02.04.2010 - 22:41
![]() Kitty wrote:
Kitty wrote:
Hej! er der en der har fundet ud af hvordan de ærmer skal strikkes? synes at der mangler vende oplysninger!!! den fortvivlede..... kitty
02.04.2010 - 22:35
![]() Jill wrote:
Jill wrote:
Has anyone successfully knitted this pattern? I am finding the sleeve instructions difficult to understand!
25.01.2010 - 23:30
![]() DROPS Design NL wrote:
DROPS Design NL wrote:
Hoi Antoinet. De onderkant van de mouw moet met Alpaca gebreid worden, vanwege de strepen van Fabel en Alpaca. Het patroon zou moeten kloppen. Ik hoop dat je hiermee verder kan. Gr. Tine
03.12.2009 - 10:44
![]() DROPS Design NL wrote:
DROPS Design NL wrote:
Goedenavond Antoinet. De 2 cm is de onderkant van de mouw. Ze worden inderdaad pas na de 2 cm samen met de overige 59 st voor de schouder/pas gebreid. Je breit ook 1 cm extra over de st, die op de hulpdraad gaan voor het achterpand. Wat wel voor mij onduidelijk is, is dat er staat dat je met Alpaca moet breien - volgens mij moet dat Fabel zijn, maar dat heb ik aan ons Designteam gevraagd. Ik kom dan hier zsm terug. Gr. Tine
30.11.2009 - 20:09
![]() Antoinet Wielens wrote:
Antoinet Wielens wrote:
Vraag; de nieuwe steken alpaca van de onderkant mouw worden die pas na 2 cm vast gebreid aan de 59 steken fabel? deze 59 steken zijn toch de bovenkant mouw, dan worden de nieuwe steken toch in het begin van de naald opgezet. voorpand is 2 cm langer en de draad is aan de onderrand. Moet nu met een nieuwe draad alpaca beginnen. Graag uw uitleg ik kom er niet uit. In afwachting op antwoord met vriendelijke groet ANtoinet Wielens
26.11.2009 - 00:49
|
|
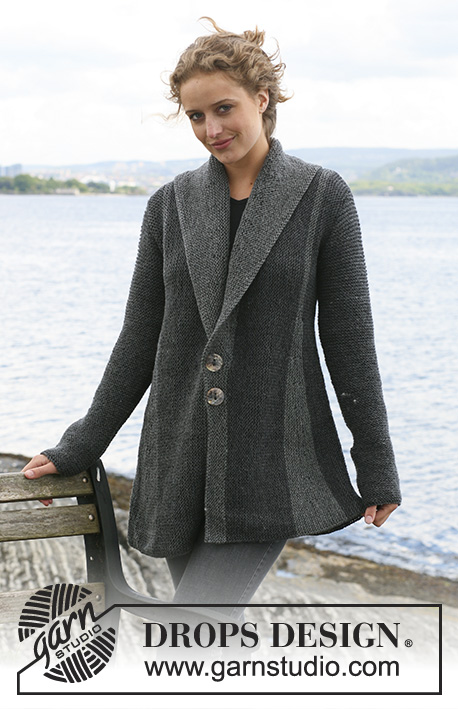
Cat Stripes |
|
 |
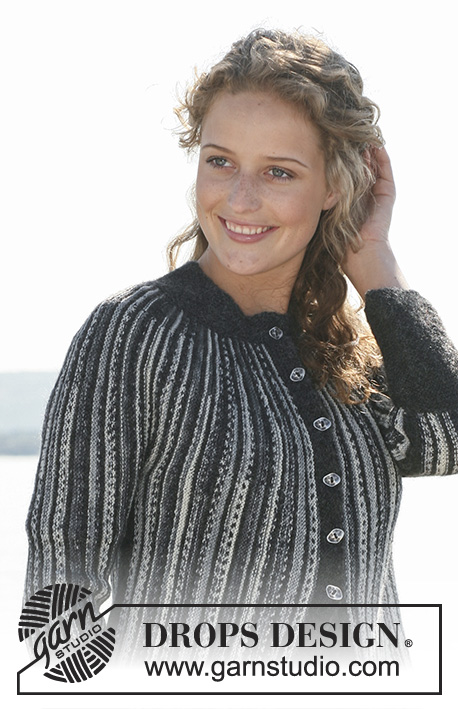 |
DROPS jacket in garter st in ”Fabel” and ”Alpaca”. Worked from side to side with shortened rows. Size S - XXL.
DROPS 110-2 |
|
|
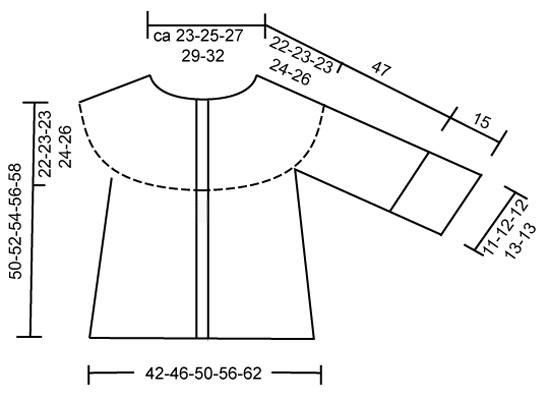
Knitting tip-1: When working turns, twist the Fabel and Alpaca threads at bottom edge after every 4th row, in order the Alpaca thread follows the piece. Knitting tip-2: Steam iron garment before use. Turns: Work shortened rows with turns in mid piece to slightly A-shape the jacket. Beg at bottom edge and work towards neckline. * Work all sts with Fabel, turn piece and work return row. Work 103-108-112-115-119 sts with Fabel, turn piece and work return row. See Knitting-tip-1! Work 89-94-97-99-103 sts with Fabel, turn piece and work return row. Work 70-73-76-78-80 sts with Fabel, turn piece and work return row. Work all sts with Alpaca, turn piece and work return row *. Repeat from *-*. Turns, neckline: Beg mid front (1st row = RS): * Work row to MT-4, turn piece, K2 tog and work return row to MT-1, turn piece, K2 tog and work return row to MT-3, turn piece , K2 tog and work return row to MT-2, turn piece, K2 tog and work return row on all sts *, repeat from *-*. ___________________________________________________________________ JACKET Jacket is worked from side to side, beg mid front on left front piece, work towards sleeve, work sleeve, back piece, sleeve and then right front piece. Row is worked from bottom edge towards neckline and the entire jacket is worked in garter st, i.e. K all rows. Left front piece: Loosely cast on 115-120-125-129-134 sts on needle size 3.5 mm [US 4] with Alpaca. First row = RS (from bottom edge towards neckline). Work approx 3 cm [1⅛"] on all sts with Alpaca = front band (make sure next row is from RS). Remember the knitting gauge! Now continue with shortened rows and Turns – see explanation above. See Knitting tip-1! Continue like this until piece measures approx 23-25-27-30-33 cm [9"-9¾"-10⅝"-11¾"-13"] from casting on row (measured at bottom edge). At neckline piece measures approx 11-12-12½-14-15 cm [4⅜"-4¾"-4⅞"-5½"-6"] from casting on row. Now continue over the side piece with Alpaca as follows: work 1 cm [⅜"] back and forth on 65-68-71-73-75 sts from bottom edge only. Insert a Marking Thread (MT) (= mid side). Work 1 cm [⅜"] back and forth on the 65-68-71-73-75 sts again and now slip these sts on a stitch holder (to be used later for back piece). Now work the sleeve. Left sleeve: = 50-52-54-56-59 sts on needle. Loosely cast on 11 new sts over sts on stitch holder. Continue with Alpaca on the new sts only (= edge under the sleeve), at the same time cast on 15-14-14-13-13 sts 2 times and 17-17-15-15-12 sts 1 time on every other row towards bottom edge. At the same time when piece measures 2 cm [¾"] continue on all sts. Continue with Turns. After all new sts have been cast on there are 108 sts on needle. Continue until piece measures approx 22-24-24-25-26 cm [8 ¾"-9½"-9½"-9¾"-10¼"] (along bottom edge) measured from where the last new sts were cast on. Loosely bind off 17-17-15-15-12 sts from bottom edge and now bind off on every other row: 15-14-14-13-13 sts 2 times and 11 sts 1 time = 50-52-54-56-59 sts left on needle. Back piece: Slip the 65-68-71-73-75 sts from stitch holder back on needle = 115-120-125-129-134 sts. Continue with Turns. When piece measures approx 21-23-25-28-31 cm [8¼"-9"-9¾"-11"-12¼"] (measured along bottom edge) from MT at mid side, insert a new MT = mid back, (piece measures approx 28-31-33-35-37 cm [11"-12¼"-13"-13¾"-14½"] at neckline, measured from casting on row mid front). Continue until piece measures approx 20-22-24-27-30 cm [8"-8¾"-9½"-10⅝"-11¾"] (measured along bottom edge) from MT mid back. Now work side piece in Alpaca as follows: Work 1 cm [⅜"] back and forth on 65-68-71-73-75 sts from bottom edge only. Insert a MT (= mid side). Work 1 cm [⅜"] back and forth on the 65-68-71-73-75 sts again and now slip these sts on a stitch. Right sleeve: Like left sleeve. Right front piece: Slip the 65-68-71-73-75 sts from stitch holder back on needle = 115-120-125-129-134 sts. Continue with Turns as on back piece. When you have worked the same amount of rows on right front piece as on left front piece work front band as follows: Work approx 1.5 cm [½"] on all sts with Alpaca. On next row from RS (from bottom edge) bind off for buttonholes as follows: Work 47-47-48-51-51 sts, bind off 1 st, * work 13-14-15-15-16 sts, bind off 1 st *, repeat from *-* a total of 4 times, work the remaining 11-12-12-13-14 sts. On next row cast on 1 new st over the bind off sts. Continue on all sts until front band measures approx 3 cm [1⅛"]. Bind off loosely. Cuffs: Pick up 1 st in approx every other row along sleeve edge. Work garter st back and forth on all sts with Alpaca, at the same time adjust no of sts to 51-55-55-58-60 on first row. When cuff measures approx 15 cm [6"] (or required length) bind off loosely. Assembly: Sew seam under sleeves, edge to edge with neat sts – seam will sit approx 1 cm [⅜"] from centre of sleeve because of the edge under sleeve. Sew openings under sleeves (by side piece). Neckline: Worked in garter st. Beg mid front (from the RS). Pick up approx 120-170 sts round the neck (also over front bands each side) with Alpaca. K 1 row from WS. Insert 4 marking threads/markers (=MT) round neck as follows: MT-1 and MT-4: each side after 19 sts from mid front. MT-2 and MT-3: each side after 30 sts from mid front. These MT are to be used for working Turns. Now also insert another 2 MT, 1 each side on back piece in transition between sleeve and back piece. These MT are to be used for dec. Continue with Turns – see explanation above. At the same time, on every row from RS dec 1 st on each side of both MT on back piece (= 4 dec). At the same time when neckline measures approx 1.5 cm [½"] mid front bind off for 1 buttonhole in line with others on front band by binding off the 4th st from mid front. On next row cast on 1 new st in the same place. Continue with Turns and dec until neckline measures approx 4 cm [1½"] (measured mid back). Dec on back piece are now complete. K 1 row from RS, at the same time dec 20 sts evenly between MT-2 and MT-3. K 1 row from WS. Continue with Turns as before. When neckline measures approx 6 cm [2⅜"] mid back K 1 row from RS, at the same time inc 25 sts evenly between MT-2 and MT-3. Continue with Turns until neckline measures 7 cm [2¾"] (measured mid back). Bind off loosely. Crochet border round jacket: Crochet a border round jacket with crochet hook size 3.5 mm [E/4] and Alpaca as follows, beg at neck mid back, work round neck, down along front band, along bottom edge, up along front band and round neck to mid back: * 1 sc, 2 ch, skip approx 1 cm [⅜"] *, repeat from *-* and finish with 1 sl st in sc from beg of round. Note! Make sure border isn’t too tight. Crochet border round sleeves: Crochet a similar border round sleeve edges. Assembly: Sew on buttons. Also see Knitting tip-2! |
|
 |
|
Have you finished this pattern?Tag your pictures with #dropspattern or submit them to the #dropsfan gallery. Do you need help with this pattern?You'll find 19 tutorial videos, a Comments/Questions area and more by visiting the pattern on garnstudio.com. © 1982-2026 DROPS Design A/S. We reserve all rights. This document, including all its sub-sections, has copyrights. Read more about what you can do with our patterns at the bottom of each pattern on our site. |
|


With over 40 years in knitting and crochet design, DROPS Design offers one of the most extensive collections of free patterns on the internet - translated to 17 languages. As of today we count 324 catalogs and 12290 patterns - 12280 of which are translated into English (US/in).
We work hard to bring you the best knitting and crochet have to offer, inspiration and advice as well as great quality yarns at incredible prices! Would you like to use our patterns for other than personal use? You can read what you are allowed to do in the Copyright text at the bottom of all our patterns. Happy crafting!
Post a comment to pattern DROPS 110-2
We would love to hear what you have to say about this pattern!
If you want to leave a question, please make sure you select the correct category in the form below, to speed up the answering process. Required fields are marked *.