
Looking for a yarn?


Comments / Questions (164)
![]() Yvonne wrote:
Yvonne wrote:
Lt. Anleitung soll 1 R re auf rechts gesteickt werden. Was bedeutet das, wenn ich doch vorher krausrechts stricke? Dann habe ich doch immer eine linke reihe vorher.
10.05.2023 - 15:22DROPS Design answered:
Liebe Yvonne, mit 1 R. re. auf rechts ist es 1 Hinreihe rechts; und mit 1 R. re. auf links 1 Rückreihe rechts gemeint. Viel Spaß beim stricken!
10.05.2023 - 16:50
![]() Katja wrote:
Katja wrote:
Ich habe das Modell gestrickt. Ohne größere Probleme. Beim Tragen verwandelt sich allerdings die mittellange und weite Jacke immer mehr in einen langen und schmalen Mantel. Das wäre ja bei der kraussrechten Strickweise und doch beachtlichem Gewicht wegen Karisma zu erwarten. Schade, dass ich nicht daran gedacht hatte. Also denkt bitte daran, liebe Strickfans: so fest wie nur möglich stricken!
21.11.2022 - 20:28
![]() Ulrika Nielsen wrote:
Ulrika Nielsen wrote:
Hej! På höger framstycke står det att man skall avmaska 1 maska 35 gånger från rätsidan. Jag citerar: "Sticka 1 varv räta på avigsidan. Sedan stickas det så här: Kom ihåg att fortsätta avmaska i början av de AVIGA varven!" Det borde ni väl ändra?
17.05.2022 - 13:36
![]() Leslie wrote:
Leslie wrote:
I finally waded through this pattern which was a bit complicated at times, but I'm not getting the last part of the assembly - "sew collar tog mid back and sew to neckline". Specifically, the "dark gray" part (which come to a point on each side), which I really need a visual or something more specific. If someone has a back photo of their completed project, I think even that would help me. Thanks!
06.05.2022 - 15:41DROPS Design answered:
Dear Leslie, the "dark grey" part on back piece belongs to the collar pieces worked on each front piece (on left front piece, you increase sts at the end of every WS row and on right front piece you decreased sts at the beg of RS row and on right front piece you ). You will find much more pictures of this jacket on Ravelry, maybe it can help you. Happy knitting!
06.05.2022 - 16:09
![]() DeeDee Ralph wrote:
DeeDee Ralph wrote:
I am more of a beginner knitter and I am not convinced that I can successfully do the buttonholes so I would like to eliminate them. I skipped over that part and believe that I have completed the first pleat. I still have 72 stitches and I assume that I cast off at this point. (also, how many pleats do I make?) I am also making mine in the same color so no contrast. Maybe I bit off more than I should have. It wouldn't be the first time! Thanks FOR YOUR HELP!
10.03.2022 - 23:26DROPS Design answered:
Dear Mrs Ralph, repeat the short rows until you get the 159 to 179 sts (see size), then work one pleat; now work back and forth (remember to continue decreasing as before) = 131 to 149 sts, then cast off 8-10 sts; work flat for 7cm and work 1 pleast, and continue flat to 15-16 cm, etc. Can this help?
11.03.2022 - 09:55
![]() Vicki wrote:
Vicki wrote:
Love the look of the design. According to the instructions two pleats are made for each front, and there is only one pleat in the photo of the garment. I am also unclear on the front band, relative to a second pleat, which I don’t see. Thanks for your help.
07.09.2020 - 22:38DROPS Design answered:
Dear Vicky, only one of both pleat is worked with the 2nd colour, that's why you can see only one pleat on the photo, but pattern is right like this. Happy knitting!
08.09.2020 - 10:26
![]() Erna Böhre wrote:
Erna Böhre wrote:
Ik brei het Li voorpand en ben nu op het punt om de voorbies te breien. Ik begrijp de instructies niet waarbij je 72 steken vanaf de merkdraad moet breien de meerderingen erbij telt en het werk keert. Brei ik dit deel op de heengaande naald maar over een deel van de steken en teruggaand over alle steken?
19.01.2019 - 12:53DROPS Design answered:
Dag Erna,
Als je op de goede kant van het werk aan het breien bent en je bent bij de markeerdraad, dan brei je op dat moment 72 steken en dan keer je het werk (dus je breit niet de hele naald naar beneden)
23.01.2019 - 10:37
![]() Margaretha Emretsson wrote:
Margaretha Emretsson wrote:
Jag vill veta vilket garn jag kan byta till eftersom det aktuella garnet på mönstret inte fanns. Ni frågar hur många trådar men det vet jag inte.
18.01.2019 - 14:55DROPS Design answered:
Hei Margaretha. Denne jakken er strikket i Karisma som fortsatt er en del av vårt sortiment, og selges hos nesten alle våre forhandlere. Om du gjerne vil bytte til et annet garn kan du bruke hvilken garn du vil fra garngruppe B, da disse har samme strikkefasthet. For en oversikt over hvilke garn det er kan du trykke her. God fornøyelse.
23.01.2019 - 15:34
![]() Alexandra wrote:
Alexandra wrote:
Hej, sitter o läser igenom hur man ska gå tillväga men ser inte hur man gör luvan, står inte det med i beskrivningen?
12.12.2018 - 03:51DROPS Design answered:
Hei Alexandra. Det er ingen hette på denne jakken, men sjalskragen går ut i en spiss bak på ryggen. Denne strikkes som en del av forstykket, ved at du øker masker på slutten av omgangene fra vrangsiden. Først økes det 8-8-8-8-10-10 masker, og videre økes det 1 maske totalt 35-35-35-35-37-37 ganger. Kragen syes sammen midt bak tilslutt, som forklart under montering. God fornøyelse
12.12.2018 - 07:52Maureen Troake wrote:
Hello from South Africa. I love this pattern and want to make it for a friend. However, she wants a hood as well. Is it possible for someone to assist in adapting the collar design to become a hood?
14.06.2018 - 21:20DROPS Design answered:
Dear Mrs Troake, we are unfortunately not able to adjust every pattern to every individual request, for any indiividual assistance for adjustements, you are welcome to contact the store where you bought the yarn (even per mail or telephone) or to request help from a knitting forum. Happy knitting!
15.06.2018 - 08:23
|
|
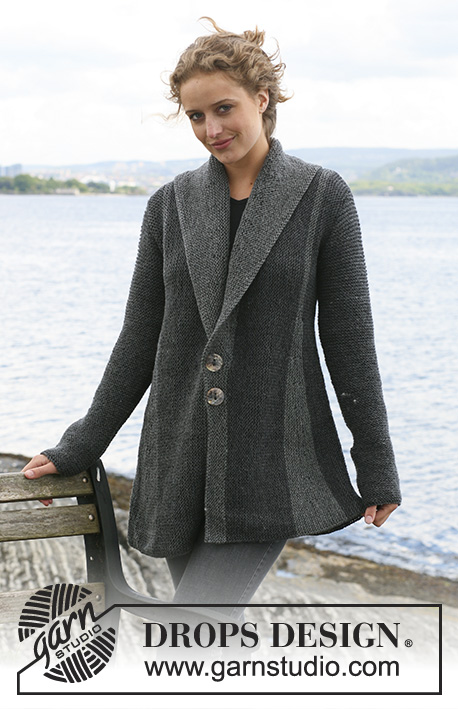
Pleasing in Pleats |
|
 |
 |
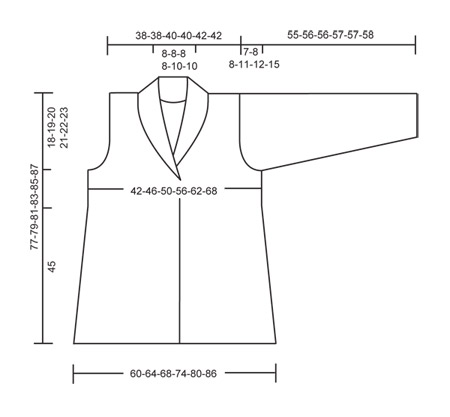
DROPS jacket with pleats worked from side to side in garter st in ”Karisma ”. Size S - XXXL. Yarn alternative ”Merino Extrafine”.
DROPS 110-1 |
|
|
Knitting tip: Garter st becomes very elastic. The garment will therefore be slightly longer and wider than measurements in measurement chart. Pleats: Work pleats in dark gray. 1 pleat with shortened rows: work 72 sts, turn piece and work return row, work 60 sts, turn piece and work return row, work 52 sts, turn piece and work return row, work 44 sts, turn piece and work return row, work 36 sts, turn piece and work return row, work 28 sts, turn piece and work return row, work 20 sts, turn piece and work return row, work 12 sts, turn piece and work return row, work all sts on row, turn piece and work return row, work all sts on row, turn piece and work return row, work all sts on row, turn piece and work return row, work all sts on row, turn piece and work return row, work 12 sts, turn piece and work return row, work 20 sts, turn piece and work return row, work 28 sts, turn piece and work return row, work 36 sts, turn piece and work return row, work 44 sts, turn piece and work return row, work 52 sts, turn piece and work return row, work 60 sts, turn piece and work return row, work 72 sts, turn piece and work return row. Measurement tip: Measure from cast on row and measure where pleat is narrowest. Buttonhole: At the same time on the 3rd row worked on all sts bind off for 2 buttonholes as follows: bind off st 73 and 74 from Marking Thread (MT) (i.e. the 2 sts after the turn) and bind off st 86 and 87 after MT (= 11 sts between buttonholes). On next row cast on 2 new sts over the cast of sts. ________________________________________________________________ BACK PIECE Worked back and forth on needle. The whole piece is worked in garter st, i.e. K all rows. Beg at side. See Knitting tip! Loosely cast on 94-96-98-99-101-102 sts on needle size 5 mm [US 8] with charcoal gray. Work 5-7-7-13-15-21 rows garter st (row 1 = RS). Remember the knitting gauge! At the end of next row (from WS) cast on 3 sts for armhole and now cast on 3 sts at the end of every 4th row from WS a total of 0-1-2-3-4-5 times. At the end of next row from WS cast on 26-24-23-22-20-19 sts 1 time = 123-126-130-133-136-139 sts. Seen from the RS, the sts on the right side of piece = towards neckline and sts on the left side of piece = towards bottom edge. Continue in garter st on all sts until piece measures 7-9-11-14-16-19 cm [2¾"-3½"-4⅜"-5½"-6¼"-7½"] from casting on row (adjust so that next row is from RS). Change to dark gray. K 1 row from RS and now work 1 pleat – see above. When pleat is completed, K 1 row from WS on all sts. Change to charcoal gray and continue back and forth on all sts until piece measures 17-19-21-24-26-29 cm [6¾"-7½"-8¼"-9½"-10¼"-11⅜"] – see Measurement tip! Now bind off 3 sts at the beg of row from RS for neck = 120-123-127-130-133-136 sts. Continue until piece measures 25-27-29-32-36-39 cm [9¾"-1⅝"-11⅜"-12½"-14¼"-15¼"] and now inc 3 sts at the end of row from WS = 123-126-130-133-136-139 sts. Continue back and forth on all sts until piece measures 32-34-36-39-43-46 cm [12½"-13⅜"-14¼"-15¼"-17"-18"] (adjust so that next row is from RS). Change to dark gray. K 1 row from RS and then work 1 pleat. When pleat is completed K 1 row on all sts from WS and change to charcoal gray. Continue until piece measures 40-42-45-48-52-55 cm [15¾"-16½"-17¾"-19"-20½"-21⅝"] and now bind off 26-24-23-22-20-19 sts at the beg of row from RS for armhole = 97-102-107-111-116-120 sts. On next row from RS bind off 3 sts at the beg of row and now bind off 3 sts at the beg of row on every 4th row from RS a total of 0-1-2-3-4-5 times = 94-96-98-99-101-102 sts. Work 5-7-7-13-15-21 rows back and forth on all sts. Piece now measures approx 42-46-50-56-62-68 cm [16½"-18"-19¾"-22"-24⅜"-26¾"]. Bind off loosely. LEFT FRONT PIECE Cast on and work piece from the side towards mid front. Loosely cast on 94-96-98-99-101-102 sts on needle size 5 mm [US 8] with charcoal gray. Work garter st back and forth on needle and cast on new sts for armhole as described for back piece = 123-126-130-133-136-139 sts. When piece measures 7-9-11-14-16-19 cm [2¾"-3½"-4⅜"-5½"-6¼"-7½"] (adjust so that next row is from RS) change to dark gray. K 1 row from RS and now work 1 pleat – see above. When pleat is completed K 1 row on all sts from WS and now change to charcoal gray. Continue back and forth on needle on all sts until piece measures 17-19-21-24-26-29 cm [6¾"-7½"-8¼"-9½"-10¼"-11⅜"] – see Measuring tip! Insert 1 Marking Thread (MT) at the beg of row (as seen from RS) and continue back and forth on all sts, at the same time inc 8-8-8-8-10-10 sts at the end of next row from WS = 131-134-138-141-146-149 sts. Now inc 1 st at the end of every row from WS a total of 35-35-35-35-37-37 times. At the same time after 7-7-7-7-9-9 inc change to dark gray on the next row from RS. K 1 row and K 1 row from WS. Remember to continue inc 1 st at the end of row! Now work 1 pleat (Note! no of sts in Pleat is from MT, the inc sts are additional). When pleat is completed K 1 row from RS and K 1 row from WS (also inc on this row). There are now 160-163-167-170-177-180 sts on row. Now work front band/collar (at the same time continue to inc 1 st at the end of every row from WS) as follows: * work 72 sts (from MT, the inc sts are additional), turn piece and work return row, work all sts on row, turn piece and work return row *. Repeat from *-* a total of 3 times. All inc are now complete = 166-169-173-176-183-186 sts on row. Cast of loosely. RIGHT FRONT PIECE Cast on and work piece from mid front towards the side. Loosely cast on 166-169-173-176-183-186 sts on needle size 5 mm [US 8] with dark gray. Insert 1 MT 43-43-43-43-47-47 sts in from beg of row (from RS). K 1 row from RS, at the same time beg dec 1 st at the beg of every row (from RS) a total of 35-35-35-35-37-37 times. K 1 row from WS and continue as follows: Remember to continue to dec 1 st at the beg of every row! * work 72 sts (from MT, inc sts before MT are additional), turn piece and work return row, work all sts on row, turn piece and work return row *. Repeat from *-* a total of 3 times. Remember to bind off for buttonholes! – see above. There are now 159-162-166-169-176-179 sts on row. Work 1 pleat. When pleat is completed (= 139-142-146-149-156-159 sts on row), K 1 row from RS (also dec on this row), K 1 row from WS and change to charcoal gray. Work 14-14-14-14-18-18 rows back and forth on all sts. All dec are now complete = 131-134-138-141-146-149 sts on row. At the beg of next row (from RS) bind off 8-8-8-8-10-10 sts = 123-126-130-133-136-139 sts. Insert 1 MT in piece, and now measure piece from here. Continue back and forth on all sts until piece measures 7 cm [2¾"] from MT and change to dark gray (adjust so that next row is from RS). K 1 row from RS and now work 1 pleat (the pleat will be at the left side of piece as seen from the RS, i.e. same side as pleat on back piece). When pleat is completed K 1 row on all sts (from WS) and now change to charcoal gray, Continue back and forth on all sts until piece measures 15-15-16-16-16-16 cm [6"-6"-6¼"-6¼"-6¼"-6¼"] from MT and now bind off the first 26-24-23-22-20-19 sts on row (from RS) = 97-102-107-111-116-120 sts. Bind off 3 sts at the beg of next row from RS and now bind off 3 sts at the beg of every 4th row from RS a total of 0-1-2-3-4-5 times = 94-96-98-99-101-102 sts on row. Work 5-7-7-13-15-21 rows and bind off loosely. SLEEVE Worked back and forth on needle. Loosely cast on 44-46-48-48-50-52 sts (includes 1 edge st each side) on needle size 5 mm [US 8] with charcoal gray. Work garter st back and forth on needle. When piece measures approx 6 cm [2⅜"] dec 1 st each side and repeat the dec when piece measures 14 cm [5½"] = 40-42-44-44-46-48 sts. Now complete sleeve in reverse stockinette st. When piece measures 18 cm [7"] inc 1 st each side on every 5-4.5-3.5-2.5-2-2 cm [2"-1¾"-1¼"-⅞"-¾"-¾"] a total of 6-7-9-10-12-12 times = 52-56-62-64-70-72 sts. When piece measures 48-48-48-46-45-43 cm [19"-19"-19"-18"-17¾"-17"] (less on the larger sizes because of longer sleeve cap and wider shoulder) bind off 3 sts each side for armhole. bind off to shape the sleeve cap each side at the beg of every row: 2 sts 3-3-4-3-4-2 times, 1 st 0-1-0-5-4-10 times, then 2 sts each side until piece measures 54-55-55-56-56-57 cm [21¼"-21⅝"-21⅝"-22"-22"-22½"], now bind off 3 sts each side 1 time and bind off remaining sts. Sleeve measures approx 55-56-56-57-57-58 cm [21⅝"-22"-22"-22½"-22½"-22¾"]. ASSEMBLY Sew shoulder seams (the pleats on front and back piece should meet at the top of shoulder). Set in sleeves. Sew sleeve and side seams inside 1 edge st. Sew collar tog mid back and sew to neckline. Sew on buttons. |
|
|
|
Have you finished this pattern?Tag your pictures with #dropspattern or submit them to the #dropsfan gallery. Do you need help with this pattern?You'll find 18 tutorial videos, a Comments/Questions area and more by visiting the pattern on garnstudio.com. © 1982-2025 DROPS Design A/S. We reserve all rights. This document, including all its sub-sections, has copyrights. Read more about what you can do with our patterns at the bottom of each pattern on our site. |
|


With over 40 years in knitting and crochet design, DROPS Design offers one of the most extensive collections of free patterns on the internet - translated to 17 languages. As of today we count 314 catalogs and 11822 patterns - 11812 of which are translated into English (US/in).
We work hard to bring you the best knitting and crochet have to offer, inspiration and advice as well as great quality yarns at incredible prices! Would you like to use our patterns for other than personal use? You can read what you are allowed to do in the Copyright text at the bottom of all our patterns. Happy crafting!
Post a comment to pattern DROPS 110-1
We would love to hear what you have to say about this pattern!
If you want to leave a question, please make sure you select the correct category in the form below, to speed up the answering process. Required fields are marked *.