
Popular categories
Looking for a yarn?


Comments / Questions (64)
![]() Lynn wrote:
Lynn wrote:
Thanks. I’m visualizing it better, but another question. Do I use/attach new yarn or was I to have ended working the side at that end to just continue with that yarn?
31.10.2018 - 17:10DROPS Design answered:
Dear Lynn, you will have to cut the yarn you used for the side on left front piece (for the 1 cm worked over the bottom sts on left front piece) and join new yarn to work sleeve. Happy knitting!
01.11.2018 - 13:59
![]() Lynn wrote:
Lynn wrote:
I have made some progress and am now starting the left sleeve. I don't see where you switch from Alpaca to Fabel, and the picture indicates the sleeve is Fabel. It says to continue with Alpaca on the new stitches only. Does that mean all but the 11 stitches are Fabel? For the whole sleeve??
30.10.2018 - 18:33DROPS Design answered:
Dear Lynn, you start sleeve with Alpaca and cast on new sts with Alpaca, then work only over the new stitches casting on more sts (= always with alpaca), when piece measures 2 cm (bottom of the sleeve), work short rows as explained above, ie with Fabel and Alpaca. Happy knitting!
31.10.2018 - 08:18
![]() Lynn wrote:
Lynn wrote:
Follow up: I agree the gauge is so important. But, as I said, when I swatch I get two different gauges for the different yarns. Is this the intent of the designer??
03.10.2018 - 16:22DROPS Design answered:
Dear Lynn, that's why you can work 2 swatches: one with only Alpaca (for the edges - so that your edges are not too tight/loose) and one with stripes Fabel/Alpaca so that you are also sure to get the correct tension with stripes. Remember to block your swatch before measuring it - and then repeat process with smaller/larger needles if necessary. Happy knitting!
04.10.2018 - 09:32
![]() Lynn wrote:
Lynn wrote:
I have the yarn called for in the pattern, but the two types knit up to different gauges--the Fabel multi-color yarn is right using the #4 needles called for. But for the Alpaca, I have to go down to a size 2 needle or smaller to get that gauge. Is this how the pattern was intended?? Do I switch needles when using the Alpaca??
02.10.2018 - 22:04DROPS Design answered:
Dear Lynn, work a swatch following the stripes as in the short rows, steam iron your swatch to block it and check your gauge. Try again with smaller/larger needles if required. It's important that you get the correct tension to get the finished measurements as shown in chart. Happy knitting!
03.10.2018 - 07:46
![]() Sylvie wrote:
Sylvie wrote:
Bonjour, quand on commence la manche gauche, faut-il d'abord faire un aller-retour sur les 50 mailles du haut puis ajouter les 11, 15, 15 et 17 mailles ou bien faut-il tricoter les 11, 15, 15, 17 mailles puis ajouter les 50 mailles du haut ? D'avance merci pour votre réponse. Cordialement
30.04.2017 - 17:23DROPS Design answered:
Bonjour Sylvie, non on ne tricote pas les 50 m, on monte d'abord 11 m, puis 2x15 m et 1 x17 m en même temps, on tricote les rangs raccourcis à 2 cm depuis le début de la manche. Bon tricot!
02.05.2017 - 11:11
![]() John Nergård wrote:
John Nergård wrote:
Er det noe galt med størrelsen på ermene? Jeg er kommet til 24 cm str medium, hun jeg strikker til er 33 cm rundt øverarmen!! Er det noe i oppskriften jeg ikke har fått med meg? John
18.05.2016 - 23:06DROPS Design answered:
Hej John. 24 cm er maalet nederst paa aermet (fra hvor du satte de siste nye m opp), det skulle gerne vaere breddere överst. Men hvis du gerne vil have ermet breddere alligevel, saa strik lidt mere (inclusiv vendinger), men vaer opmaerksom paa du saa bruger lidt mere garn. God fornöjelse.
19.05.2016 - 13:22
![]() Angelika wrote:
Angelika wrote:
Hallo liebes Drops-Team, ich verstehe die Anleitung zum Stricken der Halskante nicht. Nach 4cm Halskante werden 20 Maschen abgenommen; nach 6cm dann 25 Maschen aufgenommen? Wäre für eine Erklärung dankbar.
13.05.2016 - 07:55DROPS Design answered:
Liebe Angelika, Zu- und Abnahmen an der Halskante werden oftmals wegen der besseren Passform gemacht.
19.05.2016 - 08:29ANNALISA BERTIN wrote:
Gradirei molto avere la traduzione di questo modello in italiano. E' possibile? Grazie infinite! annalisa bertin
03.10.2015 - 14:21
![]() Molie wrote:
Molie wrote:
Bonjour, je commence ce jolie modèle mais je ne sais pas comment faire après le quatrième rang:le fil fabel ce trouve au milieu de l'ouvrage.
09.07.2014 - 16:35
![]() Kimetra Flowers wrote:
Kimetra Flowers wrote:
I typed my comment too quickly: I meant that you should call it the OSLO OSO Slimming Sweater.
06.07.2014 - 21:13
|
|
Cat Stripes |
|
 |
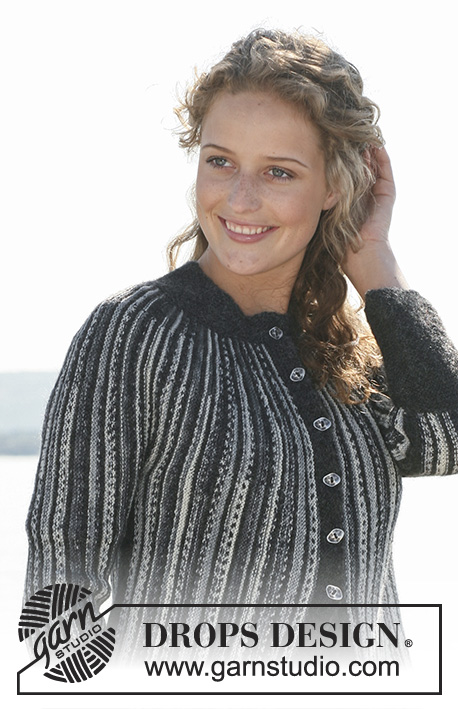 |
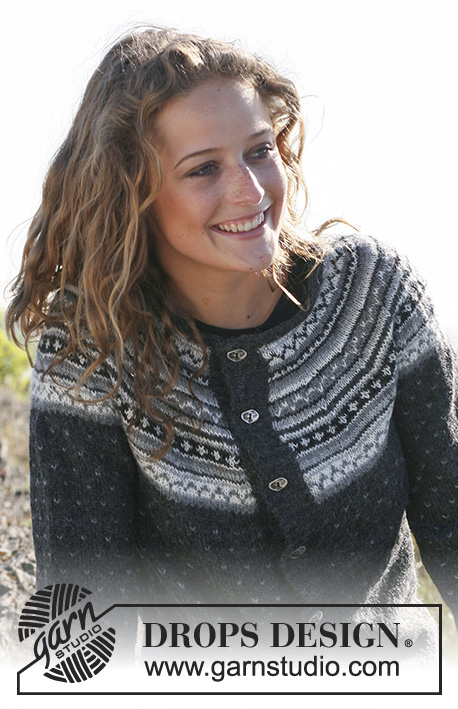
DROPS jacket in garter st in ”Fabel” and ”Alpaca”. Worked from side to side with shortened rows. Size S - XXL.
DROPS 110-2 |
|
|
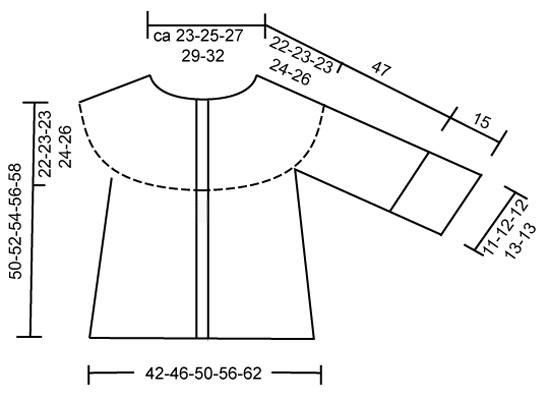
Knitting tip-1: When working turns, twist the Fabel and Alpaca threads at bottom edge after every 4th row, in order the Alpaca thread follows the piece. Knitting tip-2: Steam iron garment before use. Turns: Work shortened rows with turns in mid piece to slightly A-shape the jacket. Beg at bottom edge and work towards neckline. * Work all sts with Fabel, turn piece and work return row. Work 103-108-112-115-119 sts with Fabel, turn piece and work return row. See Knitting-tip-1! Work 89-94-97-99-103 sts with Fabel, turn piece and work return row. Work 70-73-76-78-80 sts with Fabel, turn piece and work return row. Work all sts with Alpaca, turn piece and work return row *. Repeat from *-*. Turns, neckline: Beg mid front (1st row = RS): * Work row to MT-4, turn piece, K2 tog and work return row to MT-1, turn piece, K2 tog and work return row to MT-3, turn piece , K2 tog and work return row to MT-2, turn piece, K2 tog and work return row on all sts *, repeat from *-*. ___________________________________________________________________ JACKET Jacket is worked from side to side, beg mid front on left front piece, work towards sleeve, work sleeve, back piece, sleeve and then right front piece. Row is worked from bottom edge towards neckline and the entire jacket is worked in garter st, i.e. K all rows. Left front piece: Loosely cast on 115-120-125-129-134 sts on needle size 3.5 mm [US 4] with Alpaca. First row = RS (from bottom edge towards neckline). Work approx 3 cm [1⅛"] on all sts with Alpaca = front band (make sure next row is from RS). Remember the knitting gauge! Now continue with shortened rows and Turns – see explanation above. See Knitting tip-1! Continue like this until piece measures approx 23-25-27-30-33 cm [9"-9¾"-10⅝"-11¾"-13"] from casting on row (measured at bottom edge). At neckline piece measures approx 11-12-12½-14-15 cm [4⅜"-4¾"-4⅞"-5½"-6"] from casting on row. Now continue over the side piece with Alpaca as follows: work 1 cm [⅜"] back and forth on 65-68-71-73-75 sts from bottom edge only. Insert a Marking Thread (MT) (= mid side). Work 1 cm [⅜"] back and forth on the 65-68-71-73-75 sts again and now slip these sts on a stitch holder (to be used later for back piece). Now work the sleeve. Left sleeve: = 50-52-54-56-59 sts on needle. Loosely cast on 11 new sts over sts on stitch holder. Continue with Alpaca on the new sts only (= edge under the sleeve), at the same time cast on 15-14-14-13-13 sts 2 times and 17-17-15-15-12 sts 1 time on every other row towards bottom edge. At the same time when piece measures 2 cm [¾"] continue on all sts. Continue with Turns. After all new sts have been cast on there are 108 sts on needle. Continue until piece measures approx 22-24-24-25-26 cm [8 ¾"-9½"-9½"-9¾"-10¼"] (along bottom edge) measured from where the last new sts were cast on. Loosely bind off 17-17-15-15-12 sts from bottom edge and now bind off on every other row: 15-14-14-13-13 sts 2 times and 11 sts 1 time = 50-52-54-56-59 sts left on needle. Back piece: Slip the 65-68-71-73-75 sts from stitch holder back on needle = 115-120-125-129-134 sts. Continue with Turns. When piece measures approx 21-23-25-28-31 cm [8¼"-9"-9¾"-11"-12¼"] (measured along bottom edge) from MT at mid side, insert a new MT = mid back, (piece measures approx 28-31-33-35-37 cm [11"-12¼"-13"-13¾"-14½"] at neckline, measured from casting on row mid front). Continue until piece measures approx 20-22-24-27-30 cm [8"-8¾"-9½"-10⅝"-11¾"] (measured along bottom edge) from MT mid back. Now work side piece in Alpaca as follows: Work 1 cm [⅜"] back and forth on 65-68-71-73-75 sts from bottom edge only. Insert a MT (= mid side). Work 1 cm [⅜"] back and forth on the 65-68-71-73-75 sts again and now slip these sts on a stitch. Right sleeve: Like left sleeve. Right front piece: Slip the 65-68-71-73-75 sts from stitch holder back on needle = 115-120-125-129-134 sts. Continue with Turns as on back piece. When you have worked the same amount of rows on right front piece as on left front piece work front band as follows: Work approx 1.5 cm [½"] on all sts with Alpaca. On next row from RS (from bottom edge) bind off for buttonholes as follows: Work 47-47-48-51-51 sts, bind off 1 st, * work 13-14-15-15-16 sts, bind off 1 st *, repeat from *-* a total of 4 times, work the remaining 11-12-12-13-14 sts. On next row cast on 1 new st over the bind off sts. Continue on all sts until front band measures approx 3 cm [1⅛"]. Bind off loosely. Cuffs: Pick up 1 st in approx every other row along sleeve edge. Work garter st back and forth on all sts with Alpaca, at the same time adjust no of sts to 51-55-55-58-60 on first row. When cuff measures approx 15 cm [6"] (or required length) bind off loosely. Assembly: Sew seam under sleeves, edge to edge with neat sts – seam will sit approx 1 cm [⅜"] from centre of sleeve because of the edge under sleeve. Sew openings under sleeves (by side piece). Neckline: Worked in garter st. Beg mid front (from the RS). Pick up approx 120-170 sts round the neck (also over front bands each side) with Alpaca. K 1 row from WS. Insert 4 marking threads/markers (=MT) round neck as follows: MT-1 and MT-4: each side after 19 sts from mid front. MT-2 and MT-3: each side after 30 sts from mid front. These MT are to be used for working Turns. Now also insert another 2 MT, 1 each side on back piece in transition between sleeve and back piece. These MT are to be used for dec. Continue with Turns – see explanation above. At the same time, on every row from RS dec 1 st on each side of both MT on back piece (= 4 dec). At the same time when neckline measures approx 1.5 cm [½"] mid front bind off for 1 buttonhole in line with others on front band by binding off the 4th st from mid front. On next row cast on 1 new st in the same place. Continue with Turns and dec until neckline measures approx 4 cm [1½"] (measured mid back). Dec on back piece are now complete. K 1 row from RS, at the same time dec 20 sts evenly between MT-2 and MT-3. K 1 row from WS. Continue with Turns as before. When neckline measures approx 6 cm [2⅜"] mid back K 1 row from RS, at the same time inc 25 sts evenly between MT-2 and MT-3. Continue with Turns until neckline measures 7 cm [2¾"] (measured mid back). Bind off loosely. Crochet border round jacket: Crochet a border round jacket with crochet hook size 3.5 mm [E/4] and Alpaca as follows, beg at neck mid back, work round neck, down along front band, along bottom edge, up along front band and round neck to mid back: * 1 sc, 2 ch, skip approx 1 cm [⅜"] *, repeat from *-* and finish with 1 sl st in sc from beg of round. Note! Make sure border isn’t too tight. Crochet border round sleeves: Crochet a similar border round sleeve edges. Assembly: Sew on buttons. Also see Knitting tip-2! |
|
 |
|
Have you finished this pattern?Tag your pictures with #dropspattern or submit them to the #dropsfan gallery. Do you need help with this pattern?You'll find 19 tutorial videos, a Comments/Questions area and more by visiting the pattern on garnstudio.com. © 1982-2026 DROPS Design A/S. We reserve all rights. This document, including all its sub-sections, has copyrights. Read more about what you can do with our patterns at the bottom of each pattern on our site. |
|


With over 40 years in knitting and crochet design, DROPS Design offers one of the most extensive collections of free patterns on the internet - translated to 17 languages. As of today we count 324 catalogs and 12290 patterns - 12280 of which are translated into English (US/in).
We work hard to bring you the best knitting and crochet have to offer, inspiration and advice as well as great quality yarns at incredible prices! Would you like to use our patterns for other than personal use? You can read what you are allowed to do in the Copyright text at the bottom of all our patterns. Happy crafting!
Post a comment to pattern DROPS 110-2
We would love to hear what you have to say about this pattern!
If you want to leave a question, please make sure you select the correct category in the form below, to speed up the answering process. Required fields are marked *.