
Popular categories
Looking for a yarn?


Comments / Questions (56)
![]() GIUSEPPINA PARISI wrote:
GIUSEPPINA PARISI wrote:
Buongiorno, questo modello si può lavorare anche con i ferri circolari in tondo? In piano ho difficoltà perché i punti diventano disuguali... (con la mia mano) Grazie per la gentile risposta.
12.02.2026 - 11:09DROPS Design answered:
Buongiorno Giuseppina, questo modello è progettato per essere lavorato in piano, ma, adattando il modello lo può lavorare anche in tondo. Buon lavoro!
14.02.2026 - 14:01
![]() Yvette wrote:
Yvette wrote:
Bonjour je suis sur le devant mais je ne comprends pas comment on termine sur du point de mousse… « Après 1 motif de M2/M3 en hauteur, on a 31m pour chaque épaule. À 59cm de hauteur totale, terminer au point mousse. À 62cm de hauteur totale, rabattre toutes les mailles. » Le point de mousse serait sur les épaules… à quel moment on reprend les mailles centrales? Merci
20.03.2025 - 19:48DROPS Design answered:
Bonjour Yvette, de la même façon que pour le dos, les 3 cm (en taille S) du devant et du dos se tricotent au point mousse et plus en point ajouré. Autrement dit, lorsque vous avez terminé un dernier motif du point ajouré en hauteur, continuez au point mousse pour les 3 derniers cm. Les mailles mises en attente sont reprises à la fin pour le col, cf. Assemblage. Bon tricot!
21.03.2025 - 08:31
![]() Tone wrote:
Tone wrote:
Det er en ting til jeg lurer på nå når jeg skal montere. Hvorfor felles de midterste maskene på bakstykke for så å plukke opp nye når man skal strikke halskant? Hadde ikke vært penere å sette de masken på tråd, slik man gjør på forstykket?
09.02.2025 - 15:06DROPS Design answered:
Hei Tone, Det er helt mulig å sette maskene på bakstykket på en tråd også. God fornøyelse!
10.02.2025 - 06:50
![]() Tone wrote:
Tone wrote:
Hvordan får man pene skuldersømmer når man har riller på toppen, slik som i denne oppskriften? Jeg fnner ingen videoer på det. Hadde det blitt penere å sy sammen uten å felle av først?
09.02.2025 - 15:00DROPS Design answered:
Hei Tone, Du kunne bruke maskesting til skuldersømmen. Her er lenken til videoen vår: https://www.garnstudio.com/video.php?id=48&lang=no God fornøyelse!
11.02.2025 - 07:00
![]() Tone wrote:
Tone wrote:
Kan denne toppen strikkes rundt, på rundpinne slik at forstykket og bakstykket strikes sammen opp til under ermeåpningen?
31.01.2025 - 18:02DROPS Design answered:
Hei Tone. Ja, men les godt igjennom oppskriften og finn ut av hva som må tilpasses (f.eks trengs da ikke kantmaskene i sidene, finn ut hvordan du skal felle, få perlestrikken til å stemme når det strikkes rundt osv). mvh DROPS Design
03.02.2025 - 14:30
![]() Będzie Po Polsku wrote:
Będzie Po Polsku wrote:
Ile włóczki proporcjonalnie idzie na wzór ażurowy, a ile na pozostałe elementy? po połowie? 2/5? np. xxl/xxxl 250g/250g, 200g/300g? 350g/150g? proszę o odpowiedź
04.11.2024 - 16:23DROPS Design answered:
Witaj, niestety nie potrafię precyzyjnie odpowiedzieć na to pytanie. Radzę zrobić 2 identyczne próbki, jedna ażurem, a druga pozostałym ściegiem i zważyć je. Próbki powinny być większe niż zazwyczaj, wtedy obliczenie będzie dokładniejsze. Pozdrawiamy!
05.11.2024 - 09:13
![]() Patricia Psotka-Sarmini wrote:
Patricia Psotka-Sarmini wrote:
Hallo Drops Team, irgendwie komme ich mit dem Muster M1 nicht klar. M1a besteht aus 3M, soweit klar. M1b soll aus 6M bestehen. Gibt es zwischen den 2 Umschlägen noch 1 re M? Also 1Mre, 1 U, 2M re zusammen stricken, 1M re, 2M überzogen zusammen, 1 U, über 114M das Muster M1b. Dann M1c=1Mre, 2M re überzogen, 1M re, 1RM
14.07.2024 - 20:10DROPS Design answered:
Liebe Patricia, ja, zwischen den Umschlägen ist immer noch 1 M re. Sie stricken wie folgt: 1 M re, 2 M re zusammenstricken, 1 Umschlag (= M.1A), * 1 M re, 1 Umschlag, 2 M re überzogen zusammenstricken, 1 M re, 2 M re zusammenstricken, 1 Umschlag * (= M.1B), von *-* über insgesamt 114 M stricken, dann 1 M re, 1 Umschlag, 2 M überzogen zusammenstricken, 1 M re (= M.1C). Gutes Gelingen weiterhin!
21.07.2024 - 16:23
![]() Brigitta Sommer wrote:
Brigitta Sommer wrote:
Guten Tag Für dieses Objekt habe ich gemäss ihren angaben für gr. L 9 strangen bei renis wollshop gekauft. Leider reicht das nicht. Ich muss 1 strange nachkaufen. Ich hoffe dass ich noch die gleiche farbpartie erhalte. Ist das auch andern schon passiert. Besten Dank für Ihre Antwort Brigitta Sommer
10.03.2024 - 12:29
![]() Brigitta Sommer wrote:
Brigitta Sommer wrote:
Guten Tag. Kann es sein dass der obere Teil d.h. das Muster ohne Randmaschen gestrickt wird? Kann man dann die Maschen für das Ärmelbord gut aufnehmen ohne Randmaschen? Besten Dank für die Anwort Brigitta Sommer
27.11.2023 - 13:38DROPS Design answered:
Liebe Frau Sommer, es sind keine extra Randmaschen, man wird einfach die erste und die letzte Masche wie bei den Diagrammen gestrickt. Viel Spaß beim stricken!
27.11.2023 - 16:01
![]() Robi wrote:
Robi wrote:
Buongiorno, perché ci sono le spiegazioni sul davanti sinistro,e la parte destra dov'è?Grazie.
09.12.2021 - 08:26DROPS Design answered:
Buonasera Robi, grazie per la segnalazione: abbiamo corretto il testo. Buon lavoro!
10.12.2021 - 13:14
|
||||||||||||||||
DROPS 107-24 |
||||||||||||||||
|
|
||||||||||||||||
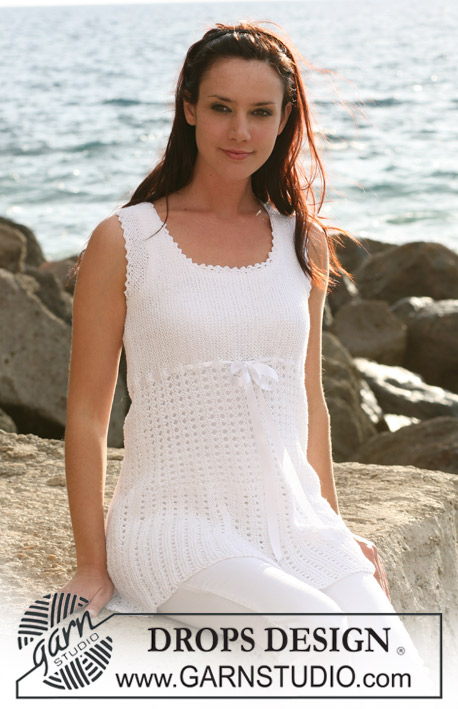
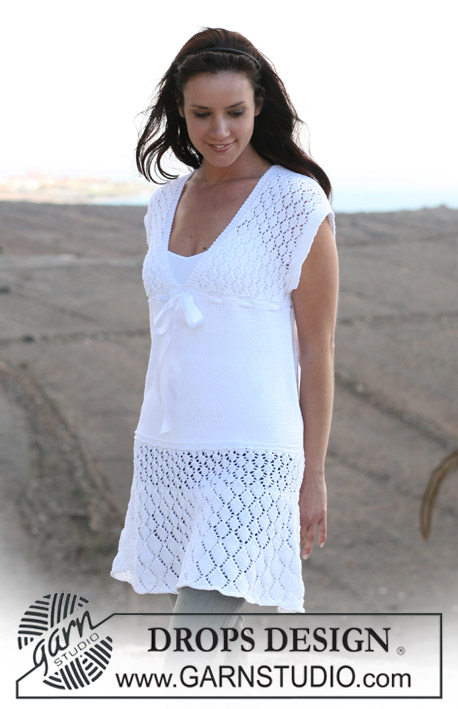
DROPS top in lace pattern and Rib in “Muskat”. Size S – XXXL
DROPS 107-24 |
||||||||||||||||
|
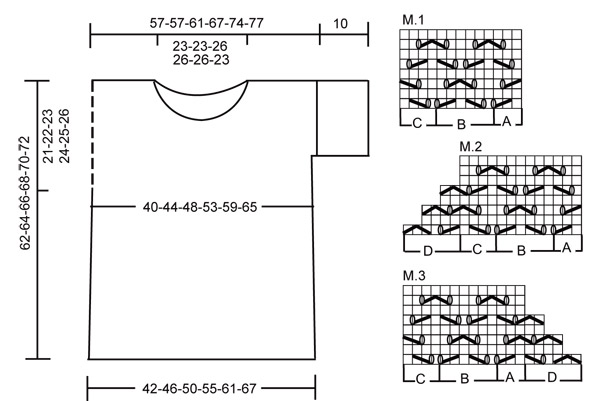
Rib: As seen from RS: *K1/P2*, repeat from *-*. Garter st, back and forth on needle: K all rows Garter st, in the round: K 1 round, P 1 round. Moss st: First row: *K1/P1*, repeat from *-*. Second row: P over K, K over P. Repeat second row. Pattern: See diagram M.1, M.2 and M.3.The diagram shows the pattern from the RS side. Back piece: Worked back and forth on circular needle. Cast on 101-107-116-131-143-155 sts (includes 1 edge st each side) on needle size 3.5 mm [US 4]. Work 2 rows stockinette st and continue in Rib with 1 edge st each side – see above. Continue like this until piece measures 12 cm [4¾"]. Change to needle size 4 mm [US 6] and continue in stockinette st, at the same time dec 11-9-10-13-13-13 sts evenly on first row = 90-98-106-118-130-142 sts. Remember the knitting gauge! When piece measures 15 and 20 cm [6" and 8"] dec 1 st each side = 86-94-102-114-126-138 sts. When piece measures approx 21-22-22-23-23-24 cm [8¼"-8¾"-8¾"-9"-9"-9½"] – adjust so that next row is from RS – work 4 rows garter st, then 2 rows stockinette st and continue in moss st – see above. When piece measures approx 25-26-26-27-27-28 cm [9¾"-11"-11"-10⅝"-10⅝"-11"] – adjust so that next row is from RS - work 2 rows stockinette st, then 4 rows garter st, at the same time dec 5-7-9-9-15-15 sts evenly on last row = 81-87-93-105-111-123 sts. Now continue in M.1 from RS as follows: 1 edge st, M.1A (= 3 sts), M.1B on the next 72-78-84-96-102-114 sts, and finish row with M.1C (= 4 st) and 1 edge st. After 1 vertical repeat of M.1, work 4 rows garter st, at the same time inc 5-7-9-9-15-15 sts evenly on first row = 86-94-102-114-126-138 sts. Work 2 rows stockinette st, 4 rows garter st, 2 rows stockinette st and continue in moss st. When piece measures approx 40-41-42-43-44-45 cm [15¾"-16⅛"-16½"-17"-17¼"-17¾"] – adjust so that next row is from RS – work 2 rows stockinette st, at the same time dec 1 st on last row = 85-93-101-113-125-137 sts. Now cast on 9-5-4-4-4-1 new sts each side = 103-103-109-121-133-139 sts. Work 4 rows garter st and continue as follows from RS: M.1A (= 3 sts), M.1B on the next 96-96-102-114-126-132 sts, M.1C (= 4 sts). Continue like this until piece measures 59-61-63-65-67-69 cm [23¼"-24"-24¾"-25½"-26⅜"-27⅛"] and now complete piece in garter st. When piece measures 60-62-64-66-68-70 cm [23⅝"-24⅜"-25¼"-26"-26¾"-27½"] bind off the middle 39-39-45-45-45-39 sts for neck and dec 1 st on neckline on next row = 31-31-31-37-43-49 sts left on each shoulder. Bind off loosely when piece measures 62-64-66-68-70-72 cm [24⅜"-25¼"-26"-26¾"-27½"-28⅜"]. Front piece: Cast on and work like back piece until piece measures approx 54-56-58-59-61-63 cm [X"] – adjust to 1 full repeat of M.1 = 103-103-109-121-133-139 sts. Continue as follows: M.2A (= 3 sts), M.2B on the next 24-24-24-30-36-42 sts, M.2C (=4 sts) and M.2D (= 6 sts). Slip the next 29-29-35-35-35-29 sts on a thread or stitch holder, and continue as follows: M.3D, M.3A, M.3B on the next 24-24-24-30-36-42 sts, finish row with M.3C. After 1 vertical repeat of M.2/M.3 there are 31-31-31-37-43-49 sts left on each shoulder. When piece measures 59-61-63-65-67-69 cm [X"] complete piece in garter st. bind off when piece measures 62-64-66-68-70-72 cm [24⅜"-25¼"-26"-26¾"-27½"-28⅜"]. Assembly: Sew shoulder seams. Sleeve edges: Pick up 92-98-104-110-116-122 sts (includes 1 edge st each side) along armhole on needle size 3.5 mm [US 4]. K 1 row from WS and continue in Rib (first row = WS) as follows: 1 edge st, *P1/K2", repeat from *-* and finish with 1 edge st. (from RS = P2/K1). Continue until Rib measures approx 10 cm [4"] and bind off loosely in Rib. Assembly: Sew sleeve edge seam, under arm seam and side seam inside 1 edge st. Pick up approx 110-125 sts (includes sts on thread or stitch holder) round neckline and work 4 rows garter st. Bind off. |
||||||||||||||||
Diagram explanations |
||||||||||||||||
|
||||||||||||||||
 |
||||||||||||||||
Have you finished this pattern?Tag your pictures with #dropspattern or submit them to the #dropsfan gallery. Do you need help with this pattern?You'll find 21 tutorial videos, a Comments/Questions area and more by visiting the pattern on garnstudio.com. © 1982-2026 DROPS Design A/S. We reserve all rights. This document, including all its sub-sections, has copyrights. Read more about what you can do with our patterns at the bottom of each pattern on our site. |
||||||||||||||||


With over 40 years in knitting and crochet design, DROPS Design offers one of the most extensive collections of free patterns on the internet - translated to 17 languages. As of today we count 324 catalogs and 12290 patterns - 12280 of which are translated into English (US/in).
We work hard to bring you the best knitting and crochet have to offer, inspiration and advice as well as great quality yarns at incredible prices! Would you like to use our patterns for other than personal use? You can read what you are allowed to do in the Copyright text at the bottom of all our patterns. Happy crafting!
Post a comment to pattern DROPS 107-24
We would love to hear what you have to say about this pattern!
If you want to leave a question, please make sure you select the correct category in the form below, to speed up the answering process. Required fields are marked *.