
Popular categories
Looking for a yarn?


Comments / Questions (40)
![]() Nora Schmid wrote:
Nora Schmid wrote:
Nachdem ich das Seitenteil gestrickt habe, sind 9 Maschen zuviel. Es sind 57 statt 48 Maschen, davon 25 Maschen Krausrippe für den Kragen. in der anleitung habe ich nichts weiter gefunden wo ich abnehmen könnte. Kann mir jemand helfen?
04.09.2014 - 22:16DROPS Design answered:
Sie haben ja mit 54 M angefangen. Sie nehmen an der Seite der Jacke wie beim Rückenteil ab, d.h. Sie nehmen 7 M ab (alle 5 cm 7 x 1 M) = 47 M. Außerdem nehmen Sie für den Kragen 7 M zu = 54 M. Für den Armausschnitt nehmen Sie insgesamt 6 M ab (1x 3 M, 1x 2 M und 1x 1 M) = 48 M.
10.09.2014 - 10:33
![]() Irène Willocq wrote:
Irène Willocq wrote:
Merci infiniment pour vos explications qui m'ont bien aidée et grâce auxquelles j'y suis arrivée. Cordialement
20.12.2013 - 18:02
![]() Irène Willocq wrote:
Irène Willocq wrote:
Je ne comprends pas l'explication pour le col châle. Faut-il tricoter un rang à l'endroit, et le rang suivant à l'envers à l 'exception des 13 mailles de bordures à tricoter au point mousse ? Et que signifie "la mesure à partir du marqueur sur le côté le plus court" ? Je suis débutante et là vraiment je suis bloquée. J'attends votre réponse avec impatience et vous en remercie d'avance. Cordialement Irène Willocq
20.12.2013 - 00:43DROPS Design answered:
Bonjour Mme Willocq, on tricote des rangs raccourcis sur le col pour lui donner sa forme, commencez par l'extérieur (pas côté épaule), et tricotez *2 rangs sur toutes les m, 2 rangs sur les 13 premières m* (et pas 1 rang comme indiqué par erreur auparavant), ainsi on a davantage de rangs sur l'extérieur du col et moins côté "épaule", le côté le plus court. Bon tricot!
20.12.2013 - 09:15
![]() C. Cuppes wrote:
C. Cuppes wrote:
Hoe kan het dat als je met 2 draden breidt van de kleur (522) waar je het hele vest meebreidt, minder nodig hebt dan van de overige kleuren. Bijvoorbeeld maat XL. kleur 522 350 gram nodig en van de oveige 3 kleuren in totaal 550 gram nodig. (904 200 gr, 151 150 gr, 161 200 gr).
18.11.2013 - 12:14DROPS Design answered:
Hoi. Het vest wordt gebreid met strepen van verschillende kleuren. De bollen komen per 50 gram, dus je zult wat restjes overhouden van de streep kleuren als het vest klaar is. Als je bij de laatste bol aankomt, kun je deze tot 2 kleine bollen rollen en zo met 2 draden breien of gebruik de binnenste en de buitenste draad van de bol.
19.11.2013 - 16:56
![]() Winifred Waite wrote:
Winifred Waite wrote:
Many thanks for your very prompt reply.
04.06.2013 - 12:12
![]() Winifred Waite wrote:
Winifred Waite wrote:
Can you clarify the final instructions for the shawl collar please. I don't understand how you can knit 13 stitches then knit a row without turning and knitting back those 13 stitches just as you do when you knit short rows.Many thanks for advice on this.
03.06.2013 - 20:03DROPS Design answered:
Dear Mrs Waite, you are correct, you will work short rows on the collar to make it wider on the outermost sts, so that you work 2 rows on all sts and 2 rows on the first 13 sts only and repeat these 4 rows. Happy knitting!
04.06.2013 - 08:48
![]() Winifred Waite wrote:
Winifred Waite wrote:
Many thanks for your response. I'm using the same colours as on the pattern but they seem a bit darker than the photograph. I know it's difficult to get an exact representation on a website. However the colours are absolutely gorgeous. I just can't stop knitting and watching the combinations of colours emerging. I feel like Joseph in a coat of so many colours it will go with everything! Maybe is name should be Joseph's Jacket. Many thanks for this fabulous wool and lovely pattern.
30.05.2013 - 19:27
![]() Winifred Waite wrote:
Winifred Waite wrote:
On back & fronts after work measures 33 cms and you have worked the 2 rows garter st 2 rows st stitch 3 times do I assume you revert to stocking stitch for the remainder?
27.05.2013 - 17:16DROPS Design answered:
Dear Mrs Wait, after these 12 rows you continue in stocking st as before. Happy knitting!
28.05.2013 - 09:09
![]() Utemi wrote:
Utemi wrote:
Inzwischen habe ich verstanden, dass mit 2 Fäden gestrickt wird. Es wäre toll und sehr hilreich, wenn die Farbwechsel vor der Anleitung zusätzlich als Liste aufgeführt werden könnten. Da das Muster sehr einfach ist, müsste ich den Farbwrchsel im Text nicht mehr suchen. Vielen Dank im Voraus!
25.03.2013 - 05:33
![]() Jeanette Seitzberg wrote:
Jeanette Seitzberg wrote:
Hej, Denne skønne jakke skal være mit næste projekt, men jeg undrer mig over garnforbruget. Det ser ud som om turkis/blå er gennemgående mens der skiftes mellem de andre farver. I str XL skal der bare kun bruges 350g turkis/blå mens der skal bruges 550g af de andre. Det er en meget stor forskel - kan det passe? Vh, Jeanette
21.10.2012 - 19:34DROPS Design answered:
Hej Jeanette, ja garnforbruget skal stemme ellers havde vi hørt noget nu!
16.11.2012 - 09:46
|
|
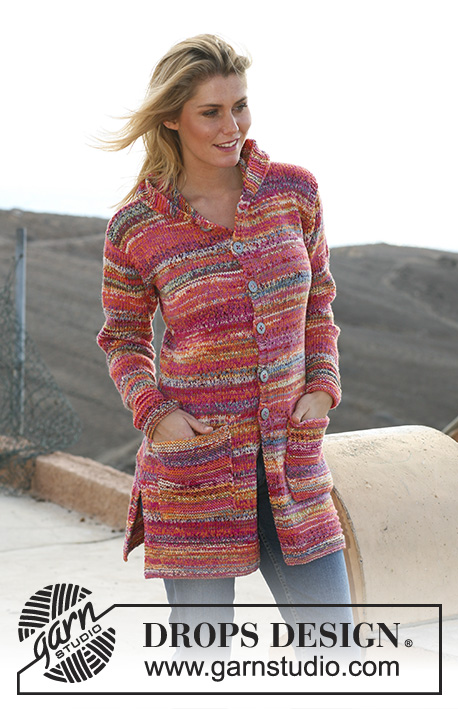
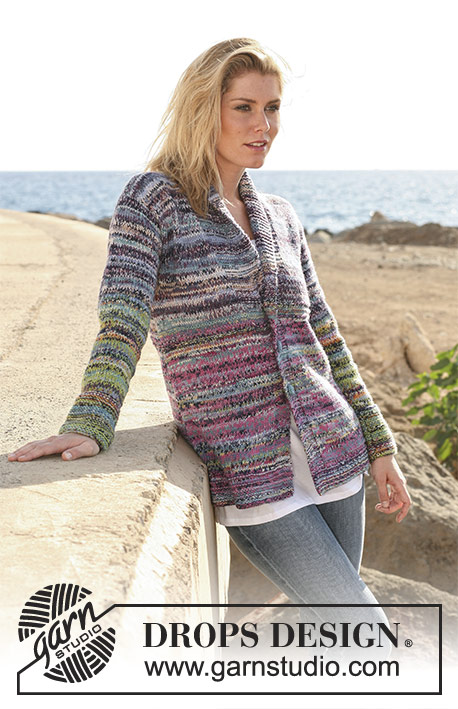
Desert Spring |
|
 |
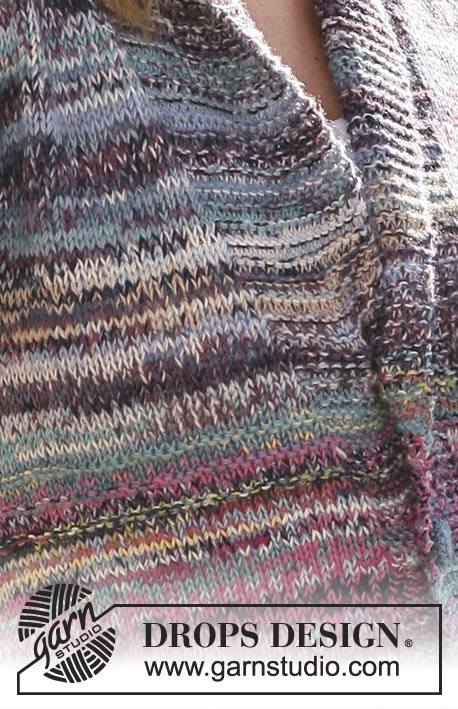 |
DROPS jacket with collar in double thread “Fabel”. Size S – XXXL
DROPS 106-29 |
|
|
Garter st, back and forth on needle: K all rows. Increasing tip (applies to collar): Inc inside 1 garter st as follows: make 1 yo, K yo into back of st on return row. Work all inc sts in garter st. Buttonholes: Make buttonholes on right front piece. 1 buttonhole = bind off fourth st from mid front, cast on 1 new st on return row. Make buttonholes when piece measures: Size S: 21, 27 and 33 cm [8¼"-10⅝" and 13"]. Size M: 22, 28 and 34 cm [8¾"-11" and 13⅜"]. Size L: 23, 29 and 35 cm [9"-11⅜" and 13¾"]. Size XL: 24, 30 and 36 cm [9½"-11¾" and 14¼"]. Size XXL: 25, 31 and 37 cm [9¾"-12¼" and 14½"]. Size XXXL: 26, 32 and 38 cm [10¼"-12½" and 15"]. Back piece: Worked back and forth on needle. Cast on 90-98-104-112-118-122 sts (includes 1 edge st each side) on needle size 5 mm [US 8] with 1 thread turquoise/blue (no 522) and 1 thread pink dream (no 161) and work 4 cm [1½"] garter st. Now work 2 rows stockinette st, 2 rows garter st, 2 rows stockinette st and 2 rows garter st. Remember the knitting gauge! Continue in stockinette st, at the same time when piece measures 14 cm [5½"] dec 1 st each side on every 5-5-5-7-11-11 cm [2"-2"-2"-2¾"-4⅜"-4⅜"] a total of 7-7-7-6-4-4 times = 76-84-90-100-110-114 sts. When piece measures 33 cm [13"] work *2 rows garter st, 2 rows stockinette st*, repeat from *-* a total of 3 times. When piece measures 38 cm [15"] change pink dream (no 161) to lavender mix (no 904) and continue in double thread with turquoise/blue mix (no 522) and lavender mix (no 904). When piece measures 49-50-51-52-53-54 cm [19¼"-19¾"-20"-20½"-21"-21¼"] bind off 3 sts each side for armhole and dec to shape the armhole on every other row: 2 sts 1-2-3-4-6-6 times and 1 st 1-2-2-4-5-6 times = 64-66-68-70-70-72 sts. When piece measures 66-68-70-72-74-76 cm [26"-26¾"-27½"-28⅜"-29⅛"-30"] bind off the middle 16-16-18-18-18-20 sts for neck and dec 1 st on neckline on next row = 23-24-24-25-25-25 sts left on each shoulder. Bind off when piece measures 68-70-72-74-76-78 cm [26¾"-27½"-28⅜"-29⅛"-30"-30¾"]. Left front piece: Cast on 54-58-61-65-68-70 sts (includes 1 edge st at side and 9 front band sts towards mid front) on needle size 5 mm [US 8] with 1 thread turquoise/blue (no 522) and 1 thread pink dream (no 161) and work 4 cm [1½"] garter st. Continue as follows: 2 rows stockinette st, 2 rows garter st, 2 rows stockinette st, 2 rows garter st with 9 front band sts in garter st. Now continue in stockinette st with 9 front band sts in garter st. At the same time dec at side as described for back piece. When piece measures 33 cm [13"] work *2 rows garter st, 2 rows stockinette st*, repeat from *-* a total of 3 times. Read all of the following section before continuing! At the same time when piece measures 34-35-36-37-38-39 cm [13⅜"-13¾"-14¼"-14½"-15"-15¼"] inc for collar – see Increasing tip: 1 st on every 5-5-6-6-7-7 cm [2"-2"-2⅜"-2⅜"-2¾"-2¾"] a total of 7-7-6-6-6-6 times – work inc sts in garter st. At the same time when piece measures 34-35-36-37-38-39 cm [13⅜"-13¾"-14¼"-14½"-15"-15¼"] inc number of garter sts on collar (i.e. number of sts remains the same, but number of garter sts inc and number of stockinette dec) on every 3 cm [1⅛"] a total of 9-9-10-10-10-10 times. Note! At the same time when piece measures 38 cm [15"] change pink dream (no 161) to lavender mix (no 904) and continue in double thread with turquoise/blue mix (no 522) and lavender mix (no 904). At the same time when piece measures 49-50-51-52-53-54 cm [19¼"-19¾"-20"-20½"-21"-21¼"] bind off for armhole as described for back piece. After all inc and dec are complete = 48-49-49-50-50-51 sts on row. When piece measures 68-70-72-74-76-78 cm [26¾"-27½"-28⅜"-29⅛"-30"-30¾"] bind off the outermost 23-24-24-25-25-26 sts for shoulder = 25 sts left on collar. Insert a Marking Thread (MT). Continue in garter st on collar as follows: *2 rows on all sts, 2 rows on 13 sts towards mid front*, repeat from *-* until collar measures 5.5-5.5-6-6-6-6.5 cm [2¼"-2¼"-2⅜"-2⅜"-2⅜"-2½"] from MT on the shorter side. Bind off loosely. Right front piece: Like left front piece, but mirrored. Remember buttonholes – see above. Sleeve: Worked back and forth on needle. Cast on 41-43-45-46-48-50 sts (includes 1 edge st each side) on needle size 5 mm [US 8] with 1 thread turquoise/blue (no 522) and 1 thread guacamole (no 151) and work 12 cm [4¾"] garter st. Continue in stockinette st, at the same time when piece measures 14-14-13-13-14-14 cm [5½"-5½"-5⅛"-5⅛"-5½"-5½"] inc 1 st each side on every 4-3-3-2.5-2-2 cm [1½"-1⅛"-1⅛"-⅞"-¾"-¾"] a total of 9-11-12-13-14-15 times = 59-65-69-72-76-80 sts. Note! At the same time when piece measures 36 cm [14¼"] change guacamole (no 151) to lavender mix (no 904) and continue in double thread with turquoise/blue mix (no 522) and lavender mix (no 904). When piece measures 48-48-48-48-44-44 cm [19"-19"-19"-19"-17¼"-17¼"] (less on the larger sizes because of larger sleeve cap) dec to shape the sleeve cap each side on every other row: 3 sts 1 time, 2 sts 2-3-3-3-3-3 times, 1 st 1-1-2-4-7-8 times, then 2 sts each side until piece measures 54-55-56-56-57-57 cm [21¼"-21⅝"-22"-22"-22½"-22½"], dec 3 sts each side 1 time and bind off remaining sts. Sleeve measures approx 55-56-57-57-58-58 cm [21⅝"-22"-22½"-22½"-22¾"-22¾"]. Assembly: Sew shoulder seams. Set in sleeves and sew side and sleeve seams inside 1 edge st. Sew tog collar mid back and sew collar to neckline. Button covers: Crochet 3 covers with crochet hook size 2.5 mm [US C/2] with 1 thread turquoise/blue mix as follows: 2 ch, then 16 dc in the first ch, finish with 1 sl st at the top of first dc (= round 1) Round 2: 1 sc in each dc and finish with 1 sl st in first sc from beg of round = 16 sc. Round 3: 3 ch, 1 dc in every other sc and finish with 1 sl st in third ch from beg of round = 8 dc. Put buttons inside cover, sew round the edge of cover and tighten thread. Sew on buttons on left front piece to fit buttonholes. |
|
 |
|
Have you finished this pattern?Tag your pictures with #dropspattern or submit them to the #dropsfan gallery. Do you need help with this pattern?You'll find 23 tutorial videos, a Comments/Questions area and more by visiting the pattern on garnstudio.com. © 1982-2026 DROPS Design A/S. We reserve all rights. This document, including all its sub-sections, has copyrights. Read more about what you can do with our patterns at the bottom of each pattern on our site. |
|


With over 40 years in knitting and crochet design, DROPS Design offers one of the most extensive collections of free patterns on the internet - translated to 17 languages. As of today we count 324 catalogs and 12290 patterns - 12280 of which are translated into English (US/in).
We work hard to bring you the best knitting and crochet have to offer, inspiration and advice as well as great quality yarns at incredible prices! Would you like to use our patterns for other than personal use? You can read what you are allowed to do in the Copyright text at the bottom of all our patterns. Happy crafting!
Post a comment to pattern DROPS 106-29
We would love to hear what you have to say about this pattern!
If you want to leave a question, please make sure you select the correct category in the form below, to speed up the answering process. Required fields are marked *.