
Popular categories
Looking for a yarn?


|
|
Desert Spring |
|
 |
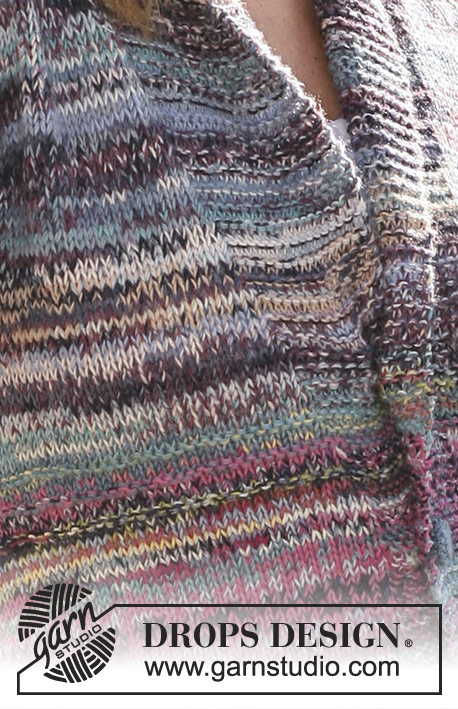 |
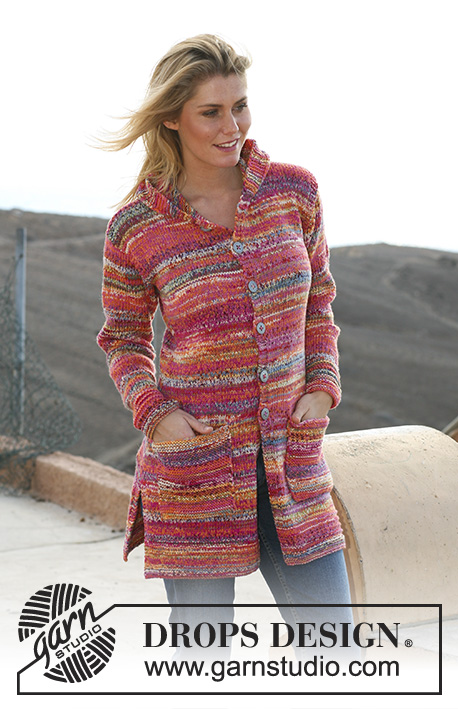
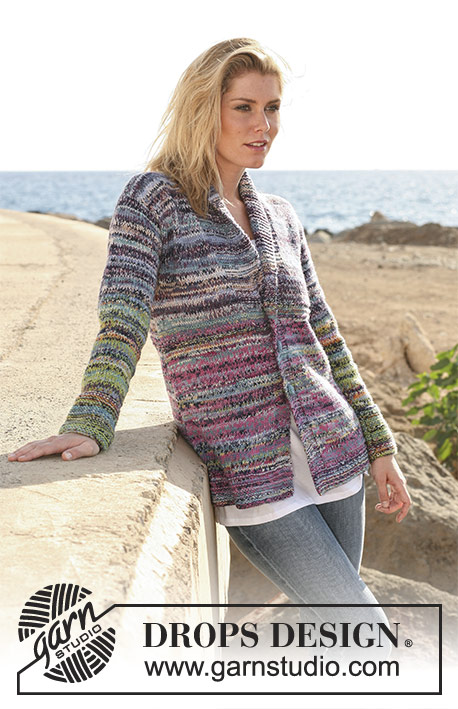
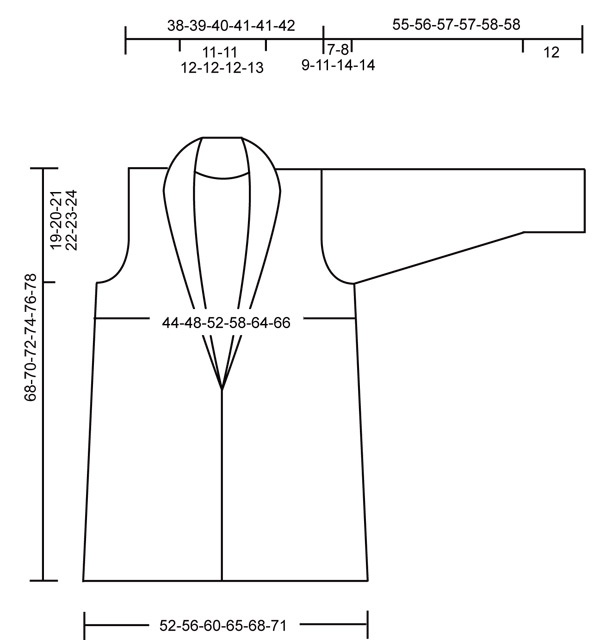
DROPS jacket with collar in double thread “Fabel”. Size S – XXXL
DROPS 106-29 |
|
|
Garter st, back and forth on needle: K all rows. Increasing tip (applies to collar): Inc inside 1 garter st as follows: make 1 yo, K yo into back of st on return row. Work all inc sts in garter st. Buttonholes: Make buttonholes on right front piece. 1 buttonhole = cast off fourth st from mid front, cast on 1 new st on return row. Make buttonholes when piece measures: Size S: 21, 27 and 33 cm. Size M: 22, 28 and 34 cm. Size L: 23, 29 and 35 cm. Size XL: 24, 30 and 36 cm. Size XXL: 25, 31 and 37 cm. Size XXXL: 26, 32 and 38 cm. Back piece: Worked back and forth on needle. Cast on 90-98-104-112-118-122 sts (incl 1 edge st each side) on needle size 5 mm with 1 thread turquoise/blue (no 522) and 1 thread pink dream (no 161) and work 4 cm garter st. Now work 2 rows stocking st, 2 rows garter st, 2 rows stocking st and 2 rows garter st. Remember the knitting tension! Continue in stocking st, at the same time when piece measures 14 cm dec 1 st each side on every 5-5-5-7-11-11 cm a total of 7-7-7-6-4-4 times = 76-84-90-100-110-114 sts. When piece measures 33 cm work *2 rows garter st, 2 rows stocking st*, repeat from *-* a total of 3 times. When piece measures 38 cm change pink dream (no 161) to lavender mix (no 904) and continue in double thread with turquoise/blue mix (no 522) and lavender mix (no 904). When piece measures 49-50-51-52-53-54 cm cast off 3 sts each side for armhole and dec to shape the armhole on every other row: 2 sts 1-2-3-4-6-6 times and 1 st 1-2-2-4-5-6 times = 64-66-68-70-70-72 sts. When piece measures 66-68-70-72-74-76 cm cast off the middle 16-16-18-18-18-20 sts for neck and dec 1 st on neckline on next row = 23-24-24-25-25-25 sts left on each shoulder. Cast off when piece measures 68-70-72-74-76-78 cm. Left front piece: Cast on 54-58-61-65-68-70 sts (incl 1 edge st at side and 9 front band sts towards mid front) on needle size 5 mm with 1 thread turquoise/blue (no 522) and 1 thread pink dream (no 161) and work 4 cm garter st. Continue as follows: 2 rows stocking st, 2 rows garter st, 2 rows stocking st, 2 rows garter st with 9 front band sts in garter st. Now continue in stocking st with 9 front band sts in garter st. At the same time dec at side as described for back piece. When piece measures 33 cm work *2 rows garter st, 2 rows stocking st*, repeat from *-* a total of 3 times. Read all of the following section before continuing! At the same time when piece measures 34-35-36-37-38-39 cm inc for collar – see Increasing tip: 1 st on every 5-5-6-6-7-7 cm a total of 7-7-6-6-6-6 times – work inc sts in garter st. At the same time when piece measures 34-35-36-37-38-39 cm inc number of garter sts on collar by 1 st (i.e. number of sts remains the same, but number of garter sts inc and number of stocking dec) on every 3 cm a total of 9-9-10-10-10-10 times. Note! At the same time when piece measures 38 cm change pink dream (no 161) to lavender mix (no 904) and continue in double thread with turquoise/blue mix (no 522) and lavender mix (no 904). At the same time when piece measures 49-50-51-52-53-54 cm cast off for armhole as described for back piece. After all inc and dec are complete = 48-49-49-50-50-51 sts on row. When piece measures 68-70-72-74-76-78 cm cast off the outermost 23-24-24-25-25-26 sts for shoulder = 25 sts left on collar. Insert a Marking Thread (MT. Continue in garter st on collar as follows: *K 2 rows on all sts, K 2 rows on 13 sts towards mid front*, repeat from *-* until collar measures 5.5-5.5-6-6-6-6.5 cm from MT on the shorter side. Cast off loosely. Right front piece: Like left front piece, but mirrored. Remember buttonholes – see above. Sleeve: Worked back and forth on needle. Cast on 41-43-45-46-48-50 sts (incl 1 edge st each side) on needle size 5 mm with 1 thread turquoise/blue (no 522) and 1 thread guacamole (no 151) and work 12 cm garter st. Continue in stocking st, at the same time when piece measures 14-14-13-13-14-14 cm inc 1 st each side on every 4-3-3-2.5-2-2 cm a total of 9-11-12-13-14-15 times = 59-65-69-72-76-80 sts. NB! At the same time when piece measures 36 cm change guacamole (no 151) to lavender mix (no 904) and continue in double thread with turquoise/blue mix (no 522) and lavender mix (no 904). When piece measures 48-48-48-48-44-44 cm (less on the larger sizes because of larger sleeve cap) dec to shape the sleeve cap each side on every other row: 3 sts 1 time, 2 sts 2-3-3-3-3-3 times, 1 st 1-1-2-4-7-8 times, then 2 sts each side until piece measures 54-55-56-56-57-57 cm, dec 3 sts each side 1 time and cast off remaining sts. Sleeve measures approx 55-56-57-57-58-58 cm. Assembly: Sew shoulder seams. Set in sleeves and sew side and sleeve seams inside 1 edge st. Sew tog collar mid back and sew collar to neckline. Button covers: Crochet 3 covers with crochet hook size 2.5 mm with 1 thread turquoise/blue mix as follows: 2 ch, then 16 tr in the first ch, finish with 1 sl st at the top of first tr (= round 1) Round 2: 1 dc in each tr and finish with 1 sl st in first dc from beg of round = 16 dc. Round 3: 3 ch, 1 tr in every other dc and finish with 1 sl st in third ch from beg of round = 8 tr. Put buttons inside cover, sew round the edge of cover and tighten thread. Sew on buttons on left front piece to fit buttonholes. |
|
|
|
|
Have you made this or any other of our designs? Tag your pictures in social media with #dropsdesign so we can see them! Do you need help with this pattern?You'll find tutorial videos, a Comments/Questions area and more by visiting the pattern on garnstudio.com. © 1982-2024 DROPS Design A/S. We reserve all rights. This document, including all its sub-sections, has copyrights. Read more about what you can do with our patterns at the bottom of each pattern on our site. |
|


With over 40 years in knitting and crochet design, DROPS Design offers one of the most extensive collections of free patterns on the internet - translated to 17 languages. As of today we count 304 catalogues and 11422 patterns - 11422 of which are translated into English (UK/cm).
We work hard to bring you the best knitting and crochet have to offer, inspiration and advice as well as great quality yarns at incredible prices! Would you like to use our patterns for other than personal use? You can read what you are allowed to do in the Copyright text at the bottom of all our patterns. Happy crafting!
Comments / Questions (39)
I only want to use two strands of the yarn and colours for this pattern. I'm also thinking of changing it to a sweater. How much yarn would I need?
11.11.2023 - 08:36DROPS Design answered:
Dear Adri, you would need a similar amount of yarn for a jacket and a sweater. If you only use 2 colours, then you will need the same amount of each colour to work with one thread of each. Happy knitting!
12.11.2023 - 20:01Peut on faire ce modèle àvec un seul fil merci
01.04.2022 - 03:22DROPS Design answered:
Bonjour Mme Polî, tout à fait, il vous faudra alors utiliser une laine du groupe de fils C - utilisez notre convertisseur pour voir les alternatives possibles (indiquez bien "2 fils") puis cliquez sur les noms pour voir les nuanciers. Bon tricot!
01.04.2022 - 08:12Dec to shape cap, 3 st 1 time, 2 sts 3 times, 1 st 4 times for xl . pls exp if that means to k 3 tog on the one row each end, then 2 tog on alt row three times. I am lost .Sorry need help Thanks
12.02.2022 - 18:26DROPS Design answered:
Dear Audrey, you should here cast off (not decrease), ie on back piece cast off at the beginning of each row on each side: 3 sts 1 time (= 3 sts at the beg of next 2 rows), then 2 sts 3 times (= 2 sts at the beg of next 6 rows) and 1 stitch 4 times (= 1 stich at the beg of next 8 rows). Happy knitting!
14.02.2022 - 11:05At 14 1/2 "inc for collar 1 st every 2 3/8, 6times At 14 1/2" inc g sts 1 1/8 ", 10times can this be done . don't understand, not explained clearly
07.02.2022 - 23:31DROPS Design answered:
Dear Mrs Eddy, when piece measures 14½’ (4th size), you will start increasing for the collar = increase the number of stitches on needle - see Increasing tip, then you will increase the number of stitches worked in garter stitch (and decrease the number of stitches worked in stocking stitch) - the number of stitches remains the same with these increases. Happy knitting!
08.02.2022 - 09:18For the pattern Desert Spring when you get to the part for the collar it states that at 35cm you should increase one stitch for the collar every 5cm. then it states that at 35cm you should increase one stitch for the collar every 3cm, which one of these is correct?
19.01.2022 - 21:12DROPS Design answered:
Dear Mrs Shipman, both are correct: the increases started at 35 cm do not increase the number of stitches: you just work 1 extra stitch in garter stitch (and then 1 stitch less in stocking stitch), you will just increase the number of stitches worked in garter stitch. You increase the number of sts for collar at the same time with a yarn over inside the edge stitch = this will increase the total number of sts on the row. Happy knitting!
20.01.2022 - 09:17Buongiorno, davvero un bel modello. Non capisco questo passaggio del davanti sinistro, potreste aiutarmi? GRAZIE MILLE "Proseguire a punto legaccio sulle m del collo come segue: *lavorare 2 ferri a dir su tutte le m, 2 ferri a dir solo sulle prime 13 m dal centro davanti *, ripetere da *-* finché il collo non misura 5,5-5,5-6-6-6-6,5 cm dal segno" Devo suddividere le maglie?
15.04.2021 - 13:53DROPS Design answered:
Buonasera Angela, è una lavorazione a ferri accorciati, cioè solo su una parte delle maglie e non su tutte le maglie del ferro. Buon lavoro!
15.04.2021 - 19:38Merci beaucoup de votre aide et de répondre aussi vite. Vous avez de très très beaux modèles de tricot.
13.01.2021 - 20:50Bonjour, J'aimerais avoir des explications pour le col sur le dos. Je comprends comment faire le col sur les deux devants mais pour ce qui est du dos, il manque des explications à quelques parts... Vous dites assembler le col au milieu dos puis le coudre à l'encolure dos, mais à quel endroit sont ces explications?
13.01.2021 - 01:01DROPS Design answered:
Bonjour Brigitte, vous assemblez entre elles les 25 mailles du col rabattues à la fin du devant droit et du devant gauche, et assemblez ensuite les rangs (le petit côté, celui où vous avez tricoté moins de rangs = côté épaule) le long des mailles rabattues pour l'encolure dos. Cette vidéo montre comment tricoter un col châle simple (= sans les rangs raccourcis faits ici). En espérant qu'elle puisse vous aider. Bon tricot!
13.01.2021 - 07:27Desert spring, sjaalkraag: hoe maak ik de kraag dicht? Is hier een filmpje van?
10.09.2020 - 15:16DROPS Design answered:
Dag Mirjam,
Nee, hier is helaas geen filmpje van. Je kan de kraag midden achter dicht maken met maassteken en ook aan het pand vastnaaien kun je maassteken gebruiken.
18.09.2020 - 12:31Linkerv.pand de kraag begin met 2nld ribbel dan verkorte nld dan wordt de kraag rechts wijder,maar die kant wordt toch in de halskant genaaid?
21.11.2019 - 22:01DROPS Design answered:
Dag Riet,
Dat klopt, maar met het linker voorpand wordt bedoeld wanneer je het kledingstuk draagt. Dus als je het vest aan hebt dan zit de kraag van het linker voorpand aan de rechterkant.
23.11.2019 - 16:56