DROPS Fabel
DROPS Fabel
75% Wool, 25% Polyamide
from 3.00 $ /50g
Get the yarn to make this pattern from 36.00$.

The yarn cost is calculated from the pattern’s smallest size and the yarn’s cheapest product type. Looking for an even better price? You might find it on the DROPS Deals!

DROPS SS24

Berlingot Cardigan

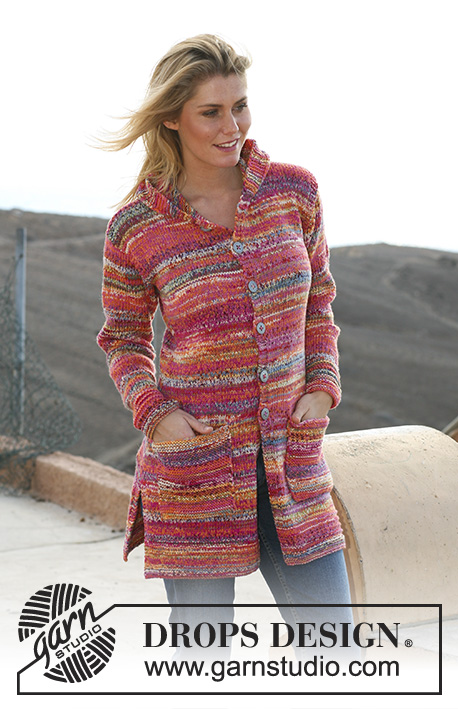
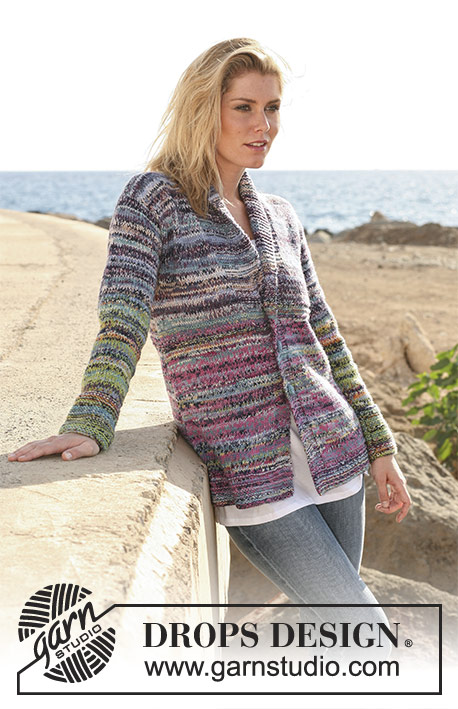
DROPS stripy jacket with ¾ sleeves in double thread “Fabel”. Size S-XXXL

DROPS 106-12
Size: S – M – L – XL – XXL – XXXL
Finished measurements:
Bust: 34⅝"-37¾"-41"–44"-48¾"-53½"
Hem: 35½"-38½"-41¾"–45¾"-49½"-54¼"
Full length: 26"-26¾"-27½"-28⅜"-29⅛"-30"

Materials:DROPS Fabel from Garnstudio
Color no 161, pink dream: 150-150-150-200-200-200 g
Color no 159, red chilli: 150-150-150-200-200-200 g
Color no 151, guacamole: 150-150-150-200-200-200 g
Color no 153, tex mex: 150-150-150-200-200-200 g

DROPS pointed and circular needle 80 cm size 5 mm [31½" US 8] - or size needed to obtain 17 sts x 22 rows in stockinette st with double thread Fabel = 10 x 10 cm [4" x 4"].

DROPS crochet hook size 3 mm [US C] – for button covers

DROPS Wood button, no 501: 5-5-5-6-6-6 pcs.

-------------------------------------------------------

Alternative Yarn – See how to change yarns here
Yarn Groups A to F – Use the same pattern and change the yarn here
Yarn usage using an alternative yarn – Use our yarn converter here

-------------------------------------------------------

DROPS Fabel
DROPS Fabel
75% Wool, 25% Polyamide
from 3.00 $ /50g
Get the yarn to make this pattern from 36.00$.

The yarn cost is calculated from the pattern’s smallest size and the yarn’s cheapest product type. Looking for an even better price? You might find it on the DROPS Deals!

Pattern instructions

NOTE: This pattern is written in American English. All measurements in charts are in cm. For conversion from inches to cm - click here. There are different terms for crocheting in American and British English. If this pattern includes crochet, click for "crochet terms" here. For this pattern in British English, please click here.
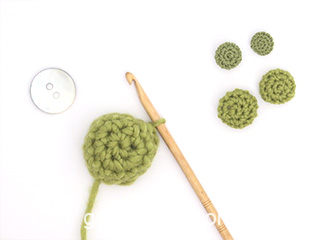
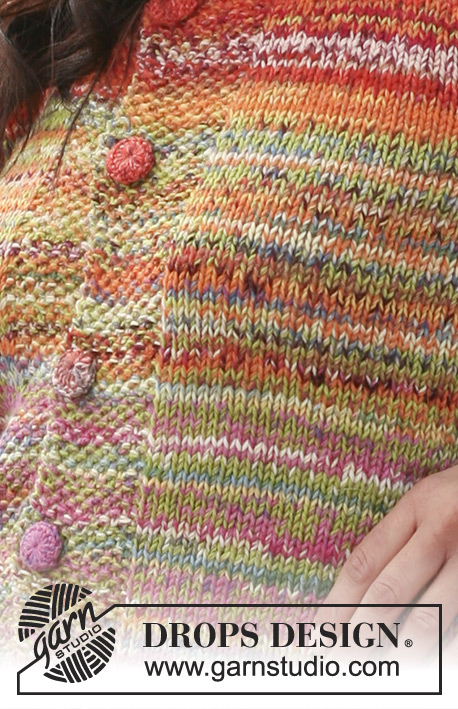
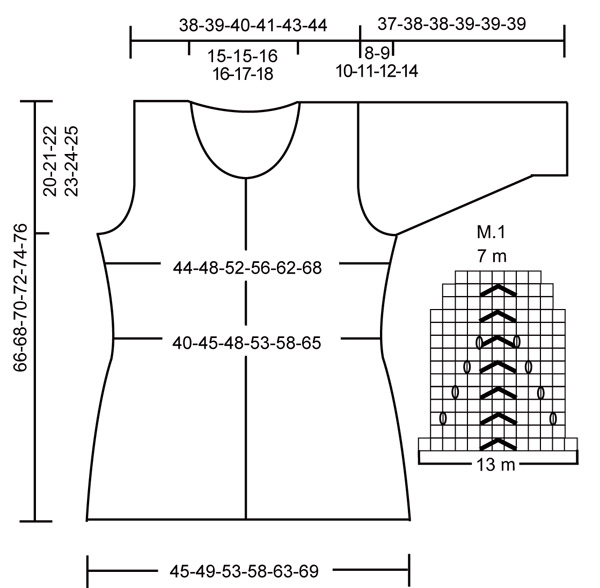
Garter st, back and forth on needle: K all rows.

Moss st: First row: *K1/P1*, repeat from *-*. Second row: P over K, K over P. Repeat second row.

Pattern: See diagram M.1. The diagram shows the pattern from the RS side.

Stripes:
Body piece:
Color no 161 + 159:
From casting on row to 17-17-18-18-19-19 cm [6¾"-6¾"-7"-7"-7½"-7½"].
Color no 161 + 151:
From 17-17-18-18-19-19 cm [6¾"-6¾"-7"-7"-7½"-7½"] to 34-34-36-36-38-38 cm [13⅜"-13⅜"-14¼"-14¼"-15"-15"].
Color no 151 + 153:
From 34-34-36-36-38-38 cm [13⅜"-13⅜"-14¼"-14¼"-15"-15"] to 50-51-53-54-56-58 cm [19¾"-20"-21"-21¼"-22"-22¾"].
Color no 153 + 159:
From 50-51-53-54-56-58 cm [19¾"-20"-21"-21¼"-22"-22¾"] to finished measurements.

Sleeve:
Color no 161 + 159:
From casting on row to 10-10-10-10-10-10 cm [4"-4"-4"-4"-4"-4"].
Color no 161 + 151:
From 10-10-10-10-10-10 cm [4"-4"-4"-4"-4"-4""] to 19-20-20-20-20-20 cm [7½"-8"-8"-8"-8"-8"].
Color no 151 + 153:
From 19-20-20-20-20-20 cm [7½"-8"-8"-8"-8"-8"] to 28-29-29-30-30-30 cm [11"-11⅜"-11⅜"-11¾"-11¾"-11¾"].
Color no 153 + 159:
From 28-29-29-30-30-30 cm [11"-11⅜"-11⅜"-11¾"-11¾"-11¾"] to finished measurements.

Buttonhole: Make buttonholes on right front piece. 1 buttonhole = bind off 4th st from mid front and cast on 1 new st on return row.
Make buttonholes when piece measures:
Size S: 12, 23, 33, 43 and 53 cm [4¾"-9"-13"-17" and 21"].
Size M: 12, 23, 34, 45 and 55 cm [4¾"-9"-13⅜"-17¾" and 21⅝"].
Size L: 12, 23, 34, 45 and 56 cm [4¾"-9"- 13⅜"-17¾" and 22"].
Size XL: 12, 22, 31, 40, 49 and 58 cm [4¾"-8¾"-12¼"-15¾"-19¼" and 22¾"].
Size XXL: 12, 22, 32, 41, 50 and 59 cm [4¾"-9"-12¼"-16⅛"-19¾" and 23¼"].
Size XXXL: 12, 22, 32, 42, 52 and 61cm [4¾"-9"-12¼"-16½"-20½" and 24"].


Front and back piece: Knitted back and forth on circular needle from mid front. Cast on 284-310-336-362-401-440 sts (includes 12 front band sts each side towards mid front) on circular needle size 5 mm [US 8] with 1 thread no 161 and 1 thread no 159 and work stripes – see above. Work 2 rows garter st and continue as follows from RS: 12 moss sts – see above (front band), M.1 on the next 260-286-312-338-377-416 sts, 12 moss sts (front band). After 1 vertical repeat of M.1 = 164-178-192-206-227-248 sts on row. Continue in stockinette st with 12 moss sts each side. Insert 2 Marking Threads (MT) in piece, 44-47-51-54-60-65 sts in from each side (back piece = 76-84-90-98-107-118 sts). Remember the knitting gauge! When piece measures 8 cm [3⅛"] dec 1 st on both sides of each MT on every 3-4-4.5-5-6-6.5 cm [1⅛"-1½"-1¼"-2"-2⅜"-2½"] a total of 4 times = 148-162-176-190-211-232 sts. Remember buttonholes on right front piece! When piece measures 24-26-28-30-32-34 cm [9½"-10¼"-11"-11¾"-12½"-13⅜"] inc 1 st on both sides of each MT on every 9-8.5-8-7.5-7-6.5 cm [3½"-3¼"-3⅛"-2⅞"-2¾"-2½"] a total of 3 times = 160-174-188-202-223-244 sts. When piece measures 46-47-48-49-50-51 cm [18"-18½"-19"-19¼"-19¾"-20"] bind off 3 sts on both sides of each MT for armhole and now complete back and front pieces separately.

Back piece: = 68-76-82-90-99-110 sts.
Dec to shape the armhole each side on every other row: 3 sts 0-0-0-0-1-1 time, 2 sts 1-2-3-4-4-6 times and 1 st 0-1-1-2-2-3 times = 64-66-68-70-73-74 sts. When piece measures 64-66-68-70-72-74 cm [25¼"- 26"-26¾"-27½"-28⅜"-29⅛"] bind off the middle 24-24-26-26-27-28 sts for neck and dec 1 st on neckline on next row = 19-20-20-21-22-22 sts left on each shoulder. Bind off when piece measures 66-68-70-72-74-76 cm [26"-26¾"-27½"-28⅜"-29⅛"-30"].

Left front piece: = 40-43-47-50-56-61 sts. Dec for armhole as described for back piece = 38-39-40-40-43-43 sts. When piece measures 54-56-57-59-60-62 cm [21¼"-22"-22½"-23¼"-23⅝"-24⅜"] put 12 sts towards mid front on a thread and dec to shape the neckline on every other row: 3 sts 1 time, 2 sts 1 time and 1 st 2-1-3-2-4-4 times = 19-20-20-21-22-22 sts left on shoulder. Bind off when piece measures 66-68-70-72-74-76 cm [26"-26¾"-27½"-28⅜"-29⅛"-30"].

Right front piece: Like left front piece, but mirrored.

Sleeve: Knitted back and forth on pointed needles. Cast on 38-40-42-44-46-48 sts (includes 1 edge st each side) on needle size 5 mm [US 8] with 1 thread no 161 and 1 thread no 159 and work stripes – see above. Work 6 rows moss st and continue in stockinette st, at the same time inc 10 sts evenly on first row = 48-50-52-54-56-58 sts. When piece measures 5 cm [2"] inc 1 st each side on every 3.5-3-2.5-2-1.5-1.5 cm [1¼"-1⅛"-⅞"-¾"-½"-½"] a total of 7-8-9-11-12-13 times = 62-66-70-76-80-84 sts. When piece measures 29-29-28-28-27-25 cm [11⅜"-11⅜"-11"-11"-10⅝"-9¾"] (less on the larger sizes because of larger sleeve cap) dec to shape the sleeve cap each side on every other row: 3 sts 1 time, 2 sts 3 times, 1 st 1-2-3-4-5-7 times, then 2 sts each side until piece measures 36-37-37-38-38-38 cm [14¼"-14½"-14½"-15"-15"-15"], dec 3 sts 1 time each side and bind off. Sleeve measures approx 37-38-38-39-39-39 cm [14½"-15"-15"-15¼"-15¼"-15¼"].

Assembly: Sew shoulder seams. Pick up approx 84 to 97 sts (includes sts on threads) round neckline on circular needle size 5 mm [US 8] with 1 thread no 153 and 1 thread no 159, work 4 rows garter st back and forth on needle, bind off. Set in sleeves and sew sleeve seam inside 1 edge st.

Button covers: Crochet 5-5-5-6-6-6 covers - 3-3-3-3-3-3 in color no 161 and 2-2-2-3-3-3 in color no 159 - with crochet hook size 3 mm [US C] in single thread Fabel as follows:
2 ch, then 16 dc in the first ch, finish with 1 sl st at the top of first dc (= round 1)
Round 2: 1 sc in each dc and finish with 1 sl st in first sc from beg of round (= 16 sc).
Round 3: 1 dc (replace first dc with 3 ch) in every other sc and finish with 1 sl st in first dc from beg of round = 8 dc.

Put buttons inside cover, sew round the edge of cover and tighten thread. Sew on buttons to fit buttonholes.

Diagram

All measurements in charts are in cm.

symbols = K from RS, P from WS
symbols = slip 1 st as if to K, K2 tog, psso
symbols = 1 yo between 2 sts
diagram

Each of our patterns has specific tutorial videos to help you.

Do you have a question? See a list of frequently asked questions (FAQ)

Knitting tension is what determines the final measurements of your work, and is usually measured per 10 x 10 cm. It is provided like so: number of stitches in width x number of rows in height - eg: 19 stitches x 26 rows = 10 x 10 cm.

The knitting tension is very individual; some people knit/crochet loosely while others work tightly. You adjust the knitting tension with the needle size, which is why the suggested needle size only serve as a guide! You need to adjust this (up or down) to ensure that YOUR knitting tension matches the knitting tension provided in the pattern. If you work with a different knitting tension than provided you will have a different yarn consumption, and your work will have different measurements than what the pattern suggests.

The knitting tension also determines which yarns can replace each other. As long as you achieve the same knitting tension you can replace one yarn with another.

See DROPS lesson: How to measure your tension/gauge

See DROPS video: How to make a gauge tension swatch

The required amount of yarn is provided in grams, eg: 450 g. To calculate how many balls you’ll need you first need to know how many grams are in 1 ball (25g, 50g or 100g). This information is available if you click on the individual yarn quality on our pages. Divide the amount required with the amount of each ball. For example, if each ball is 50g (the most common amount), the calculation will be as follows: 450 / 50 = 9 balls.

The important thing when changing from one yarn to another is that the knitting/crochet tension remains the same. This is so that the measurements of the finished piece will be the same as on the sketch provided. It is easier to achieve the same knitting tension using yarns from the same yarn group. It is also possible to work with multiple strands of a thinner yarn to achieve the knitting tension of a thicker one. Please try our yarn converter. We recommend you to always work a test swatch.

Please NOTE: when changing yarn the garment might have a different look and feel to the garment in the photo, due to individual properties and qualities of each yarn.

See DROPS lesson: Can I use a different yarn than the one mentioned in the pattern?

All our yarns are categorised into yarn groups (from A to F) according to thickness and knitting tension – group A contains the thinnest yarns and group F the thickest. This makes it easier for you to find alternative yarns to our patterns, should you wish to switch yarn. All yarns within the same group have a similar knitting tension and can easily replace each other. However, different yarn qualities have different structures and properties which will give the finished work a unique look and feel.

Click here for an overview of the yarns in each yarn group

At the top of all our patterns you’ll find a link to our yarn converter, which is a helpful tool should you wish to use a different yarn than suggested. By filling in the yarn quality you wish to replace, the amount (in your size) and number of strands, the converter will present good alternative yarns with the same knitting tension. Additionally it will tell you how much you’ll require in the new qualities and whether you’ll need to work with multiple strands. Most skeins are 50g (some are 25g or 100g).

If the pattern is worked with multiple colours, every colour will have to be converted separately. Similarly, if the pattern is worked with several strands of different yarns (for example 1 strand Alpaca and 1 strand Kid-Silk) you will have to find alternatives for each, individually.

Click here to see our yarn converter

Since different yarns have different qualities and textures we have chosen to keep the original yarn in our patterns. However, you can easily find options among our available qualities by using our yarn converter, or simply pick a yarn from the same yarn group.

It is possible that some retailers still have discontinued yarns in stock, or that someone has a few skeins at home that they would like to find patterns for.

The yarn converter will provide both alternative yarn as well as required amount in the new quality.

If you think it's hard to decide what size to make, it can be a good idea to measure a garment you own already and like the size of. Then you can pick the size by comparing those measures with the ones available in the pattern's size chart.

You'll find the size chart at the bottom of the pattern.

See DROPS lesson: How to read size chart

The needle size provided in the pattern serves only as a guide, the important thing is to follow the knitting tension. And since knitting tension is very individual, you will have to adjust the needle size to ensure that YOUR tension is the same as in the pattern – maybe you’ll have to adjust 1, or even 2 needle sizes, up or down to achieve the correct tension. For this, we recommend that you work test swatches.

Should you work with a different knitting tension than the one provided, the measurements of the finished garment might deviate from the measurement sketch.

See DROPS lesson: How to measure your tension/gauge

See DROPS video: How to make a gauge tension swatch

Working a garment top-down provides more flexibility and room for personal adjustment. For example it is easier to try the garment on while working, as well as making adjustments to length of yoke and shoulder caps.

The instructions are carefully explaining every step, in the correct order. Diagrams are adjusted to the knitting direction and are worked as usual.

The diagram depicts all rows/rounds, and every stitch seen from the right side. It is read from bottom to top, from right to left. 1 square = 1 stitch.

When working back and forth, every other row is worked from the right side and every other row is worked from the wrong side. When working from the wrong side, the diagram will have to be worked reversed: from left to right, knit stitches are purled, purl stitches are knit etc.

When working in the round every round is worked from the right side and the diagram are worked from right to left on all rounds.

See DROPS lesson: How to read knitting diagrams

The diagram depicts all rows/rounds, and every stitch seen from the right side. It is worked from bottom to top, from right to left.

When working back and forth every other row is worked from the right side: from right to left and every other row is worked from the wrong side: from left to right.

When working in the round, every row in the diagram are worked from the right side, from right to left.

When working a circular diagram you start in the middle and work your way outwards, counter clockwise, row by row.

The rows usually start with a given number of chain stitches (equivalent to the height of the following stitch), this will either be depicted in the diagram or explained in the pattern.

See DROPS lesson: How to read crochet diagrams

Instructions for working several diagrams after each other on the same row/round, will often be written like so: “work A.1, A.2, A.3 a total of 0-0-2-3-4 times". This means you work A.1 once, then A.2 is worked once, and A.3 is repeated (in width) the number of times provided for your size – in this case like so: S = 0 times, M = 0 times, L=2 times, XL= 3 times and XXL = 4 times.

The diagrams are worked as usual: begin with the first row in A.1, then work the first row in A.2 etc.

See DROPS lesson: How to read knitting diagrams

See DROPS lesson: How to read crochet diagrams

The total width of the garment (from wrist-to-wrist) will be larger in the larger sizes, despite the actual sleeves being shorter. The larger sizes have longer sleeve caps and wider shoulders, so there will be a good fit in all sizes.

The measurement sketch/schematic drawing provides information regarding the full length of the garment. If it’s a jumper or a jacket the length is measured from the highest point on the shoulder (usually closest to the neckline), and straight down to the bottom of the garment. It is NOT measured from the tip of shoulder. Similarly, the length of yoke is measured from the highest point on the shoulder and down to where yoke is split into body and sleeves.

See DROPS lesson: How to read a schematic drawing

Diagrams are often repeated on the round or in height. 1 repeat is the diagram the way it appears in the pattern. If it says to work 5 repeats of A.1 in the round, then you work A.1 a total of 5 times after/next to each other in the round. If it says to work 2 repeats of A.1 vertically/in height you work the entire diagram once, then begin again at the start and work the entire diagram one more time.

Chain stitches are slightly narrower than other stitches and to avoid working the cast-on edge too tight, we simply chain more stitches to begin with. The stitch count will be adjusted on the following row to fit the pattern and measurement sketch.

The rib edge is more elastic and will contract slightly compared to, for example, stocking stitch. By increasing before the rib edge, you avoid a visible difference in width between the rib edge and the rest of the body.

It’s very easy to cast off too tightly, and by making yarn overs while casting off (and simultaneously casting these off) you avoid a too tight cast off edge.

See DROPS video: How to bind off with yarn overs (yo)

To achieve an even increase (or decrease) you can increase on, for example: every 3rd and 4th row alternately, like so: work 2 rows and increase on the 3rd row, work 3 rows and increase on the 4th. Repeat this until the increase is complete.

See DROPS lesson: Increase or decrease 1 st on every 3rd and 4th row alternately

Should you prefer to work in the round instead of back and forth, you may of course adjust the pattern. You’ll need to add steeks mid-front (usually 5 stitches), and follow the instructions. When you would normally turn and work from the wrong side, simply work across the steek and continue in the round. At the end you’ll cut the piece open, pick up stitches to work bands, and cover the cut edges.

See DROPS video: How to knit steeks and cut open

Should you prefer to work back and forth instead of in the round, you may of course adjust the pattern so you work the pieces separately and then assemble them at the end. Divide the stitches for the body in 2, add 1 edge stitch in each side (for sewing) and work the front and back pieces separately.

See DROPS lesson: Can I adapt a pattern for circular needles into straight needles?

Pattern repeats can vary slightly in the different sizes, in order to get the correct proportions. If you’re not working the exact same size as the garment in the photo, yours might deviate slightly. This has been carefully developed and adjusted so that the complete impression of the garment is the same in all sizes.

Make sure to follow instructions and diagrams for your size!

If you have found a pattern you like which is available in women’s size it’s not very difficult to convert it to men’s size. The biggest difference will be the length of sleeves and body. Start working on the women size that you think would fit across the chest. The additional length will be worked right before you cast off for the armhole/sleeve cap. If the pattern is worked top-down you can add the length right after the armhole or before the first decrease on sleeve.

Regarding additional yarn amount, this will depend on how much length you add, but it is better with a skein too many than too few.

All yarns will have excess fibres (from production) that might come off as lint or shedding. Brushed yarns (ie hairier yarns) have more of these loose, excess fibres, causing more shedding.

Shedding also depends on what is worn under or over the garment, and whether this pulls at the yarn fibres. It’s therefore not possible to guarantee that there will be no shedding

Below are some tips on how to get the best result when working with hairier yarns:

1. When the garment is finished (before you wash it) shake it vigorously so the looser hairs come off. NOTE: do NOT use a lint roller, brush or any method that pulls at the yarn.

2. Place the garment in a plastic bag and put it in your freezer - the temperature will cause the fibres to become less attached to each other, and excess fibres will come off easier.

3. Leave in the freezer for a few hours before taking it out and shaking it again.

4. Wash the garment according to the instructions on the yarn label.

Pilling is a natural process that happens to even the most exclusive of fibers. It's a natural sign of wear and tear that is hard to avoid, and that is most visible in high friction areas of your garment like a sweater's arms and cuffs.

You can make your garment look as new by removing the pilling, using a fabric comb or a pill/lint remover.

Still can't find the answer you need? Then scroll down and leave your question so one of our experts can try to help you. This will be done normally within 5 to 10 working days.
In the meantime, you can read the questions and answers that others have left to this pattern or join the DROPS Workshop on Facebook to get help from fellow knitters/crocheters!

You might also like...

Post a comment to pattern DROPS 106-12

We would love to hear what you have to say about this pattern!

If you want to leave a question, please make sure you select the correct category in the form below, to speed up the answering process. Required fields are marked *.

Comments / Questions (59)

country flag Ineke Schroen wrote:

De eerste naald van het patroon m 1 zijn 13steken De tweede patroonnaald zijn 11 steken tot 7 steken Brij je de tussenliggende steken samen om 11 steken patroon te krijgen?

01.10.2023 - 14:22

DROPS Design answered:

Dag Ineke,

Ja, je breit in het midden steeds 2 steken samen en je haalt de afgehaalde steek over de samengebreide steken. Hierdoor minder je 2 steken.

03.10.2023 - 06:07

country flag Lydie wrote:

Bonjour je commence les diminutions situées de chaque coté des marqueurs a 8 cm et j aimerai savoir quelle diminutions faire ??? 2 mailles ensembles ?? 1 maille glisseé 1 maille tricoté.... laquelle de quel coté du marqueur ??? je vous remercie

09.05.2023 - 19:16

DROPS Design answered:

Bonjour Lydie, vous pouvez tricoter ces diminutions au choix; par ex. glissez 1 m à l'endroit, tricotez 1 m end et passez la m glissée par-dessus la m tricotée, marqueur du côté, 2 m end à l'end (ou bien l'inverse, tout dépend de la façon dont vous préférez voir vos diminutions. N'hésitez pas à essayer sur un échantillon si vous préférez être sûre de vous. Bon tricot!

10.05.2023 - 08:18

country flag Judy Caudill wrote:

What I'm asking is: When beginning the stockinette stitch in size large, how should the 192 stitches should be devided between the two fronts and one back. Judy

23.05.2022 - 05:22

DROPS Design answered:

Dear Mrs Caudill, after A.1 has been worked 1 time in height (= there are 192 sts on needle), continue in stocking stitch with the front band sts in moss stitch as before. When piece measures 8 cm [3 1/8’’] decrease on each side of each marker, when piece measures 28 cm[11"] start to increase on each side; and when piece measures 48 cm [19"], divide piece for armhole and finish back and front pieces separately. Happy knitting!

23.05.2022 - 08:55

country flag Judy Caudill wrote:

I've done the ruffle portion and was wondering if you could give me a stitch count for size (L) on the row beginning with stockinette and 12 moss stitches each side because I want to make sure I've left enough stitches for the back. It says there are 51 stitches to the MT that I did at the beginning of the ruffle but there have been decreases.

21.05.2022 - 04:21

DROPS Design answered:

Dear Judy, after finishing in length M.1, you have decreased from 13 stitches to 7. For size L, you should have 192 stitches after this. Happy knitting!

22.05.2022 - 23:38

country flag Judy Caudill wrote:

Re. 106-12 The chart shows 13 st and make one M.1 every 13 sts. 24 times,right?Where do you recommend I place that M.1?

14.04.2022 - 19:58

DROPS Design answered:

Hi Judy, in size L, you start the row as follow: 12 sts in moss stitch, then you repeat M.1 24 times until 12 sts remain, you work tjis 12 sts in moss stitch. How to work several different diagrams worked consecutively on the row/round you will find HERE. Happy knitting!

15.04.2022 - 09:42

country flag Judy Caudill wrote:

Pat. #106-12. I don't understand on page 2 after knitting 2 rows of garter, M.1 on the next (in my case 312 sts.) Is that possible, M-1, 312 times? And the chart shows 13m to 7m sts. of M.1. Also what does the (m) stand for?

10.04.2022 - 20:04

DROPS Design answered:

Dear Judy, the m is the term for st (stitch) in the original language (norsk), which can still be found in some of our older diagrams. So the repeats is from 13 stitches (first row) to 7 stitches (last row). On the other hand, you work 24 repeats of M.1, which would cover the 312 sts. Happy knitting!

10.04.2022 - 20:48

country flag Jana wrote:

Ich würde diese Jacke gerne statt mit den 3/4 Ärmeln mit langen Ärmeln stricken. Gibt es auch dafür eine Anleitung und wieviel mehr Wolle benötige ich ungefähr? Ich würde die Jacke auch nur mit den Farben 151 und 161 stricken....das macht es wahrscheinlich einfacher mir zu sagen, wieviel Gramm Wolle ich bei langen Ärmeln zusätzlich benötige.

12.01.2020 - 13:28

DROPS Design answered:

Liebe Jana, leider können wir jeder Anleitung nach jedem individuellen Frage anpassen und einzelne Modelle auf individuellen Wunsch hin umrechnen. Wenn sie Hilfe damit brauchen, wenden Sie sich bitte an dem Laden wo Sie die Wolle gekauft haben, dort hilft man Ihnen gerne weiter. Viel Spaß beim stricken!

13.01.2020 - 09:53

country flag Pia wrote:

Salve, un chiarimento sul n di maglie da avviare. Per la taglia xl sono previste 362 maglie. Se in 10 cm ci sono 17 m significa 212cm rispetto i 116cm circa necessari. Ho provato ad seguire le istruzioni ed effettivamente il risultato è enorme. Potete chiarire questo passaggio. Grazie

29.09.2018 - 21:21

DROPS Design answered:

Buongiorno Pia, il cardigan si lavora dal basso verso l'alto. Sulle 362 maglie avviate deve lavorare il motivo 1 che inizia con 13 maglie e finisce con 7,per cui vengono diminuite 6 maglie per ogni ripetizione del motivo. Ed è per questo che alla fine del motivo si troverà con 206 maglie, su cui proseguirà la lavorazione del cardigan. Buon lavoro!

30.09.2018 - 08:17

country flag Martine wrote:

Merci pour votre réponse - Suggestion : Afin d'être plus clair dans les explications concernant les manches, il conviendrait peut être d'indiquer le nombre de mailles restant à rabattre. Cordialement

07.05.2018 - 20:02

DROPS Design answered:

Bonjour Martine, vous devez rabattre pour l'arrondi de la manche (après 1 fois 3 m, 3 fois 2 m, 1-2-3-4-5-7 fois 1 m) 2 m de chaque côté jusqu'à ce que la manche mesure 36-37-38 cm (cf taille), le nombre de fois que vous rabattrez 2 m de chaque côté à ce niveau va dépendre de votre tension en hauteur, ce qui compte avant tout ici c'est bien la hauteur indiquée, qui va varier en fonction de votre nombre de rangs pour 10 cm. Bon tricot!

08.05.2018 - 09:09

country flag Martine wrote:

Bonjour. Je suis en train de faire les manches de ce modèle et j'ai un doute sur l'emmanchure de celle-ci. Je tricote la taille M et, après toutes les diminutions, il me reste 26 m sur une hauteur de 9 cm. Cela me paraît très court pour les assembler à l'emmanchure du corps, qui elle, mesure 21 cm de haut. Me suis-je trompée quelque part ???

04.05.2018 - 16:35

DROPS Design answered:

Bonjour Martine, l'arrondi de la manche mesure bien 9 cm en taille M - cf schéma, tout est donc juste. Épinglez votre manche autour de l'emmanchure, elle devrait tout à fait correspondre. Bon tricot!

07.05.2018 - 08:11