
Popular categories
Looking for a yarn?


Comments / Questions (44)
![]() Thea wrote:
Thea wrote:
Ik kan niet zo goed zien of het achterpand en de mouwen nu de averechte of de ribbelkant als goede kant is. Het lijkt de ribbelkant.
25.11.2018 - 17:09DROPS Design answered:
Dag Thea,
De mouwen en het achterpand worden (net als de voorpanden) in averechtse tricotsteek gebreid. Dat betekent dat het tricotpatroon aan de binnenkant (verkeerde kant) komt, en wat normaal de achterkant is van tricotsteek aan de buitenkant (goede kant) komt.
28.11.2018 - 12:41
![]() A. Van Zweden wrote:
A. Van Zweden wrote:
Hoeveel bollen wol heb ik nodig voor vest met maat L.
05.11.2018 - 13:08DROPS Design answered:
Dag A. Van Zweden
Voor maat L heb je 1150 gram nodig. 1 bol weegt 50 gram, dus je hebt 23 bollen nodig.
07.11.2018 - 14:38
![]() ARTAZ Jeannine wrote:
ARTAZ Jeannine wrote:
Bonsoir, excusez moi ,je voudrais savoir en ce qui concerne les torsades le croisement se faite un coup les 8 m.devant et un autre coup les 8m. derrière le travail,est-ce bien ça? et par contre on fait le prochain croisement tous les combien de rangs ou cm? car moi j'ai tricoter 13 rg et le 14rg croisement mais je trouve que ça fait un peu court. Merci d'avance
10.12.2014 - 22:26DROPS Design answered:
Bonjour Mme Artaz, pour le devant droit, toutes les torsades se font en glissant les 7 m devant l'ouvrage (au devant gauche, on les glisse derrière l'ouvrage). Le 1er croisement se fait au rang 15 du diagramme, puis on tricote 9 rangs après la torsade (= jusqu'à la fin du diagramme) puis on reprend au rang 1 du diagramme, entre chacune des torsades suivantes, on aura 23 rangs (les 9 rangs après la torsade + 14 rangs avant la torsade dans le diagramme). Bon tricot!
11.12.2014 - 10:10
![]() ARTAZ Jeannine wrote:
ARTAZ Jeannine wrote:
Bonsoir, je vous remercie pour votre patience et enfin j'y suis arrivée...je suis trop contente..donc là je tricote à fond car maintenant je suis trop pressée de finir la veste..Merci encore pour vos explications.
09.12.2014 - 22:21
![]() ARTAZ Jeannine wrote:
ARTAZ Jeannine wrote:
Bonjour,je reviens vers vous car concernant les explications du devant je ne comprends pas le processus des marqueurs je n'arrive pas à comprendre se que vous dite quand on doit tric.2 m. dans chacune des 8m.(t.L) car au depart on a 30 m. et apres les 2 m.tric. on a 38 m.et de quel coté on retrouve les 11 m. et les 3m. au point mousse serviront-elle pour assembler la bordure? Merci de m'expliquer. si je comprends en gros on devrait faire au total 8 augmentations. Merci d'avance
08.12.2014 - 14:25DROPS Design answered:
Bonjour Mme Artaz, pour le devant droit, on place 2 marqueurs (à partir de la droite sur l'endroit = à partir du côté bordure devant): le 1er après 6 m et le 2e après 14 m (= on a 8 m entre les 2 marqueurs). Au 4e rang point mousse, on tricote 2 fois chacune de ces 8 m à l'end - voir ci-dessus = on augmente ainsi de 8 m = 38 m au total. On continue ensuite ainsi sur l'end (à partir de la droite): 1 m lis, 3 m env, M1, 11 m env et 3 m point mousse (côté dos). Bon tricot!
08.12.2014 - 17:02
![]() ARTAZ Jeannine wrote:
ARTAZ Jeannine wrote:
Bonjour, dans ces explications de cette veste pour le devant vous dites de monter 30 mailles (y compris 1m. lisiere de chaque coté) est ce qu'il faut vraiment 30 m. ou en compter 2 plus pour les m. lisières. Merci d'avance
05.12.2014 - 14:36DROPS Design answered:
Bonjour Mme Artaz, les m lis (= 1 de chaque côté) sont comprises dans les 30 m (en taille L), pas besoin de les ajouter. Bon tricot!
05.12.2014 - 16:44
![]() Tina wrote:
Tina wrote:
Hallo, ich habe mir die Original-Wolle zur Anleitung bei Drops gekauft. Nun steht aber leider keine Waschanleitung auf dem Etikett. Allerdings steht drauf "Excellent for felting". Wenn die Jacke von Hand gewaschen wird, filzt sie doch hoffentlich nicht, oder???
29.11.2013 - 12:16DROPS Design answered:
Liebe Tina, Eskimo filzt bei Maschinenwäsche 40°, Sie können Ihr Strickstück von Hand bei 30° waschen, siehe Pflegehinweise auf der Farbkarte. Kleidungsstücke aus Naturmaterialien müssen weniger gewaschen werden als synthetische Kleidung, oftmals reicht auslüften.
01.12.2013 - 09:46
![]() Anette wrote:
Anette wrote:
Den är kanske i längsta laget för att tilltala mig - men kragen är ju helt underbar! Och det går ju alltid att korta ner den.....
28.10.2007 - 17:55Ulrika wrote:
Den är helt enkelt underbar!! Ett extra plus för knapparna!
04.10.2007 - 13:56Martha wrote:
Beautiful! I think it would appeal to more if it was oversized so it could hang better.
12.09.2007 - 21:27
|
||||||||||
Grey Fire Jacket |
||||||||||
|
|
||||||||||
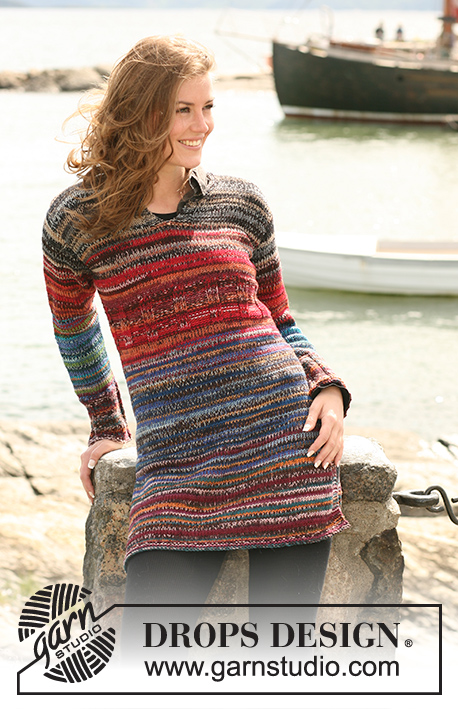
DROPS jacket in ”Snow” with large cables and collar. Size S - XXXL
DROPS 102-4 |
||||||||||
|
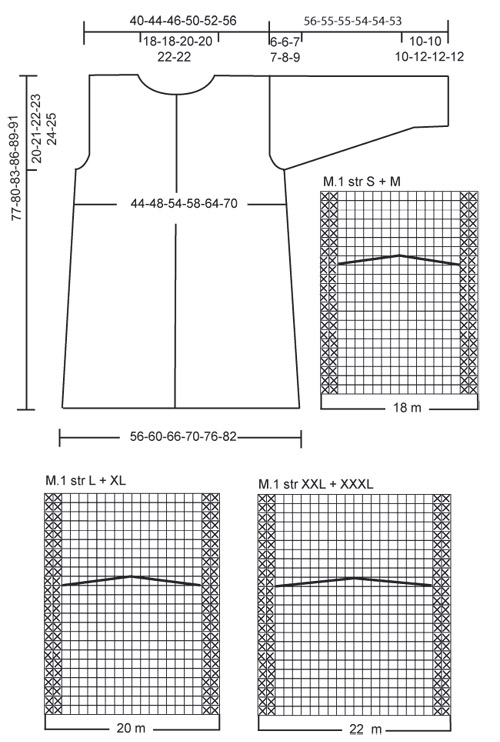
Knitting gauge: 10 sts x 14 rows stocking sts = 10 x 10 cm [4" x 4"] Pattern: See diagram M.1. Diagrams are seen from RS. Garter st: Knit all rows back and forth on needle Decreasing tips (applies to neckline): Dec 2 sts as follows: Knit 1 sts, K2 sts tog, pass 1st st of the second. Buttonhole: Bind off for buttonhole on right front band. 1 buttonhole = bind off 1 st and cast on 1 new sts over the bind off st on next row. Back piece: Cast on 56-60-66-70-76-82 sts loosely on needles size 9 mm [US 13] with Snow. Knit 4 rounds garter sts – see explanation above. Continue in stocking sts WS out with 3 sts garter sts on each side. When piece measures 10 cm [4"] dec 1 sts on each side within 3 garter sts on every 8-9-9-9-10-10 cm [3,15"-3,55"-3,55"-3,55"-4"-4"] 6 times in total = 44-48-54-58-64-70 sts. When piece measures 57-59-61-63-65-66 cm [22,4"-23,2"-24"-24,8"-25,6"-26"] bind off 2 sts on each side for armhole. Bind off 1 st for armhole on each side on every other row: 0-0-2-2-4-5 times = 40-44-46-50-52-56 sts. When piece measures 75-78-81-84-87-89 cm [29½"-30,7"-31,9"-33,1"-34,25"-35"] bind off middle 18-18-20-20-22-22 sts for neck = 11-13-13-15-15-17 sts left on each shoulder. Knit until piece measures 77-80-83-86-89-91 cm [30,3"-31½"-32,7"-33,9"-35"-35,8"]. Bind off loosely. Right front piece: Cast on 25-27-30-32-34-37sts loosely (incl 1 edge sts on each side) on needles size 9 mm [US 13] with Snow. Insert 2 marking threads or stitch markers as follows (from mid front): 1 marking thread or stitch marker after 6 sts and 1 marking thread or stitch marker after 13-13-14-14-15-15 sts. Knit 4 rows garter sts. At the same time on 4th row knit 2 sts in each of the 7-7-8-8-9-9 sts between 2 marking threads or stitch markers = 32-34-38-40-43-46 sts. Continue as follows (1st row = RS): 1 edge sts, 3 sts stocking sts with WS out, M.1 (see diagram for your size), 7-9-11-13-14-17 sts stocking sts with WS out and 3 sts garter sts. Continue as follows: At the same time when piece measures 10 cm [X"] dec on side like back piece = 26-28-32-34-37-40 sts. When piece measures 57-59-61-63-65-66 cm [22,4"-23,2"-24"-24,8"-25,6"-26"] bind off for armhole on side like back piece = 24-26-28-30-31-33 sts. When piece measures 69-72-74-77-79-81 cm [27,2"-28,35"-29,1"-30,3"-31,1"-31,9"] slip 5-5-5-5-6-6 sts towards mid front on 1 thread. Then dec 2 sts for neck on every other row from RS 4-4-5-5-5-5 times in total – read Decreasing tips. After decreases 11-13-13-15-15-17 sts are left on shoulder. Continue with K over K and P over P until piece measures 77-80-83-86-89-91 cm [30,3"-31½"-32,7"-33,9"-35"-35,8"]. Bind off loosely. Left front piece: Knit like right piece but reversed. Additionally (regarding M.1) slip sts onto cable needles to back of piece instead of to front. Sleeve: NOTE: Shorter measurements in larger sizes due to longer sleeve top and wider shoulders. Cast on 28-30-32-32-34-34 sts loosely on needles size 8 mm [US 11] with Snow. P1 row from WS. Continue with Rib K1/P1 until piece measures 10-10-10-12-12-12 cm [4"-4"-4"-4,75"-4,75"-4,75"]. Knit 1 row garter sts from RS at the same time dec 6 sts evenly = 22-24-26-26-28-28 sts. Change to needle size 9 mm [US 13]. K1 row from WS. Continue with stocking sts with WS out until piece is completed. When piece measures 15-15-15-17-17-17 cm [5,9"-5,9"-5,9"-6,7"-6,7"-6,7"] inc 1 sts on each side on every 5-5-4-3.5-3-2.5 cm [2"-2"-1,6"-1,4"-1,2"-1"] 7-7-8-9-9-10 times in total = 36-38-42-44-46-48 sts. When piece measures 50-49-48-47-46-44 cm [19,7"-19,3"-18,9"-18½"-18,1"-17,3"] bind off 4 sts on each side to shape sleeve cap 1 time. Continuing, bind off 2 sts on every other row until piece measures 55-54-54-53-53-52 cm [21,65"-21,25"-21,25"-20,9"-20,9"-20,5"]. Then bind off 4 sts 1 time on each side. Bind off remaining sts. Piece measures approx 56-55-55-54-54-53 cm [22"-21,65"-21,65"-21,25"-21,25"-20,9"]. Assembly: Sew shoulder seams. Front edge: Pick up approx 76 to 90 sts in edge sts mid front on right front piece from neckline to bottom cast on edge, on needle size 8 mm [US 11] with Snow. K1 row from WS at the same time as inc evenly to 93-97-99-103-107-109 sts. K1 row from RS. Continue with Rib K1/P1 and 1 sts garter sts on each side. At the same time when front edge measures approx 2 cm [0,8"] and 10-10-10-12-12-12 cm [4"-4"-4"-4,75"-4,75"-4,75"] bind off for 7-7-7-8-8-8 button holes – see explanation above – evenly. Place bottom button holes approx 20 cm [8"] from cast on edge and top most approx 2 cm [0,8"] below neck. When Rib measures approx 12-12-12-14-14-14 cm [4,75"-4,75"-4,75"-5½"-5½"-5½"] bind off loosely, K over K and P over P. Repeat on left front piece, but do not bind off for buttonholes. Collar: Pick up 77 to 99 sts (incl sts on thread and 13-13-13-15-15-15 sts over front edge on each side) dividable with 2 + 1, on needle size 8 mm [US 11] with Snow. K1 row from WS, and K1 row from RS. Continue as follows (from WS): 13-13-13-15-15-15 sts garter sts, Rib P1/ K1 until 14-14-14-16-16-16 sts are left knit P1 and 13-13-13-15-15-15 sts garter sts. Continue as follows until collar measures approx 34-34-36-36-38-38 cm [13,4"-13,4"-14,2"-14,2"-15"-15"], bind off loosely K over K and P over P. Assembly: Sew sleeves on. Sew sleeves and side seams in one; sew outermost edge to avoid a thick seam. |
||||||||||
Diagram explanations |
||||||||||
|
||||||||||
 |
||||||||||
Have you finished this pattern?Tag your pictures with #dropspattern or submit them to the #dropsfan gallery. Do you need help with this pattern?You'll find 22 tutorial videos, a Comments/Questions area and more by visiting the pattern on garnstudio.com. © 1982-2026 DROPS Design A/S. We reserve all rights. This document, including all its sub-sections, has copyrights. Read more about what you can do with our patterns at the bottom of each pattern on our site. |
||||||||||


With over 40 years in knitting and crochet design, DROPS Design offers one of the most extensive collections of free patterns on the internet - translated to 17 languages. As of today we count 324 catalogs and 12290 patterns - 12280 of which are translated into English (US/in).
We work hard to bring you the best knitting and crochet have to offer, inspiration and advice as well as great quality yarns at incredible prices! Would you like to use our patterns for other than personal use? You can read what you are allowed to do in the Copyright text at the bottom of all our patterns. Happy crafting!
Post a comment to pattern DROPS 102-4
We would love to hear what you have to say about this pattern!
If you want to leave a question, please make sure you select the correct category in the form below, to speed up the answering process. Required fields are marked *.