
Popular categories
Looking for a yarn?


Comments / Questions (55)
![]() Tisseur Martine wrote:
Tisseur Martine wrote:
Bonjour pourriez vous m envoyer un schéma explicatif détaillé car je ne comprends pas le montage et le tricotage des devants à partir de la fin des augmentations au niveau 1m tout les 4 rangs 12x et 3 x tous les 6rangs taille xl Pourquoi la hauteur totale des devants est plus haute que celle du dos : 62 et 52 ? Merci beaucoup et désolée d être confuse
17.02.2023 - 19:43
![]() MAUGAN wrote:
MAUGAN wrote:
L’ouvrage mesure environ 47-51-55-59-63 cm. Au rang suivant, rabat 8-10-13-16-18 mailles du côté 1 pour l’emmanchure, puis 20-20-20-20-21 fois 1 m comme suit : diminuer tous les rangs pendant 3 rangs, puis tricoter 1 rang sans diminutions. Bonjour, je ne comprends pas comment faire ces diminutions 20 fois 1 maille pendant 3 rangs. pouvez vous m'éclairer s'il vous plait ? Merci pour votre réponse. Cordialement. Chantal Maugan
04.01.2023 - 13:18DROPS Design answered:
Bonjour Mme Maugan, vous diminuez 1 m à chacun des 3 rangs suivants (= sur l'endroit et sur l'envers), puis tricotez 1 rang sans diminuer. Répétez ces 4 rangs jusqu'à ce que les 20 mailles aient été rabattues (autrement dit répétez 5 fois ces 4 rangs, puis diminuez 1 m aux 2 rangs suivants). Vous pouvez diminuer en tricotant 2 m ens à l'end sur l'end/2 m ens à l'env sur l'envers ou en rabattant 1 m au début du rang sur l'endroit/sur l'envers - dans ce cas-là, on peut faire l'une ou l'autre des 2 techniques. Bon tricot!
04.01.2023 - 14:14
![]() Joëlle Grosemans wrote:
Joëlle Grosemans wrote:
Ont ne fait pas les emmanchures comme le dos un peu difficile de comprendre
21.04.2022 - 11:51DROPS Design answered:
Bonjour Mme Grosemans, il est normal de ne pas former les emmanchures pour les devants comme pour le dos car on ne les tricote de la même façon. Suivez attentivement les indications pour votre taille; mesurez bien au bon endroit et rabattez sur le côté-1 ou diminuez sur le côté-2 comme indiqué. Bon tricot!
21.04.2022 - 13:23
![]() Rivière Joëlle wrote:
Rivière Joëlle wrote:
Avez vous de la laine acrylique, et peux t on tricoter ce modèle avec des aiguilles numéro 5.merci
13.04.2021 - 14:45DROPS Design answered:
Bonjour Mme Rivière, vous trouverez ici toutes les infos sur les alternatives ; vous pouvez également utiliser notre convertisseur pour voir les alternatives proposées. Bon tricot!
13.04.2021 - 15:26
![]() Karin Levin wrote:
Karin Levin wrote:
Vad rekommenderar ni för garn istället för de som utgått?
10.04.2021 - 18:28DROPS Design answered:
Hej Karin, Vi anbefaler 1 tråd DROPS Safran og 1 tråd DROPS Alpaca. Prøv vores garnomregner. Vælg Silke-Tweed, vælg garnforbrug i din størrelse og vælg 1 tråd. Gør det samme med Cotton-Viscose så får du garnforbruget i de forskellige kvaliteter :)
12.04.2021 - 14:34
![]() Ria Peters wrote:
Ria Peters wrote:
Dank voor de reactie maar het is me nog niet duidelijk wanneer je moet beginnen met het minderen aan kant 2. Er staat nl na de laatste mindering aan kant 2, wanneer het werk een hoogte heeft van 58 cm voor mijn maat, maar moet dat niet zijn de laatste mindering aan kant 1 (het armsgat)?
30.12.2020 - 16:25DROPS Design answered:
Dag Ria,
Ja, ik denk dat je gelijk hebt. Het afkanten voor het armsgat is dan namelijk klaar, dus de laatste mindering aan kant-1 ipv kant-2.
02.01.2021 - 14:31
![]() Loes wrote:
Loes wrote:
Heeft u misschien 'n foto of plaatje dat ik de achterkant van dit truitje kan zien ter verduidelijking?
28.12.2020 - 15:42DROPS Design answered:
Dag Loes,
Nee, helaas is er alleen een foto van de voorkant.
02.01.2021 - 18:45
![]() Ria Peters wrote:
Ria Peters wrote:
De laatste Alinea van de beschrijving van het voorpand begrijp ik niet. Wat wordt bedoeld met de laatste mindering aan kant 2? Ik hoop dat u me kunt helpen ondanks het feit dat het hier een oud patroon betreft .
26.12.2020 - 17:57DROPS Design answered:
Dag Ria,
De linkerkant is kant-1 en de rechterkant (dus de kant die het dichts bij de hals komt is kant-2. In de laatste alinea wordt aangegeven dat je 1 steek in elke 2e naald (dus de ene naald wel en de ander naald niet) moet minderen aan kant-2 tot alle steken zijn afgekant.
27.12.2020 - 22:15
![]() Rana Totah wrote:
Rana Totah wrote:
I am sorry but you didn’t confirm if the decrease is from the edge of side one or after the 3 garter stitch
14.12.2020 - 11:59DROPS Design answered:
Dear Mrs Totah, you will cast off (not decrease, pattern will be edited thank you) at the side-1, after you have cast off the 3 sts in garter stitch, continue cast off and work all stitches in stocking stitch. Happy knitting!
15.12.2020 - 08:26
![]() Rana Totah wrote:
Rana Totah wrote:
Hello , I have a question about the decrease for side1 , @40 cm from edge, should I decrease the from the edge or after the 3 garter stitches.?
11.12.2020 - 19:31DROPS Design answered:
Dear Mrs Totah, the decreases at 40 cm (first size) are worked at side-1. Happy knitting!
14.12.2020 - 10:32
|
|
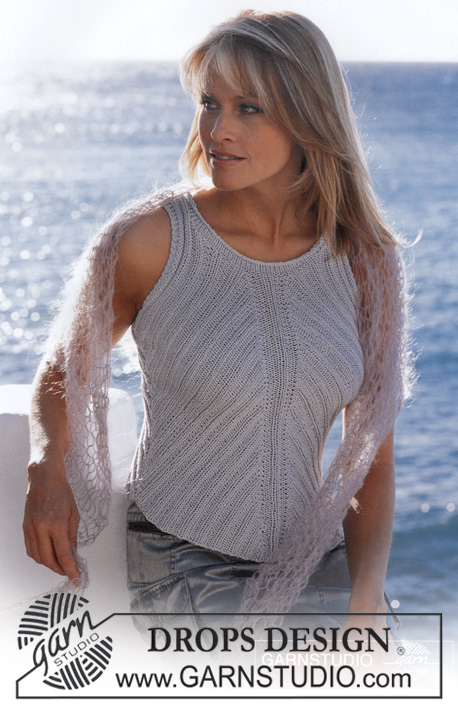
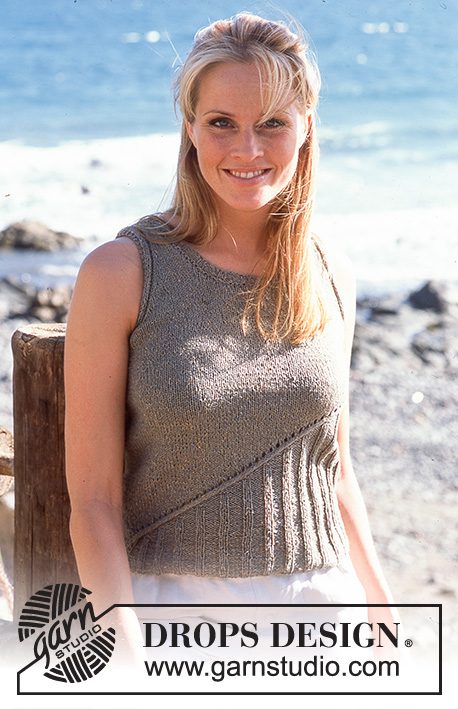
Sea Crossing |
|
|
|
|
Jumper in Silke-tweed and Cotton Viscose with wrap-round at front
DROPS 81-28 |
|
|
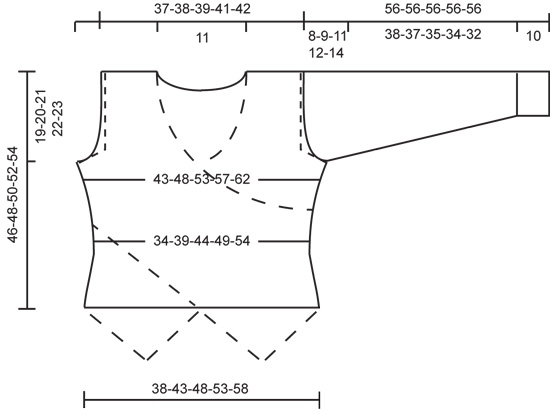
Gauge: 16 sts x 20 rows with 1 strand of each yarn (2 strands) in stockinette st = 10 x 10 cm. Note: The row gauge must be accurate in order for the pattern to work out. Increasing tips (for fronts): All increases are made on right side rows. Inc 1 st inside 3 edge sts knit in garter st by making a yo, on the next row twist and P the yo so that there will not be a hole. Decreasing tips (for fronts): All decs are made on right side rows. Dec 1 st inside of 3 edge sts knit in garter st as follows: After 3 edge sts: Slip 1 st as if to knit, K 1, psso. Before 3 edge sts: K 2 tog. Measuring-tips: Make all measurements when piece is lying flat. Back: Cast on 63-71-79-87-95 sts with 1 strand of each yarn (2 strands). Knit 4 rows garter st, then change to stockinette st. When the piece measures 5, 7 and 9 cm dec 1 st at each side = 57-65-73-81-89 sts. When the piece measures 12 cm inc 1 st at each side every 2-2-2-2.5-2.5 cm a total of 7-7-7-6-6 times = 71-79-87-93-101 sts. When the piece measures 27-28-29-30-31 cm bind off for armhole at each side every other row: 3 sts 1 time, 2 sts 1-2-3-4-5 times and 1 st 1-2-3-3-4 times = 59-61-63-65-67 sts. When the piece measures 43-45-47-49-51 cm knit 4 rows garter st over the center 23 sts (the remaining sts in stockinette st as before). Then bind off the center 17 sts for the neck = 21-22-23-24-25 sts remain on each shoulder. Continue with stockinette st and 3 sts in garter st at neck edges to finished measurements. Bind off when the piece measures 46-48-50-52-54 cm. Right front: Read the entire instructions and the tips above before knitting. All instructions relating to right edge and left edge of the piece are as seen from the right side of the work. Cast on 22-24-26-28-30 sts with 1 strand of each yarn (2 strands). Knit 4 rows garter st, then knit stockinette st, keeping 3 sts in garter st at the left edge of the piece (side-1) = this is the center front/lower edge. After the 2nd row of garter st, begin cast on for the side edge of the sweater at the right edge of the piece (side-2) every other row: 1 st 5-6-7-8-9 times, 2 sts 4 times, 3 sts 2 times and then 4 sts 1 time = 45-48-51-54-57 sts. The piece measures approx. 12-13-14-15-16 cm. Continue in stockinette st, keeping 3 sts in garter st at each edge – and dec 1 st at side-2 (see Decreasing tips): every 4th row 6-7-11-12-13 times and then every 6th row 4-4-2-2-2 times = 35-37-38-40-42 sts. The piece measures approx. 36-39-42-45-48 cm. Now inc 1 st at side-2 (see Increasing tips): every 4th row 6-5-4-3-1 times and then every other row 4-6-9-11-15 times. At the same time, when front piece measures 40-44-48-52-56 cm (from cast on edge), bind off on side-1 on every other row: 1 st 7 times (decrease at the edge, after the 3 garter sts have been bind off, knit stockinette stitch over all sts). The piece measures approx. 47-51-55-59-63 cm. On the next row bind off 8-10-13-16-18 sts at side-1 for armhole. Then dec 1 st at armhole 20-20-20-20-21 times as follows: dec every row for 3 rows and then knit 1 row without dec. After last inc on side-2 the piece measures approx. 51-54-58-61-65 cm from cast-on edge. Now dec 1 st from edge of side-2 every other row until all sts are bound off. The piece measures approx. 60-64-68-72-76 cm from cast-on edge to shoulder. Left front: Cast on and knit the same as the right, reversing all shaping. Sleeve: Cast on 36-38-40-42-42 sts with 1 strand of each yarn (2 strands). Knit 4 rows garter st, then continue as follows (first row = right side): K 1 row, * P 3 rows, K 3 rows *, repeat from * - * until the piece measures 10 cm, then knit stockinette st to finished measurements. When the piece measures 13 cm inc 1 st at each side every 3.5-3-3-2.5-2 cm a total of 10-11-11-12-14 times = 56-60-62-66-70 sts. When sleeve measures 48-47-45-44-42 cm bind off for sleeve cap at each side every other row: 3 sts 1 time, 2 sts 3 times, 1 st 0-1-3-4-6 times and then 2 sts at each side until the piece measures 55 cm, then bind off 3 sts 1 time at each side. Bind off the remaining sts, the piece measures approx. 56 cm. Assembly: Sew shoulder seams. Sew in sleeves. Lay right front over left and sew side seams (see dotted lines on diagram). |
|
 |
|
Have you finished this pattern?Tag your pictures with #dropspattern or submit them to the #dropsfan gallery. Do you need help with this pattern?You'll find 16 tutorial videos, a Comments/Questions area and more by visiting the pattern on garnstudio.com. © 1982-2026 DROPS Design A/S. We reserve all rights. This document, including all its sub-sections, has copyrights. Read more about what you can do with our patterns at the bottom of each pattern on our site. |


With over 40 years in knitting and crochet design, DROPS Design offers one of the most extensive collections of free patterns on the internet - translated to 17 languages. As of today we count 325 catalogs and 12298 patterns - 12288 of which are translated into English (US/in).
We work hard to bring you the best knitting and crochet have to offer, inspiration and advice as well as great quality yarns at incredible prices! Would you like to use our patterns for other than personal use? You can read what you are allowed to do in the Copyright text at the bottom of all our patterns. Happy crafting!
Post a comment to pattern DROPS 81-28
We would love to hear what you have to say about this pattern!
If you want to leave a question, please make sure you select the correct category in the form below, to speed up the answering process. Required fields are marked *.