
Popular categories
Looking for a yarn?


Comments / Questions (137)
![]() Eve wrote:
Eve wrote:
Bonjour, le modèle n'a ni côtes ni point mousse en bordure c'est donc normal. Pour remédier à ça tu peux soit quelques rangs de points mousse en relevant le mailles et qui a l'avantage de ne pas resserrer le tricot mais qui l'épaissit, soit quelques rangs de côtes un larges à étirer au fer pour éviter le resserrement.
07.11.2012 - 08:05
![]() Tsang wrote:
Tsang wrote:
Bonjour mon tricot roule dans le bas du dos; quel conseil me donneriez-vous pour qu'il ne roule plus? merci beaucoup julienne
06.11.2012 - 18:31
![]() Carine wrote:
Carine wrote:
Juste pour vous dire qu'il manque la traduction de la hauteur des boutons pour la taille M Size M: 21, 25 and 29 cm
20.09.2012 - 17:44DROPS Design answered:
Merci Carine, ces indications ont été ajoutées. Bon tricot !
20.09.2012 - 18:27
![]() GROISET wrote:
GROISET wrote:
Bonjour, J'ai un souci avec la bande devant (12 pts mousse) qui n'est pas de la même hauteur que le jersey, du coup celle ci "tire" sur le gilet : il n'est jamais bien plat. Avez vous ne solution pour les prochaines fois. Cathy
01.06.2012 - 07:18DROPS Design answered:
Bonjour Cathy, vous pouvez bloquer votre gilet (le faire sécher le gilet à plat aux mesures finales) pour lui donner forme. Dans les modèles plus récents, des rangs raccourcis sont tricotés sur les mailles des bordures devants.
04.06.2012 - 11:27
![]() TSANG Julienne wrote:
TSANG Julienne wrote:
Merci beaucoup !
30.03.2012 - 19:41
![]() TSANG Julienne wrote:
TSANG Julienne wrote:
Qu'est ce que ça veut dire? j'ai tricoté le point envers au 1er rang j'ai compris ça mais pas évident merci "Tricoter le 1er rang à l’end sur l’env"
29.03.2012 - 23:01DROPS Design answered:
Bonjour Julienne, "Tricoter le 1er rang à l'end sur l'env" signifie que le 1er rang = envers de l'ouvrage et que l'on va tricoter toutes les mailles à l'end. On continue ensuite en jersey end : au rang suivant, on est sur l'endroit et on tricote en jersey end (= à l'end), et au 3ème rang (rang suivant), on tricote toutes les mailles à l'envers (= sur l'envers). Bon tricot !
30.03.2012 - 09:32
![]() Vekkuli wrote:
Vekkuli wrote:
Hihan suomenkielisessä ohjeessa on virhe: "Lisää nyt 1 s kummassakin reunassa 15-16-16-18-19-20 x 8-7-7-6-5-5 cm:n välein = 76-80-84-90-96-100 s." Lisäys tehdään 15-16-16-18-19-20 x 8-7-7-6-5-5 KRS:n välein, ei cm:n.
27.11.2011 - 11:40
![]() DROPS Design wrote:
DROPS Design wrote:
You have 58 sts before dec. You dec a total of 22 sts for neck and you dec a total of 12 sts for armhole. 58-22-12= 24. Looks ok.
05.10.2010 - 18:46
![]() Christy Foote wrote:
Christy Foote wrote:
I am making size small (cast on (104 back piece) and ended up with 24 stitches for each shoulder. I made the front pieces and ended up with 31 stiches at the end. No matter how many times I looked at the math for all the decreases, I still ended up with 31 stitches, yet it needs to be sewn to the back piece with 24 stiches? I'd really appreciate your help if there is something I am missing of a problem in the pattern. Thank you.
05.10.2010 - 05:58
![]() Michele wrote:
Michele wrote:
I have started the back piece with 2 rows of garter stitch but the bottom is still curling. Is this correct?
23.08.2009 - 16:32
|
|
Swing |
|
|
|
|
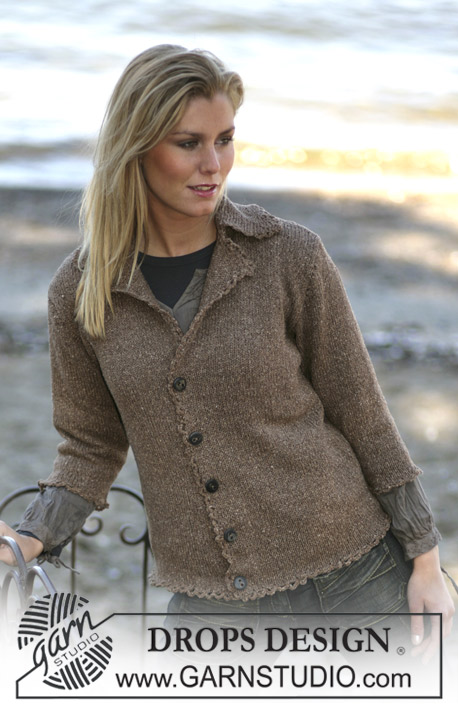
DROPS Tailored cardigan knitted in “Alpaca
DROPS 97-18 |
|
|
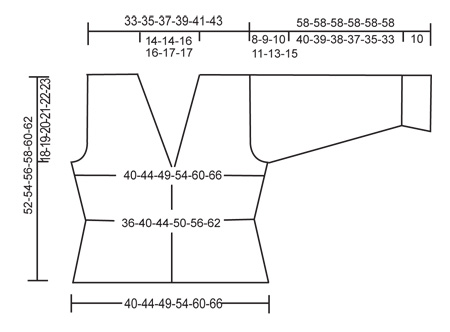
Gauge: 23 sts x 30 rows on needles size 3.5 mm in stocking sts = 10 x 10 cm. Garter sts (back and forth on needle): Knit all rows. Decreasing tips-1 (apply for the cut at the sides): All decreases are done from the RS! Dec as follows after the marking thread: K2 tog. Dec as follows before the marking thread: Slip a st as if to knit, K1, psso. Decreasing tips-2 (apply for the armholes and the neck): All dec are done from the RS! Dec. inside 3 edge sts at the armhole and inside 12 sts of garter sts for the neck side. Dec as follows before 3/12 sts: K2 tog. Dec as follows after 3/12 sts: Slip a st as if to knit, K1, psso. Increasing tips: Inc as follows: Pick up 1 st from previous row and K it. ------------------------------------------------------------------ Back piece: Cast on 94-104-114-126-140-154 sts (includes1 edge st each side) on needles size 3.5 mm/US 4 in Alpaca. K the 1st row from the WS and continue in stocking sts throughout. Insert a marker 24-26-29-32-35-39 sts in from each side (= 46-52-56-62-70-76 sts between the marking threads). When the piece measures 6-7-8-9-10-11 cm dec by each marker for the cut at each side. Dec after the 1st marker and before the 2nd marker – see decreasing tips-1: Dec on every 6th row a total of 5 times = 84-94-104-116-130-144 sts. When the piece measures 17-18-19-20-21-22 cm inc again by the marker – inc after the 1st marker and before the 2nd marker – see increasing tips. Inc on every 6th row a total of 5 times = 94-104-114-126-140-154 sts. When the piece measures 34-35-36-37-38-39 cm bind off 4-5-6-8-10-12 sts each side for the armholes. Continue to dec 1 st each side on every other row – see decreasing tips-2: 5-7-8-10-13-15 times = 76-80-86-90-94-100 sts. When the piece measures 48-50-52-54-56-58 cm knit 4 rows of garter sts over the centre 52-52-56-56-60-60 sts (continue to knit other sts as before) then bind off the centre 28-28-32-32-36-36 sts for the neck. Continue to bind off 1 st towards the neck on every other row inside 12 sts of garter sts a total of 2 times – see decreasing tips-2: = 22-24-25-27-27-30 sts left on each shoulder. Bind off remaining sts when the piece measures 52-54-56-58-60-62 cm. Left front piece: Cast on 53-58-63-69-76-83 sts (includes 1 edge st at the side and 12 sts for the centre front band) on needles size 3.5 mm/US 4. K the 1st row from the WS. Continue in stocking sts but work the 12 band sts in garter sts throughout. Insert a marker 24-26-29-32-35-39 sts in from the side. When the piece measures 6-7-8-9-10-11 cm dec 1 st before the marker for the cut – see decreasing tips-1: On every 6th row a total of 5 times = 48-53-58-64-71-78 sts. When the piece measures 17-18-19-20-21-22 cm inc 1 st before the marker – see increasing tips: On every 6th row a total of 5 times = 53-58-63-69-76-83 sts. Please read all of the following section before continuing! Neck shaping: When the piece measures 29-30-31-32-33-34 cm dec for the neck shape inside the 12 band sts – see decreasing tips-2: Dec 1 st on every other row a total of 18 times and then on every 4th row a total of 4-4-6-6-8-8 times. Armhole: At the same time when the piece measures 34-35-36-37-38-39 cm bind off for the armhole as done for the back piece. When all dec are completed for the neck and armhole = 22-24-25-27-27-30 sts left on the shoulder. Bind off remaining sts when the piece measures 52-54-56-58-60-62 cm Right front piece: Cast on and knit as left front piece but reverse. Note! Dec and inc for the cut after the markers. In addition bind off for 3 button holes at the front band edge. 1 buttonhole= bind of the 5th and 6th st from the edge and cast on 2 new sts at the same place on the returning row. Bind off for button holes when the piece measures: Size XS: 21, 24 and 27 cm Size S: 20, 24 and 28 cm Size M: 21, 25 and 29 cm Size L: 22, 26 and 30 cm Size XL: 21, 26 and 31 cm Size XXL: 22, 27 and 32 cm Sleeve: Cast 56-58-62-64-68-70 sts (includes 1 edge st each side) on needles size 3.5 mm/US 4. K 1 row from the WS. Continue in stocking sts. When the piece measures 10 cm dec 10 sts evenly distributed on row = 46-48-52-54-58-60 sts. Continue to inc 1 st each side on every 8-7-7-6-5-5 row a total of 15-16-16-18-19-20 times =76-80-84-90-96-100 sts. When the piece measures 50-49-48-47-45-43 cm bind off for sleeve cap each side on every other row: 4 sts 1 time, 3 sts 1 time 2 sts 2 times, 1 st 5-6-8-9-12-15 times, continue to cast off 2 sts each side until the piece measures 57 cm, then cast off 3 sts 1 time each side. Bind off remaining sts when the piece measures approx 58 cm. Assembly: Sew the shoulder seams, insert the sleeves and sew the sleeve and side seams inside 1 edge st. Sew in the buttons. |
|
 |
|
Have you finished this pattern?Tag your pictures with #dropspattern or submit them to the #dropsfan gallery. Do you need help with this pattern?You'll find 18 tutorial videos, a Comments/Questions area and more by visiting the pattern on garnstudio.com. © 1982-2026 DROPS Design A/S. We reserve all rights. This document, including all its sub-sections, has copyrights. Read more about what you can do with our patterns at the bottom of each pattern on our site. |


With over 40 years in knitting and crochet design, DROPS Design offers one of the most extensive collections of free patterns on the internet - translated to 17 languages. As of today we count 324 catalogs and 12290 patterns - 12280 of which are translated into English (US/in).
We work hard to bring you the best knitting and crochet have to offer, inspiration and advice as well as great quality yarns at incredible prices! Would you like to use our patterns for other than personal use? You can read what you are allowed to do in the Copyright text at the bottom of all our patterns. Happy crafting!
Post a comment to pattern DROPS 97-18
We would love to hear what you have to say about this pattern!
If you want to leave a question, please make sure you select the correct category in the form below, to speed up the answering process. Required fields are marked *.