
Popular categories
Looking for a yarn?


Comments / Questions (137)
![]() Jeanette wrote:
Jeanette wrote:
Hallo, de onderkant van het vestje krult erg om. Op de foto zie ik dit niet. Wat kan ik daaraan doen?
01.11.2013 - 21:10DROPS Design answered:
Hoi. De rand krult omdat er niet een brede boord of rand onder zit.Na het wassen in vorm brengen en plat laten drogen. Krult de rand nog een beetje, dan kan je de rand lichtjes persen.
04.11.2013 - 20:22
![]() Vanessa wrote:
Vanessa wrote:
Ja, so ist es viel besser! Herzlichen Dank!
12.10.2013 - 10:51
![]() Vanessa wrote:
Vanessa wrote:
Hallo! Könnten Sie bitte den Abketten Tipp 2 erklaeren? Was bedeutet dieser Satz? 'Innerhalb 3 M. Glattstr. am Armloch und 12 M. Krausrippe am Hals.' Danke schön im Voraus
10.10.2013 - 20:26DROPS Design answered:
Liebe Vanessa, dies ist eine ältere Anleitung und noch etwas holprig übersetzt. Wir entschuldigen uns dafür! Die betreffende Stelle ist nun überarbeitet und hoffentlich klarer.
11.10.2013 - 10:11
![]() Carole DURAND wrote:
Carole DURAND wrote:
Sinon je viens de relire les explications et seules les augmentations doivent parfois se faire à une fréquence de rang impair alors qu'il est demandé de les faire à l'endroit. Comment procéder ?
22.08.2013 - 23:35DROPS Design answered:
Bonjour Mme Durand, vous pouvez faire ces augmentations soit tous les 5-7 rangs et augmenter sur l'envers, soit alterner tous les 6 et tous les 4 rangs ou bien tous les 8 et tous les 6 rangs. Bon tricot!
26.08.2013 - 16:36
![]() Carole DURAND wrote:
Carole DURAND wrote:
Il semble y avoir une discordance entre les explications en français et en anglais : Dos "A 17-18-19-20-21-22 cm de hauteur totale, augmenter [...] 5fois tous les 5 rangs " "When the piece measures 17-18-19-20-21-22 cm inc [...] Inc on every 6th row a total of 5 times"
22.08.2013 - 23:32DROPS Design answered:
Tout à fait Carole, cette erreur a été corrigée, merci. Bon tricot!
23.08.2013 - 16:27
![]() Carole wrote:
Carole wrote:
Il est indiqué que les diminutions doivent se faire sur l'endroit, or il faut en faire certaines à une fréquence impaire (par ex diminuer 5 fois tous les 5 rangs). Cela veut dire tous les 5 rangs endroits (soit tous les 10 rangs en tout) ou bien les faire tous les 5 rangs et là les faire soit à l'endroit soit à l'envers ? Merci de votre aide
22.08.2013 - 23:19DROPS Design answered:
Bonjour Carole, les dim et les augm se font tous les 6 rangs (dos et devants). Les diminutions sur les côtés se font sur l'endroit : *1 rang avec dim, 4 rangs sans dim*, répétez de *-*. Bon tricot!
23.08.2013 - 16:27
![]() Gundula wrote:
Gundula wrote:
Dies war mein erstes Modell, dass ich mit DROPS gestaltet habe. Seitdem bin ich restlos begeistertvom Garn und vom Modell. Ich habe 3 Varianten gestrickt. Besonders die leichte Tailierung und die Trompetenärmelchen wirken geschickt und fantasievoll. Tipp: aus dem Restgarn Blüten häkeln und assymetrisch auf Ärmel und Kacke "streuen".
27.05.2013 - 22:50Patati0 wrote:
Bonjour, Pour faire ce modèle,je peux utiliser aussi la laine de madeline tosh light?.
19.03.2013 - 15:24
![]() Maike Möller wrote:
Maike Möller wrote:
Hallo,ich habe eine Frage. zur Anleitung 97-18. Es geht um den Ärmel.Dort steht:weiter 2Mauf beiden Seiten Abk. bis 57cm Länge. ich hätte dann bei Größe M nur noch ca 4 Restmaschen nach 58 cm. Ist das korrekt??????
07.02.2013 - 12:11DROPS Design answered:
Guten Tag Frau Möller, stimmt Ihre Maschenprobe in der Höhe genau mit unserer überein? Wenn der Ärmel so ins Armloch passt, ist es gut möglich.
08.02.2013 - 08:00
![]() Barbro Larsson wrote:
Barbro Larsson wrote:
Stickar i storlek s Maskantalet stämmer inte vid avmaskning på bakstycketStickar nu ärmen.Avmaskning för ärmkullen kan väl inte stämma.Att ju större storlek du stickar i desto tidigare börjar du avmaskningen Det bör ju vara tvärtemot. Tråkigt att mönstret inte stämmer Dåligt och irriterande Har också varit i min garnaffär
14.01.2013 - 22:30DROPS Design answered:
Jo men det stämmer kortare mått i större stl pga bredare axelmått!
23.01.2013 - 13:54
|
|
Swing |
|
|
|
|
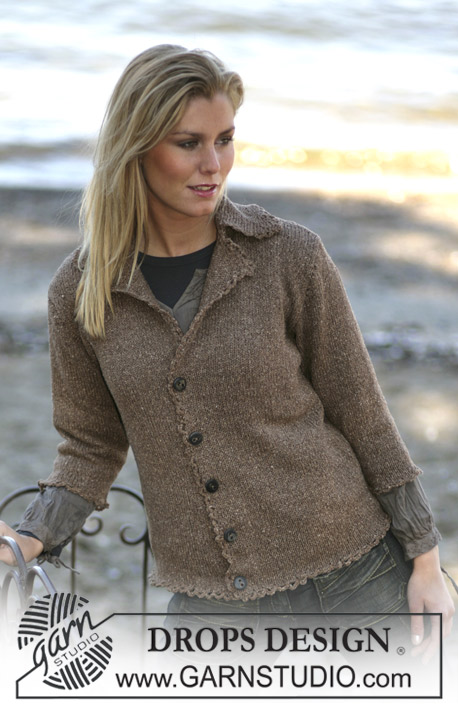
DROPS Tailored cardigan knitted in “Alpaca
DROPS 97-18 |
|
|
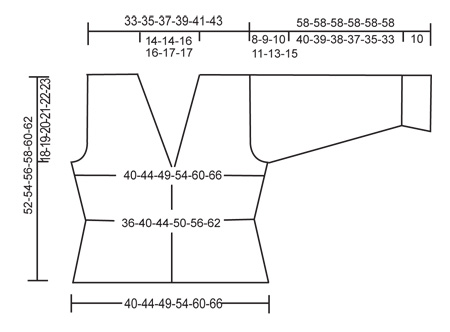
Gauge: 23 sts x 30 rows on needles size 3.5 mm in stocking sts = 10 x 10 cm. Garter sts (back and forth on needle): Knit all rows. Decreasing tips-1 (apply for the cut at the sides): All decreases are done from the RS! Dec as follows after the marking thread: K2 tog. Dec as follows before the marking thread: Slip a st as if to knit, K1, psso. Decreasing tips-2 (apply for the armholes and the neck): All dec are done from the RS! Dec. inside 3 edge sts at the armhole and inside 12 sts of garter sts for the neck side. Dec as follows before 3/12 sts: K2 tog. Dec as follows after 3/12 sts: Slip a st as if to knit, K1, psso. Increasing tips: Inc as follows: Pick up 1 st from previous row and K it. ------------------------------------------------------------------ Back piece: Cast on 94-104-114-126-140-154 sts (includes1 edge st each side) on needles size 3.5 mm/US 4 in Alpaca. K the 1st row from the WS and continue in stocking sts throughout. Insert a marker 24-26-29-32-35-39 sts in from each side (= 46-52-56-62-70-76 sts between the marking threads). When the piece measures 6-7-8-9-10-11 cm dec by each marker for the cut at each side. Dec after the 1st marker and before the 2nd marker – see decreasing tips-1: Dec on every 6th row a total of 5 times = 84-94-104-116-130-144 sts. When the piece measures 17-18-19-20-21-22 cm inc again by the marker – inc after the 1st marker and before the 2nd marker – see increasing tips. Inc on every 6th row a total of 5 times = 94-104-114-126-140-154 sts. When the piece measures 34-35-36-37-38-39 cm bind off 4-5-6-8-10-12 sts each side for the armholes. Continue to dec 1 st each side on every other row – see decreasing tips-2: 5-7-8-10-13-15 times = 76-80-86-90-94-100 sts. When the piece measures 48-50-52-54-56-58 cm knit 4 rows of garter sts over the centre 52-52-56-56-60-60 sts (continue to knit other sts as before) then bind off the centre 28-28-32-32-36-36 sts for the neck. Continue to bind off 1 st towards the neck on every other row inside 12 sts of garter sts a total of 2 times – see decreasing tips-2: = 22-24-25-27-27-30 sts left on each shoulder. Bind off remaining sts when the piece measures 52-54-56-58-60-62 cm. Left front piece: Cast on 53-58-63-69-76-83 sts (includes 1 edge st at the side and 12 sts for the centre front band) on needles size 3.5 mm/US 4. K the 1st row from the WS. Continue in stocking sts but work the 12 band sts in garter sts throughout. Insert a marker 24-26-29-32-35-39 sts in from the side. When the piece measures 6-7-8-9-10-11 cm dec 1 st before the marker for the cut – see decreasing tips-1: On every 6th row a total of 5 times = 48-53-58-64-71-78 sts. When the piece measures 17-18-19-20-21-22 cm inc 1 st before the marker – see increasing tips: On every 6th row a total of 5 times = 53-58-63-69-76-83 sts. Please read all of the following section before continuing! Neck shaping: When the piece measures 29-30-31-32-33-34 cm dec for the neck shape inside the 12 band sts – see decreasing tips-2: Dec 1 st on every other row a total of 18 times and then on every 4th row a total of 4-4-6-6-8-8 times. Armhole: At the same time when the piece measures 34-35-36-37-38-39 cm bind off for the armhole as done for the back piece. When all dec are completed for the neck and armhole = 22-24-25-27-27-30 sts left on the shoulder. Bind off remaining sts when the piece measures 52-54-56-58-60-62 cm Right front piece: Cast on and knit as left front piece but reverse. Note! Dec and inc for the cut after the markers. In addition bind off for 3 button holes at the front band edge. 1 buttonhole= bind of the 5th and 6th st from the edge and cast on 2 new sts at the same place on the returning row. Bind off for button holes when the piece measures: Size XS: 21, 24 and 27 cm Size S: 20, 24 and 28 cm Size M: 21, 25 and 29 cm Size L: 22, 26 and 30 cm Size XL: 21, 26 and 31 cm Size XXL: 22, 27 and 32 cm Sleeve: Cast 56-58-62-64-68-70 sts (includes 1 edge st each side) on needles size 3.5 mm/US 4. K 1 row from the WS. Continue in stocking sts. When the piece measures 10 cm dec 10 sts evenly distributed on row = 46-48-52-54-58-60 sts. Continue to inc 1 st each side on every 8-7-7-6-5-5 row a total of 15-16-16-18-19-20 times =76-80-84-90-96-100 sts. When the piece measures 50-49-48-47-45-43 cm bind off for sleeve cap each side on every other row: 4 sts 1 time, 3 sts 1 time 2 sts 2 times, 1 st 5-6-8-9-12-15 times, continue to cast off 2 sts each side until the piece measures 57 cm, then cast off 3 sts 1 time each side. Bind off remaining sts when the piece measures approx 58 cm. Assembly: Sew the shoulder seams, insert the sleeves and sew the sleeve and side seams inside 1 edge st. Sew in the buttons. |
|
 |
|
Have you finished this pattern?Tag your pictures with #dropspattern or submit them to the #dropsfan gallery. Do you need help with this pattern?You'll find 18 tutorial videos, a Comments/Questions area and more by visiting the pattern on garnstudio.com. © 1982-2026 DROPS Design A/S. We reserve all rights. This document, including all its sub-sections, has copyrights. Read more about what you can do with our patterns at the bottom of each pattern on our site. |


With over 40 years in knitting and crochet design, DROPS Design offers one of the most extensive collections of free patterns on the internet - translated to 17 languages. As of today we count 324 catalogs and 12290 patterns - 12280 of which are translated into English (US/in).
We work hard to bring you the best knitting and crochet have to offer, inspiration and advice as well as great quality yarns at incredible prices! Would you like to use our patterns for other than personal use? You can read what you are allowed to do in the Copyright text at the bottom of all our patterns. Happy crafting!
Post a comment to pattern DROPS 97-18
We would love to hear what you have to say about this pattern!
If you want to leave a question, please make sure you select the correct category in the form below, to speed up the answering process. Required fields are marked *.