
Popular categories
Looking for a yarn?


Comments / Questions (50)
![]() Rikke wrote:
Rikke wrote:
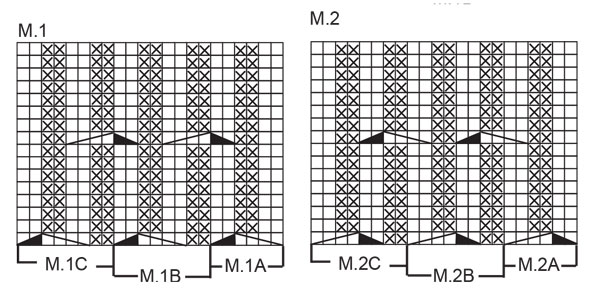
Hej! Skal ærmerne begge strikkes efter mønster M1, eller skal ærme 2 strikkes som mønster M2 for at mønsteret passer med ryg- og forstykke? 😊
27.01.2022 - 14:32DROPS Design answered:
Hej Rikke, ærmerne passer fint hvis du strikker dem i M1 begge to :)
27.01.2022 - 15:43
![]() Kat Arnett wrote:
Kat Arnett wrote:
At the top of the body before the section for Sleeves, I'm not clear about dec 10 sts for each side (5 sts at each side of the marker). Are those sts bound off all together (for an underarm) or spread evenly across the front and back ? I'm confused by the decrease tip. I assume that tip applies to the raglan.
28.11.2019 - 10:55DROPS Design answered:
Dear Mrs Arnett, you have to cast off these 10 stitches on each side for armholes - English pattern will be edited, thanks for your feedback. Happy knitting!
28.11.2019 - 12:05
![]() Hana Machyckova wrote:
Hana Machyckova wrote:
Hello, I am not sure how to "slip P2 from cable needle back on left needle", could you, please explain or maybe add a video tutorial for this type of cables? Otherwise the pattern looks great when knitted, just this part seems somehow twisted the wrong way in my swatch. Thank you!
19.09.2019 - 23:04DROPS Design answered:
Dear Mrs Machyckova, to work the cables work that way: slip the next 4 sts onto cable needle (= P2, K2) behind (3rd symbol) or in front (4th symbol) of work, knit the next 2 stitches, then the 4 stitches from cable needle will be divided into 2 "groups": the first 2 sts (=P2) will be slipped back on the left needle (without working them) (= K2 remain on cable needle), and you will now purl these both stitches then knit the 2 stitches from the cable needle. Happy knitting!
20.09.2019 - 08:46
![]() Jan Schlaybaugh wrote:
Jan Schlaybaugh wrote:
Can this be made using garter stitch only rather than cabling? How much would the pattern need to be adjusted?
25.01.2019 - 00:41DROPS Design answered:
Dear Mrs Schlaybaugh, the number of stitches in the pattern would be completely different since cabling require more stitches in width than garter stitch. It might be a good idea to find another pattern worked with garter stitch only to avoid any adjustments. Happy knitting!
25.01.2019 - 09:01
![]() Maiken wrote:
Maiken wrote:
Jeg prøver og kjope strikkepinner, trenger jeg rundpinnene i 40, 60 eller 80cm?
22.09.2018 - 23:19DROPS Design answered:
Hei Maiken, Du trenger rundpinne 80 cm i begge størrelsene. God fornøyelse!
24.09.2018 - 07:54Stella Jennison wrote:
Hi. I am knitting the medium size of the Irish Mint pattern. (160 sts) After completing the rib, I’ve started the pattern but the front section uses 88 sts instead of 80, leaving me 8 sts short for the front section. Is the cast on count wrong or should there be an increase after the rib? I look forward to your reply. Stella
18.12.2017 - 13:48DROPS Design answered:
Dear Mrs Jennison, you are right, do not work the P2,K2 at the end of the repeat, ie work as follows: *P2 (insert a marking thread between these 2 sts = the side), M1.A (= 6 sts), M.1B over 24 sts, M.1C (= 8 sts), P2 (= mid front), M.2A (= 6 sts), M.2B over 24 sts, M.2C (= 8 sts)* - a correction will be made asap. Happy knitting!
18.12.2017 - 14:44
![]() Christina Søndergaard wrote:
Christina Søndergaard wrote:
Jeg har et problem med denne swetters str S Drops 96-5 der står at jeg skal slå 144 op og strikke 8 cm 2 ret 2 vrang derefter mønster og her går det galt jeg jeg har lagt tallene sammen og får et resultat der siger 166 hvad gør jeg forkert ? Med venlig hilsen Christina
23.09.2017 - 15:22DROPS Design answered:
Hei Christina. Litt usikker på hvor det går feil hos deg, men du skal strikke: 2 vr +2r + 2vr + 6(M.1A) + 16(M.1B over 16 m) + 8( M.1C) + 2vr + 6(M.2A) +16(M.2B over 16 m) + 8(M.2C) + 2vr + 2r = 72 masker x 2 (foran og bak) = 144 masker omgangen rundt. God Fornøyelse!
25.09.2017 - 12:16
![]() Małgorzata wrote:
Małgorzata wrote:
Dziękuję za odpowiedź,ale znam technikę robienia warkoczem. Doszłam do wniosku, że w opisie popełniono błąd. Uważam, że przy drugim opisie dod.zdejmowania oczek na drut zapasowy powinno być: zdjąć 2 o.na drut pomoc.przed robótką,a nie 4 o.Proszę o odp.czy mam rację.
16.06.2017 - 19:18
![]() Małgorzata wrote:
Małgorzata wrote:
Mam pytanie odnośnie wzoru warkoczowego. Przerabiany w prawą i w lewą stronę nie wygląda tak samo. W przypadku, kiedy oczka na drut zapasowy przekłada się na tył robótki, to na wierzchu skrzyżowania warkocza biegną oczka prawe. Kiedy wykonuję skrzyżowanie warkocza przekładając oczka na drut zapasowy z przodu robótki oczka prawe jakby biegły w dwóch różnych rzędach i widoczne są też oczka lewe.
14.06.2017 - 19:15DROPS Design answered:
Witaj Małgosiu! Aby poradzić sobie z techniką warkoczy proponuję obejrzeć video z różnymi ich rodzajami np. TUTAJ. Powodzenia!
16.06.2017 - 09:43
![]() Danuta wrote:
Danuta wrote:
Nie rozumiem dodawania oczek , w rękawie, jeżeli marker włożę pomiędzy dwa ol. to dodając w opisany sposób nie uzyskam ściegu 2ol i 2op
12.02.2017 - 23:17DROPS Design answered:
Witaj Danuto, w opisie jest tak: "Na wys. 10 cm od dołu robótki zacząć dodawanie 1 o. z 2 stron markera 12-12-12-16 razy co 3-3-3-2 cm." Zostanie dodane 2 oczka między 2 oczami lewymi na spodzie rękawa. Dalej ważne jest kolejne zdanie: "Przer. nowe oczka ściągaczem, tzn. 2 pierwsze o. na lewo, 2 nast. o. na prawo)". To nie znaczy, że pod spodem rękawa będzie biegł cały czas ściągacz 2 o.p., 2 o.l., ale efekt będzie w miarę niwidoczny i nie będzie odróżniał się zbyt od wzoru na rękawie. POWODZENIA
13.02.2017 - 11:08
|
|||||||||||||
Irish Mint |
|||||||||||||
|
|
|||||||||||||
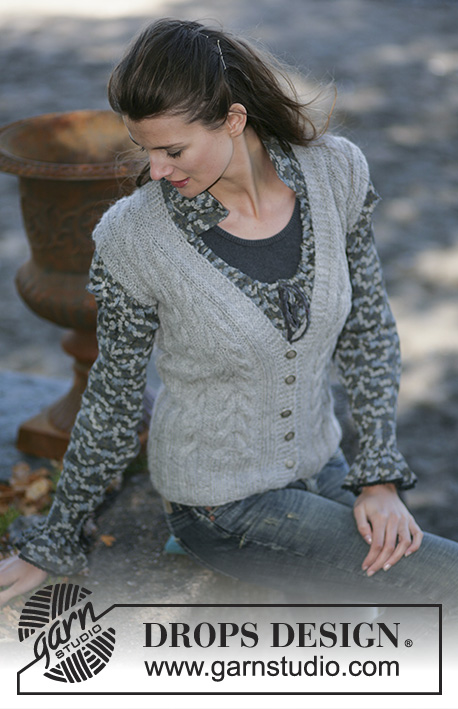
DROPS Jumper with cable pattern and raglan sleeve in Snow
DROPS 96-5 |
|||||||||||||
|
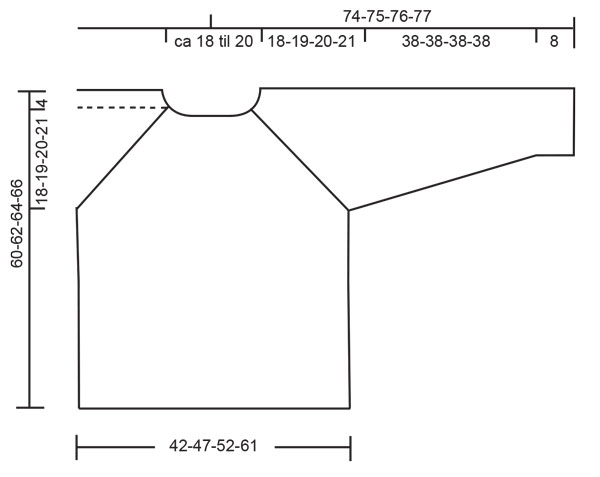
Knitting Tension/gauge: 17 stitches x 16 rows on needle size 8 mm / US 11 in cable pattern = 10 x 10 cm / 4" x 4" Pattern: see diagrams M.1 and M.2. The diagrams are seen from the right side. Decreasing tips (applies to raglan): Dec as follows before the marker: K2 tog Dec as follows after the marker: slip 1 st as if to knit, K1, psso On the rounds without dec, knit sts on each side of marker. -------------------------------------------------- Back and front piece: Cast on 144-160-176-208 sts on circular needle size 6 and knit 8 cm / 3⅛" Rib *P2, K2*, (begin with P2 = the side). Change to circular needle size 8 mm / US 11 and continue as follows: Size S: *P2 (insert a marker between these 2 sts = the side), K2, P2, diagram M.1A (= 6 sts), M.1B over 16 sts, M.1C (= 8 sts), P2 (= mid front), M.2A (= 6 sts), M.2B over 16 sts, M.2C (= 8 sts), P2, K2*, repeat from *-* over the back piece. Size M: *P2 (insert a marker between these 2 sts = the side), diagram M1.A (= 6 sts), M.1B over 24 sts, M.1C (= 8 sts), P2 (= mid front), M.2A (= 6 sts), M.2B over 24 sts, M.2C (= 8 sts), P2, K2*, repeat from *-* over the back piece. Size L: *P2 (insert a marker between these 2 sts = the side), K2, P2, diagram M1.A (= 6 sts), M.1B over 24 sts, M.1C (= 8 sts), P2 (= mid front), M.2A (= 6 sts), M.2B over 24 sts, M.2C (= 8 sts), P2, K2*, repeat from *-* over the back piece. Size XL: *P2 (insert a marker between these 2 sts = the side), K2, P2, diagram M1.A (= 6 sts), M.1B over 32 sts, M.1C (= 8 sts), P2 (= mid front), M.2A (= 6 sts), M.2B over 32 sts, M.2C (= 8 sts), P2, K2*, repeat from *-* over the back piece. All sizes: Continue like this until piece measures 38-39-40-41 cm / 15"-15¼"-15¾"-16⅛". Now bind off 10 sts each side (5 sts on each side of the markers) = 62-70-78-94 sts left on the front and back piece respectively. Put the piece aside and knit the sleeves. Sleeves: The sleeves are knitted round on double pointed needles. Cast on 40-40-48-48 sts on double pointed needles size 6 mm / US 10 and work 8 cm / 3⅛" Rib *P2, K2* (begin with P2 = mid under arm). Change to double pointed needles size 8 mm / US 11 and continue as follows: Size S + M: P2 (insert a marker between these 2 sts = mid under arm), M1.A (= 6 sts), M.1B over 24 sts, M.1C (= 8 sts) Size L + XL: P2 (insert a marker between these 2 sts = mid under arm), K2, P2, M1.A (= 6 sts), M.1B over 24 sts, M.1C (= 8 sts), P2, K2 Continue pattern like this. At the same time, when piece measures 10 cm / 4" inc 1 st on both sides of the P2 mid under arm, repeat on every 3-3-3-2 cm / 3⅛"-3⅛"-3⅛"-¾" a total of 12-12-12-16 times = 64-64-72-80 sts – work the inc sts in Rib, i.e. P the first 2, K the next 2 etc. When piece measures 46 cm / 18" (adjust to the same row in pattern where you dec for armholes on body piece) bind off 10 sts mid under arm, i.e. 5 sts on each side of marker = 54-54-62-70 sts left on row. Put piece aside and knit another sleeve. Yoke: Put sleeves in on the same circular needle as back and front pieces where you bound off for armholes = 232-248-280-328 sts. Insert a marker in all transitions between sleeves and body pieces = 4 markers. Continue in pattern, at the same time dec for raglan on every other row – see Decreasing tips: 7-9-6-4 times and then on every row: 15-13-20-26 times. After all dec are complete = 56-72-72-88 sts left on round. Neck: Change to double pointed needles size 6 mm / US 10 and work 1 round in pattern, at the same time dec 8 sts in the 3 larger sizes by knitting the 8 sts at the top of each sleeve tog 2 by 2 to make them P1, K2, P1. Continue in Rib *K2, P2* to fit in with pattern – if number of sts don’t fit by the raglan on front and back piece, dec so that no of sts fits = approx 56 – 80 sts. Bind off in Rib when neck measures 10 cm / 4". Assembly: Sew the openings under arms. |
|||||||||||||
Diagram explanations |
|||||||||||||
|
|||||||||||||
 |
|||||||||||||
 |
|||||||||||||
Have you finished this pattern?Tag your pictures with #dropspattern or submit them to the #dropsfan gallery. Do you need help with this pattern?You'll find 17 tutorial videos, a Comments/Questions area and more by visiting the pattern on garnstudio.com. © 1982-2026 DROPS Design A/S. We reserve all rights. This document, including all its sub-sections, has copyrights. Read more about what you can do with our patterns at the bottom of each pattern on our site. |
|||||||||||||


With over 40 years in knitting and crochet design, DROPS Design offers one of the most extensive collections of free patterns on the internet - translated to 17 languages. As of today we count 324 catalogs and 12285 patterns - 12275 of which are translated into English (US/in).
We work hard to bring you the best knitting and crochet have to offer, inspiration and advice as well as great quality yarns at incredible prices! Would you like to use our patterns for other than personal use? You can read what you are allowed to do in the Copyright text at the bottom of all our patterns. Happy crafting!
Post a comment to pattern DROPS 96-5
We would love to hear what you have to say about this pattern!
If you want to leave a question, please make sure you select the correct category in the form below, to speed up the answering process. Required fields are marked *.