
Popular categories
Looking for a yarn?


Comments / Questions (4)
![]() Claudia wrote:
Claudia wrote:
Ich habe schon so einiges nach Anleitungen gestrickt. Aber diese Anleitung ist unverständlich/unbrauchbar.
01.10.2024 - 11:40
![]() Corinne wrote:
Corinne wrote:
Bonjour, pour le modèle 74-18 (veste), j’en suis à l’étape bordure devant et col. Je ne sais pas comment m’y prendre. Faut-il relever à partir d’en haut ou du bas du devant ? Et que signifie jusqu'au milieu de l’encolure ? Merci pour votre précieuse aide. Bonne journée
04.01.2023 - 11:02DROPS Design answered:
Bonjour Corinne, mesurez 26 cm à partir de l'épaule le long du devant (côté bordure et pas côté emmanchure), relevez 60-68 m sur l'endroit à partir du bas du devant jusqu'au marqueur + 38 m à partir du marqueur jusqu'au milieu de l'encolure dos et tricotez en côtes. On rabat ensuite les mailles jusqu'au marqueur (bordure devant) et on tricote le col sur les 38 m restantes en augmentant pour le retombé du col. Pour le devant gauche, vous relèverez 38 m sur l'endroit à partir du milieu de l'encolure dos jusqu'à 26 cm de l'épaule + 60-68 m le long du devant gauche jusqu'en bas. Bon tricot!
04.01.2023 - 14:01
![]() Lisebeth wrote:
Lisebeth wrote:
Bonjour, je ne comprends pas bien cette partie de l'explication de la manche : "A 47-46-45-44-43 cm de hauteur totale, rabattre de chaque côté tous les 2 rangs : 1 fois 3 m, 1 fois 2 m et 3-4-4-5-6 fois 1 m, puis 2 m jusqu'à 56-57-57-57-58 cm de hauteur totale, puis 1 fois 3 m. " Le "puis 2 m jusqu'à x cm", ça veut dire qu'on répète la diminution jusqu'à 57 cm ? Ou on diminue de 2m 1 fois et on continue droit jusqu'à 57 cm pour la taille L ? Merci d'avance.
07.05.2022 - 16:15DROPS Design answered:
Bonjour Liesbeth, vous allez rabattre 2 mailles de chaque côté jusqu'à ce que la manche mesure 57 cm de hauteur totale - ajustez la hauteur mais veillez bien à ce que vous ayez rabattu le même nombre de mailles de chaque côté; la hauteur est ici plus importante que le nombre de mailles; terminez en rabattant d'abord 3 mailles au début des 2 rangs suivants et rabattez les mailles restantes. Bon tricot!
09.05.2022 - 08:28
![]() Lisebeth wrote:
Lisebeth wrote:
Bonjour, Il me semble qu'il y a une erreur sur le devant droit qui se tricote en sens inverse. Il est écrit : 5 m end, *5 m end, 5 m env * répéter de * à * et terminer par 5 m env, 1 m lis au point mousse. Or si on fait ça, on aura 10m. endroit et non plus 5, pour démarrer, et 10m. envers à la fin. Je suppose qu'il faut faire : 5 m end, *5 m env, 5 m end* répéter de * à * et terminer par 5 m end. Pouvez-vous cnofirmer svp ? Merci d'avance.
05.05.2022 - 18:46DROPS Design answered:
Bonjour Lisebeth, vous avez tout à fait raison, la correction a été faite, merci. Bonne continuation!
06.05.2022 - 07:59
|
|
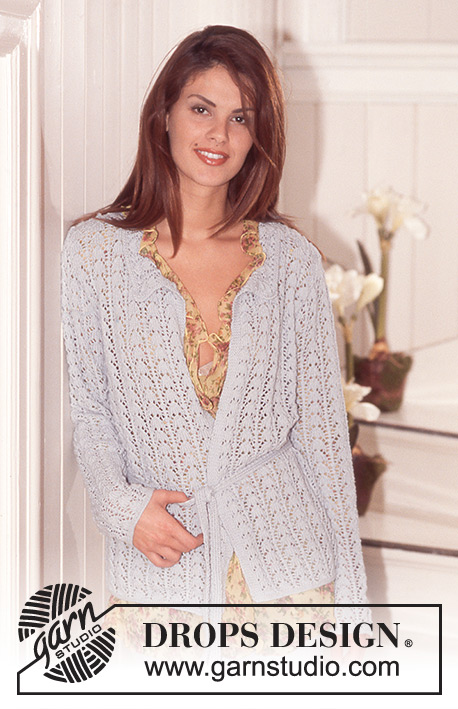
DROPS 74-18 |
|
|
|
|
DROPS Cardigan in Snow.
DROPS 74-18 |
|
|
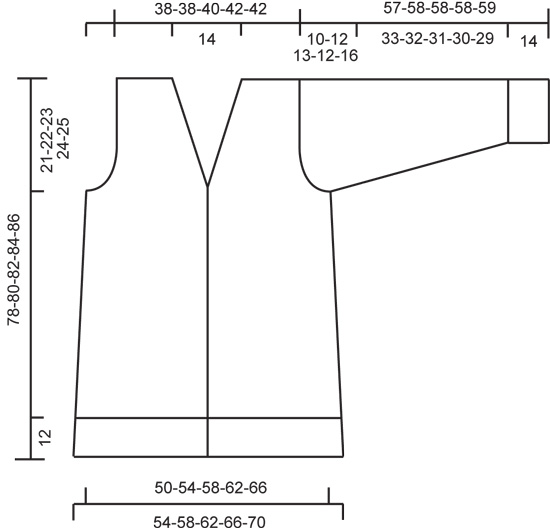
Gauge: 10 sts x 14 rows = 10 x 10 cm on needles 9 in stockinette st. Garter st, when knitting flat: Knit all sts, all rows. Decreasing tips (for neck): All decs are made on right side rows! Dec for the neck inside 1 edge st as follows. After edge st: Slip 1 st as if to knit, K 1, psso. Before edge st: K 2 tog. Back: Cast on 77-87-97-97-107 sts on smaller needles and knit the next row as follows: K 1 (edge st), * K 5, P 5 *, repeat from * - *, ending with K 5, K 1 (edge st). After 2 rows dec all * K 5, P 5 * to * K 4, P 4 * = 62-70-78-78-86 sts. Continue with rib until the piece measures 12 cm. Change to larger needles and stockinette st to finished measurements, decreasing 8-10-14-10-14 sts evenly distributed on the first row = 56-60-64-68-72 sts. When the piece measures 25 cm dec 1 st at each side. Repeat dec when the piece measures 45 cm = 52-56-60-64-68 sts. When the piece measures 57-58-59-60-61 cm bind off for armhole at each side every other row: 3 sts 1-1-1-1-2 times, 2 sts 1-2-2-2-2 times and 1 st 2-2-3-4-3 times = 38-38-40-42-42 sts. When the piece measures 76-78-80-82-84 cm bind off the center 14 sts for the neck = 12-12-13-14-14 sts remain on each shoulder. Bind off when the piece measures 78-80-82-84-86 cm. Left front: Cast on 42-42-42-52-52 sts on smaller needles and knit the next row as follows: K 1 (edge st), P 5, * K 5, P 5 *, repeat from * - * ending with K 5 and K 1 (edge st) at the center front. After 2 rows dec all * K 5, P 5 * to * K 4, P 4 * = 34-34-34-42-42 sts, continue with rib until the piece measures 12 cm. Change to larger needles and stockinette st to finished dimensions decreasing 9-7-5-11-9 evenly distributed on the 1st row = 25-27-29-31-33 sts. When the piece measures 25 cm dec 1 st at the side. Repeat dec when the piece measures 45 cm = 23-25-27-29-31 sts. When the piece measures 52-54-56-58-60 cm dec 1 st for the neck every 10 rows 4 times - see decreasing tips! At the same time when the piece measures 57-58-59-60-61 cm bind off for armhole at the side as on back. When all armhole and neck shaping is complete 12-12-13-14-14 sts remain on shoulder. Bind off when the piece measures 78-80-82-84-86 cm. Right front: Cast on and knit the same as the left, reversing all shaping. So that the rib will look the same, begin rib as follows: K 1 (center front edge st), K 5, * P 5, K 5 *, repeat from * - * ending with P 5 and K 1 (side edge st). Sleeve: Cast on 32-32-42-42-42 sts on smaller needles and knit rib as follows: K 1 (edge st), * K 5, P 5 *, repeat from * - * ending with K 1 (edge st). After 2 rows dec all * K 5, P 5 * to * K 4, P 4 * = 26-26-34-34-34 sts. Continue with rib until the piece measures 14 cm. Change to larger needles and stockinette st to finished measurements. At the same time when the piece measures 14 cm inc 1 st at each side every 5-4-7-5-4 cm a total of 7-8-5-6-7 times = 40-42-44-46-48 sts. When sleeve measures 47-46-45-44-43 cm bind off for sleeve cap at each side every other row: 3 sts 1 time, 2 sts 1 time and 1 st 3-4-4-5-6 times, then 2 sts at each side until the piece measures 56-57-57-57-58 cm and then bind off 3 sts 1 time. Bind off the remaining sts, the piece measures approx. 57-58-58-58-59 cm. Button band + Collar: Sew shoulder seams. Right side: Put a marker on the front 26 cm below shoulder. Pick up along right front and to center back of neck on smaller needles as follows: 60-60-60-68-68 sts up to the marker and 38 sts to center back of the neck = 98-98-98-106-106 sts. Knit as follows from bottom edge: K 4 (sts knit in garter st throughout), then * K 4, P 4 *, repeat from * - * ending with P 2 at center back. There should be P 4 below the marker and K 4 above the marker. Knit rib until edge measures 8 cm, then bind off all sts up to the marker = 60-60-60-68-68 sts (bind off in pattern). Continue with rib over the remaining 38 sts (for collar). Now knit the first K 4 above the marker in garter st. At the same time inc 1 st every other row at center back in the transition between the edge P 2 and K 4 beside it. Twist the increased sts when pulling up to avoid a hole, then purl all increased sts. Continue until the collar measures 20-22 cm (there are 8-10 sts increased at the back, so there are 10-12 purl sts at center back as seen from right side of work). Now inc all * K 4, P 4 * to * K 5, P 5 *, and inc 1 st in each 4 sts over the 10-12 P sts at center back = 56-60 sts. Knit 1 row rib without increasing, then bind off in rib, the collar measures approx. 22-24 cm. Left side: Knit the same as the right side, reversing all shaping. Belt: Cast on 9 sts on smaller needles and knit as follows: K 1 (edge st knit in garter st), * K 1, P 1 *, repeat from * - * ending with K 1 and K 1 (edge st knit in garter st). Knit until belt measures approx. 130-150 cm. Bind off. Assembly: Sew the collar at center back (there will be 20-24 P sts at center back). Sew in sleeves and sew sleeve and side seams. |
|
 |
|
Have you finished this pattern?Tag your pictures with #dropspattern or submit them to the #dropsfan gallery. Do you need help with this pattern?You'll find 17 tutorial videos, a Comments/Questions area and more by visiting the pattern on garnstudio.com. © 1982-2026 DROPS Design A/S. We reserve all rights. This document, including all its sub-sections, has copyrights. Read more about what you can do with our patterns at the bottom of each pattern on our site. |


With over 40 years in knitting and crochet design, DROPS Design offers one of the most extensive collections of free patterns on the internet - translated to 17 languages. As of today we count 324 catalogs and 12290 patterns - 12280 of which are translated into English (US/in).
We work hard to bring you the best knitting and crochet have to offer, inspiration and advice as well as great quality yarns at incredible prices! Would you like to use our patterns for other than personal use? You can read what you are allowed to do in the Copyright text at the bottom of all our patterns. Happy crafting!
Post a comment to pattern DROPS 74-18
We would love to hear what you have to say about this pattern!
If you want to leave a question, please make sure you select the correct category in the form below, to speed up the answering process. Required fields are marked *.