
Popular categories
Looking for a yarn?


Comments / Questions (5)
![]() Julia wrote:
Julia wrote:
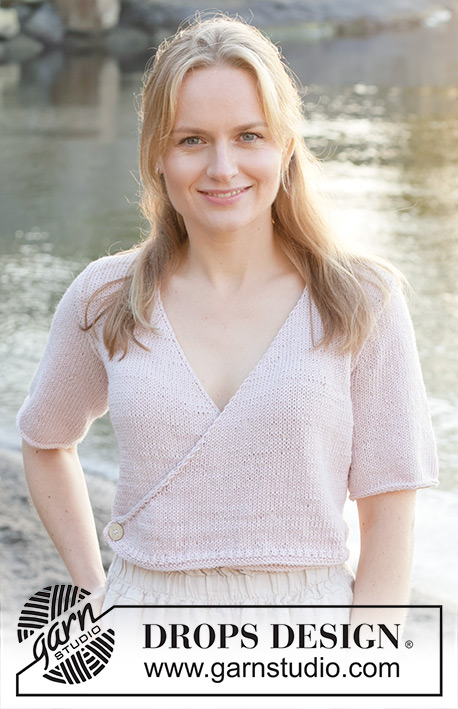
Hallo! Ich plane diese Jacke in Größe XL nachzustricken. Die Abnahmen für den Umschlagteil sind nach 38 + 36 + 28 = 102 Reihen erledigt. Mit einer Maschenprobe mit 28 Reihen für 10 cm, sind das ca. 36 cm und mit den 4 cm vor den Abnahmen ca. 40 cm. Also müssen danach noch ca. 10 cm ohne weitere Abnahmen am Umschlagteil gestrickt werden? Ich frage, weil aus dem Diagramm nicht so richtig hervor geht, ob der obere Teil bis zur Schulternaht eine gerade Kante hat. Danke.
20.10.2025 - 19:24DROPS Design answered:
Liebe Julia, auf einem der Fotos sehen Sie, dass der obere Teil der Vorderteile bis zur Schulternaht gerade nach oben geht und keine Schrägung mehr hat. Die Anleitung ist so korrekt. Viel Spaß beim Stricken! :-)
22.10.2025 - 20:28
![]() Jeannette wrote:
Jeannette wrote:
Hallo Drops Team Entschuldigung, ich nin es schon wieder. Das mit den Knopflöcher habe ich jetzt verstanden... Habe trotzdem ein ? Wieso benötigt man 4 Knöpfe? Drops Nr 802 2 Stück und Drops Nr.803 2 Stück ?
01.10.2025 - 23:10DROPS Design answered:
Hi, Jeannette, the small buttons are sewn on the inside to help stabilize and are not visible on the outside. When sewing, put the needle first through the big button, then the front piece where the button should be fastened, and lastly through the small button and fasten. Repeat on the other side of the front piece. Happy knitting!
31.10.2025 - 14:19
![]() Jeannette wrote:
Jeannette wrote:
Ist das eine Knopfloch nicht an der falschen Stelle?
24.09.2025 - 14:33
![]() Abby wrote:
Abby wrote:
Hello! For the back piece (in size XL) it says to cast off 27 stitches for the back neckline, but later for the back neck-edge it says to pick up 40 stitches. How is this done? Thank you!
28.04.2025 - 01:20DROPS Design answered:
Dear Abby, you will cast off the middle 27 sts then cast off 1 stitch 2 times on each side of neck - when picking up stitches along neck you pick up stitches from shoulder down to neck, along neck and up to left shoulder - there are approx. 4 cm between the middle 27 sts cast off and the top of shoulder on each side - you will have to pick up approx; 6-7 sts from shoulder down to the 27 sts cast off, then 1 st in each of these 27 sts + approx. 7-6 sts from neck up to shoulder = 40 sts. Happy knitting!
28.04.2025 - 09:15
![]() Paula wrote:
Paula wrote:
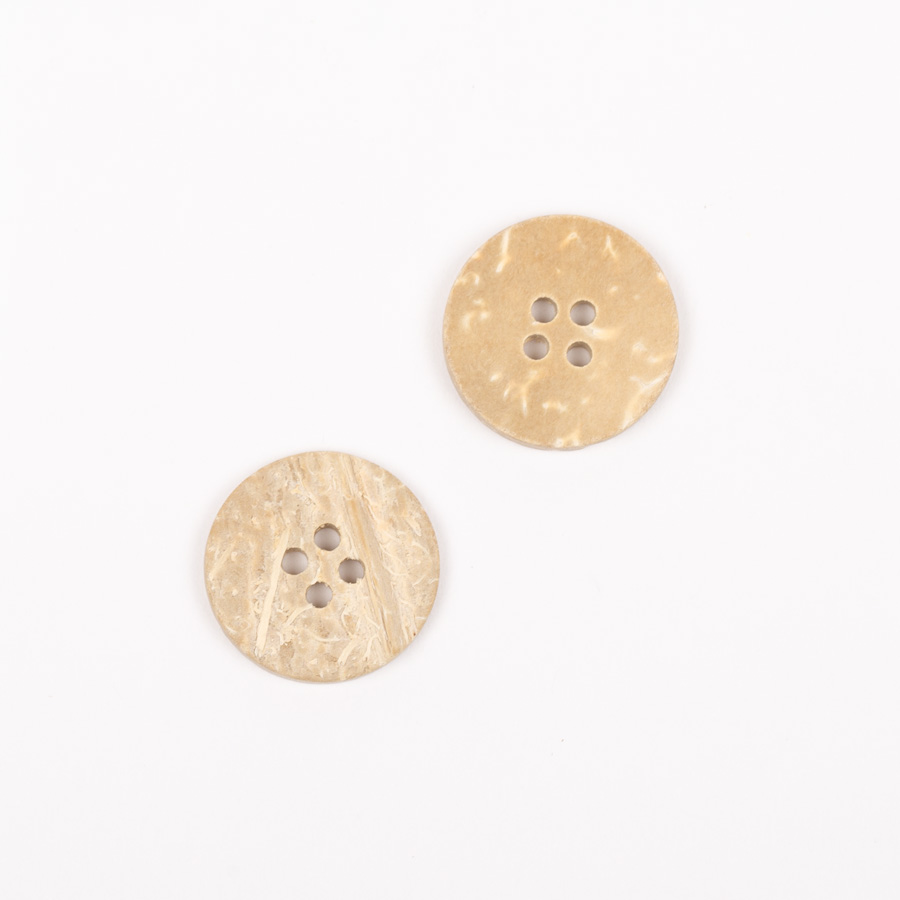
Auf dem Foto sieht man nur einen Knopf. Laut Anleitung verstehe ich es allerdings so, dass man beide Knopflöcher ins Außenteil einarbeitet und daher auch beide Knöpfe sieht. Ist das korrekt? Ansonsten verstehe ich nicht, was der erste und was der zweite Markierungsfaden ist.
11.04.2025 - 18:12DROPS Design answered:
Liebe Paula, die beide Knöpfe werden auf der rechten Vorderteil angenäht; der eine an der Außenseite und der andere (der kleine) in der Innenseite, deshalb kann man nur einen Knopf auf dem Bild sehen, da der kleinere innen ist. Viel Spaß beim Stricken!
22.04.2025 - 08:03
|
|
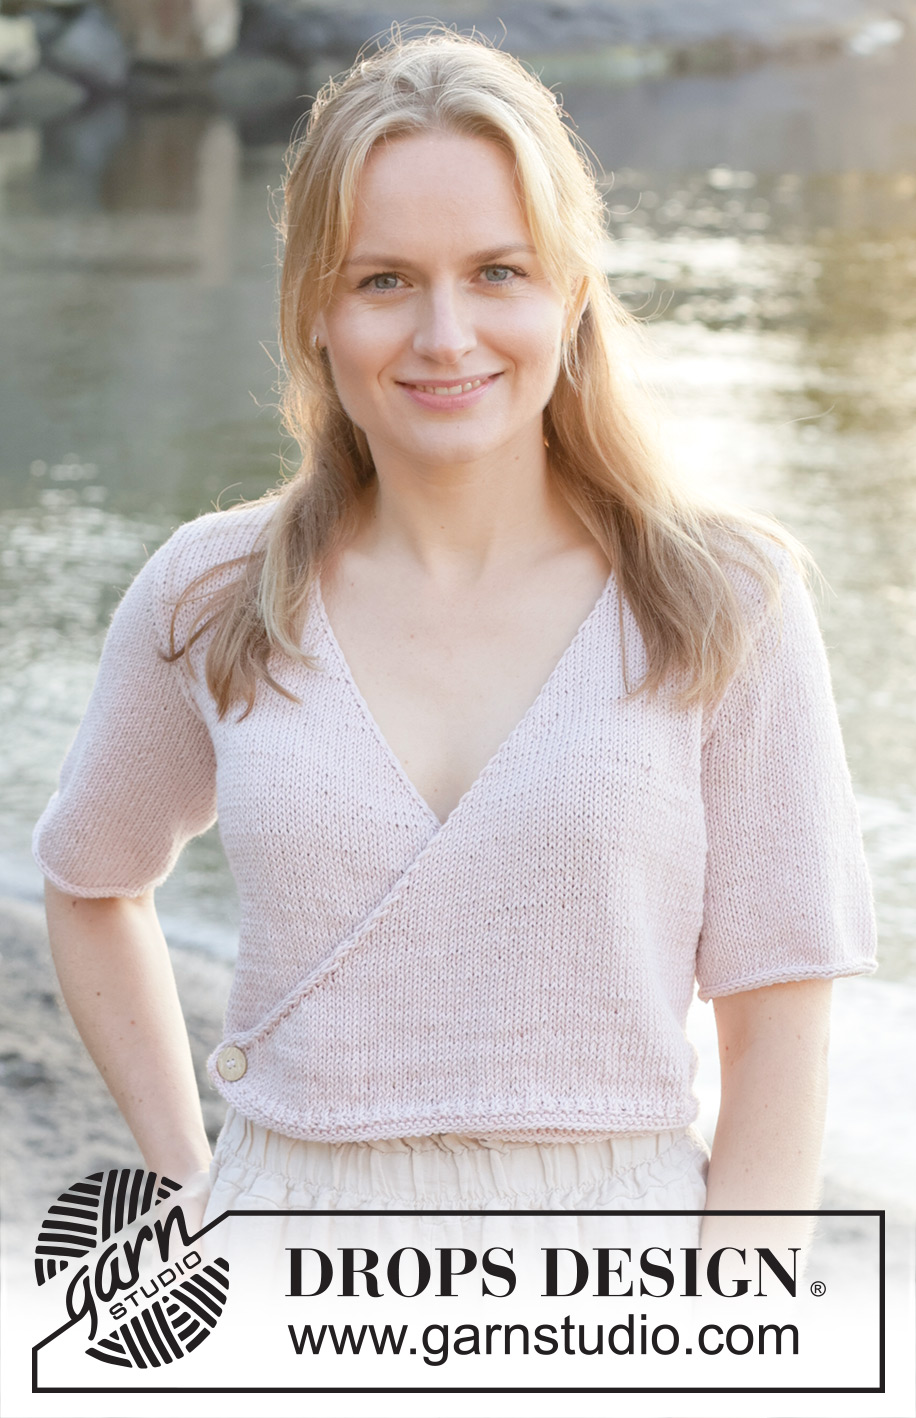
New Dawn Wrap#newdawnwrap |
|
 |
 |
Knitted wrap-over jacket with short sleeves in DROPS Cotton Merino. The piece is worked bottom up with stockinette stitch V-neck and I-cord. Sizes S - XXXL.
DROPS 257-5 |
|
|
------------------------------------------------------- EXPLANATIONS FOR THE PATTERN: ------------------------------------------------------- 2 EDGE STITCHES IN I-CORD: START OF ROW: Slip 1 stitch purl-wise with strand in front, knit 1. END OF ROW: Work until there are 2 stitches left on the row, slip 1 stitch purl-wise with strand in front, knit 1. Work like this from both the right and wrong side. BUTTONHOLES: Work 2 buttonholes from the right side as follows: Work as before to 7 stitches past the second marker-thread (i.e., left side of the piece when worn), knit 2 together, make 1 yarn over, work until there are 5 stitches left on the row, knit 2 together, make 1 yarn over, work to end of row. On the next row purl the yarn overs to leave holes. DECREASE TIP-1 (decrease 2 stitches in the side): All decreases are worked from the right side! AFTER MARKER: Slip 1 stitch knit-wise, knit 2 together, pass the slipped stitch over the knitted-together stitches (2 decreased stitches). BEFORE MARKER: Work until there are 3 stitches left before the marker, knit 3 together (= 2 decreased stitches). DECREASE TIP-2 (decrease 1 stitch in the side): All decreases are worked from the right side! AFTER MARKER: Slip 1 stitch knit-wise, knit 1, pass the slipped stitch over the knitted stitch (1 decreased stitch). BEFORE MARKER: Work until there are 2 stitches left before the marker, knit 2 together (= 1 decreased stitch). DECREASE TIP-3: All decreases are worked from the right side! Decrease 1 stitch on each side of the marker-thread as follows: Work until there are 3 stitches left before the marker-thread, knit 2 together, knit 2 (marker-thread sits between these 2 stitches), slip 1 stitch knit-wise, knit 1 and pass the slipped stitch over the knitted stitch (2 stitches decreased). INCREASE TIP: Increase 1 stitch on each side of the marker-thread: Work until there are 3 stitches left before the marker-thread, make 1 yarn over, knit 6 (marker-thread sits in the middle of these 6 stitches), 1 yarn over. On the next row/round work the yarn overs twisted to avoid holes. Then work the new stitches in stockinette stitch. KNITTING TIP: When working short rows, there will be a small hole after each turn. This hole can be closed by tightening the strand or using the technique German Short Rows as follows: Slip the first stitch purl-wise, take the strand over the right needle and tighten well from the back (2 loops on the needle). These loops are worked together on the next row. I-CORD BIND OFF: Slip the 3 new stitches onto the left needle, so the strand is 3 stitches in on the needle (the strand tightens when working to form a small tube). ROW 1 (right side): Knit 2, knit 2 twisted together. Slip the 3 stitches on the right needle onto the left needle. Do not turn. Repeat ROW 1. ------------------------------------------------------- START THE PIECE HERE: ------------------------------------------------------- JACKET – SHORT OVERVIEW OF THE PIECE: The pattern uses both long and short needles; start with the length which fits the number of stitches and change when necessary. The piece is worked back and forth, bottom up as far as the armholes, while increasing in the sides and decreasing for the wrap-over at the same time. The piece is divided for the armholes and the back and front pieces finished separately. The shoulder seams are sewn and the back neckline is bind off with I-cord. Stitches are knitted up around the armholes and the sleeves started back and forth for the sleeve cap, then finished in the round. If there is a «0» in your chosen size, skip the information and go straight to the next instruction. BODY: Cast on 239-263-287-317-359-395 stitches with circular needle size 3 MM = US 2.5 and DROPS Cotton Merino. Work as follows: ROW 1 (wrong side): 2 EDGE STITCHES IN I-CORD – read description above, purl until there are 2 stitches left, 2 edge stitches in I-cord. ROW 2 (right side): 2 edge stitches in I-cord, purl until there are 2 stitches left, 2 edge stitches in I-cord. Work ROWS 1 and 2 one more time. Then work as follows: ROW 5 (wrong side): 2 edge stitches as before, work rib (purl 1, knit 1) until there are 3 stitches left, purl 1, 2 edge stitches as before. ROW 6 (right side): 2 edge stitches as before, work rib (knit 1, purl 1) until there are 3 stitches left, knit 1, 2 edge stitches as before. After ROW 6: Change to circular needle size 4 MM = US 6. Continue with stockinette stitch, with 2 edge stitches in I-cord on each side. Insert 1 marker-thread 78-86-94-104-118-130 stitches in from each side (= 83-91-99-109-123-135 stitches on the back piece between the marker-threads). Allow the marker-threads to follow your work onwards; they are used when increasing in the sides. When the piece measures 3 cm = 1⅛", work 2 BUTTONHOLES on the left front piece – read description above. When the piece measures 4 cm = 1½", start to decrease for the wrap-over on both sides. AT THE SAME TIME begin to increase for the body on each side of both marker-threads. Read the next 2 paragraphs before continuing. Remember to maintain the knitting gauge. DECREASE FOR WRAP-OVER: Insert 1 marker inside the 2 outermost stitches on each side of the piece; allow these markers to follow your work onwards. Decrease as follows from the right side in each side of piece: Read DECREASE TIP-1 and decrease 2 stitches every 2nd row 15-16-17-19-23-26 times, then read DECREASE TIP-2 and decrease 1 stitch every 2nd row 13-15-17-18-18-18 times. Then decrease 1 stitch every 4th row 6-6-7-7-7-7 times - NOTE: Make sure the I-cord-edge is not being tightened while decreasing inside the edge stitches. INCREASE IN SIDES: Read INCREASE TIP and increase 1 stitch on each side of both marker-threads (= 4 increased stitches) every 3½-3½-4-4-4-4 cm = 1¼"-1¼"-1½"-1½"-1½"-1½", 6 times (= 24 increased stitches). BIND OFF FOR ARMHOLES: AT THE SAME TIME, when the piece measures 25-26-27-28-29-30 cm = 9¾"-10¼"-10⅝"-11"-11⅜"-11¾", bind off 4-5-6-8-10-12 stitches for the armholes on each side of both marker-threads (= 8-10-12-16-20-24 stitches bind off for each armhole). The front and back pieces are finished separately. BACK PIECE: = 87-93-99-105-115-123 stitches. Insert 1 new marker inside the outermost 3 stitches on each side. Allow these markers to follow your work onwards. Work stockinette stitch back and forth, decreasing for the armholes from the right side as follows: Read DECREASE TIP-1 and decrease 2 stitches every 2nd row 0-0-0-2-4-6 times on both sides, then read DECREASE TIP-2 and decrease 1 stitch every 2nd row 7-9-11-9-9-7 times on both sides = 73-75-77-79-81-85 stitches. When the piece measures 40-42-44-46-48-50 cm = 15¾"-16½"-17¼"-18"-19"-19¾", bind off the middle 25-25-27-27-29-29 stitches for the neckline and finish each shoulder separately. SHOULDERS: = 24-25-25-26-26-28 stitches. Insert 1 marker inside the 3 outermost stitches by the neckline and allow it to follow your work onwards. Work stockinette stitch, decreasing for the neckline every 2nd row as follows (according to DECREASE TIP-2): 1 stitch 2 times = 22-23-23-24-24-26 shoulder-stitches. Bind off when the piece measures 44-46-48-50-52-54 cm = 17¼"-18"-19"-19¾"-20½"-21¼" from the cast-on edge. RIGHT FRONT PIECE: Insert 1 new marker inside the outermost 3 stitches by the armhole and allow it to follow your work onwards. Work stockinette stitch with 2 edge stitches in I-cord as before. Continue to decrease for the wrap-over. In addition, decrease for the armhole from the right side as follows: Read DECREASE TIP-1 and decrease 2 stitches every 2nd row 0-0-0-2-4-6 times by the side, then read DECREASE TIP-2 and decrease 1 stitch every 2nd row 7-9-11-9-9-7 times. After all the decreases for the wrap-over and armhole, there are 24-25-25-26-26-28 shoulder stitches (2 more stitches than on the back piece due to the edge stitches). When the piece measures 44-46-48-50-52-54 cm = 17¼"-18"-19"-19¾"-20½"-21¼" from the cast-on edge, bind off the outermost 22-23-23-24-24-26 stitches from the armhole for the shoulder (binding off with purl from the wrong side) = 2 stitches left. Work these 2 edge stitches as before, then place them on a stitch holder; they are later used when binding off with I-cord at the back of the neck). LEFT FRONT PIECE: Work in the same way as the right front piece but, when binding off from the armhole for the shoulder, bind off with knit from the right side (also binding off the 2 edge stitches). ASSEMBLY: Sew the shoulder seams, sewing stitch to stitch from the armhole to the neckline. NOTE: do not sew the 2 edge stitches on the right front piece. Sew 2 buttons on each side of the right front piece so they match the buttonholes. The buttons are above each other with the garment between them; the small button on the wrong side and the large button on the right side. Sew through the large button, through the garment, then through the small button all at the same time. BACK NECK-EDGE: Use circular needle size 4 MM = US 6. Start from the right side on the right shoulder (when the garment is worn) and knit up approx. 38-38-40-40-42-42 stitches along the back neckline to the left shoulder. Cut the strand. Place the 2 edge stitches from the stitch holder on the needle, knit these 2 stitches and cast on 1 stitch (= 3 stitches). Work I-CORD BIND OFF – read description above, until there are 3 stitches left on the right needle. Slip these 3 stitches onto the left needle, knit 1, knit 2 together = 2 stitches. Slip these 2 stitches onto the left needle and bind off. Sew these 2 stitches together with the 2 bind-off edge stitches on the left front piece. SLEEVES: The sleeves are worked from the armhole downwards. Lay the piece flat and insert 1 marker at the top of the armhole and 1 marker-thread in the middle of the 8-10-12-16-20-24 bind-off stitches at the bottom of the armhole. Use circular needle size 3 MM = US 2.5. Start at the bottom of the armhole and knit up 72-76-82-86-92-96 stitches, with equal numbers of stitches on both sides of the marker/marker-thread. Change to circular needle size 4 MM = US 6. Starting at the bottom of the armhole, work stockinette stitch and short rows back and forth for the sleeve cap as follows: ROW 1 (right side): Knit to 6-6-6-6-6-6 stitches past the marker at top of armhole – read KNITTING TIP, turn. ROW 2 (wrong side): Purl 6-6-6-6-6-6 stitches past the marker, turn. ROW 3 (right side): Knit to 2-2-2-2-2-2 stitches past the previous turn, turn. ROW 4 (wrong side): Purl to 2-2-2-2-2-2 stitches past the previous turn, turn. ROW 5 (right side): Knit to 2-2-2-1-1-1 stitches past the previous turn, turn. ROW 6 (wrong side): Purl to 2-2-2-1-1-1 stitches past the previous turn, turn. Repeat ROWS 3 to 6 until you have turned a total of 26-28-30-36-42-48 times (13-14-15-18-21-24 times on each side, with the last row from the wrong side). AFTER THE LAST TURN: The final time row 4 or 6 is worked, turn and knit back from the right side to the marker-thread at the bottom of the armhole (mid-under sleeve). Allow this marker-thread to now follow your work onwards; it is used when decreasing under the sleeve. Work stockinette stitch in the round for 1 cm = ⅜". Now decrease 2 stitches under the sleeve – read DECREASE TIP-3. Decrease like this every 2nd round 2-3-5-5-6-7 times = 68-70-72-76-80-82 stitches. Continue working until the sleeve measures 25-25-26-26-27-27 cm = 9¾"-9¾"-10¼"-10¼"-10⅝"-10⅝" from the marker on the shoulder. Change to double pointed needles size 3 MM = US 2.5. Cast on 3 stitches onto the right needle. Work I-cord bind off until there are 3 stitches left on the right needle. Slip these 3 stitches onto the left needle and bind off. Sew the I-cord stitches together with a couple of small stitches. The sleeve measures approx. 26-26-27-27-28-28 cm = 10¼"-10¼"-10⅝"-10⅝"-11"-11" from the shoulder marker. |
|
 |
|
Have you finished this pattern?Tag your pictures with #dropspattern #newdawnwrap or submit them to the #dropsfan gallery. Do you need help with this pattern?You'll find 30 tutorial videos, a Comments/Questions area and more by visiting the pattern on garnstudio.com. © 1982-2026 DROPS Design A/S. We reserve all rights. This document, including all its sub-sections, has copyrights. Read more about what you can do with our patterns at the bottom of each pattern on our site. |
|


With over 40 years in knitting and crochet design, DROPS Design offers one of the most extensive collections of free patterns on the internet - translated to 17 languages. As of today we count 324 catalogs and 12290 patterns - 12280 of which are translated into English (US/in).
We work hard to bring you the best knitting and crochet have to offer, inspiration and advice as well as great quality yarns at incredible prices! Would you like to use our patterns for other than personal use? You can read what you are allowed to do in the Copyright text at the bottom of all our patterns. Happy crafting!
Post a comment to pattern DROPS 257-5
We would love to hear what you have to say about this pattern!
If you want to leave a question, please make sure you select the correct category in the form below, to speed up the answering process. Required fields are marked *.