
Popular categories
Looking for a yarn?


Comments / Questions (5)
![]() Simone wrote:
Simone wrote:
Hallo, nachdem die linken und rechten Schultermaschen zusammengeführt wurden, soll glatt rechts weitergestrickt werden , bevor für die Armausschnitte zugenommenwird. (25 cm bei Größe S. ) Ab wo werden die 25 cmgemessen? Ab Zusammenführung oder schon inklusive Schultermaschen? Vielen Dank!
08.04.2026 - 14:08DROPS Design answered:
Liebe Simone, die 25 cm messen Sie ab die aufgenommenen Maschen für Vorderteile, dh vom Anfang Vorderteil an. Viel Spaß beim Stricken!
09.04.2026 - 10:08
![]() Loraine wrote:
Loraine wrote:
Bonjour, pouvez-vous me confirmer que lorsqu'il s'agit de relever les mailles le long de l'épaule droite, on remonte jusque avant les côtes (en incluant les mailles de l'épaule côté dos) ? Merci
15.01.2026 - 22:30DROPS Design answered:
Bonjour Loraine, non pas vraiment, vous ne relevez les mailles que dans les rangs tricotés avec augmentations, par ex en taille XS vous avez tricoté 24 rangs, vous relevez 1 m dans chacun de ces 24 rangs = 24 mailles pour l'épaule devant. Bon tricot!
19.01.2026 - 07:14
![]() Marion wrote:
Marion wrote:
Hallo, wie nehme ich die drei Maschen am Rand (Reihe 4 und 5 am rückenteil) zu?
09.01.2026 - 10:38DROPS Design answered:
Liebe Marion, in diesem Video zeigen wir, wie man Maschen seitlich auffasst, so werden Sie hier diese 3 Maschen auffassen, jeweils 1 Masche in jeder der 3 ersten Reihen am Ende der Hinreihe auffassen, wenden und am Ende der nächsten Reihe, jeweils 1 Masche in jeder der 3 ersten Reihen auffassen. Viel Spaß beim Stricken!
12.01.2026 - 07:58
![]() Marie wrote:
Marie wrote:
Je ne comprends pas ce qu'est l'icord dans le cas du rabat de mailles. Impossible de monter trois mailles, d'avoir le fil à trois mailles du bord, d'en tricoter trois autres, de repasser les premières par dessus les autres à gauche, et puis quand rabat-on ?? Tricote t-on en rond ? Combien de rangs ? La vidéo ne correspond pas à ce qu'on cherche à faire. Pouvez-vous envoyer une vidéo qui correspond exactement à notre cas.
31.03.2025 - 21:59DROPS Design answered:
Bonjour Marie, on monte les nouvelles mailles sur l'aiguille droite et on les glisse sur l'aiguille gauche, sans les tricoter, ainsi, le fil va se trouver après la dernière des mailles montées = à 3 mailles du bord de l'aiguille; nous avons 2 vidéos montrant comment rabattre avec un I-cord: dans celle-ci, on monte 2 mailles avant de rabattre les mailles et dans celle-ci, on en monte 4 et on rabat les mailles tout autour de l'ouvrage (en bas d'un pull par ex.). L'une de ces vidéos - ou bien les 2, devraient pouvoir vous aider. Bon tricot!
01.04.2025 - 08:59
![]() Claudette wrote:
Claudette wrote:
Désolée, je ne peux pas voir les photos du modèle ni les diagrammes. Pourquoi?
01.03.2025 - 21:27DROPS Design answered:
Bonjour Claudette, essayez de nettoyer le cache / supprimer les cookies ou bien tentez avec un autre navigateur ou un autre appareil. Bon tricot!
03.03.2025 - 12:08
|
|
Harbour Day#harbourdaysweater |
|
 |
 |
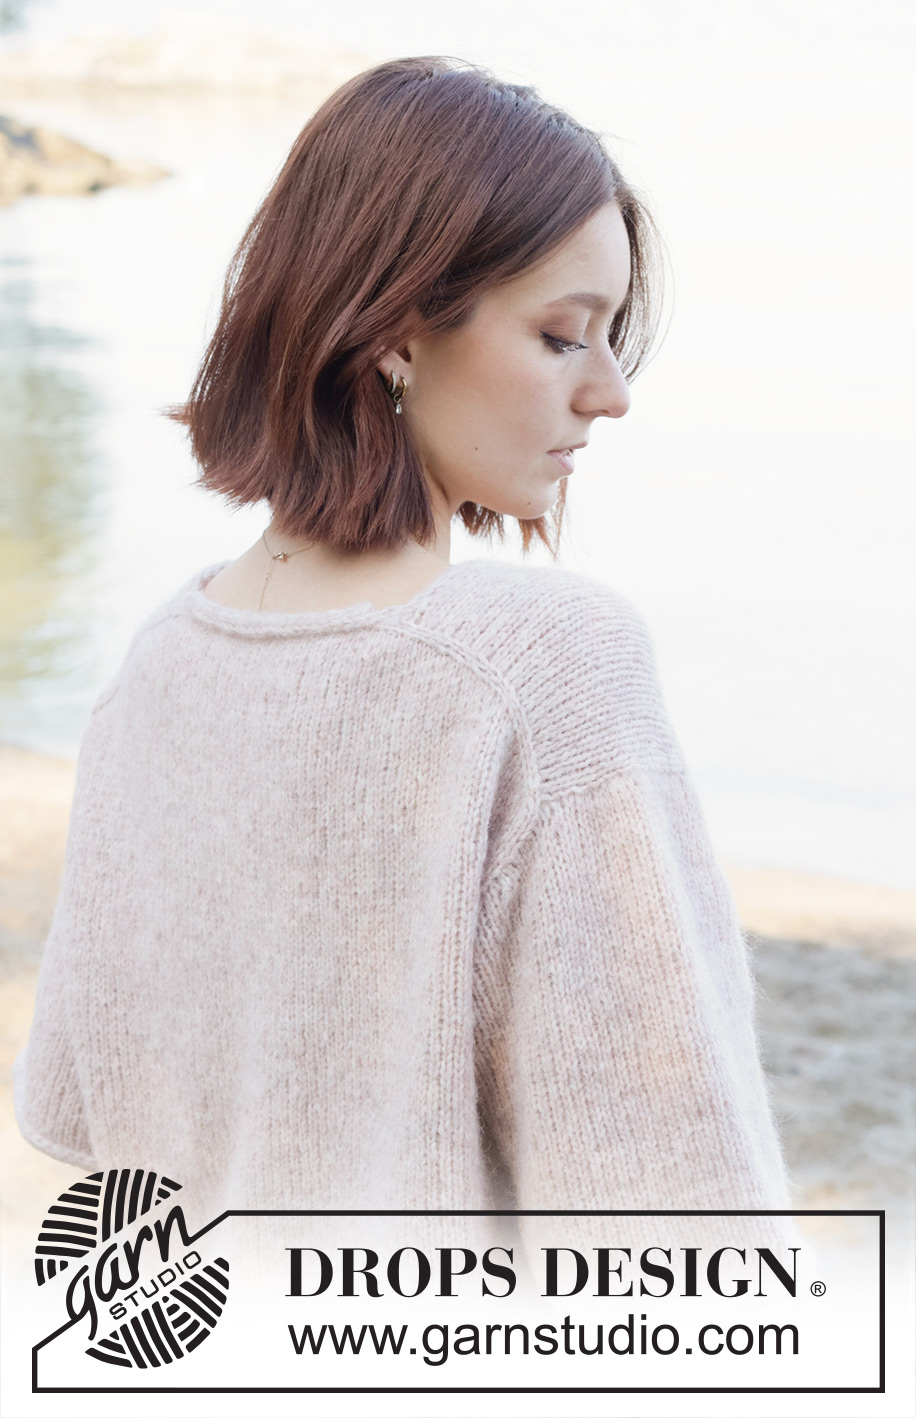
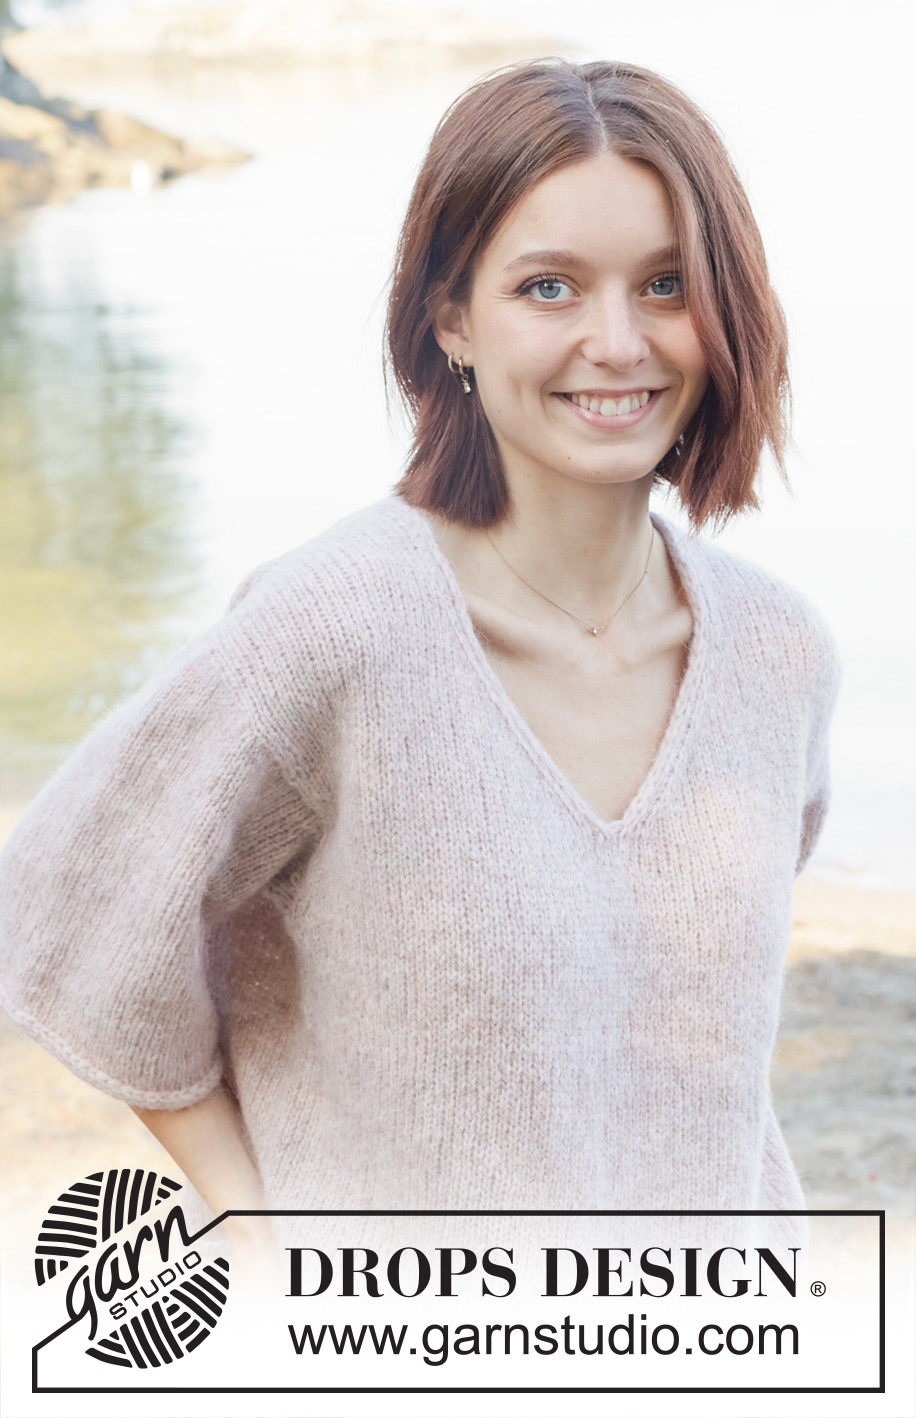
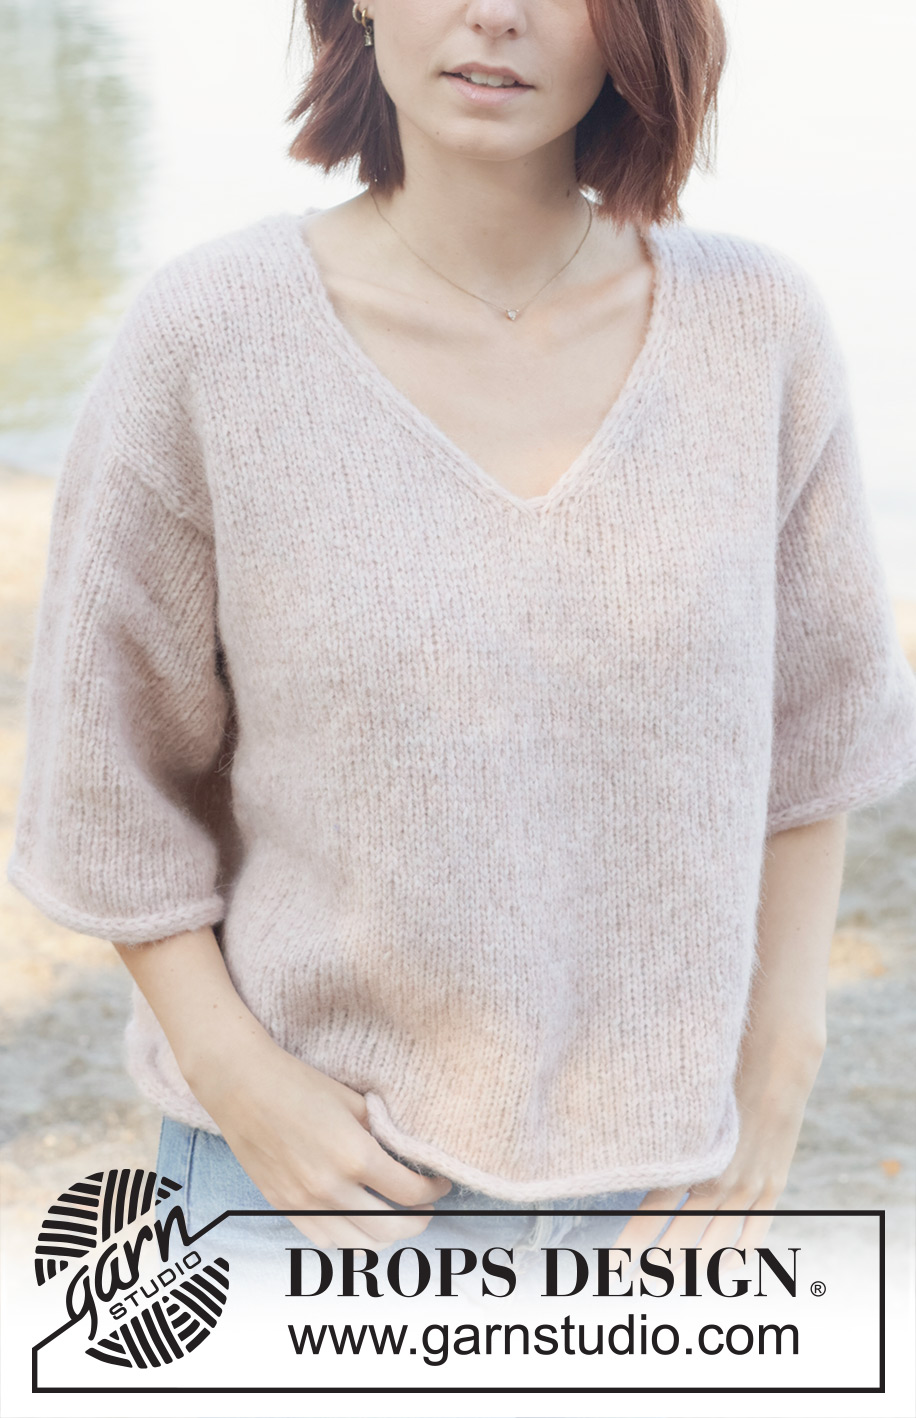
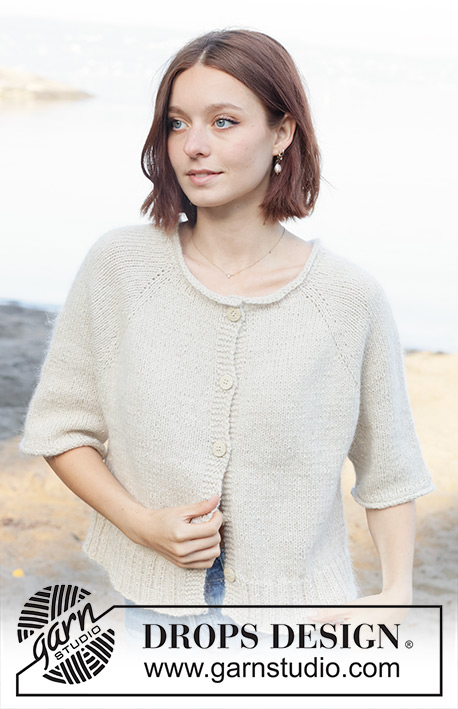
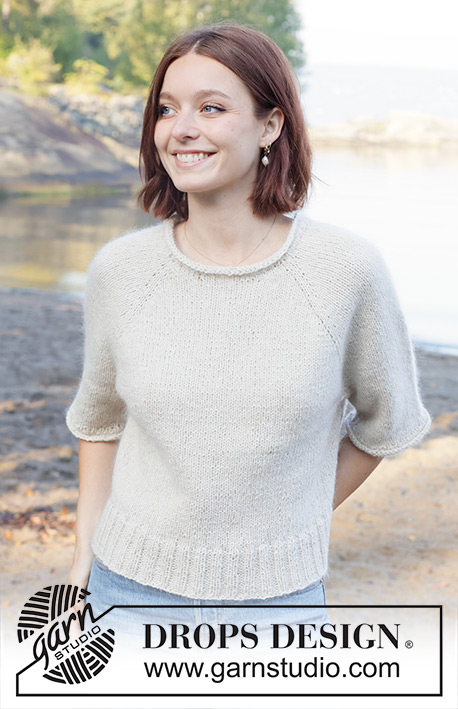
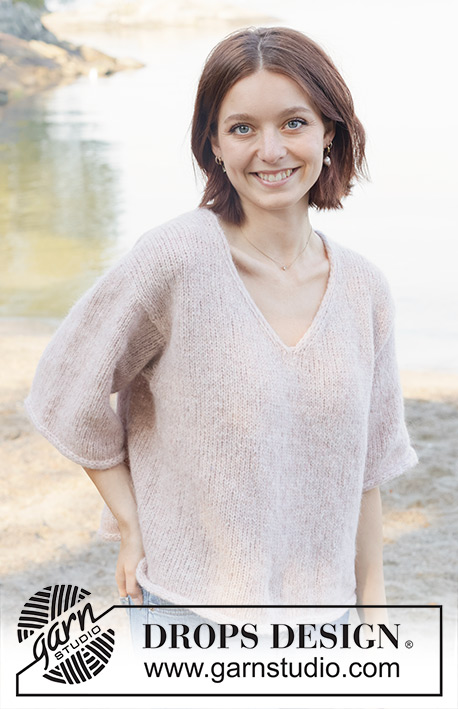
Knitted sweater in DROPS Air. The piece is worked top down with European/diagonal shoulders, V-neck, I-cord and short sleeves. Sizes XS - XXL.
DROPS 257-17 |
|
|
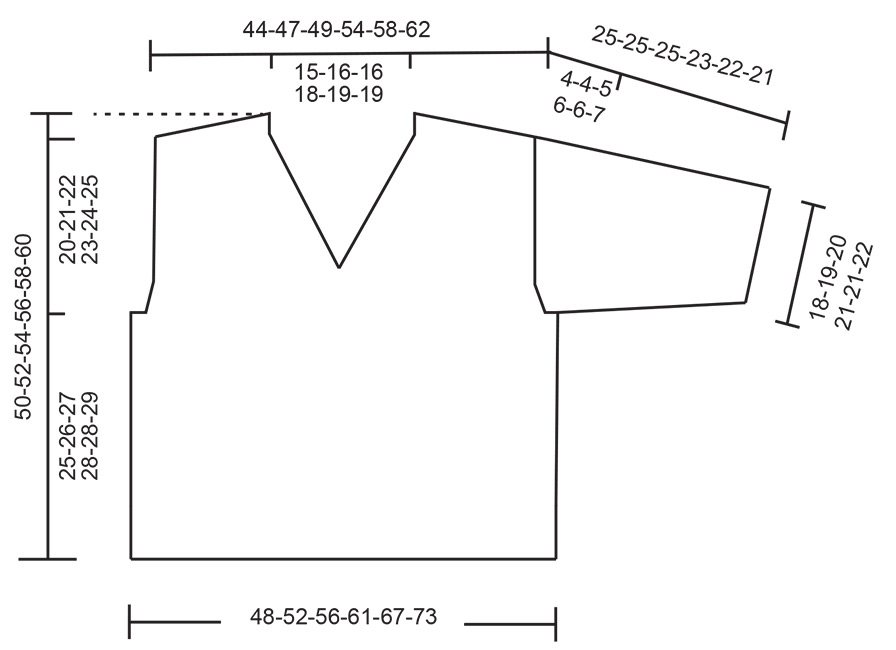
------------------------------------------------------- EXPLANATIONS FOR THE PATTERN: ------------------------------------------------------- INCREASE TIP-1: INCREASE 1 STITCH TOWARDS THE LEFT - from RIGHT SIDE: Use left needle to pick up yarn between 2 stitches from row below, pick up yarn from the front and knit in the stitch loop that is on the back of the needle. INCREASE 1 STITCH TOWARDS THE RIGHT - from RIGHT SIDE: Use left needle to pick up yarn between 2 stitches from row below, pick up yarn from the back and knit in the stitch loop that is on the front side of the needle. INCREASE TIP-2: INCREASE 1 STITCH TOWARDS THE RIGHT - from WRONG SIDE: Use left needle to pick up yarn between 2 stitches from row below, pick up yarn from the back and purl in the stitch loop that is on the front side of the needle. INCREASE 1 STITCH TOWARDS THE LEFT - from WRONG SIDE: Use left needle to pick up yarn between 2 stitches from row below, pick up yarn from the front and purl in the stitch loop that is on the back side of the needle. EDGE STITCHES RIGHT SHOULDER: RIGHT SIDE: Work until there are 3 stitches left, purl 1, slip 1 stitch purl-wise with strand in front, knit 1. WRONG SIDE: Slip 1 stitch purl-wise with strand in front, knit 2, work to end of row. EDGE STITCHES LEFT SHOULDER: RIGHT SIDE: Slip 1 stitch purl-wise with strand in front, knit 1, purl 1, work to end of row. WRONG SIDE: Work until there are 3 stitches left, knit 1, slip 1 stitch purl-wise with strand in front, knit 1. I-CORD BIND OFF: At the end of the round, and after the last stitch has been worked, cast on 3 stitches on the right needle from the right side, leaving the working strand 3 stitches in on the needle (the strand tightens the piece while you work, forming a tube). ROW 1 (right side): Knit 2, knit the next 2 stitches twisted together. ROW 2 (right side): Slip 3 stitches from the right needle onto the left needle, knit 2, knit the next 2 stitches twisted together. Repeat ROW 2 until there are 3 stitches left on the right needle. Slip these 3 stitches onto the left needle. Bind off. Sew a small stitch, joining the beginning and the end of the I-cord. KNITTING TIP: When working short rows, there will be a small hole after each turn. This hole can be closed by tightening the strand or using the technique German Short Rows as follows: Slip the first stitch purl-wise, take the strand over the right needle and tighten well from the back (2 loops on the needle). These loops are worked together on the next row. DECREASE TIP (for sleeves): Decrease 1 stitch on each side of the marker-thread as follows: Work until there are 3 stitches left before the marker-thread, knit 2 together, knit 2 (marker-thread sits between these 2 stitches), slip 1 stitch knit-wise, knit 1 and pass the slipped stitch over the knitted stitch. ------------------------------------------------------- START THE PIECE HERE: ------------------------------------------------------- SWEATER – SHORT OVERVIEW OF THE PIECE: The pattern uses both long and short needles; start with the length which fits the number of stitches and change when necessary. The piece is started back and forth, casting on stitches at the back of the neck and working the back piece top down, while increasing stitches on each side for the shoulders, which become slightly diagonal. The back piece is worked as far as the armholes. The front piece is then worked in 2 sections, first the right shoulder, knitting up stitches along the right back shoulder, then increasing for the neckline. This is repeated on the left back shoulder. The 2 front sections are joined when the neckline is finished and worked until the armholes are finished. The front and back pieces are joined on the same circular needle and the body is worked in the round. Stitches are knitted up around the armholes for the sleeves, which are started back and forth for the sleeve cap, then finished in the round. BACK PIECE: Cast on 21-23-23-27-29-29 stitches with circular needle size 5 MM = US 8 and DROPS Air. ROW 1 (wrong side): Purl. ROW 2 (right side): * Knit 1, purl 1*, work from *-* until there is 1 stitch left, knit 1. ROW 3: Knit over knit and purl over purl. ROW 4: Work the rib as before, knit up 3 stitches along the side of the piece, with 1 stitch knitted up in the outermost stitch on each of the 3 worked rows = 24-26-26-30-32-32 stitches. ROW 5: Purl the 3 new stitches, continue the rib to the end of the row, knit up 3 stitches along the side of the piece, in the outermost stitch of each of the 3 worked rows = 27-29-29-33-35-35 stitches. Now work and increase as follows: ROW 1 (right side): Read INCREASE TIP-1. Knit 3, increase 1 stitch towards the left, knit until there are 3 stitches left, increase 1 stitch towards the right, knit 3. ROW 2 (wrong side): Read INCREASE TIP-2 Purl 3, increase 1 stitch towards the right, purl until there are 3 stitches left, increase 1 stitch towards the left, purl 3. Work ROWS 1 and 2 a total of 12-13-14-15-16-18 times (24-26-28-30-32-36 rows worked). There are 75-81-85-93-99-107 stitches. Insert 1 marker outermost on one side; the piece is now measured from here! Continue with stockinette stitch until the piece measures 12-13-13-14-13-14 cm = 4¾"-5⅛"-5⅛"-5½"-5⅛"-5½" from the marker and along the armhole. Remember to maintain the knitting gauge. Now increase for the armholes. INCREASE FOR ARMHOLES: ROW 1 (right side): Remember INCREASE TIP-1. Knit 3, increase 1 stitch towards the left, knit until there are 3 stitches left, increase 1 stitch towards the right, knit 3. ROW 2 (wrong side): Purl. Work ROWS 1 and 2 a total of 2-2-3-3-4-4 times = 79-85-91-99-107-115 stitches. Continue working until the piece measures 14-15-16-17-17-18 cm = 5½"-6"-6¼"-6¾"-6¾"-7", from the marker measured along the armhole, finishing after a row from the wrong side. Cut the strand, place the stitches on a stitch holder and work the right front piece. RIGHT SHOULDER: Find the right back shoulder as follows: Lay the back piece flat, right side up, with the stitch holder towards you; right side of piece = right shoulder. Start from the right side by the armhole on the right back shoulder and knit up 1 stitch in each worked row, inside the outermost stitch as far as the neckline = 24-26-28-30-32-36 stitches. All measurements on the front piece are from this knitted-up row. Work stockinette stitch back and forth with 3 EDGE STITCHES mid-front – read description above (first row from the wrong side). When the piece measures 9 cm = 3½", increase for the neckline as follows: ROW 1 (right side): Work until there are 4 stitches left, increase 1 towards the right, knit 1, 3 edge stitches - remember INCREASE TIP-1. ROW 2 (wrong side): Work 3 edge stitches, purl to end of row. Work ROWS 1 and 2 a total of 13-14-14-16-17-17 times (26-28-28-32-34-34 worked rows) = 37-40-42-46-49-53 stitches. Work 1 row from the right side then place the stitches on a stitch holder and work the left front piece. LEFT SHOULDER: Start from the right side by the neckline on the left back shoulder and knit up 1 stitch in each worked row, inside the outermost stitch as far as the armhole = 24-26-28-30-32-36 stitches. All measurements on the front piece are from this knitted-up row. Work stockinette stitch back and forth with 3 EDGE STITCHES mid-front – read description above (first row from the wrong side). When the piece measures 9 cm = 3½", increase for the neckline as follows: ROW 1 (right side): Remember INCREASE TIP-1. Work 3 edge stitches, knit 1, increase 1 towards the left, work to end of row. ROW 2 (wrong side): Purl until there are 3 stitches left, work 3 edge stitches. Work ROWS 1 and 2 a total of 13-14-14-16-17-17 times (26-28-28-32-34-34 worked rows) = 37-40-42-46-49-53 stitches. Work 1 row from the right side (next row should be worked from the wrong side). Now join the 2 front pieces, working the next row from the wrong side as follows: Purl the 37-40-42-46-49-53 stitches from the left front piece, place the stitches from the right front piece on the left needle and purl them = 74-80-84-92-98-106 stitches. Work as follows from the right side: Knit 36-39-41-45-48-52, place the next stitch on a cable needle in front of the piece, knit 1, knit 1 from the cable needle, knit the last 36-39-41-45-48-52 stitches. Work stockinette stitch back and forth until the piece measures 24-25-25-26-27-28 cm = 9½"-9¾"-9¾"-10¼"-10⅝"-11". Now increase for the armholes. NOTE! There is 1 stitch less on the front piece compared to the back piece. INCREASE FOR ARMHOLES: ROW 1 (right side): Remember INCREASE TIP-1. Knit 3, increase 1 stitch towards the left, knit until there are 3 stitches left, increase 1 stitch towards the right, knit 3. ROW 2 (wrong side): Purl. Work ROWS 1 and 2 a total of 2-2-3-3-4-4 times = 78-84-90-98-106-114 stitches. Continue working until the piece measures 26-27-28-29-31-32 cm = 10¼"-10⅝"-11"-11⅜"-12¼"-12½", finishing after a row from the wrong side. Join the front and back pieces for the body. The piece is now measured from here! BODY: Knit the 78-84-90-98-106-114 stitches on the front piece, cast on 4-4-6-6-8-10 stitches (under sleeve), knit the79-85-91-99-107-115 stitches on the back piece, cast on 4-4-6-6-8-10 stitches (under sleeve) = 165-177-193-209-229-249 stitches. Work stockinette stitch in the round for 25-26-27-28-28-29 cm = 9¾"-10¼"-10⅝"-11"-11"-11⅜". Bind off with I-CORD – read description above. SLEEVES: Lay the piece flat and insert 1 marker at the top of the armhole (NOTE! This is not where stitches were knitted up for the front piece but approx. 5-6 cm = 2"-2⅜" down the front piece). Using circular needle size 4 MM = US 6, start in the middle of the cast-on stitches under the sleeve and knit up 68-70-76-78-82-86 stitches around the armhole, with equal numbers of stitches before and after the marker on the shoulder. Change to circular needle size 5 MM = US 8. Work short rows back and forth for the sleeve cap (gives the sleeve a better fit), starting mid-under the sleeve as follows: ROW 1 (right side): Knit to 9-10-10-10-11-11 stitches past the marker on the shoulder, turn – read KNITTING TIP. ROW 2 (wrong side): Purl to 9-10-10-10-11-11 stitches past the marker, turn. ROW 3 (right side): Knit to 7-7-6-3-3-3 stitches past the previous turn, turn. ROW 4 (wrong side): Purl to 7-7-6-3-3-3 stitches past the previous turn, turn. Repeat ROWS 3 and 4 until you have turned a total of 8-8-10-14-14-16 times (4-4-5-7-7-8 times on each side, with the last row from the wrong side). After the last row 4, turn and knit back to the beginning of the round (mid-under sleeve). Insert 1 marker-thread at the beginning of the round. Allow the marker-thread to follow your work onwards; it is used when decreasing under the sleeve. Work stockinette stitch in the round until the sleeve measures 1 cm = ⅜" from the join. Now decrease 2 stitches under the sleeve - read DECREASE TIP, see description above. Decrease like this every 2nd round 2-2-3-3-4-4 times, then every 10-10-10-10-5-5 cm = 4"-4"-4"-4"-2"-2" 1-1-1-1-2-2 times (a total of 3-3-4-4-6-6 times) = 62-64-68-70-70-74 stitches. Continue working until the sleeve measures 24-24-24-22-21-20 cm = 9½"-9½"-9½"-8¾"-8¼"-8" from the marker. Bind off with I-CORD. The sleeve measures approx. 25-25-25-23-22-21 cm = 9¾"-9¾"-9¾"-9"-8¾"-8¼" from the marker. |
|
 |
|
Have you finished this pattern?Tag your pictures with #dropspattern #harbourdaysweater or submit them to the #dropsfan gallery. Do you need help with this pattern?You'll find 32 tutorial videos, a Comments/Questions area and more by visiting the pattern on garnstudio.com. © 1982-2026 DROPS Design A/S. We reserve all rights. This document, including all its sub-sections, has copyrights. Read more about what you can do with our patterns at the bottom of each pattern on our site. |
|


With over 40 years in knitting and crochet design, DROPS Design offers one of the most extensive collections of free patterns on the internet - translated to 17 languages. As of today we count 324 catalogs and 12290 patterns - 12280 of which are translated into English (US/in).
We work hard to bring you the best knitting and crochet have to offer, inspiration and advice as well as great quality yarns at incredible prices! Would you like to use our patterns for other than personal use? You can read what you are allowed to do in the Copyright text at the bottom of all our patterns. Happy crafting!
Post a comment to pattern DROPS 257-17
We would love to hear what you have to say about this pattern!
If you want to leave a question, please make sure you select the correct category in the form below, to speed up the answering process. Required fields are marked *.