
Popular categories
Looking for a yarn?


Comments / Questions (31)
![]() Susi wrote:
Susi wrote:
Ah Pardon, habe es verstanden. Ich hatte das schon beim linkenVorderteil falsch gemacht und die beiden linken Maschen vor dem I-Cord einfach rechts gestrickt. Also alles aufribbeln...
02.06.2025 - 12:47
![]() Susi wrote:
Susi wrote:
Beim rechten Vorderteil steht zu Beginn: \"1 Rück-Reihe links stricken, dann die nächste Hin-Reihe wie folgt stricken: Glatt rechts stricken bis noch 4 Maschen übrig sind, 2 Maschen links, 2 MASCHEN I-CORD (siehe oben). \" Wieso denn 2 Maschen \' LINKS\' vor dem I- Cord? Das muß doch \'RECHTS\' heißen, oder nicht ???
02.06.2025 - 12:43
![]() Marjorie wrote:
Marjorie wrote:
Is the back peice and two front pieces the same length when I pick up for the body. My two front pieces are longer than the back
12.04.2025 - 18:57DROPS Design answered:
Dear Marjorie, the pieces don't measure the same because, as you can see in the photos, the front piece actually start lower towards the back piece. So the back piece is lower and the front pieces start low at the back, worked over the top of the shoulders and worked down on the front piece. But they should be at the same height when you work the body. Happy knitting!
14.04.2025 - 00:37
![]() Charbonnier Céline wrote:
Charbonnier Céline wrote:
Bonjour, Pouvez-vous m’expliquer les diminutions tous les 1 1/2 rang ? Merci
19.03.2025 - 18:20DROPS Design answered:
Bonjour Mme Charbonnier, je vois des diminutions tous les 1,5 cm pour les manches, mais pas tous les 1,5 rangs, à quelles diminutions faites-vous référence? Merci!
20.03.2025 - 09:36
![]() Charbonnier wrote:
Charbonnier wrote:
Bonjour je ne comprends pas comment diminuer tous les 1 1/2 tour
19.03.2025 - 16:21
![]() Anette Leonhard wrote:
Anette Leonhard wrote:
Ich kann nur das erste Video starten und anschauen (ohne Ton). Warum?
01.03.2025 - 18:47DROPS Design answered:
Liebe Frau Leonhard, versuchen Sie den Cache/die Cookies zu leeren, oder mit einem anderen Browser / Gerät, die Videos sollten Sie schauen können. (Unsere Videos laufen ohne Ton - mehr lesen Sie unter "More Info"). Viel Spaß beim Stricken!
03.03.2025 - 09:25
![]() Thea wrote:
Thea wrote:
Hei! Det står under venstre og høyre forstykke at man skal strikke to masker icord og to masker vrang. Hvordan skal de to «vrange» maskene strikkes fra vrangen?
23.01.2025 - 22:49DROPS Design answered:
Hei Thea, Disse 2 maskene skal strikkes rett fra vrangen. God fornøyelse!
24.01.2025 - 06:56
![]() MAJA wrote:
MAJA wrote:
Stickar st M. Förstår inte hur jag skall göra ärmkullen och tycker beskrivningen är svår att förstå. Har lagt upp 82 m runt ärmen. Efter hur många maskor från första uppläggningsmaskan i ärmhålet är det lämpligt att börja med förkortade varven.
13.11.2024 - 20:38DROPS Design answered:
Hej Maja, du starter under ærmet fra retsiden og strikker til 10 masker forbi mærket midt ovenpå, så vender du og strikker varv 2 nøjagtig som det står osv :)
19.11.2024 - 10:30
![]() Maja wrote:
Maja wrote:
Kan man någonstans se vilka färger som "passar" tillsammans? Har Kid Silk nr 44 över och vill gärna använda detta. Vad skulle passa?
28.09.2024 - 20:33DROPS Design answered:
Hej Maja. Om du går in på färgkartan av DROPS Kid-Silk och klickar på bilden på färg 44 så får du upp en lista över vilka färger i andra garn som passar. Mvh DROPS Design
30.09.2024 - 14:48
![]() Tanja Strupler wrote:
Tanja Strupler wrote:
Grüezi Warum muss ich nach dem Annähen der Knöpfe Maschen aus den Schultern auffassen? Für mich ist die Arbei nach dem Annähen der Knöpfe, beendet. Habe ich etwas falsch verstanden? Freundliche Grüsse Tanja Strupler
03.09.2024 - 12:10DROPS Design answered:
Liebe Frau Strupler, ich misverstehe vielleicht Ihre Frage, die Maschen für beide Vorderteile werden aus den Schultern vom Rückenteil aufgeffasst - siehe diese Lektion; die Knopflöcher werden beim rechten Vorderteil eingearbeitet, dann die Knöpfe werden ganz am Ende angenäht.
04.09.2024 - 08:19
|
|||||||
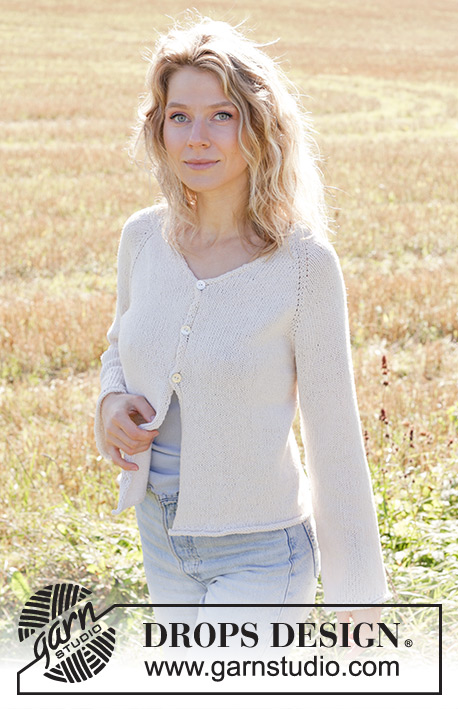
Pale Blossom#paleblossomcardigan |
|||||||
 |
 |
||||||
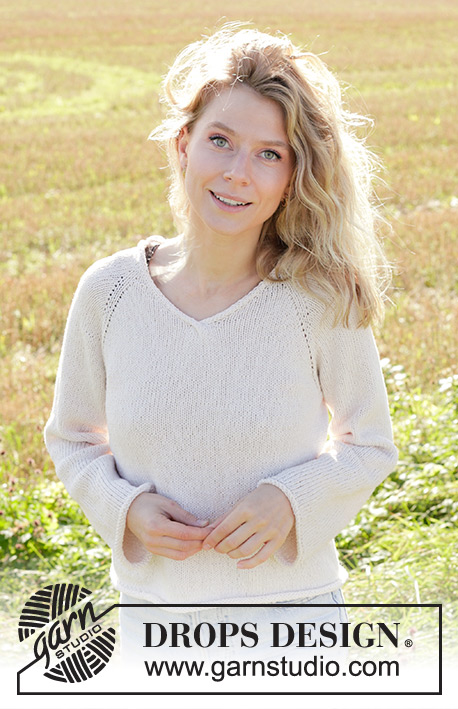
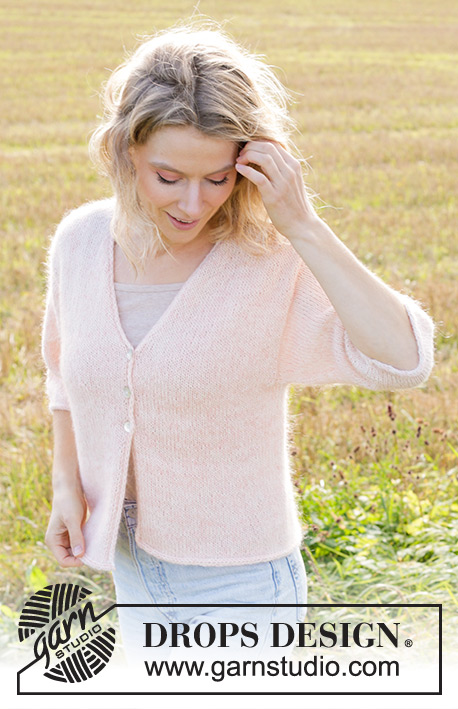
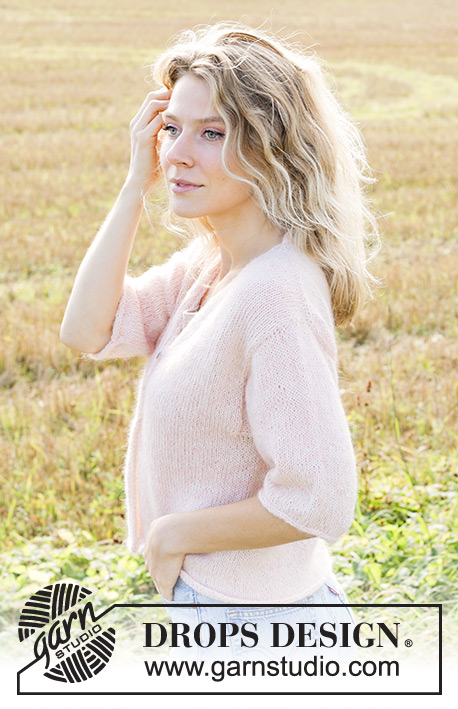
Knitted jacket in DROPS Alpaca and DROPS Kid-Silk. The piece is worked top down with European/diagonal shoulders, V-neck and I-cord. Sizes S - XXXL.
DROPS 248-35 |
|||||||
|
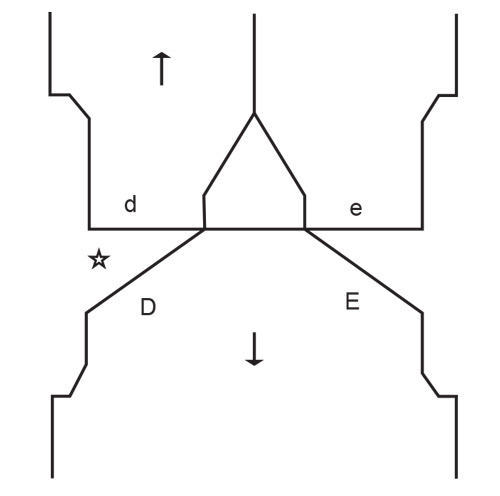
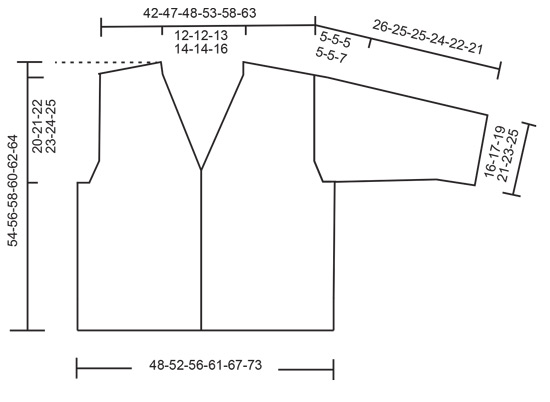
------------------------------------------------------- EXPLANATIONS FOR THE PATTERN: ------------------------------------------------------- GARTER STITCH (worked back and forth): Knit all rows. 1 ridge = knit 2 rows. INCREASE TIP-1: INCREASE 1 STITCH TOWARDS THE LEFT - from RIGHT SIDE: Use left needle to pick up yarn between 2 stitches from row below, pick up yarn from the front and knit in the stitch loop that is on the back of the needle. INCREASE 1 STITCH TOWARDS THE RIGHT - from RIGHT SIDE: Use left needle to pick up yarn between 2 stitches from row below, pick up yarn from the back and knit in the stitch loop that is on the front side of the needle. INCREASE TIP-2: INCREASE 1 STITCH TOWARDS THE RIGHT - from WRONG SIDE: Use left needle to pick up yarn between 2 stitches from row below, pick up yarn from the back and purl in the stitch loop that is on the front side of the needle. INCREASE 1 STITCH TOWARDS THE LEFT - from WRONG SIDE: Use left needle to pick up yarn between 2 stitches from row below, pick up yarn from the front and purl in the stitch loop that is on the back side of the needle. TWO I-CORD EDGE-STITCHES, RIGHT FRONT PIECE: RIGHT SIDE: Work until there are 2 stitches left, slip 1 stitch purl-wise with the strand in front, knit 1. WRONG SIDE: Slip 1 stitch purl-wise with the strand in front, knit 1, work to end of row. TWO I-CORD EDGE-STITCHES, LEFT FRONT PIECE: RIGHT SIDE: Slip 1 stitch purl-wise with the strand in front, knit 1, work to end of row. WRONG SIDE: Work until there are 2 stitches left, slip 1 stitch purl-wise with the strand in front, knit 1. BUTTONHOLES: Work the buttonholes on the right band (when the garment is worn). Work from the right side when there are 4 stitches left on the row, make 1 yarn over, purl 2 together, 2 stitches I-cord. On the next row (wrong side) knit the yarn over to leave a hole. The first buttonhole is worked 1 cm = ⅜" after the final increase for the V-neck and the next 2 buttonholes with 6-6-6-7-7-7 cm = 2⅜"-2⅜"-2⅜"-2¾"-2¾"-2¾" between each one. I-CORD BIND-OFF (bottom edge of body, back of neck): ROW 1 (right side): Knit 2, knit 2 twisted together. ROW 2 (right side): Slip the 3 stitches from the right needle back onto the left needle, knit 2, knit 2 twisted together. Repeat ROW 2 until there are 3 stitches left on the right needle. Slip the 3 stitches from the right needle back onto the left needle. Bind off. Sew a small stitch joining the beginning and end of the I-cord to the garment. I-CORD BIND-OFF (sleeves): At the end of the round after the last stitch has been worked: Cast on 3 stitches on the right needle, from the right side. Slip the 3 new stitches from the right needle onto the left needle, with the working strand 3 stitches in on the left needle (when working, tighten the strand to form a small tube). ROW 1 (right side): Knit 2, knit 2 twisted together. ROW 2 (right side): Slip the 3 stitches from the right needle back onto the left needle, knit 2, knit 2 twisted together. Repeat ROW 2 until there are 3 stitches left on the right needle. Slip the 3 stitches from the right needle back onto the left needle. Bind off. Sew a small stitch joining the beginning and end of the I-cord. DECREASE TIP (for sleeves): Decrease 1 stitch on each side of the marker-thread as follows: Work until there are 3 stitches left before the marker-thread, knit 2 together, knit 2 (marker-thread sits between these 2 stitches), slip 1 stitch knit-wise, knit 1 and pass the slipped stitch over the knitted stitch. ------------------------------------------------------- START THE PIECE HERE: ------------------------------------------------------- JACKET – SHORT OVERVIEW OF THE PIECE: The pattern uses both long and short circular needles; start with the length which fits the number of stitches and change when necessary. The piece is started, working back and forth on the needle, casting on stitches for the back of the neck, working the back piece top down and increasing on each side for the shoulders which are slightly diagonal. Work as far as the armholes. The back piece then waits while the front pieces are worked, knitting up stitches along one shoulder, working and increasing for the neckline, then doing the same along the other shoulder and working as far as the armholes. The front and back pieces are placed on the same circular needle and the body continued back and forth. Stitches are knitted up around each armhole. The sleeve cap is worked back and forth with short rows, then the sleeve is continued in the round. An I-cord edge is worked at the back of the neck to finish. BACK PIECE: Cast on 24-24-26-28-28-30 stitches with circular needle size 4.5 MM = US 7 and 1 strand of each quality (2 strands). Purl 1 row from the wrong side. Read INCREASE TIP-1 and work as follows from the right side: Knit 3, increase towards the left, knit until there are 3 stitches left, increase towards the right, knit 3. Read INCREASE-TIP-2 and work as follows from the wrong side: Purl 3, increase towards the right, purl until there are 3 stitches left, increase towards the left, purl 3. REMEMBER THE KNITTING GAUGE! Continue increasing like this, both from the right and wrong side, a total of 26-30-30-34-38-42 times = 76-84-86-96-104-114 stitches. Insert 1 marker outermost on one side. The piece is now measured from here! Work stockinette stitch back and forth until the piece measures 12-13-13-13-14-15 cm = 4¾"-5⅛"-5⅛"-5⅛"-5½"-6" from the marker along the armhole. Work as follows from the right side: Knit 3, increase towards the left, knit until there are 3 stitches left, increase towards the right, knit 3 - remember INCREASE TIP-1. Increase like this on each row from the right side a total of 2-2-3-3-4-4 times = 80-88-92-102-112-122 stitches. Continue working until the piece measures 14-15-16-16-17-18 cm = 5½"-6"-6¼"-6¼"-6¾"-7" along the armhole. Finish with a row from the right side. Cut the strand, place the stitches on a stitch holder and work the front pieces. LEFT FRONT PIECE: Start with the left shoulder (when the garment is worn). Knit up 26-30-30-34-38-42 stitches inside the outermost stitch along the left back shoulder (knit up 1 stitch in each row from the top edge, see D in sketch). All measurements are taken from here. Purl 1 row from the wrong side, then work as follows from the right side: TWO I-CORD EDGE STITCHES – read description above, purl 2, stockinette stitch over the remaining stitches. Continue this pattern. When the piece measures 7 cm = 2¾", increase for the neckline, starting from the right side as follows: Work 4 stitches as before, increase towards the left, work to end of row – remember INCREASE TIP-1. Increase 1 stitch every 2nd row (each row from the right side) 10 times, then every 4th row 6-6-7-8-8-9 times (a total of 16-16-17-18-18-19 increases for the neckline). AT THE SAME TIME when the piece measures 24-25-25-27-28-29 cm = 9½"-9¾"-9¾"-10⅝"-11"-11⅜", work as follows from the right side: Work until there are 3 stitches left, increase towards the right, knit 3 – remember INCREASE TIP-1. Increase like this on each row from the right side a total of 2-2-3-3-3-3 times = 44-48-50-55-60-65 stitches. Continue working until the piece measures 26-27-28-30-31-32 cm = 10¼"-10⅝"-11"-11¾"-12¼"-12½", finishing with a row from the right side. Cut the strand, place the stitches on a stitch holder and work the right front piece. All increases for the V-neck should now be finished. RIGHT FRONT PIECE: Knit up 26-30-30-34-38-42 stitches inside the outermost stitch along the right back shoulder (knit up 1 stitch in each row from the top edge, see E in sketch). All measurements are taken from here. Purl 1 row from the wrong side, then work as follows from the right side: Work stockinette stitch until there are 4 stitches left, purl 2 and TWO I-CORD EDGE STITCHES – remember description above. When the piece measures 7 cm = 2¾", increase for the neckline starting from the right side as follows: Work until there are 4 stitches left, increase towards the right, work the last 4 stitches as before. Increase 1 stitch every 2nd row (each row from the right side) 10 times, then every 4th row 6-6-7-8-8-9 times (a total of 16-16-17-18-18-19 increases for the neckline). AT THE SAME TIME when the piece measures 24-25-25-27-28-29 cm = 9½"-9¾"-9¾"-10⅝"-11"-11⅜", work as follows from the right side: Work 3 stitches, increase towards the left, work to end of row – remember INCREASE TIP-1. Increase like this on each row from the right side a total of 2-2-3-3-3-3 times = 44-48-50-55-60-65 stitches. Continue working until the piece measures 26-27-28-30-31-32 cm = 10¼"-10⅝"-11"-11¾"-12¼"-12½", finishing with a row from the right side. Now work from the wrong side as follows: Work the 44-48-50-55-60-65 stitches from the right front piece, cast on 6-6-8-8-8-10 stitches (in side under sleeve), work the 80-88-92-102-112-122 stitches from the back piece, cast on 6-6-8-8-8-10 stitches (in side under sleeve), work the 44-48-50-55-60-65 stitches from the left front piece. BODY: = 180-196-208-228-248-272 stitches. Continue stockinette stitch back and forth with 2 edge stitches + purl 2 on each side, mid-front. Work until the piece measures 54-56-58-60-62-64 cm = 21¼"-22"-22¾"-23⅝"-24⅜"-25¼", from the top front shoulder. Bind off with I-CORD – read description above. SLEEVES: Lay the piece flat and insert 1 marker at the top of the armhole (NOTE! This is not where stitches were knitted up but approx. 6-7 cm = 2⅜"-2¾" down the front piece = mid-top of shoulder). Using circular needle size 4.5 MM = US 7, start in the middle of the cast-on stitches under the sleeve and knit up 78-82-88-90-94-100 stitches around the armhole – make sure you have equal numbers of stitches on each side of the marker. Work stockinette stitch back and forth with short rows for the sleeve cap (to give the sleeve a better fit). Start mid-under the sleeve. Row 1 (right side): work to 9-10-11-11-11-12 stitches past the marker, turn. Row 2 (wrong side): work 9-10-11-11-11-12 stitches past the marker, turn. Row 3 (right side): work to 5-5-5-5-6-4 stitches past the previous turn, turn. Row 4 (wrong side): work to 5-5-5-5-6-4 stitches past the previous turn, turn. Repeat rows 3 and 4 until you work 34-35-36-36-41-40 stitches past the marker (6-6-6-6-6-8 turns on each side). Work from the right side to the beginning of the row (mid-under sleeve). Insert 1 marker-thread here, which is used when decreasing under the sleeve. Allow the thread to follow your work onwards. Continue with stockinette stitch in the round. When the sleeve measures 7-7-7-7-7-9 cm = 2¾"-2¾"-2¾"-2¾"-2¾"-3½", from the knitted-up stitches (all lengths measured mid-top of sleeve), decrease 2 stitches under the sleeve – read DECREASE TIP. Decrease like this every 2nd round 2 times, then every 1½-1½-1½-2-2-2 cm = ½"-½"-½"-¾"-¾"-¾", 8-8-8-5-4-3 times (a total of 10-10-10-7-6-5 times) = 58-62-68-76-82-90 stitches. Work until the sleeve measures 26-25-25-24-22-21 cm = 10¼"-9¾"-9¾"-9½"-8¾"-8¼". Bind off with I-CORD – remember description above. I-CORD, BACK OF NECK: Use circular needle size 4.5 MM = US 7. Cast on 2 stitches with 1 strand of each quality, then knit up 24-24-26-28-28-30 stitches (inside 1 edge stitch, along the back neckline) from one shoulder-line to the other shoulder-line. Cut the strand. Start where the 2 stitches were cast on and bind off with I-CORD – remember description above. ASSEMBLY: Sew the buttons onto the left front piece. |
|||||||
Diagram explanations |
|||||||
|
|||||||
 |
|||||||
 |
|||||||
Have you finished this pattern?Tag your pictures with #dropspattern #paleblossomcardigan or submit them to the #dropsfan gallery. Do you need help with this pattern?You'll find 29 tutorial videos, a Comments/Questions area and more by visiting the pattern on garnstudio.com. © 1982-2026 DROPS Design A/S. We reserve all rights. This document, including all its sub-sections, has copyrights. Read more about what you can do with our patterns at the bottom of each pattern on our site. |
|||||||


With over 40 years in knitting and crochet design, DROPS Design offers one of the most extensive collections of free patterns on the internet - translated to 17 languages. As of today we count 324 catalogs and 12290 patterns - 12280 of which are translated into English (US/in).
We work hard to bring you the best knitting and crochet have to offer, inspiration and advice as well as great quality yarns at incredible prices! Would you like to use our patterns for other than personal use? You can read what you are allowed to do in the Copyright text at the bottom of all our patterns. Happy crafting!
Post a comment to pattern DROPS 248-35
We would love to hear what you have to say about this pattern!
If you want to leave a question, please make sure you select the correct category in the form below, to speed up the answering process. Required fields are marked *.