
Popular categories
Looking for a yarn?


|
|
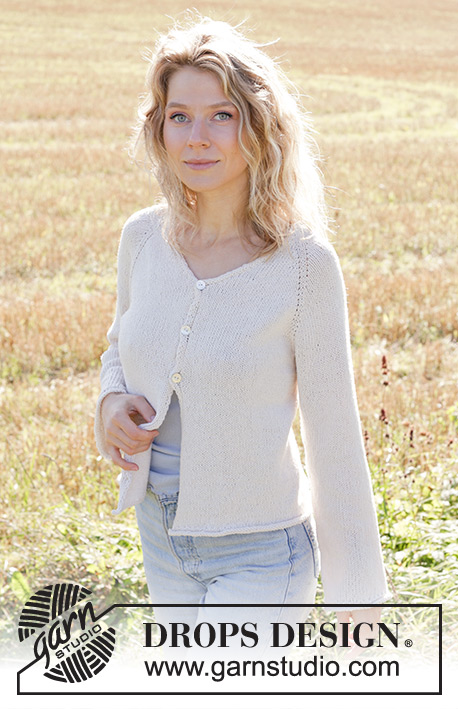
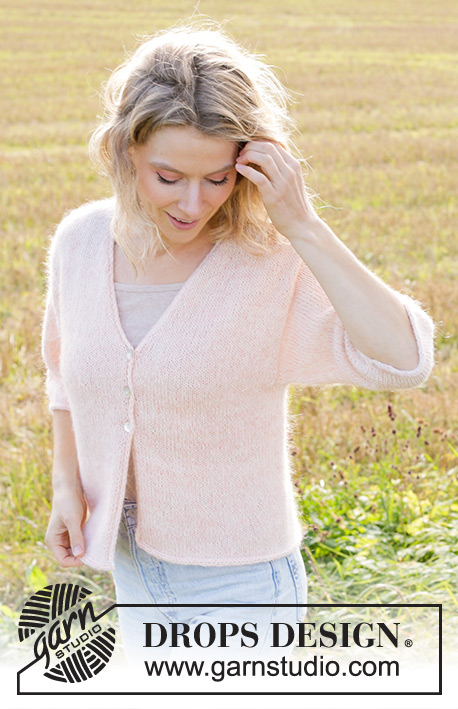
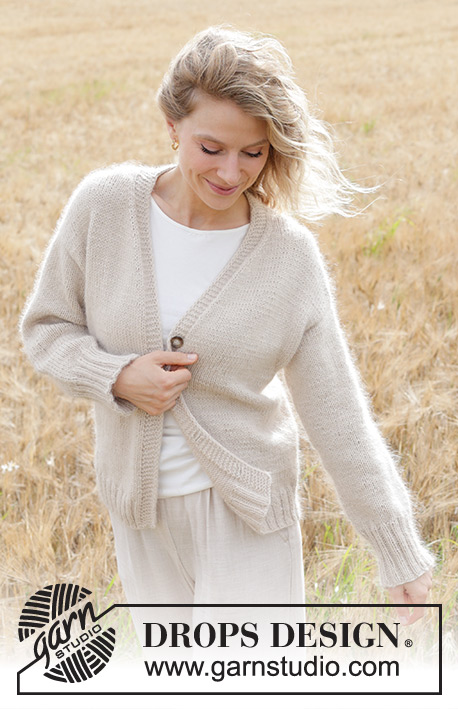
Gentle Wind Cardigan |
|
 |
 |
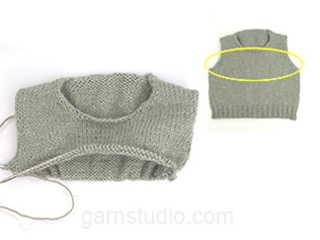
Knitted jacket in DROPS Daisy and DROPS Kid-Silk. The piece is worked top down with stockinette stitch, European/diagonal shoulders, V-neck and I-cord. Sizes S - XXXL.
DROPS 248-4 |
|
|
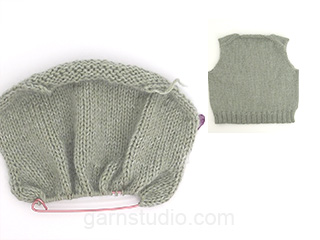
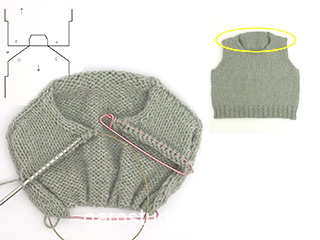
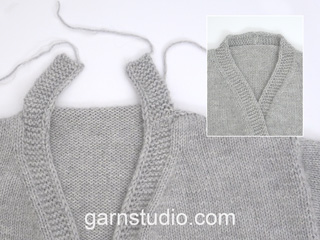
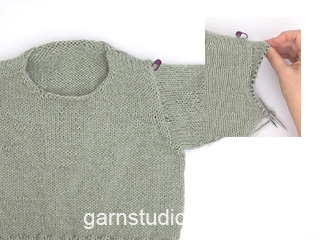
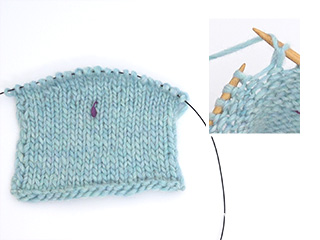
------------------------------------------------------- EXPLANATIONS FOR THE PATTERN: ------------------------------------------------------- GARTER STITCH (worked back and forth): Knit all rows. 1 ridge = knit 2 rows. INCREASE TIP-1: INCREASE 1 STITCH TOWARDS THE LEFT - from right side: Use the left needle to pick up the strand between 2 stitches from the previous row, pick up strand from the front and knit the back loop. INCREASE 1 STITCH TOWARDS THE RIGHT- from right side: Use the left needle to pick up the strand between 2 stitches from the previous row, pick up strand from behind, knit the front loop. INCREASE TIP-2: INCREASE 1 STITCH TOWARDS THE LEFT - from wrong side: Use the left needle to pick up the strand between 2 stitches from the previous row, pick up strand from behind and purl the front loop. INCREASE 1 STITCH TOWARDS THE RIGHT- from wrong side: Use the left needle to pick up the strand between 2 stitches from the previous row, pick up strand from the front purl the back loop. LEFT BAND WITH I-CORD: RIGHT SIDE: Slip 1 stitch purl-wise with strand in front, knit 1, work 5 garter stitches. WRONG SIDE: Work 5 garter stitches, slip 1 stitch purl-wise with strand in front, knit 1. RIGHT BAND WITH I-CORD: RIGHT SIDE: Work 5 garter stitches, slip 1 stitch purl-wise with strand in front, knit 1. WRONG SIDE: Slip 1 stitch purl-wise with strand in front, knit 1, work 5 garter stitches. BUTTONHOLES: Work buttonholes on the right band (when the garment is worn). Work from the right side when there are 5 stitches left on the row as follows: Make 1 yarn over, knit 2 together, work to end of row as before. On the next row (wrong side), knit the yarn over to leave a hole. The first buttonhole is worked 1 cm = ⅜" after the last increase for the V-neck. The other 3 buttonholes are then worked with approx. 9½-9½-10-10-10-10½ cm = 3⅝"-3⅝"-4"-4"-4"-4⅛" between each one. The bottom buttonhole is worked in the transition between the stockinette stitch and rib. KNITTING TIP: When working the short rows, there will be a small hole when the piece is turned – the hole can be closed by tightening the strand or using the German Short rows technique as follows: Slip the first stitch as if to purl, place the strand over the right needle and tighten the strand tightly at the back (this should result in two loops on the needle). These loops are knitted together on the next row. DECREASE TIP (for sleeves): Decrease 1 stitch on each side of the marker-thread as follows: Work until there are 3 stitches left before the marker-thread, knit 2 together, knit 2 (marker-thread sits between these 2 stitches), slip 1 stitch knit-wise, knit 1 and pass the slipped stitch over the knitted stitch. ------------------------------------------------------- START THE PIECE HERE: ------------------------------------------------------- JACKET – SHORT OVERVIEW OF THE PIECE: The pattern uses needles of different lengths; start with the length which fits the number of stitches and change when necessary. Stitches are cast on for the back of the neck, then the back piece is worked back and forth, top down, increasing on each side for the shoulders until the correct number of stitches is reached. The back piece now has slightly diagonal shoulders. Continue working as far as the armholes. The back piece then waits while the front pieces are worked. The front pieces are worked separately, first the band (which is later sewn to the back neckline). Stitches are then knitted up along the shoulder on the back piece and the front piece is worked down as far as the armholes at the same time as stitches are increased for the neckline. The front and back pieces are joined and the body continued back and forth with circular needle. Stitches are knitted up around each armhole. The sleeve cap is worked back and forth with short rows, then the sleeve is continued in the round. The bands from the front pieces are sewn together (mid-back), then sewn to the neckline. BACK PIECE: Cast on 30-32-34-36-36-38 stitches with circular needle size 5 MM = US 8 and 1 strand of each quality (2 strands). ROW 1 (= wrong side): Purl. ROW 2 (= right side): Read INCREASE TIP-1, knit 3, increase 1 stitch towards the left, knit until there are 3 stitches left, increase 1 towards the right, knit 3. ROW 3 (= wrong side): Read INCREASE TIP-2, purl 3, increase 1 stitch towards the left, purl until there are 3 stitches left, increase 1 stitch towards the right, purl 3. Work ROWS 2 and 3 a total of 13-14-14-15-16-18 times (= 26-28-28-30-32-36 worked rows), after the last increase, there are 82-88-90-96-100-110 stitches. Insert 1 marker outermost on one side. The piece is now measured from here! REMEMBER THE KNITTING GAUGE! Continue with stockinette stitch until the piece measures 13-14-14-14-13-14 cm = 5⅛"-5½"-5½"-5½"-5⅛"-5½", from the marker measured along the armhole. Now increase for the armholes. INCREASE FOR ARMHOLES: ROW 1 (= right side): Remember INCREASE TIP-1, knit 3, increase 1 stitch towards the left, knit until there are 3 stitches left, increase 1 stitch towards the right, knit 3. ROW 2 (= wrong side): Purl. Work ROWS 1 and 2 a total of 1-1-2-3-4-4 times (= 2-2-4-6-8-8 worked rows) = 84-90-94-102-108-118 stitches. Continue working until the piece measures 14-15-16-17-17-18 cm = 5½"-6"-6¼"-6¾"-6¾"-7", from the marker measured along the armhole, finishing with a row from the right side. Cut the strand, place the stitches on a stitch holder and work the left band and front piece along the left back shoulder as follows. LEFT BAND: Cast on 7 stitches with circular needle size 5 MM = US 8 and 1 strand of each quality (= 2 strands). Work LEFT BAND WITH I-CORD – read description above, until the band measures 8-9-9-10-10-10 cm = 3⅛"-3½"-3½"-4"-4"-4", finishing with a row from the wrong side. Now work the left front piece as follows: LEFT FRONT PIECE: Find the left back shoulder as follows: Lay the back piece flat, right side up, with the stitches on the stitch holder towards you. The left side of the back piece is the left shoulder. Knit up stitches along the left back shoulder, starting from the right side by the neck and working to the shoulder as follows: ROW 1 (= right side): Work the 7 band stitches, then knit up 1 stitch in each row along the left back shoulder, inside the outermost stitch (knit up 26-28-28-30-32-36 stitches) = 33-35-35-37-39-43 stitches. All measurements on the front piece are taken from the knitted-up stitches. ROW 2 (= wrong side): Purl until there are 7 stitches left, work 7 band stitches as before. ROW 3 (= right side): Work 7 band stitches, knit to end of row. ROW 4 (= wrong side): Purl until there are 7 stitches left, work 7 band stitches. Repeat ROWS 3 and 4 until the piece measures 7-7-7-7-8-8 cm = 2¾"-2¾"-2¾"-2¾"-3⅛"-3⅛". OVERVIEW OF THE NEXT SECTION: Now start to increase for the V-neck. You will also increase for the armhole before the increases for the V-neck are finished. Read both next 2 sections before continuing, so you know when to begin increasing for the armhole. INCREASE FOR V-NECK: ROW 1 (= right side): Work 7 band stitches, knit 2, increase 1 stitch towards the left - remember INCREASE TIP-1, knit to end of row. ROW 2 (= wrong side): Purl until there are 7 stitches left, work 7 band stitches. Work ROWS 1 and 2 a total of 10-11-12-13-13-14 times (= 20-22-24-26-26-28 worked rows). Then increase as follows: ROW 1 (= right side): Work 7 band stitches, knit to end of row. ROW 2 (= wrong side): Purl until there are 7 stitches left, work 7 band stitches. ROW 3 (= right side): Work 7 band stitches, knit 2, increase 1 stitch towards the left - remember INCREASE TIP-1, knit to end of row. ROW 4 (= wrong side): Purl until there are 7 stitches left, work 7 band stitches. Work ROWS 1 to 4 a total of 5 times (= 20 worked rows) = 15-16-17-18-18-19 increases for V-neck. Continue with stockinette stitch and the bands. INCREASE FOR ARMHOLE: AT THE SAME TIME, when the piece measures 23-24-24-24-25-26 cm = 9"-9½"-9½"-9½"-9¾"-10¼", increase for the armhole as follows (remember the increases for V-neck are not finished): ROW 1 (= right side): Work 7 band stitches, knit until there are 3 stitches left, increase 1 stitch towards the right - remember INCREASE TIP-1, knit 3. ROW 2 (= wrong side): Purl until there are 7 stitches left, work 7 band stitches. Work ROWS 1 and 2 a total of 1-1-2-3-4-4 times (= 2-2-4-6-8-8 worked rows). When all the increases for V-neck and armhole are finished, there are 49-52-54-58-61-66 stitches. Continue working until the piece measures 24-25-26-27-29-30 cm = 9½"-9¾"-10¼"-10⅝"-11⅜"-11¾", from the knitted-up stitches. Finish after a row from the right side. Cut the strand, place the stitches on a stitch holder and work the right band and front piece along the right back shoulder as follows: RIGHT BAND: Cast on 7 stitches with circular needle size 5 MM = US 8 and 1 strand of each quality (= 2 strands). Work RIGHT BAND WITH I-CORD – read description above, until the band measures 8-9-9-10-10-10 cm = 3⅛"-3½"-3½"-4"-4"-4", finishing with a row from the wrong side. Cut the thread and put the stitches on a thread or another needle, it should be worked from the band stitches when knitting up stitches for the right front piece. RIGHT FRONT PIECE: Knit up stitches along the right back shoulder, starting from the right side by the shoulder and working towards the neck: Knit up 1 stitch in each row, inside the outermost stitch (knit up 26-28-28-30-32-36 stitches along the right back shoulder), then work the 7 stitches from the right band as before = 33-35-35-37-39-43 stitches. All measurements on the front piece are taken from the knitted-up stitches. ROW 1 (= wrong side): Work 7 band stitches as before, purl to end of row. ROW 2 (= right side): Knit until there are 7 stitches left, work 7 band stitches. Repeat ROWS 1 and 2 until the piece measures 7-7-7-7-8-8 cm = 2¾"-2¾"-2¾"-2¾"-3⅛"-3⅛". OVERVIEW OF THE NEXT SECTION: Now start to increase for the V-neck. You will also increase for the armhole before the increases for the V-neck are finished. Read both next 2 sections before continuing, so you know when to begin increasing for the armhole. INCREASE FOR V-NECK: ROW 1 (= right side): Knit until there are 9 stitches left, increase 1 stitch towards the right - remember INCREASE TIP-1, knit 2, work 7 band stitches. ROW 2 (= wrong side): Work 7 band stitches, purl to end of row. Work ROWS 1 and 2 a total of 10-11-12-13-13-14 times (= 20-22-24-26-26-28 worked rows). Now increase as follows: ROW 1 (= right side): Knit until there are 7 stitches left, work 7 band stitches. ROW 2 (= wrong side): Work 7 band stitches, purl to end of row. ROW 3 (= right side): Knit until there are 9 stitches left, increase 1 stitch towards the right, knit 2, work 7 band stitches. ROW 4 (= wrong side): Work 7 band stitches, purl to end of row. Work ROWS 1 to 4 a total of 5 times (= 20 worked rows) = 15-16-17-18-18-19 increases for V-neck. 1 cm = ⅜" after the last increase, start working the BUTTONHOLES – read description above. Continue with stockinette stitch and the bands. INCREASE FOR ARMHOLE: AT THE SAME TIME, when the piece measures 23-24-24-24-25-26 cm = 9"-9½"-9½"-9½"-9¾"-10¼", increase for the armhole as follows (remember the increases for V-neck are not finished): ROW 1 (= right side): Knit 3, increase 1 stitch towards the left – remember INCREASE TIP-1, knit until there are 7 stitches left, work 7 band stitches. ROW 2 (= wrong side): Work 7 band stitches, purl to end of row. Work ROWS 1 and 2 a total of 1-1-2-3-4-4 times (= 2-2-4-6-8-8 worked rows). When all the increases for V-neck and armhole are finished, there are 49-52-54-58-61-66 stitches. Continue working until the piece measures 24-25-26-27-29-30 cm = 9½"-9¾"-10¼"-10⅝"-11⅜"-11¾", from the knitted-up stitches. Finish after a row from the right side. Now join all the pieces for the body as follows: BODY: The piece is now measured from here! Work from the wrong side over the 49-52-54-58-61-66 stitches on the right front piece, cast on 4-6-8-8-12-12 stitches (in side under sleeve), work from the wrong side over the 84-90-94-102-108-118 stitches on the back piece, cast on 4-6-8-8-12-12 stitches (in side under sleeve), work from the wrong side over the 49-52-54-58-61-66 stitches from the left front piece = 190-206-218-234-254-274 stitches. Continue back and forth with stockinette stitch and the bands on each side until the piece measures 28-29-30-31-31-32 cm = 11"-11⅜"-11¾"-12¼"-12¼"-12½" from the armhole. On the next row from the right side, begin the rib at the same time as you increase 22-22-22-26-26-26 stitches evenly spaced (do not increase over the bands) = 212-228-240-260-280-300 stitches. Work as follows: Change to circular needle size 4 MM = US 6. Work the band as before, work rib (knit 2, purl 2 – remember the increases) until there are 9 stitches left, knit 2 and work the band stitches as before. When the rib measures 6 cm = 2⅜", bind off. The front piece measures 58-60-62-64-66-68 cm = 22¾"-23⅝"-24⅜"-25¼"-26"-26¾" measured from the knitted-up stitches, the jacket measures 56-58-60-62-64-66 cm = 22"-22¾"-23⅝"-24⅜"-25¼"-26". The front piece is approx. 2 cm = ¾" longer, as the knitted-up stitches are not on the top of the shoulder but slightly down the back piece. SLEEVES: Lay the piece flat and insert 1 marker at the top of the armhole (NOTE! This is not where stitches were knitted up but approx. 5-6 cm = 2"-2⅜" down the front piece = mid-top of shoulder). Using circular needle size 5 MM = US 8 and 1 strand of each quality (= 2 strands), start in the middle of the cast-on stitches under the sleeve and knit up 68-74-80-82-90-94 stitches around the armhole – make sure you have equal numbers of stitches on each side of the marker. Work stockinette stitch in short rows, back and forth for the sleeve cap (to give the sleeve a better fit). Start mid-under the sleeve: ROW 1 (right side): Work 9-10-10-10-11-11 stitches past the marker, turn – read KNITTING TIP. ROW 2 (wrong side): Work 9-10-10-10-11-11 stitches past the marker, turn. ROW 3 (right side): Work 10-11-8-6-5-5 stitches past the previous turn, turn. ROW 4 (wrong side): Work to 10-11-8-6-5-5 stitches past the previous turn, turn. Repeat rows 3 and 4 until you have turned 3-3-4-5-6-6 times on each side. AFTER THE LAST TURN: After row 4 has been worked for the last time, turn and knit to the beginning of the round (mid-under sleeve). Insert 1 marker-thread here, which is used when decreasing under the sleeve. Allow the thread to follow your work onwards. Work stockinette stitch in the round. When the sleeve measures 4-4-5-6-6-6 cm = 1½"-1½"-2"-2⅜"-2⅜"-2⅜", from the knitted-up stitches (all lengths measured mid-top of sleeve), decrease 2 stitches under the sleeve – read DECREASE TIP. Decrease like this every 2nd round 2-2-3-3-4-4 times, then every 4½-3½-2½-2½-2-1½ cm = 1⅝"-1¼"-1"-1"-¾"-½", 6-8-9-9-11-12 times (a total of 8-10-12-12-15-16 times) = 52-54-56-58-60-62 stitches. Work until the sleeve measures 38-37-38-37-37-35 cm = 15"-14½"-15"-14½"-14½"-13¾". Change to double pointed needles size 4 MM = US 6. Work rib (knit 2, purl 2) at the same time as you increase 16-18-16-18-20-18 stitches evenly on the first round = 68-72-72-76-80-80 stitches. When the rib measures 10-10-10-10-10-10 cm = 4"-4"-4"-4"-4"-4", bind off. The sleeve measures approx. 48-47-48-47-47-45 cm = 19"-18½"-19"-18½"-18½"-17¾". ASSEMBLY: Sew the buttons onto the left band. Sew together the bands from the front pieces (mid-back), then sewn them to the neckline. |
|

|
|
|
Have you made this or any other of our designs? Tag your pictures in social media with #dropsdesign so we can see them! Do you need help with this pattern?You'll find tutorial videos, a Comments/Questions area and more by visiting the pattern on garnstudio.com. © 1982-2024 DROPS Design A/S. We reserve all rights. This document, including all its sub-sections, has copyrights. Read more about what you can do with our patterns at the bottom of each pattern on our site. |
|


With over 40 years in knitting and crochet design, DROPS Design offers one of the most extensive collections of free patterns on the internet - translated to 17 languages. As of today we count 304 catalogs and 11422 patterns - 11417 of which are translated into English (US/in).
We work hard to bring you the best knitting and crochet have to offer, inspiration and advice as well as great quality yarns at incredible prices! Would you like to use our patterns for other than personal use? You can read what you are allowed to do in the Copyright text at the bottom of all our patterns. Happy crafting!
Comments / Questions (32)
Question : concernant la bordure devant gauche : faut-il d'abord tricoter l'icord sur 9cm et ensuite relever les mailles le long de l'épaule gauche ? ce n'est pas très clair pour moi. Pour tricoter l'icord je n'ai pas trouvé la vidéo sur votre site Merci par avance de votre réponse Cordialement
12.03.2024 - 14:29DROPS Design answered:
Bonjour Mme Dufour, vous devez tricoter ces 7 mailles pendant 9 cm comme indiqué au tout début des explications sous BORDURE DEVANT GAUCHE AVEC I-CORD:; autrement dit, 2 m de bordure I-cord + 7 mailles point mousse, vu sur l'endroit. Cette bordure sera ensuite assemblée à celle du devant droit puis cousue le long de l'encolure dos. Après ces 9 cm, vous relevez les mailles le long du devant gauche - cf onglet vidéo pour voir comment relever les mailles et tricoter les devants. Bon tricot!
12.03.2024 - 15:45Bonsoir Ma question concerne la référence DROP YOU 8 : est elle abandonnée ? Si oui quelle référence la remplace. Cordialement
23.02.2024 - 22:49DROPS Design answered:
Bonjour Marie-Thérèse, DROPS Loves You 8 faisait partie du groupe de fils C, vous pouvez donc le remplacer par un autre fil du groupe C (cf liste, ou bien par 2 fils du groupe de fils A - plus d'infos ici. Bon tricot!
26.02.2024 - 07:49Ich meinte natürlich die Kombination mit Kid Silk, Garngruppe A, wie angegeben. Nicht Alpaka Silk.
08.02.2024 - 13:28Warum findet der Garnumrechner keine alternative Option für die Daisy ? Nach Maschenprobe kämen doch auch andere Garne in Gruppe B wie Merino Extrafine oder Karisma , kombiniert mit Alpaka Silk, infrage. Oder nicht ?
08.02.2024 - 13:26DROPS Design answered:
Liebe Susi, danke für den Hinweis, jetzt finden Sie Alternative für Daisy - aber vergessen Sie nicht die Alternative mit Kid-Silk (und nicht Brushed Alpaca Silk) zu stricken. Viel Spaß beim stricken!
09.02.2024 - 15:47Summer Wheat
21.01.2024 - 17:30Quiet luxury
21.01.2024 - 14:32Sieht sehr schön flauschig und wärmend aus
20.01.2024 - 22:20Café con leche!
20.01.2024 - 22:09Creamy Sweater
20.01.2024 - 15:31What about "Easy Like a Sunday Morning "
20.01.2024 - 14:13