
Popular categories
Looking for a yarn?


Comments / Questions (31)
![]() Mary Phillips wrote:
Mary Phillips wrote:
Hi. I am making a size XL. I am working the left front piece. It is 30 stitches, and then I increase 18 stitches toward the neckline, for a total of 48 stitches. I understand that. But at the same time, I increase 1 every right side row 3 times and now it should be 55 stitches? I count 48 on neckline side plus 3 increase on other side should be 51. Please help me understand. Thank you.
06.01.2026 - 03:16DROPS Design answered:
Hi Mary, In your size you should have knitted up 34 stitches along the left back shoulder. Then you increase 18 stitches for the neckline and 3 stitches for the armhole = 55 stitches. Regards, Drops Team.
06.01.2026 - 06:35
![]() Nadine wrote:
Nadine wrote:
Liebe Garnstudio Team Ich bin beim linken Vorderteil und komme mit der Anleitung nicht klar. Da steht: ... dann die nächste Hin-Reihe wie folgt stricken: 2 MASCHEN I-CORD (siehe oben), 2 M. links, glatt re über die restlichen Maschen. Also stricke ich in der Hin-Reihe: 2 Maschen gemäss dem I-Cord Video, dann 2Maschen links, dann den Rest rechts. In der Rückreihe? I-Cord, 2 M. rechts, den rest links?
16.09.2025 - 13:32DROPS Design answered:
Liebe Nadine, die 2 I-Cord Maschen stricken Sie wie unter 2 MASCHEN I-CORD LINKES VORDERTEIL: erklärt, dh am Anfang der Hinreihe: 1 Masche wie zum Linksstricken abheben (d.h. der Faden liegt vor der Arbeit), 1 Masche rechts, dann stricken Sie 2 Maschen links und dann alle Maschen glatt rechts; und bei den Rückreihen stricken Sie links bis 4 Maschen übrig sind, dann stricken Sie 2 Maschen rechts und die 2 I-Cord Maschen stricken Sie so: 1 Masche wie zum Linksstricken abheben (d.h. der Faden liegt vor der Arbeit), 1 Masche rechts. Viel Spaß beim Stricken!
17.09.2025 - 07:56
![]() Kim wrote:
Kim wrote:
I'm working on Row 2 of I-CORD CAST-OFF (bottom edge of body) I transferred 3 stitches from the rigth needle back onto the left needle — how can I knit 4 stitches(knit 2, knit 2 twisted together)? I look forward to your response. I’m hoping to finish this project soon :)
17.06.2025 - 07:07DROPS Design answered:
Dear Mrs Kim, knit the first 2 sts from I-cord edge then knit the 3rd of the cast off edge together with the next stitch on needle/at the bottom of jacket by knitting these 2 stitches twisted together. See also how to cast off like this in this video. Happy knitting!
19.06.2025 - 10:47
![]() Susi wrote:
Susi wrote:
Ich weiß wie das mit dem I- Cord prinzipiell geht. Trotzdem möchte ich Sie bitten, einmal Ihre deutsche Übersetzung zu prüfen. Es kann nicht sein, daß sowohl die 1. als auch die 2. Reihe Hin- Reihen sind. Die holprige Übersetzung ist leider irreführend...
16.06.2025 - 11:40
![]() Elena wrote:
Elena wrote:
La spiegazione della manica dice di iniziare la lavorazione a ferri accorciati al centro sotto la manica. Ma secondo me non è corretto, credo che bisogna iniziare al centro sopra la manica (centro sopra della spalla). È giusto? Grazie
16.06.2025 - 07:34DROPS Design answered:
Buongiormo Elena, l'inizio della manica è sotto, ma la lavorazione a ferri accorciati sarà sopra. Buon lavoro!
17.06.2025 - 08:39
![]() Susi wrote:
Susi wrote:
Unter ABKETTEN MIT I-CORD (unterer Rand des Rumpfteils) steht: "1. REIHE (Hin-Reihe): 2 Maschen rechts, die 2 nächsten Maschen rechts verschränkt zusammenstricken. 2. REIHE (Hin-Reihe): Beginn mit dem I- Cord ... " Frage: Beide Reihen können doch nicht Hin- Reihen sein ? Heißt das, daß ich erst in der 1. Hin- Reihe jede 3. Masche abnehmen muß, dann wird eine Rück- Reihe gestrickt. Dann erst in der folgenden Hin- Reihe Beginn mit dem I- Cord? Was ist da falsch ???
14.06.2025 - 12:30DROPS Design answered:
Liebe Susi, hier können Sie mal schauen, wie man mit I-Cord abkettet, das kann Ihnen sicher weiterhelfen. Viel Spaß beim Stricken!
16.06.2025 - 07:39
![]() Susi wrote:
Susi wrote:
Würden Sie den unten von mir genannten STRICKTIPP bitte ergänzen? Ich habe den Ärmel 2x wegen der Wendelöcher aufgeribbelt. Bis ich den Tipp beim Cardigan DROPS 259-19 entdeckt habe.
08.06.2025 - 17:14
![]() Sus7 wrote:
Sus7 wrote:
Siehe dazu den STRICKTIPP zum Sky Whisper Cardigan DROPS 259-19
08.06.2025 - 17:08
![]() Susi wrote:
Susi wrote:
Es fehlt leider der SRRICKTIPP zu den German Short Rows für die Armkugeln. Die Wende Löcher sehen gar nicht gut aus.
08.06.2025 - 17:01
![]() Susi wrote:
Susi wrote:
Nochmal ich: Werden die beiden linken Maschen in der Rückreihe dann links gestrickt oder rechts? Könnte ich die Kante auch mit den rechten Maschen auch so lassen? Gefällt mir fast besser als die tiefe Rille, die durch die Linksmaschen entsteht. Wäre das möglich?
02.06.2025 - 13:10DROPS Design answered:
Liebe Susi, meinen Sie die Maschen an der Blenden Maschen? die 2 linken Maschen werden innerhalb die I-Cord Maschen glatt links gestrickt, so wird die Blende aussehen. Viel Spaß beim Stricken!
02.06.2025 - 16:04
|
|||||||
Pale Blossom#paleblossomcardigan |
|||||||
 |
 |
||||||
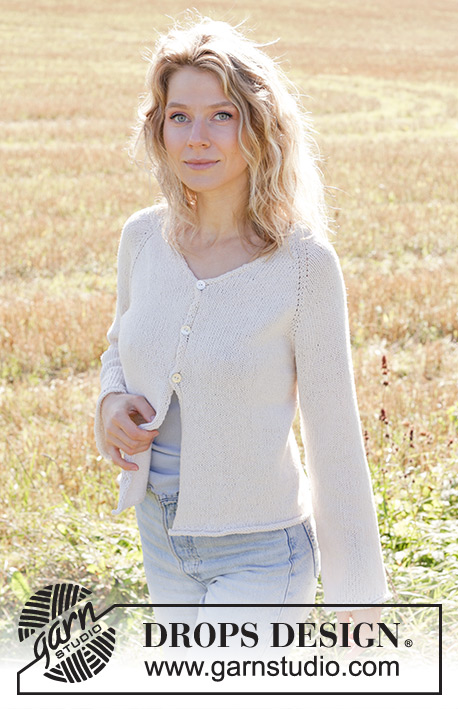
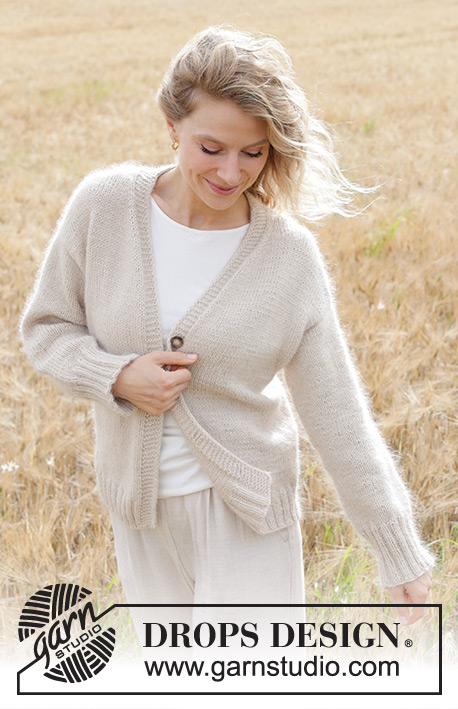
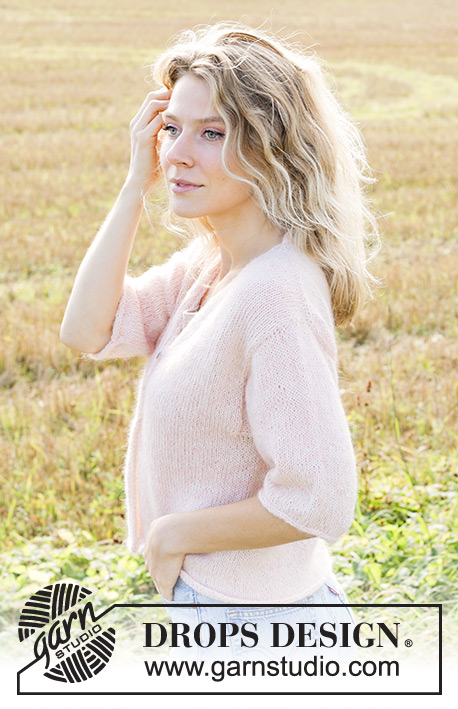
Knitted jacket in DROPS Alpaca and DROPS Kid-Silk. The piece is worked top down with European/diagonal shoulders, V-neck and I-cord. Sizes S - XXXL.
DROPS 248-35 |
|||||||
|
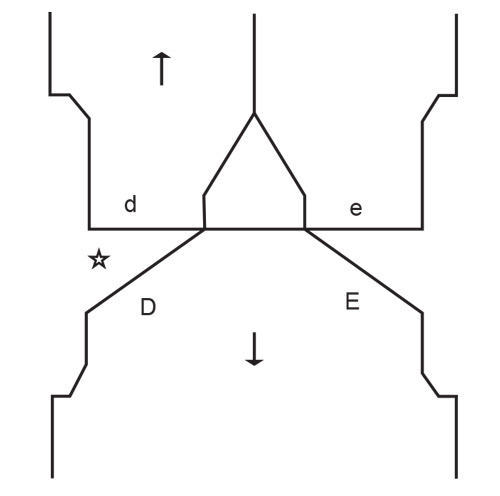
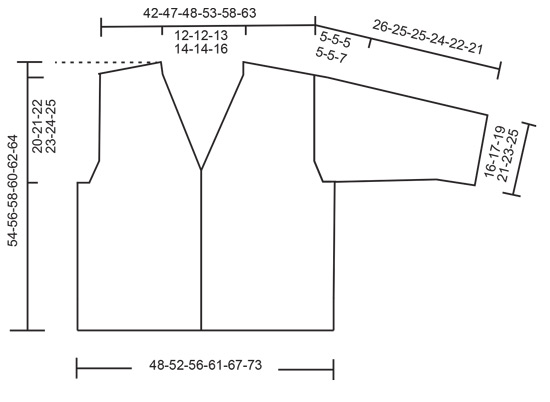
------------------------------------------------------- EXPLANATIONS FOR THE PATTERN: ------------------------------------------------------- GARTER STITCH (worked back and forth): Knit all rows. 1 ridge = knit 2 rows. INCREASE TIP-1: INCREASE 1 STITCH TOWARDS THE LEFT - from RIGHT SIDE: Use left needle to pick up yarn between 2 stitches from row below, pick up yarn from the front and knit in the stitch loop that is on the back of the needle. INCREASE 1 STITCH TOWARDS THE RIGHT - from RIGHT SIDE: Use left needle to pick up yarn between 2 stitches from row below, pick up yarn from the back and knit in the stitch loop that is on the front side of the needle. INCREASE TIP-2: INCREASE 1 STITCH TOWARDS THE RIGHT - from WRONG SIDE: Use left needle to pick up yarn between 2 stitches from row below, pick up yarn from the back and purl in the stitch loop that is on the front side of the needle. INCREASE 1 STITCH TOWARDS THE LEFT - from WRONG SIDE: Use left needle to pick up yarn between 2 stitches from row below, pick up yarn from the front and purl in the stitch loop that is on the back side of the needle. TWO I-CORD EDGE-STITCHES, RIGHT FRONT PIECE: RIGHT SIDE: Work until there are 2 stitches left, slip 1 stitch purl-wise with the strand in front, knit 1. WRONG SIDE: Slip 1 stitch purl-wise with the strand in front, knit 1, work to end of row. TWO I-CORD EDGE-STITCHES, LEFT FRONT PIECE: RIGHT SIDE: Slip 1 stitch purl-wise with the strand in front, knit 1, work to end of row. WRONG SIDE: Work until there are 2 stitches left, slip 1 stitch purl-wise with the strand in front, knit 1. BUTTONHOLES: Work the buttonholes on the right band (when the garment is worn). Work from the right side when there are 4 stitches left on the row, make 1 yarn over, purl 2 together, 2 stitches I-cord. On the next row (wrong side) knit the yarn over to leave a hole. The first buttonhole is worked 1 cm = ⅜" after the final increase for the V-neck and the next 2 buttonholes with 6-6-6-7-7-7 cm = 2⅜"-2⅜"-2⅜"-2¾"-2¾"-2¾" between each one. I-CORD BIND-OFF (bottom edge of body, back of neck): ROW 1 (right side): Knit 2, knit 2 twisted together. ROW 2 (right side): Slip the 3 stitches from the right needle back onto the left needle, knit 2, knit 2 twisted together. Repeat ROW 2 until there are 3 stitches left on the right needle. Slip the 3 stitches from the right needle back onto the left needle. Bind off. Sew a small stitch joining the beginning and end of the I-cord to the garment. I-CORD BIND-OFF (sleeves): At the end of the round after the last stitch has been worked: Cast on 3 stitches on the right needle, from the right side. Slip the 3 new stitches from the right needle onto the left needle, with the working strand 3 stitches in on the left needle (when working, tighten the strand to form a small tube). ROW 1 (right side): Knit 2, knit 2 twisted together. ROW 2 (right side): Slip the 3 stitches from the right needle back onto the left needle, knit 2, knit 2 twisted together. Repeat ROW 2 until there are 3 stitches left on the right needle. Slip the 3 stitches from the right needle back onto the left needle. Bind off. Sew a small stitch joining the beginning and end of the I-cord. DECREASE TIP (for sleeves): Decrease 1 stitch on each side of the marker-thread as follows: Work until there are 3 stitches left before the marker-thread, knit 2 together, knit 2 (marker-thread sits between these 2 stitches), slip 1 stitch knit-wise, knit 1 and pass the slipped stitch over the knitted stitch. ------------------------------------------------------- START THE PIECE HERE: ------------------------------------------------------- JACKET – SHORT OVERVIEW OF THE PIECE: The pattern uses both long and short circular needles; start with the length which fits the number of stitches and change when necessary. The piece is started, working back and forth on the needle, casting on stitches for the back of the neck, working the back piece top down and increasing on each side for the shoulders which are slightly diagonal. Work as far as the armholes. The back piece then waits while the front pieces are worked, knitting up stitches along one shoulder, working and increasing for the neckline, then doing the same along the other shoulder and working as far as the armholes. The front and back pieces are placed on the same circular needle and the body continued back and forth. Stitches are knitted up around each armhole. The sleeve cap is worked back and forth with short rows, then the sleeve is continued in the round. An I-cord edge is worked at the back of the neck to finish. BACK PIECE: Cast on 24-24-26-28-28-30 stitches with circular needle size 4.5 MM = US 7 and 1 strand of each quality (2 strands). Purl 1 row from the wrong side. Read INCREASE TIP-1 and work as follows from the right side: Knit 3, increase towards the left, knit until there are 3 stitches left, increase towards the right, knit 3. Read INCREASE-TIP-2 and work as follows from the wrong side: Purl 3, increase towards the right, purl until there are 3 stitches left, increase towards the left, purl 3. REMEMBER THE KNITTING GAUGE! Continue increasing like this, both from the right and wrong side, a total of 26-30-30-34-38-42 times = 76-84-86-96-104-114 stitches. Insert 1 marker outermost on one side. The piece is now measured from here! Work stockinette stitch back and forth until the piece measures 12-13-13-13-14-15 cm = 4¾"-5⅛"-5⅛"-5⅛"-5½"-6" from the marker along the armhole. Work as follows from the right side: Knit 3, increase towards the left, knit until there are 3 stitches left, increase towards the right, knit 3 - remember INCREASE TIP-1. Increase like this on each row from the right side a total of 2-2-3-3-4-4 times = 80-88-92-102-112-122 stitches. Continue working until the piece measures 14-15-16-16-17-18 cm = 5½"-6"-6¼"-6¼"-6¾"-7" along the armhole. Finish with a row from the right side. Cut the strand, place the stitches on a stitch holder and work the front pieces. LEFT FRONT PIECE: Start with the left shoulder (when the garment is worn). Knit up 26-30-30-34-38-42 stitches inside the outermost stitch along the left back shoulder (knit up 1 stitch in each row from the top edge, see D in sketch). All measurements are taken from here. Purl 1 row from the wrong side, then work as follows from the right side: TWO I-CORD EDGE STITCHES – read description above, purl 2, stockinette stitch over the remaining stitches. Continue this pattern. When the piece measures 7 cm = 2¾", increase for the neckline, starting from the right side as follows: Work 4 stitches as before, increase towards the left, work to end of row – remember INCREASE TIP-1. Increase 1 stitch every 2nd row (each row from the right side) 10 times, then every 4th row 6-6-7-8-8-9 times (a total of 16-16-17-18-18-19 increases for the neckline). AT THE SAME TIME when the piece measures 24-25-25-27-28-29 cm = 9½"-9¾"-9¾"-10⅝"-11"-11⅜", work as follows from the right side: Work until there are 3 stitches left, increase towards the right, knit 3 – remember INCREASE TIP-1. Increase like this on each row from the right side a total of 2-2-3-3-3-3 times = 44-48-50-55-60-65 stitches. Continue working until the piece measures 26-27-28-30-31-32 cm = 10¼"-10⅝"-11"-11¾"-12¼"-12½", finishing with a row from the right side. Cut the strand, place the stitches on a stitch holder and work the right front piece. All increases for the V-neck should now be finished. RIGHT FRONT PIECE: Knit up 26-30-30-34-38-42 stitches inside the outermost stitch along the right back shoulder (knit up 1 stitch in each row from the top edge, see E in sketch). All measurements are taken from here. Purl 1 row from the wrong side, then work as follows from the right side: Work stockinette stitch until there are 4 stitches left, purl 2 and TWO I-CORD EDGE STITCHES – remember description above. When the piece measures 7 cm = 2¾", increase for the neckline starting from the right side as follows: Work until there are 4 stitches left, increase towards the right, work the last 4 stitches as before. Increase 1 stitch every 2nd row (each row from the right side) 10 times, then every 4th row 6-6-7-8-8-9 times (a total of 16-16-17-18-18-19 increases for the neckline). AT THE SAME TIME when the piece measures 24-25-25-27-28-29 cm = 9½"-9¾"-9¾"-10⅝"-11"-11⅜", work as follows from the right side: Work 3 stitches, increase towards the left, work to end of row – remember INCREASE TIP-1. Increase like this on each row from the right side a total of 2-2-3-3-3-3 times = 44-48-50-55-60-65 stitches. Continue working until the piece measures 26-27-28-30-31-32 cm = 10¼"-10⅝"-11"-11¾"-12¼"-12½", finishing with a row from the right side. Now work from the wrong side as follows: Work the 44-48-50-55-60-65 stitches from the right front piece, cast on 6-6-8-8-8-10 stitches (in side under sleeve), work the 80-88-92-102-112-122 stitches from the back piece, cast on 6-6-8-8-8-10 stitches (in side under sleeve), work the 44-48-50-55-60-65 stitches from the left front piece. BODY: = 180-196-208-228-248-272 stitches. Continue stockinette stitch back and forth with 2 edge stitches + purl 2 on each side, mid-front. Work until the piece measures 54-56-58-60-62-64 cm = 21¼"-22"-22¾"-23⅝"-24⅜"-25¼", from the top front shoulder. Bind off with I-CORD – read description above. SLEEVES: Lay the piece flat and insert 1 marker at the top of the armhole (NOTE! This is not where stitches were knitted up but approx. 6-7 cm = 2⅜"-2¾" down the front piece = mid-top of shoulder). Using circular needle size 4.5 MM = US 7, start in the middle of the cast-on stitches under the sleeve and knit up 78-82-88-90-94-100 stitches around the armhole – make sure you have equal numbers of stitches on each side of the marker. Work stockinette stitch back and forth with short rows for the sleeve cap (to give the sleeve a better fit). Start mid-under the sleeve. Row 1 (right side): work to 9-10-11-11-11-12 stitches past the marker, turn. Row 2 (wrong side): work 9-10-11-11-11-12 stitches past the marker, turn. Row 3 (right side): work to 5-5-5-5-6-4 stitches past the previous turn, turn. Row 4 (wrong side): work to 5-5-5-5-6-4 stitches past the previous turn, turn. Repeat rows 3 and 4 until you work 34-35-36-36-41-40 stitches past the marker (6-6-6-6-6-8 turns on each side). Work from the right side to the beginning of the row (mid-under sleeve). Insert 1 marker-thread here, which is used when decreasing under the sleeve. Allow the thread to follow your work onwards. Continue with stockinette stitch in the round. When the sleeve measures 7-7-7-7-7-9 cm = 2¾"-2¾"-2¾"-2¾"-2¾"-3½", from the knitted-up stitches (all lengths measured mid-top of sleeve), decrease 2 stitches under the sleeve – read DECREASE TIP. Decrease like this every 2nd round 2 times, then every 1½-1½-1½-2-2-2 cm = ½"-½"-½"-¾"-¾"-¾", 8-8-8-5-4-3 times (a total of 10-10-10-7-6-5 times) = 58-62-68-76-82-90 stitches. Work until the sleeve measures 26-25-25-24-22-21 cm = 10¼"-9¾"-9¾"-9½"-8¾"-8¼". Bind off with I-CORD – remember description above. I-CORD, BACK OF NECK: Use circular needle size 4.5 MM = US 7. Cast on 2 stitches with 1 strand of each quality, then knit up 24-24-26-28-28-30 stitches (inside 1 edge stitch, along the back neckline) from one shoulder-line to the other shoulder-line. Cut the strand. Start where the 2 stitches were cast on and bind off with I-CORD – remember description above. ASSEMBLY: Sew the buttons onto the left front piece. |
|||||||
Diagram explanations |
|||||||
|
|||||||
 |
|||||||
 |
|||||||
Have you finished this pattern?Tag your pictures with #dropspattern #paleblossomcardigan or submit them to the #dropsfan gallery. Do you need help with this pattern?You'll find 29 tutorial videos, a Comments/Questions area and more by visiting the pattern on garnstudio.com. © 1982-2026 DROPS Design A/S. We reserve all rights. This document, including all its sub-sections, has copyrights. Read more about what you can do with our patterns at the bottom of each pattern on our site. |
|||||||


With over 40 years in knitting and crochet design, DROPS Design offers one of the most extensive collections of free patterns on the internet - translated to 17 languages. As of today we count 324 catalogs and 12290 patterns - 12280 of which are translated into English (US/in).
We work hard to bring you the best knitting and crochet have to offer, inspiration and advice as well as great quality yarns at incredible prices! Would you like to use our patterns for other than personal use? You can read what you are allowed to do in the Copyright text at the bottom of all our patterns. Happy crafting!
Post a comment to pattern DROPS 248-35
We would love to hear what you have to say about this pattern!
If you want to leave a question, please make sure you select the correct category in the form below, to speed up the answering process. Required fields are marked *.