
Popular categories
Looking for a yarn?


Comments / Questions (4)
![]() Jasmin wrote:
Jasmin wrote:
Der virker til at være noget galt med størrelsen. Jeg strikker med den rigtige strikkefasthed og alligevel ser vesten stadig ud til at blive 35 cm bred, selv om jeg var prøvet at lave den to størrelser mindre. Jeg har kun slået 128 masker op og stadig taget 14 masker ind efter ribben. Så hvordan er den stadig så stor?
16.09.2024 - 12:49
![]() Eugenia wrote:
Eugenia wrote:
Hola !!! Seguí las instrucciones muy cuidadosamente y el resultado fue un enorme pero enorme chaleco para mi nieto que solo tiene 3 años !!! Creo que a mí también me hubiera quedado grande. Hay alguna forma de obtener las instrucciones correctas ??? TIA
21.09.2023 - 21:32DROPS Design answered:
Hola Eugenia, las instrucciones son correctas. En el esquema de medidas, bajo las instrucciones del patrón, puedes ver las medidas de las diferentes partes de la labor en cm. Si las medidas no coinciden con tu prenda, comprueba que hayas mantenido la tensión del tejido indicada a lo largo de la labor. Si tienes dudas en una sección concreta, puedes indicárnoslo aquí y trataremos de solucionar tus dudas.
24.09.2023 - 20:36
![]() Francesca wrote:
Francesca wrote:
Sinistro essendo speculare come devo fare ? Invece di intrecciare faccio una diminuzione a fine giro invece che all inizio? Non so se mi sono spiegata . Grazie mille
10.10.2022 - 16:31DROPS Design answered:
Buonasera Francesca, a quale parte del modello sta facendo riferimento? Buon lavoro!
10.10.2022 - 19:10
![]() Anja Adams wrote:
Anja Adams wrote:
Ik begrijp niet hoe ik dit moet afkanten: “ kant af voor het armsgat op het begin van elke naald vanaf de zijkant als volgt: 2-1-1-1-1-1 keer 2 steken en 3-3-3-4-4-4 keer 1 steek.” En deze: “ Minder 1 steek op iedere 2e naald (elke naald aan de goede kant) 9-9-9-9-10-10 keer, dan iedere 4e naald (iedere andere naald aan de goede kant) 1-1-2-2-2-2 keer.”
19.01.2022 - 22:41DROPS Design answered:
Dag Anja,
De reeks getallen correspondeert met de maten, dus als je bijvoorbeeld maat s breit neem je het eerste getal. Je kant dan eerst 2 keer 2 steken af aan elke kant van het armsgat. Dit is dus allemaal bij het armsgat. Daarnaast minder je tegelijkertijd steken voor de v-hals en dit doe je dus midden voor bij de hals. Bovenaan staat beschreven hoe je de minderingen precies maakt en in de beschrijving staat aangegeven hoeveel minderingen je moet maken voor elke maat.
21.01.2022 - 08:50
|
|
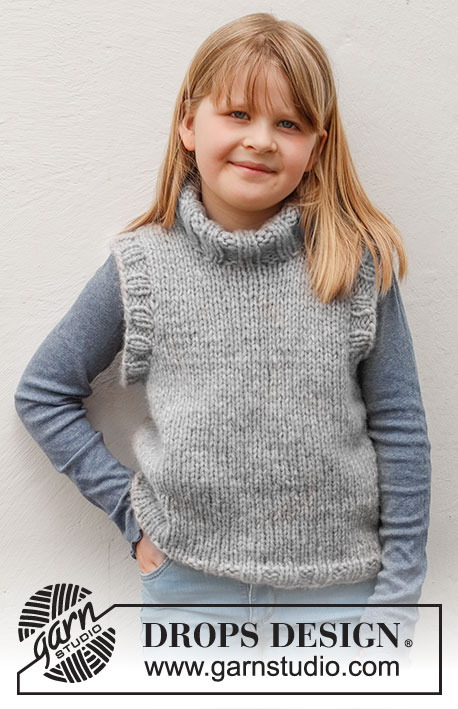
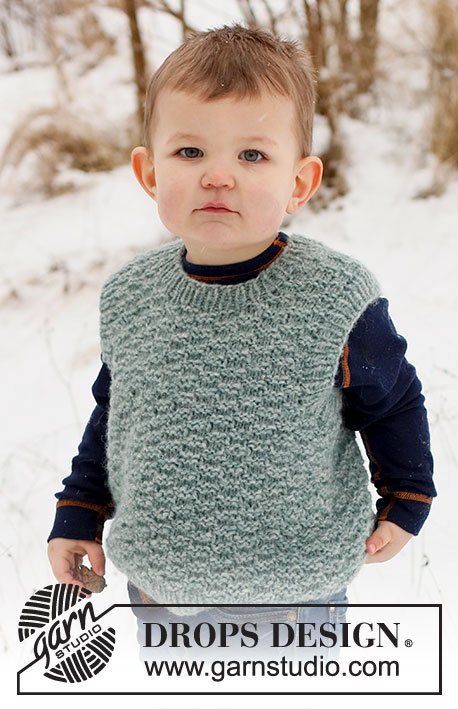
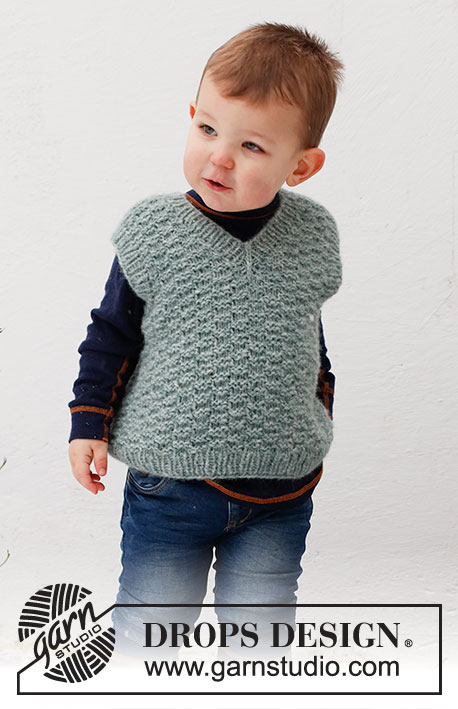
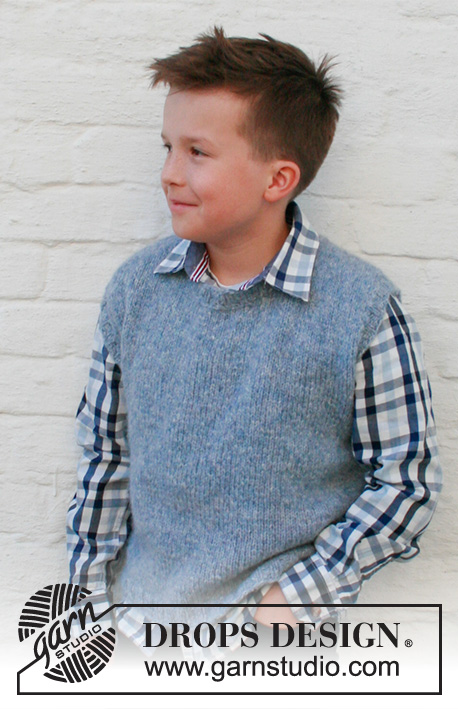
Spring Creek Vest#springcreekvest |
|
 |
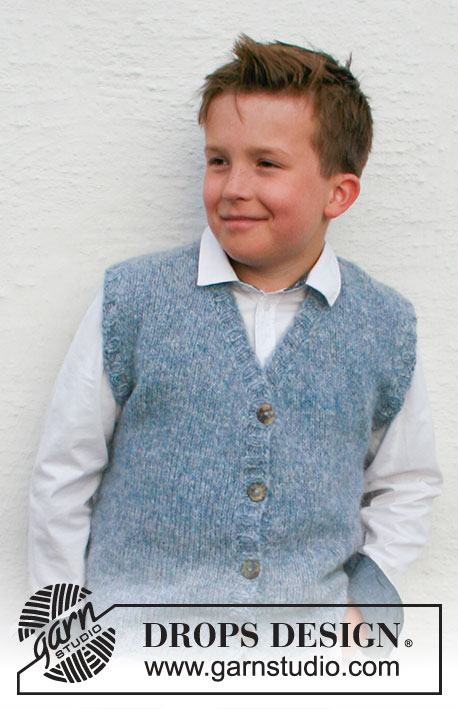 |
Knitted vest for children in DROPS Air. The piece is worked in stockinette stitch with V-neck and ribbed edges. Sizes 3 to 14 years.
DROPS Children 40-25 |
|
|
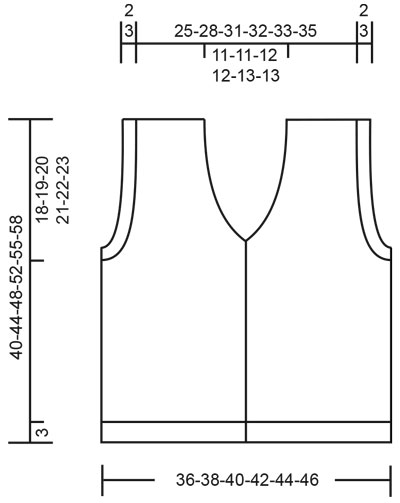
------------------------------------------------------- EXPLANATIONS FOR THE PATTERN: ------------------------------------------------------- RIDGE/GARTER STITCH (worked back and forth): Knit all rows. 1 ridge = knit 2 rows. DECREASE TIP-1 (evenly spaced): To work out how to decrease evenly, count the total number of stitches on needle (e.g. 140 stitches) minus the edge stitches (e.g. 2 stitches) and divide the remaining stitches by the number of decreases to be made (e.g. 14) = 9.9. In this example decrease by knitting together each 9th and 10th stitch (approx.). DECREASE TIP-2 (for V-neck): Decrease on the inside of the 1 edge stitch in garter stitch. All decreases are worked from the right side! AFTER THE 1 EDGE STITCH: Slip 1 stitch as if to knit, knit 1 and pass the slipped stitch over the knitted stitch (1 stitch decreased). BEFORE THE 1 EDGE STITCH: Work until there are 2 stitches left before the edge stitch, knit 2 together (= 1 stitch decreased). BINDING-OFF TIP: To avoid the bind-off edge being tight you can bind off with a larger size needle. If the edge is still tight, make 1 yarn over after approx. each 6th stitch at the same time as binding off; the yarn overs are bind off as normal stitches. ------------------------------------------------------- START THE PIECE HERE: ------------------------------------------------------- VEST – SHORT OVERVIEW OF THE PIECE: The body is worked back and forth with circular needle, bottom up. Stitches are bind off for the armholes and the front and back pieces finished separately. The shoulder seams are sewn together and ribbed sleeve-edges and neck are worked to finish. BODY: Cast on 140-144-152-160-168-176 stitches (including 1 edge stitch on each side towards mid-front) with circular needle size 4 MM = US 6 and DROPS Air. Purl 1 row (= wrong side). The next row is worked as follows from the right side: 1 edge stitch in GARTER STITCH – read description above, * knit 2, purl 2 *, work from *-* until there are 3 stitches left, knit 2 and 1 edge stitch in garter stitch. Continue this rib for 3 cm = 1⅛". Knit 1 row where you decrease 14-14-14-14-18-18 stitches evenly spaced – read DECREASE TIP-1 = 126-130-138-146-150-158 stitches. Change to circular needle size 5 MM = US 8 and work stockinette stitch back and forth, with 1 edge stitch in garter stitch on each side. REMEMBER THE KNITTING GAUGE! When the piece measures 22-25-28-31-33-35 cm = 8¾"-9¾"-11"-12¼"-13"-13¾", bind off for the armholes on the next row from the right side as follows: Work 29-30-32-34-35-37 stitches as before (= right front piece), bind off 6 stitches, work 56-58-62-66-68-72 stitches (= back piece), bind off 6 stitches and work 29-30-32-34-35-37 stitches as before (= left front piece). Place the stitches for the right front piece and the back piece on a thread or extra needle and work the left front piece. LEFT FRONT PIECE: Work stockinette stitch back and forth, with 1 edge stitch in garter stitch mid-front, and bind off for the armhole at the beginning of each row from the side as follows: 2 stitches 2-1-1-1-1-1 times and 1 stitch 3-3-3-4-4-4 times. AT THE SAME TIME when the piece measures 26-29-32-35-37-39 cm = 10¼"-11⅜"-12½"-13¾"-14½"-15¼", start to decrease for the V-neck mid-front – read DECREASE TIP-2. Decrease 1 stitch every 2nd row (each row from the right side) 9-9-9-9-10-10 times, then every 4th row (every other row from the right side) 1-1-2-2-2-2 times. After all the decreases to armhole and neck, there are 12-15-16-17-17-19 stitches on the shoulder. Work until the piece measures 40-44-48-52-55-58 cm = 15¾"-17¼"-19"-20½"-21⅝"-22¾". Bind off. RIGHT FRONT PIECE: Place the 29-30-32-34-35-37 stitches from the thread/extra needle on the other side of the piece back on circular needle size 5 MM = US 8. Work stockinette stitch back and forth with 1 edge stitch in garter stitch mid-front and bind off for the armhole at the beginning of each row from the side as follows: 2 stitches 2-1-1-1-1-1 times and 1 stitch 3-3-3-4-4-4 times. AT THE SAME TIME when the piece measures 26-29-32-35-37-39 cm = 10¼"-11⅜"-12½"-13¾"-14½"-15¼", start to decrease for the V-neck mid-front. Decrease 1 stitch every 2nd row (each row from the right side) 9-9-9-9-10-10 times, then every 4th row (every other row from the right side) 1-1-2-2-2-2 times. After all the decreases to armhole and neck, there are 12-15-16-17-17-19 stitches on the shoulder. Work until the piece measures 40-44-48-52-55-58 cm = 15¾"-17¼"-19"-20½"-21⅝"-22¾". Bind off. BACK PIECE: Place the remaining 56-58-62-66-68-72 stitches from the thread/extra needle back on circular needle size 5 MM = US 8. Work stockinette stitch back and forth and bind off for the armholes at the beginning of each row on each side as follows: 2 stitches 2-1-1-1-1-1 times and 1 stitch 3-3-3-4-4-4 times = 42-48-52-54-56-60 stitches. Continue with stockinette stitch. When the piece measures 38-42-46-50-53-56 cm = 15"-16½"-18"-19¾"-21"-22", bind off the middle 16-16-18-18-20-20 stitches for the neck and each shoulder is finished separately. Continue working and bind off 1 stitch on the next row from the neck = 12-15-16-17-17-19 stitches. Work until the piece measures 40-44-48-52-55-58 cm = 15¾"-17¼"-19"-20½"-21⅝"-22¾". Bind off. Work the other shoulder in the same way. ASSEMBLY: Sew the shoulder seams. SLEEVE-EDGES: Start from the right side at the bottom of the armhole and knit up inside the 1 edge stitch 64-68-72-76-80-84 stitches around the armhole with double pointed needles/short circular needle size 4 MM = US 6 and DROPS Air – the number of stitches should be divisible by 4. Work rib in the round (knit 2, purl 2) for 2-2-2-3-3-3 cm = ¾"-¾"-¾"-1⅛"-1⅛"-1⅛". Bind off with knit over knit and purl over purl – read BINDING-OFF TIP. Work the other sleeve-edge in the same way. RIGHT BAND AND NECK: Start from the right side at the bottom of the right front piece and knit up, inside the 1 edge stitch, 79-87-91-99-107-111 stitches up the front piece and to the middle on the back of the neck, with circular needle size 4 MM = US 6 and DROPS Air – the number of stitches should be divisible by 4 + 3. It is important the rib is neither too tight (with too few stitches) or too loose (with too many). The first row is worked as follows from the wrong side (mid-back): 1 edge stitch in garter stitch, purl 1, * knit 2, purl 2 *, work from *-* until there is 1 stitch left and 1 edge stitch in garter stitch. Continue this rib back and forth for 1-1-1-1½-1½-1½ cm = ⅜"-⅜"-⅜"-½"-½"-½". Now work 4-4-4-5-5-5 buttonholes evenly spaced. Each buttonhole is worked in a purled section (seen from the right side) by making 1 yarn over then purling 2 together. The top buttonhole is worked 1 cm = ⅜" below the beginning of the V-neck and the bottom buttonhole 5 cm = 2" from the bottom edge. Continue the rib until the band measures 3 cm = 1⅛". Bind off with garter stitch over garter stitch, knit over knit and purl over purl – remember BINDING-OFF TIP. LEFT BAND AND NECK: Start from the right side mid-back of the neck and knit up, inside the 1 edge stitch, 79-87-91-99-107-111 stitches around the neck and down the left front piece, with circular needle size 4 MM = US 6 and DROPS Air – the number of stitches should be divisible by 4 + 3. Adjust so you have the same number of stitches as on the right band/neck. The first row is worked as follows from the wrong side (bottom edge): 1 edge stitch in garter stitch, * purl 2, knit 2 *, work from *-* until there are 2 stitches left, purl 1 and 1 edge stitch in garter stitch. Continue this rib back and forth for 3 cm = 1⅛". Bind off with garter stitch over garter stitch, knit over knit and purl over purl – remember BINDING-OFF TIP. ASSEMBLY: Sew the buttons onto the left band. Sew the neck together mid-back. |
|
 |
|
Have you finished this pattern?Tag your pictures with #dropspattern #springcreekvest or submit them to the #dropsfan gallery. Do you need help with this pattern?You'll find 23 tutorial videos, a Comments/Questions area and more by visiting the pattern on garnstudio.com. © 1982-2026 DROPS Design A/S. We reserve all rights. This document, including all its sub-sections, has copyrights. Read more about what you can do with our patterns at the bottom of each pattern on our site. |
|


With over 40 years in knitting and crochet design, DROPS Design offers one of the most extensive collections of free patterns on the internet - translated to 17 languages. As of today we count 324 catalogs and 12290 patterns - 12280 of which are translated into English (US/in).
We work hard to bring you the best knitting and crochet have to offer, inspiration and advice as well as great quality yarns at incredible prices! Would you like to use our patterns for other than personal use? You can read what you are allowed to do in the Copyright text at the bottom of all our patterns. Happy crafting!
Post a comment to pattern DROPS Children 40-25
We would love to hear what you have to say about this pattern!
If you want to leave a question, please make sure you select the correct category in the form below, to speed up the answering process. Required fields are marked *.