
Popular categories
Looking for a yarn?


Comments / Questions (129)
![]() Suzi wrote:
Suzi wrote:
Gorgeous love it must knit me one
01.09.2025 - 08:18
![]() Sue wrote:
Sue wrote:
What is meant by before the neck and after the neck?
12.07.2025 - 10:31DROPS Design answered:
Dear Sue, it means that you work differently depending on whether the neck is at the start or end of the row, that is, whether the decrease is worked at the start of the row (so when you continue working "after the neck") or at the end of the row (so you work from "Before" the neck until you reach the neck, where you decrease as indicated in the corresponding section). Happy knitting!
13.07.2025 - 23:32
![]() Harriet Stjernberg wrote:
Harriet Stjernberg wrote:
Hur gör man A1 fattar inte
02.06.2025 - 18:55DROPS Design answered:
Hej Harriet, når du strikker skiftevis 1 ret og 1 vrang, så bliver det til ribstrik, du strikker ret over hinanden og vrang over hinanden :)
03.06.2025 - 07:55
![]() Pamela Gluyas wrote:
Pamela Gluyas wrote:
When casting on, do I add extra edge stitch each end or is this included included in the number cast on?is A1 the entire diagram page? What is the x then blank? Is there a tube video showing / explaining this please?
26.05.2025 - 06:09DROPS Design answered:
Hi Pamela, The number of cast-on stitches includes the edge stitches. A.1 is the only diagram used in this pattern. The open squares are knitted twisted (through the back loop) from the right side and purled twisted from the wrong side. The crossed squares are purled from the right side and knitted from the wrong side (the diagram explanations are just above the diagram). Regards, Drops team.
26.05.2025 - 06:39
![]() Evelyne wrote:
Evelyne wrote:
Est il possible de tricoter ce modèle sur des aiguilles normales. Merci de vos réponses
27.04.2025 - 15:11
![]() Maddalena wrote:
Maddalena wrote:
Buongiorno, Ho iniziato il bordo del gilet seguendo lo schema A1 , ma mi sono accorta che ,man mano che procedevo, le coste tendevano ad inclinarsi. Per questo motivo ho deciso di apportare una modifica, cioè di lavorare la maglia ritorta su tutte le maglie a diritto, sia nei ferri di andata che in quelli di ritorno.
23.03.2025 - 09:10
![]() Hanne Kirud wrote:
Hanne Kirud wrote:
Jeg er nybegynder i at strikke bluser og jeg er i tvivl om det der diagrammer. Jeg slår 121 masker op og så strikker jeg 1. pind vrang. Vend og hvad gør jeg så på de første masker og de sidste på retsiden? Er der diagram i begge ender? Gerne udførligt. Mvh Hanne
22.03.2025 - 17:16DROPS Design answered:
Hei Hanne. 1. og siste maske strikkes alltid rett (både fra retten og fra vrangen). Mellom 1. og siste maske strikkes diagram A.1. Altså, fra retten: Strikk 1 masker rett, deretter strikkes A.1 59,5 ganger (eller sagt på en annen måte: strikk A.1 59 ganger, strikk deretter 1. maske i A.1) og avslutt pinnen med 1 rett. Snu og fra vrangen strikk 1 maske rett, strikk A.1 59,5 ganger og avslutt med 1 rett. Husk les diagramikontekstene, slik at du vet hvordan ikonene skal strikkes både fra rette og fra vrangen. mvh DROPS Design
24.03.2025 - 13:29
![]() Florence wrote:
Florence wrote:
Bonjour, n'est-il pas possible de tricoter dos et devant en une fois sur aiguille circulaire (de bas en haut et de séparer l'ouvrage en arrivant aux manches ?
18.02.2025 - 14:44DROPS Design answered:
Bonjour Florence, si fort probablement, ajustez juste le nombre de mailles/les côtes sur les côtés pour que tout tombe juste. Bon tricot!
18.02.2025 - 17:36
![]() Helen Tingley wrote:
Helen Tingley wrote:
Where is the bust measurement on the diagram shown at end of pattern? It's not in middle like the one shown under size
01.01.2025 - 12:36DROPS Design answered:
Hi Helen, the bust measurement is 42-46-50-55-61-67 cm x 2 (choose your size). Happy knitting!
01.01.2025 - 20:12
![]() Isabel Veloso wrote:
Isabel Veloso wrote:
Would it be possible to crochet this lovely slip over instead of knitting it? Thanks
04.12.2024 - 15:54DROPS Design answered:
Dear Isabel, we don't make custom patterns but here you can find a similar pattern for a crochet slipover: https://www.garnstudio.com/pattern.php?id=10998&cid=19. Happy crochetting!
08.12.2024 - 01:07
|
|||||||
Visit Vienna#visitviennaslipover |
|||||||
 |
 |
||||||
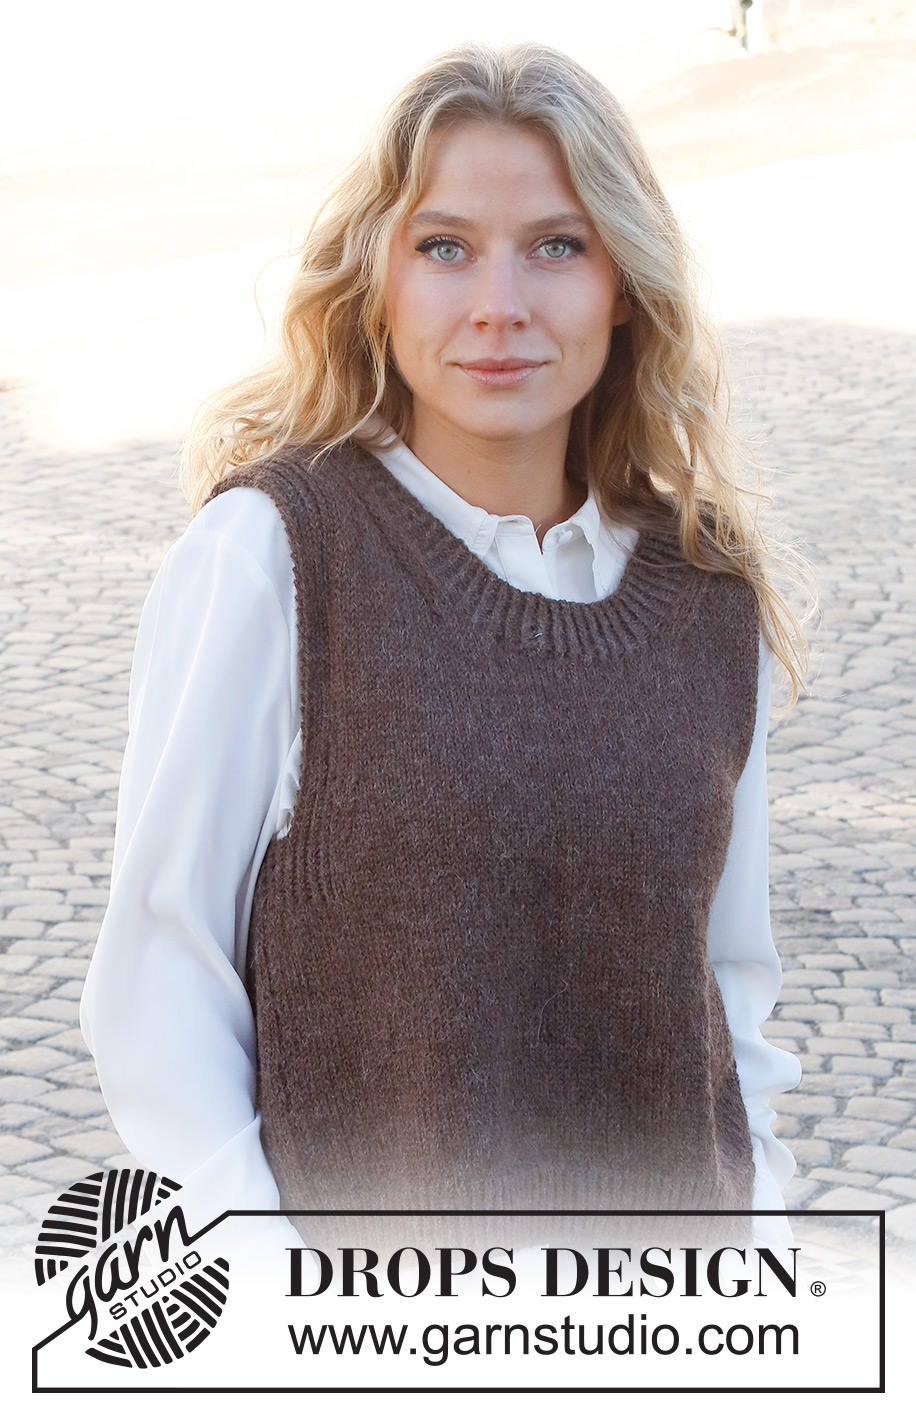
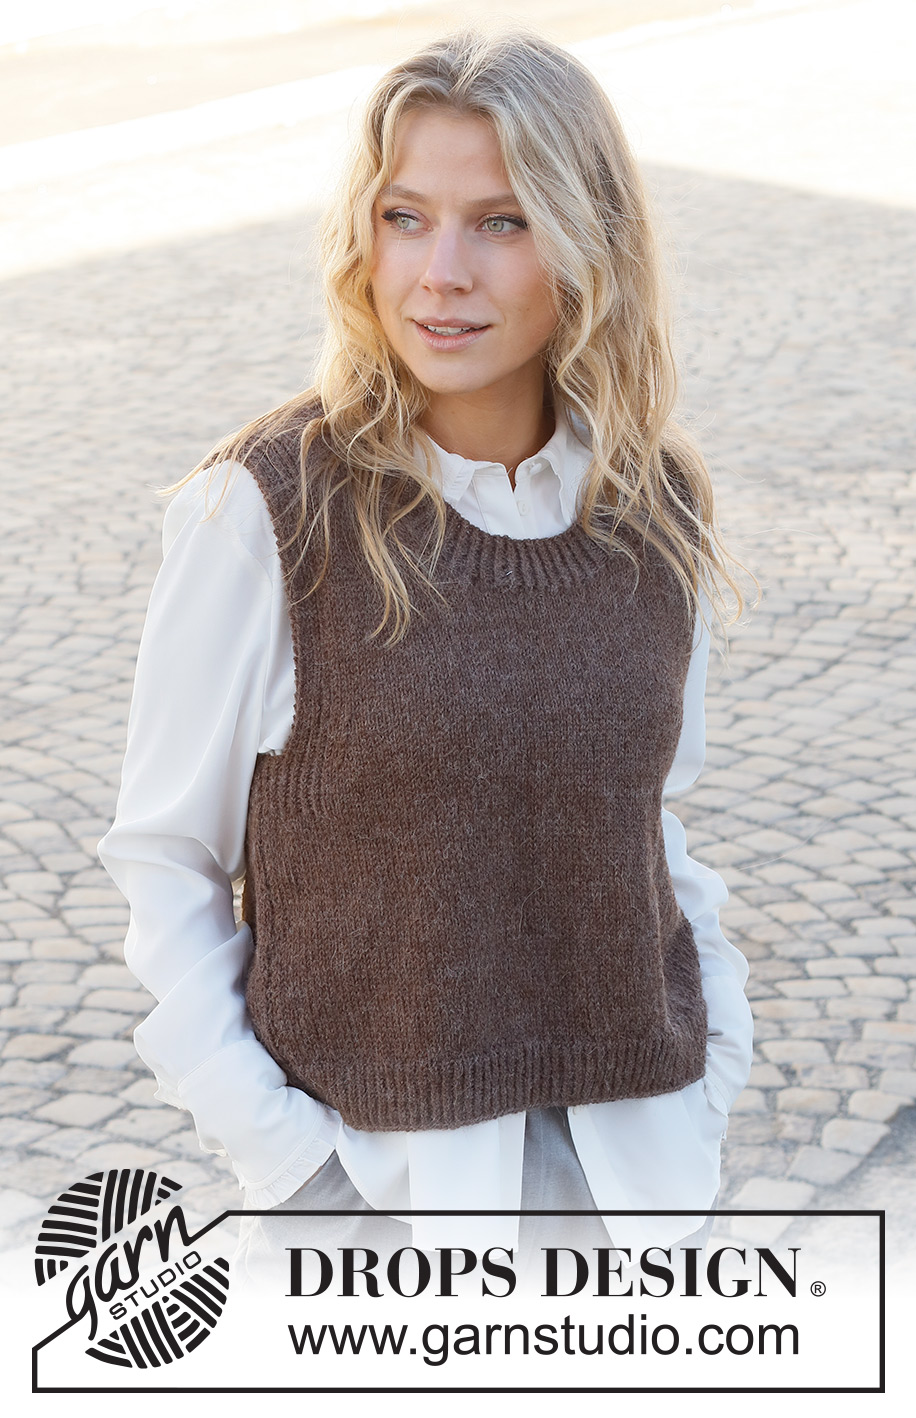
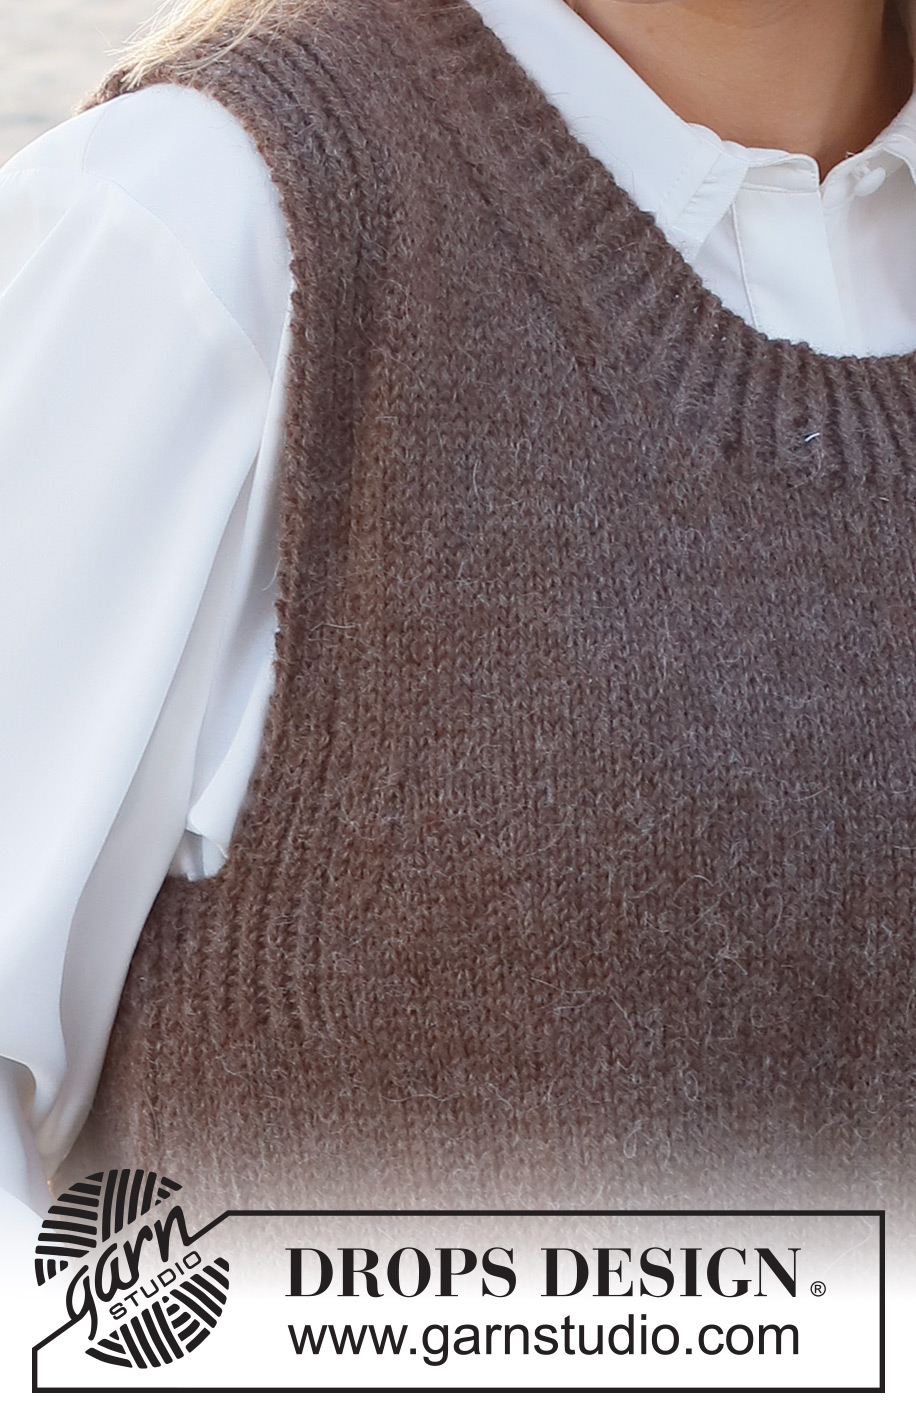
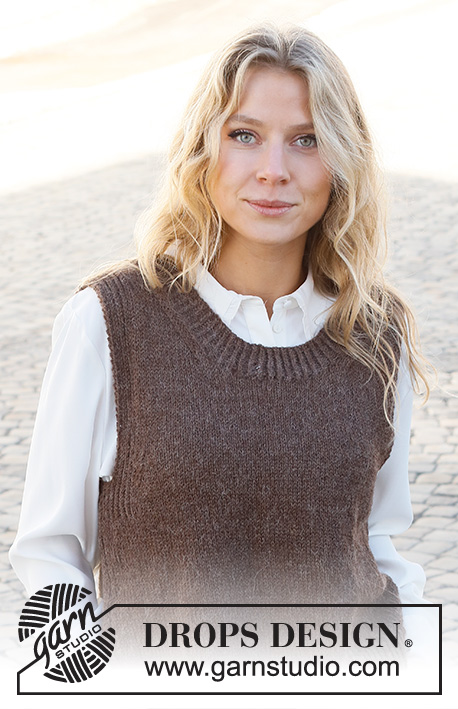
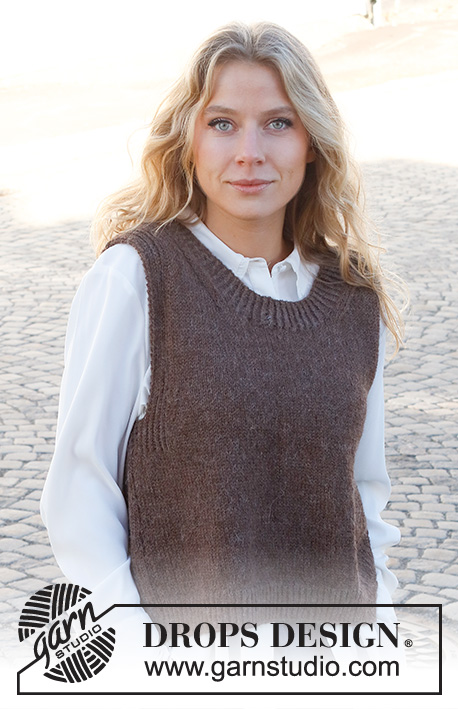
Knitted vest in DROPS Puna. The piece is worked with ribbed edges. Sizes S - XXXL.
DROPS 227-9 |
|||||||
|
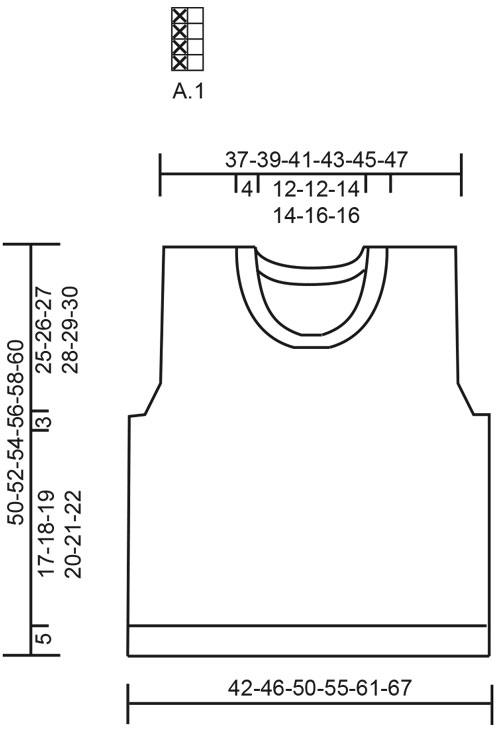
------------------------------------------------------- EXPLANATIONS FOR THE PATTERN: ------------------------------------------------------- RIDGE/GARTER STITCH (worked back and forth): Knit all rows. 1 ridge = knit 2 rows PATTERN: See diagram A.1. The diagram shows all rows in the pattern from the right side. DECREASE TIP-1 (evenly spaced): To work out how to decrease evenly, count the total number of stitches on needle (e.g. 103 stitches) minus the edge stitches (e.g. 2 stitches) and divide the remaining stitches by the number of decreases to be made (e.g. 17) = 5.9. In this example decrease by knitting together approx. each 5th and 6th stitch. Do not decrease the edge stitches. DECREASE TIP-2 (armholes): All decreases are worked from the right side! Decrease at the beginning of row: Work the first 11 stitches as before, slip 1 stitch as if to knit, knit 1 and pass the slipped stitch over the knitted stitch (= 1 stitch decreased). Decrease at the end of row: Work until there are 13 stitches left, knit 2 together and work to end of row (= 1 stitch decreased). DECREASE TIP-3 (neck): All decreases are worked from the right side! After the neck: Work 1 edge stitch in garter stitch, 2 stitches in stockinette stitch, slip 1 stitch as if to knit, knit 1 and pass the slipped stitch over the knitted stitch (= 1 stitch decreased). Before the neck: Work until there are 5 stitches left, knit 2 together and work to end of row (= 1 stitch decreased). BINDING-OFF TIP: To avoid the bind-off edge being tight you can bind off with a larger size needle. If the edge is still tight, make 1 yarn over after approx. each 4th stitch at the same time as binding off; the yarn overs are bind off as normal stitches. ------------------------------------------------------- START THE PIECE HERE: ------------------------------------------------------- VEST – SHORT OVERVIEW OF THE PIECE: The piece is worked in sections, back and forth on the needle and then sewn together. The neck is worked to finish. BACK PIECE: Cast on 103-113-121-133-149-163 stitches (including 1 edge stitch on each side) with circular needle size 3.5 MM = US 4 and DROPS Puna. Purl 1 row from the wrong side, then work rib from the right side as follows: 1 edge stitch in GARTER STITCH – read description above, work A.1 until there are 2 stitches left, work the first stitch in A.1 (so the pattern is symmetrical) and 1 edge stitch in garter stitch. Continue this rib back and forth for 5 cm = 2" – adjust so the next row is from the right side. Knit 1 row where you decrease 17-19-19-21-25-27 stitches evenly spaced – read DECREASE TIP-1 = 86-94-102-112-124-136 stitches. Change to circular needle size 4.5 MM = US 7. Purl 1 row from the wrong side. Continue with stockinette stitch and 1 edge stitch in garter stitch on each side. REMEMBER THE KNITTING GAUGE! When the piece measures 22-23-24-25-26-27 cm = 8¾"-9"-9½"-9¾"-10¼"-10⅝", work pattern as follows from the right side: 1 edge stitch in garter stitch, A.1 over the next 12-12-12-14-16-18 stitches, stockinette stitch until there are 13-13-13-15-17-19 stitches left, purl 1, A.1 over the next 11-11-11-13-15-17 stitches and 1 edge stitch in garter stitch. Continue this pattern. When the piece measures 25-26-27-28-29-30 cm = 9¾"-10¼"-10⅝"-11"-11⅜"-11¾" (the rib on each side measures 3 cm = 1⅛" – adjust to work next row from the right side), work as follows: Bind off the first 4-4-4-6-8-10 stitches for the armholes at the beginning of the next 2 rows (bind off with knit) = 78-86-94-100-108-116 stitches. The next row from the right side is worked as follows: 1 edge stitch in garter stitch, pattern as before over the next 8 stitches, work stockinette stitch until there are 9 stitches left, pattern over the next 8 stitches and 1 edge stitch in garter stitch. Continue this pattern. On the next row from the right side, decrease 1 stitch on each side for the armholes – read DECREASE TIP-2! Decrease like this each row from the right side a total of 1-3-5-6-8-10 times = 76-80-84-88-92-96 stitches. When the piece measures 46-48-50-52-54-56 cm = 18"-19"-19¾"-20½"-21¼"-22", bind off the middle 36-36-40-40-44-44 stitches for the neck and each shoulder (= 20-22-22-24-24-26 stitches) is finished separately. On the next row from the right side, decrease 1 stitch for the neck – read DECREASE TIP-3! Decrease like this each row from the right side a total of 2 times = 18-20-20-22-22-24 stitches. Continue with pattern and stockinette stitch until the piece measures 50-52-54-56-58-60 cm = 19¾"-20½"-21¼"-22"-22¾"-23⅝". Bind off with knit over knit and purl over purl. Work the other shoulder in the same way. FRONT PIECE: Cast on and work as for the back piece. When the piece measures 35-37-37-39-39-41 cm = 13¾"-14½"-14½"-15¼"-15¼"-16⅛" (there are 76-80-84-88-92-96 stitches on the needle), place the middle 18-18-20-20-24-24 stitches on a thread for the neck and each shoulder (= 29-31-32-34-34-36 stitches) is finished separately On the next row from the right side, decrease 1 stitch for the neck – remember DECREASE TIP-3! Decrease like this each row from the right side a total of 11-11-12-12-12-12 times = 18-20-20-22-22-24 stitches. Continue with pattern and stockinette stitch until the piece measures 50-52-54-56-58-60 cm = 19¾"-20½"-21¼"-22"-22¾"-23⅝". Bind off with knit over knit and purl over purl. Work the other shoulder in the same way. ASSEMBLY: Sew the shoulder seams inside the bind-off edge. Sew the side seams inside the 1 edge stitch. NECK: Start from the right side at one shoulder seam and knit up 120 to 148 stitches (including the stitches from the thread) inside the 1 edge stitch, with short circular needle size 3.5 MM = US 4 and DROPS Puna. The number of stitches must be divisible by 2; make sure the neck is neither too loose nor too tight. Work A.1 in the round over all stitches for 4½ cm = 1⅝". Bind off with knit-twisted over knit-twisted and purl over purl – read BINDING-OFF TIP. |
|||||||
Diagram explanations |
|||||||
|
|||||||
 |
|||||||
Have you finished this pattern?Tag your pictures with #dropspattern #visitviennaslipover or submit them to the #dropsfan gallery. Do you need help with this pattern?You'll find 27 tutorial videos, a Comments/Questions area and more by visiting the pattern on garnstudio.com. © 1982-2026 DROPS Design A/S. We reserve all rights. This document, including all its sub-sections, has copyrights. Read more about what you can do with our patterns at the bottom of each pattern on our site. |
|||||||


With over 40 years in knitting and crochet design, DROPS Design offers one of the most extensive collections of free patterns on the internet - translated to 17 languages. As of today we count 325 catalogs and 12298 patterns - 12288 of which are translated into English (US/in).
We work hard to bring you the best knitting and crochet have to offer, inspiration and advice as well as great quality yarns at incredible prices! Would you like to use our patterns for other than personal use? You can read what you are allowed to do in the Copyright text at the bottom of all our patterns. Happy crafting!
Post a comment to pattern DROPS 227-9
We would love to hear what you have to say about this pattern!
If you want to leave a question, please make sure you select the correct category in the form below, to speed up the answering process. Required fields are marked *.