
Popular categories
Looking for a yarn?


Comments / Questions (36)
![]() Ans wrote:
Ans wrote:
Hallo, bij de verdeling van de steken voor de markeerdraden in de pas kom ik bij maat L uit op 128 steken, maar na de mindering bij de hals staat dat ik 132 steken moet hebben. Hartelijke groet, Ans
17.12.2023 - 12:48
![]() Jo wrote:
Jo wrote:
Hi does this pattern exist in English? Thank you Jo
09.12.2023 - 07:12
![]() Katrin wrote:
Katrin wrote:
Hej, Jeg har brug for hjælp fordi jeg kan ikke komme videre i den del af opskriften: “På næste omgang tages der 4 masker ud – udtagningerne fordeles så der tages 1 maske ud ved hver raglanlinje, (strikkes 1 ret foran og bag i masken med mærke i).” Hvis jeg strikker 1 ret foran og 1 ret bag i masken, så har jeg 8 masker og ikke bare 4. Jeg kan heller ikke finde video det forklare det.
06.11.2023 - 21:00DROPS Design answered:
Hej Katrin, jo men du havde allerede de 4 masker du strikker i, dvs at du får 4 nye masker :)
10.11.2023 - 15:02
![]() Christine Gralow wrote:
Christine Gralow wrote:
In der Anleitung steht bei der Raglanzunahme das sie in die markierte Masche gearbeitet wird, im selben Satz steht aber auch das A1 in n die Masche vor der markierten gemacht werden soll. Wo mache ich denn nun diese Zunahme?
06.11.2023 - 16:31DROPS Design answered:
Liebe Frau Gralow, die 4 Maschen mit je einer Markierung sind die mittlere Masche in A.1, dh, A.1 beginnen Sie 1 Masche davor, dann stricken Sie 1 M re, 6 M in der markierten Masche, 1 M re. Die Masche mit der Markierung bleibt die mittlere Masche in A.1. Viel Spaß beim stricken!
07.11.2023 - 08:05
![]() Anna wrote:
Anna wrote:
Hallo, probleem opgelost. Ik dacht dat de dubbele hals als een col naar buiten zou worden omgeslagen, maar hij wordt naar binnen omgeslagen en daar vastgezet. Hartelijke groet.
13.10.2023 - 16:40
![]() Anna wrote:
Anna wrote:
Hallo, ik ben net begonnen met de dubbele hals. Die heeft volgens mij een echte voorkant (1 gedraaid recht, 2 averecht). De hals wordt later dubbel gevouwen, maar hoe zit het dan met de pas die eraan vast gebreid wordt? Volgens mij kom je dan uit bij een averechte tricotsteek, of zie ik nu iets over het hoofd? Hartelijke groet.
12.10.2023 - 11:15DROPS Design answered:
Dag Anna,
De hals wordt op het einde naar de binnenkant (en niet naar de buitenkant) gevouwen en vastgenaaid.
15.10.2023 - 17:13
![]() Maja wrote:
Maja wrote:
Hei! Når man strikker ferdig bærestykke, står det at man skal klippe tråden og begynne på bol fra de nye maskene som ble lagt opp. Hva skal man gjøre med pinnene da? Forstår ikke helt hvordan å starte i helt annet sted på arbeidet uten å miste/ flytte pinnene. (Strikker genser for første gang
27.09.2023 - 00:31DROPS Design answered:
Hej Maja, du kan også bare strikke frem til mærket under ærmet, så du starter omgangen derfra :)
05.10.2023 - 10:10
![]() Sandra wrote:
Sandra wrote:
Tere! Kahjuks esineb mustris tõsine viga. Nimelt on kirjas, et kaeluse soonikut tuleb kududa 1 parempidine keerdsilmus, 1 pahempidine silmus. Teiste keelte mustrites on soonikuks 1 parempidine keerdsilmus, 2 pahempidist silmust. Mõtlesingi, et miks silmuste arv ei klapi :)
27.08.2023 - 21:12
![]() Sabine wrote:
Sabine wrote:
Mit welcher der beiden Nadelstärken sollte die Maschenprobe erreicht werden - mit der dünneren oder der dickeren?
28.11.2022 - 18:27DROPS Design answered:
Liebe Sabine, die Maschenprobe soll mit der dickeren Nadelstärken erreicht werden. Viel Spaß beim stricken!
29.11.2022 - 09:44
![]() Gabriela Tóthová wrote:
Gabriela Tóthová wrote:
Hello, very nice model, is there going to be a translation of this manual into Czech in the near future? Thank you, kind regards. Gabi
09.11.2022 - 14:23DROPS Design answered:
Dear Gabi, thank you - we will add this pattern in CZ ASAP, so stay in touch :-) Have a nice day, Hana
10.11.2022 - 11:35
|
|||||||||||||||||||
Chill Chaser Sweater#chillchasersweater |
|||||||||||||||||||
 |
 |
||||||||||||||||||
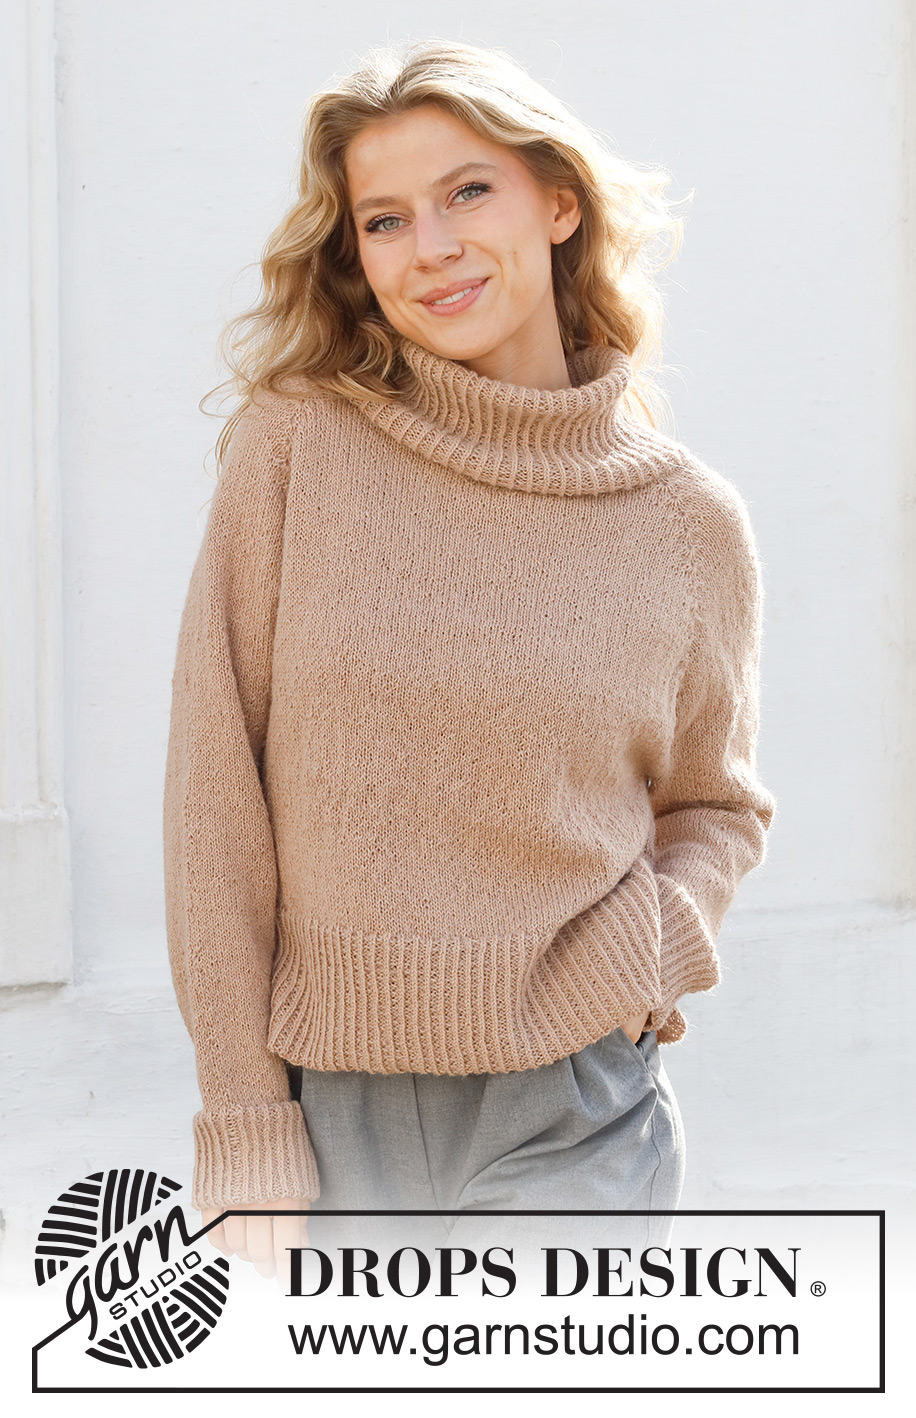
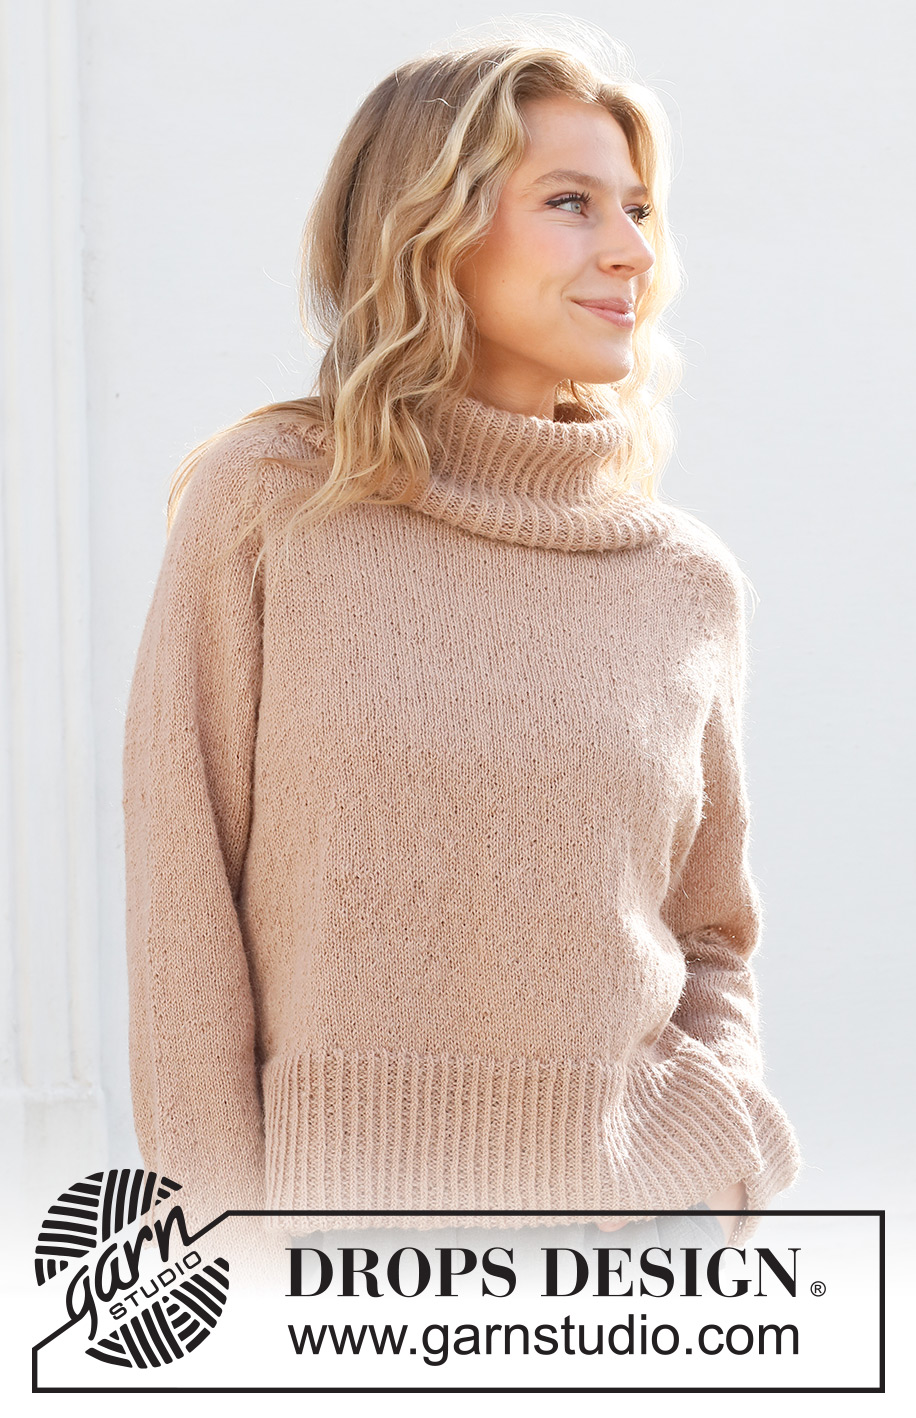
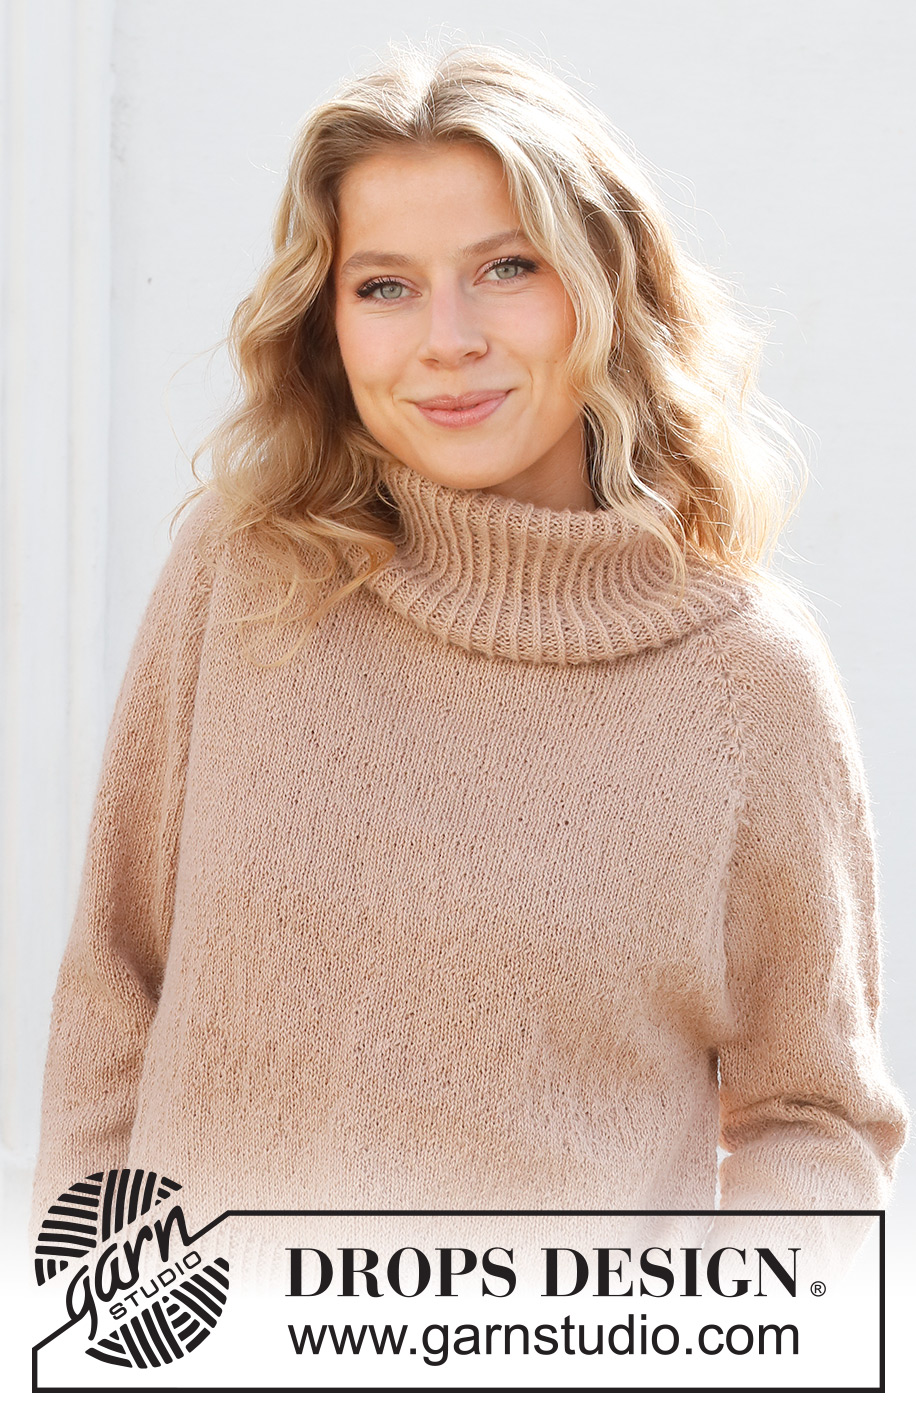
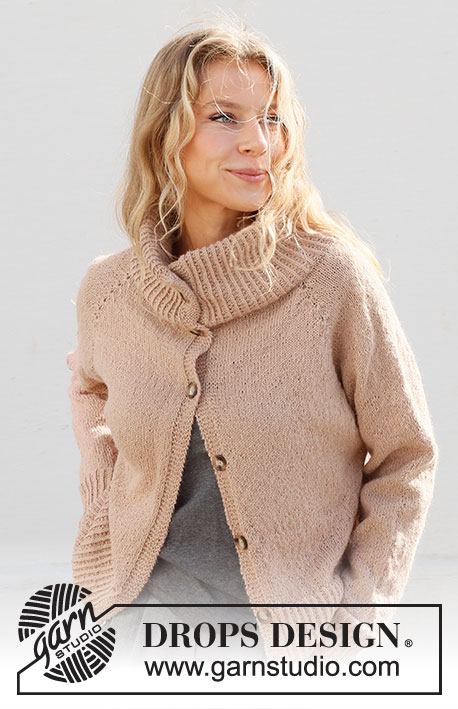
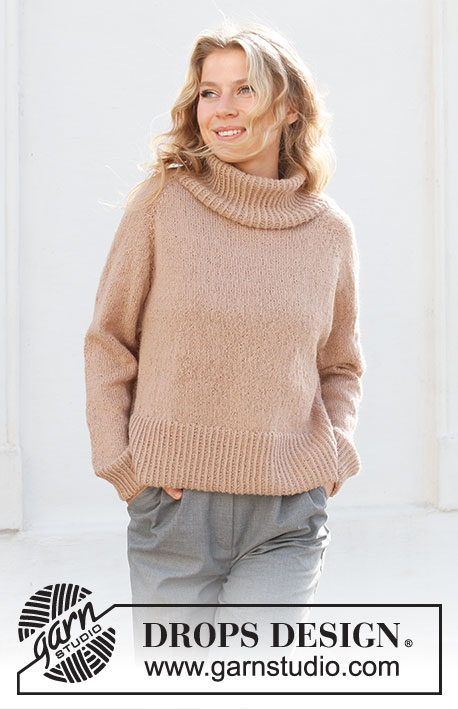
Knitted sweater in DROPS Alpaca or DROPS BabyMerino. The piece is worked top down with double neck, raglan and split in the sides. Sizes S - XXXL.
DROPS 227-35 |
|||||||||||||||||||
|
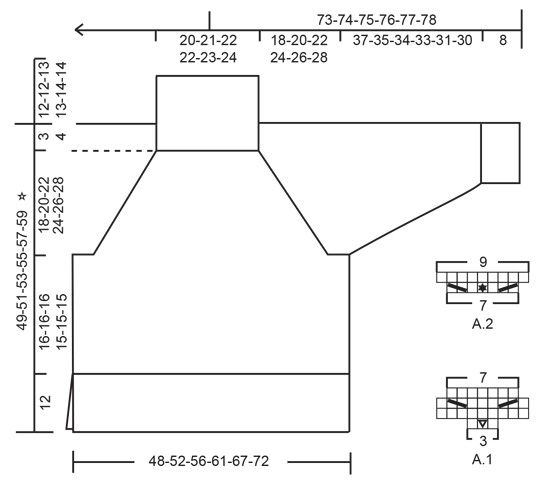
------------------------------------------------------- EXPLANATIONS FOR THE PATTERN: ------------------------------------------------------- RIDGE/GARTER STITCH (worked back and forth): Knit all rows. 1 ridge = knit 2 rows. DECREASE/INCREASE TIP (evenly spaced): To work out how to decrease/increase evenly, count the total number of stitches on needle (e.g. 147 stitches), and divide by number of decreases/increases to be made (e.g. 23) = 6.4. In this example, decrease by knitting together alternately each 5th and 6th stitch and each 6th and 7th stitch. When increasing, make 1 yarn over after alternately each 6th and 7th stitch. On the next round work the yarn overs twisted to avoid holes. PATTERN: See diagrams A.1 and A.2. RAGLAN: Increase to raglan by working A.1 over each marker-stitch as described in the text. When A.1 has been worked 1 time in height at all 4 markers, you have increased 16 stitches. Then work A.2 over each marker-stitch as described in the text. When A.2 has been worked 1 time in height at all 4 markers, you have increased 8 stitches. DECREASE TIP (for sleeves): Decrease 1 stitch on either side of the marker thread as follows: Work until there are 3 stitches left before the marker thread, knit 2 together, knit 2 (marker thread sits between these 2 stitches), slip 1 stitch as if to knit, knit 1 and pass the slipped stitch over the knitted stitch (2 stitches decreased). BINDING-OFF TIP: To avoid the bind-off edge being tight you can bind off with a larger size needle. If the edge is still tight, make 1 yarn over after approx. each 6th stitch at the same time as binding off; the yarn overs are bind off as normal stitches. ------------------------------------------------------- START THE PIECE HERE: ------------------------------------------------------- SWEATER – SHORT OVERVIEW OF THE PIECE: The neck and yoke are worked in the round from mid-back, top down. The yoke is divided for the body and sleeves. The body is continued in the round with circular needle until the rib. Then the piece is divided and the front and back pieces are finished separately, back and forth. The sleeves are worked in the round with short circular needle/double pointed needles, top down. DOUBLE NECK: Loosely cast on 147-153-159-171-177-183 stitches with short circular needle size 3 MM = US 2.5 and DROPS Alpaca or DROPS Baby Merino. Knit 1 round. Change to circular needle size 2.5 MM = US 1.5 and work rib in the round (knit 1 twisted, purl 2) for 25-25-27-27-29-29 cm = 9¾"-9¾"-10⅝"-10⅝"-11⅜"-11⅜". Knit 1 round where you decrease 23-25-27-27-29-31 stitches evenly spaced – read DECREASE/INCREASE TIP = 124-128-132-144-148-152 stitches. The neck is later folded double to give a neck height of 12-12-13-13-14-14 cm = 4¾"-4¾"-5⅛"-5⅛"-5½"-5½". Insert 1 marker in the middle of the round; the yoke is measured from this marker! YOKE: Change to circular needle size 3 MM = US 2.5. Insert 4 new markers, with a different color from the marker on the neck. These markers are used when increasing to raglan. Count 22-23-24-25-26-27 stitches (= ½ back piece), insert 1 marker in the next stitch, count 16-16-16-20-20-20 stitches (= sleeve), insert 1 marker in the next stitch, count 44-46-48-50-52-54 stitches (= front piece), insert 1 marker in the next stitch, count 16-16-16-20-20-20 stitches (= sleeve), insert 1 marker in the next stitch. There are 22-23-24-25-26-27 stitches left on the round after the last marker (= ½ back piece). Work stockinette stitch in the round. REMEMBER THE KNITTING GAUGE! AT THE SAME TIME on the 2nd round begin to increase to RAGLAN – read description above. Increase at each marker by working A.1 over each marker-stitch (middle stitch in A.1 matches the marker-stitch – begin A.1 one stitch before the stitch with the marker). Increase by repeating A.1 a total of 13-14-16-18-20-21 times in height = 332-352-388-432-468-488 stitches. On the next round increase at each marker by working A.2 over each marker-stitch (middle stitch in A.2 matches the marker-stitch –begin A.2 three stitches before the stitch with the marker). Increase by repeating A.2 a total of 2-3-3-2-2-3 times in height = 348-376-412-448-484-512 stitches. On the next round increase 4-4-0-4-0-0 stitches (increase 1 stitch by knitting the front and back loop of the stitch with a marker) = 352-380-412-452-484-512 stitches. Continue with stockinette stitch, but without further increases, until the piece measures 18-20-22-24-26-28 cm = 7"-8"-8¾"-9½"-10¼"-11" from the marker mid-front. On the next round divide for the body and sleeves as follows: Work 54-58-62-68-74-80 stitches in stockinette stitch (= ½ back piece), place the next 68-74-82-90-94-96 stitches on 1 thread for the sleeve, cast on 8-8-10-10-12-12 stitches (= in side under sleeve), work 108-116-124-136-148-160 stitches in stockinette stitch (= front piece), place the next 68-74-82-90-94-96 stitches on 1 thread for the sleeve, cast on 8-8-10-10-12-12 stitches (= in side under sleeve), work 54-58-62-68-74-80 stitches in stockinette stitch. Cut the strand. The body and sleeves are finished separately. THE PIECE IS NOW MEASURED FROM HERE! BODY: = 232-248-268-292-320-344 stitches. Insert 1 marker thread in each side of the body – in the middle of the 8-8-10-10-12-12 stitches cast on under each sleeve. There are 116-124-134-146-160-172 stitches between the marker threads. Allow the threads to follow your work onwards – they are used when dividing for the split later. Start the round at one of the marker threads and continue with stockinette stitch in the round until the piece measures 16-16-16-15-15-15 cm = 6¼"-6¼"-6¼"-6"-6"-6" from the division. There is approx. 12 cm = 4¾" left to finished length – NOTE: The sweater will be approx. 3 cm = 1⅛" longer than these measurements when worn – see measurements chart. Try the sweater on and work to desired length before working the split in each side. Now divide the piece at each marker thread and finish the front and back pieces separately. FRONT PIECE: = 116-124-134-146-160-172 stitches. Knit 1 row from the right side where you increase 29-30-32-35-39-42 stitches evenly spaced – remember DECREASE/INCREASE TIP = 145-154-166-181-199-214 stitches. Change to circular needle size 2.5 MM = US 1.5 and work rib as follows: ROW 1 (wrong side): 3 edge stitches in garter stitch, * purl 1 twisted, knit 2 *, work from *-* until there are 4 stitches left, purl 1 twisted and finish with 3 edge stitches in garter stitch. ROW 2 (right side): 3 edge stitches in garter stitch, * knit 1 twisted, purl 2 *, work from *-* until there are 4 stitches left, knit 1 twisted and finish with 3 edge stitches in garter stitch. Repeat rows 1 and 2 until the rib measures 12 cm = 4¾". Bind off with knit from the right side – read BINDING-OFF TIP! The sweater measures approx. 49-51-53-55-57-59 cm = 19¼"-20"-21"-21⅝"-22½"-23¼" from the shoulder down – measured flat. BACK PIECE: = 116-124-134-146-160-172 stitches. Knit 1 row from the right side where you increase 29-30-32-35-39-42 stitches evenly spaced = 145-154-166-181-199-214 Change to circular needle size 2.5 MM = US 1.5 and work rib as follows: ROW 1 (wrong side): 3 edge stitches in garter stitch, * purl 1 twisted, knit 2 *, work from *-* until there are 4 stitches left, purl 1 twisted and finish with 3 edge stitches in garter stitch. ROW 2 (right side): 3 edge stitches in garter stitch, * knit 1 twisted, purl 2 *, work from *-* until there are 4 stitches left, knit 1 twisted and finish with 3 edge stitches in garter stitch. Repeat rows 1 and 2 until the rib measures 12 cm = 4¾". Bind off with knit from the right side – remember BINDING-OFF TIP! The sweater measures approx. 49-51-53-55-57-59 cm = 19¼"-20"-21"-21⅝"-22½"-23¼" from the shoulder down – measured flat. SLEEVES: Place the 68-74-82-90-94-96 stitches from the thread on the one side of the piece on short circular needle size 3 MM = US 2.5 and knit up 1 stitch in each of the 8-8-10-10-12-12 stitches cast on under the sleeve = 76-82-92-100-106-108 stitches. Insert 1 marker thread in the middle of the 8-8-10-10-12-12 stitches under the sleeve. Allow the thread to follow your work onwards – it is used when decreasing under the sleeve. Start at the marker thread and work stockinette stitch in the round. When the piece measures 3-3-3-2-2-2 cm = 1⅛"-1⅛"-1⅛"-¾"-¾"-¾" from the division, decrease 2 stitches under the sleeve – read DECREASE TIP. Decrease like this every 4-3-2-1½-1½-1½ cm = 1½"-1⅛"-¾"-½"-½"-½" a total of 9-11-15-18-19-19 times = 58-60-62-64-68-70 stitches. Continue working until the sleeve measures 37-35-34-33-31-30 cm = 14½"-13¾"-13⅜"-13"-12¼"-11¾" from the division (shorter measurements in larger sizes due to wider neck and longer yoke). There is approx. 8 cm = 3⅛" left to finished length; try the sweater on and work to desired length. Knit 1 round where you increase 14-12-13-14-13-14 stitches evenly spaced – remember DECREASE/INCREASE TIP = 72-72-75-78-81-84 stitches. Change to double pointed needles size 2.5 MM = US 1.5 and work rib (knit 1 twisted, purl 2) for 8 cm = 3⅛". Bind off with knit. The sleeve measures approx. 45-43-42-41-39-38 cm = 17¾"-17"-16½"-16⅛"-15¼"-15". Work the other sleeve in the same way. ASSEMBLY: Fold the neck double to the inside and sew down. To avoid the seam being tight, it is important the seam is elastic. |
|||||||||||||||||||
Diagram explanations |
|||||||||||||||||||
|
|||||||||||||||||||
 |
|||||||||||||||||||
Have you finished this pattern?Tag your pictures with #dropspattern #chillchasersweater or submit them to the #dropsfan gallery. Do you need help with this pattern?You'll find 35 tutorial videos, a Comments/Questions area and more by visiting the pattern on garnstudio.com. © 1982-2026 DROPS Design A/S. We reserve all rights. This document, including all its sub-sections, has copyrights. Read more about what you can do with our patterns at the bottom of each pattern on our site. |
|||||||||||||||||||


With over 40 years in knitting and crochet design, DROPS Design offers one of the most extensive collections of free patterns on the internet - translated to 17 languages. As of today we count 324 catalogs and 12290 patterns - 12280 of which are translated into English (US/in).
We work hard to bring you the best knitting and crochet have to offer, inspiration and advice as well as great quality yarns at incredible prices! Would you like to use our patterns for other than personal use? You can read what you are allowed to do in the Copyright text at the bottom of all our patterns. Happy crafting!
Post a comment to pattern DROPS 227-35
We would love to hear what you have to say about this pattern!
If you want to leave a question, please make sure you select the correct category in the form below, to speed up the answering process. Required fields are marked *.