
Popular categories
Looking for a yarn?


|
|||||||||||||||||||
Chill Chaser |
|||||||||||||||||||
 |
 |
||||||||||||||||||
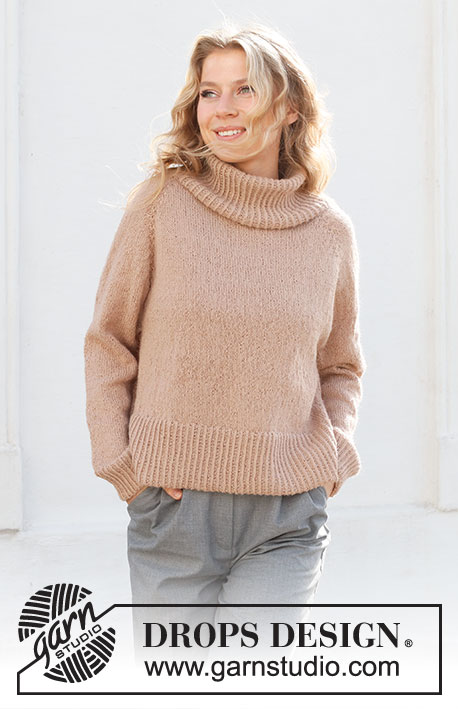
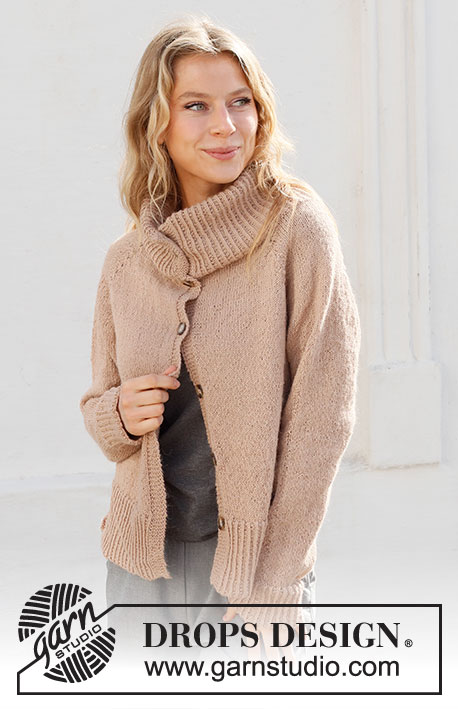
Knitted jacket in DROPS Alpaca or DROPS BabyMerino. The piece is worked top down with double neck, raglan and split in sides. Sizes S - XXXL.
DROPS 227-36 |
|||||||||||||||||||
|
------------------------------------------------------- EXPLANATIONS FOR THE PATTERN: ------------------------------------------------------- RIDGE/GARTER STITCH (worked back and forth): Knit all rows. 1 ridge = knit 2 rows. DECREASE/INCREASE TIP (evenly spaced): To work out how to decrease/increase evenly, count the total number of stitches on needle (e.g. 160 stitches), minus the bands (e.g. 12 stitches) and divide the remaining stitches by the number of decreases/increases to be made (e.g. 24) = 6.2. In this example, decrease by knitting together approx. each 5th and 6th stitch. When increasing, make 1 yarn over after approx. each 6th stitch. On the next row work the yarn overs twisted to avoid holes. Do not decrease/increase over the bands. RAGLAN: All increases are worked from the right side! Increase to raglan by working A.1 over each marker-stitch as explained in the text. When A.1 has been worked 1 time in height you have increased 16 stitches. Repeat A.1 in height as explained in the text. Then work A.2 over each marker-stitch. When A.2 has been worked 1 time in height you have increased 8 stitches. Repeat A.2 in height as explained in the text. DECREASE TIP (for sleeves): Decrease 1 stitch on either side of the marker thread as follows: Work until there are 3 stitches left before the marker thread, knit 2 together, knit 2 (marker thread sits between these 2 stitches), slip 1 stitch as if to knit, knit 1 and pass the slipped stitch over the knitted stitch (2 stitches decreased). BUTTONHOLES: Work buttonholes on the right band (when the garment is worn). Work from the right side when there are 4 stitches left on the row as follows: Make 1 yarn over, knit 2 together and knit 2. On the next row (wrong side), knit the yarn over to leave a hole. The first buttonhole is worked when the rib on the neck measures 6-6-6-6-7-7 cm = 2⅜"-2⅜"-2⅜"-2⅜"-2¾"-2¾". The next buttonhole is worked when the neck measures 19-19-21-21-22-22 cm = 7½"-7½"-8¼"-8¼"-8¾"-8¾" (these 2 buttonholes will be on top of each other when the neck is folded double). The next buttonhole is worked when the neck is finished and the remaining 4-4-4-5-5-5 buttonholes with approx. 9-9½-10-8-8½-9 cm = 3½"-3 5/9"-4"-3⅛"-3¼"-3½" between each one. BINDING-OFF TIP: To avoid the bind-off edge being tight you can bind off with a larger size needle. If the edge is still tight, make 1 yarn over after approx. each 6th stitch at the same time as binding off; the yarn overs are bind off as normal stitches. ------------------------------------------------------- START THE PIECE HERE: ------------------------------------------------------- JACKET – SHORT OVERVIEW OF THE PIECE: The neck and yoke are worked back and forth with circular needle, top down. The yoke is divided for the body and sleeves and the body continued back and forth, with circular needle as far as the bottom rib, where it is divided for the splits and the front and back pieces are finished separately. The sleeves are worked in the round with short circular needle/double pointed needles, top down. DOUBLE NECK: Cast on, a little loosely, 160-166-172-184-190-196 stitches (including 6 band stitches on each side towards mid-front) with circular needle size 3 MM = US 2.5 and DROPS Alpaca or DROPS Baby Merino. Change to circular needle size 2.5 MM = US 1.5 and purl 1 row (= wrong side). Then work rib as follows: ROW 1 (= right side): 6 band stitches in GARTER STITCH – read description above, * knit 1 twisted, purl 2 *, work from *-* until there are 7 stitches left, knit 1 twisted and 6 band stitches in garter stitch. ROW 2 (= wrong side): 6 band stitches in garter stitch, * purl 1 twisted, knit 2 *, work from *-* until there are 7 stitches left, purl 1 twisted and 6 band stitches in garter stitch. Repeat rows 1 and 2. Remember the BUTTONHOLE on the right band – read description above. When the rib measures 25-25-27-27-29-29 cm = 9¾"-9¾"-10⅝"-10⅝"-11⅜"-11⅜", knit 1 row from the right side where you decrease 24-26-28-28-30-32 stitches evenly spaced – read DECREASE/INCREASE TIP = 136-140-144-156-160-164 stitches. Purl 1 row from the wrong side (bands in garter stitch). The neck will be folded double later to give a height of approx. 12-12-13-13-14-14 cm = 4¾"-4¾"-5⅛"-5⅛"-5½"-5½". Insert 1 marker after the band at the beginning of the row; the yoke is measured from this marker! YOKE: Change to circular needle size 3 MM = US 2.5. Insert 4 markers of a different color to the marker on the neck; they will be used when increasing to raglan. Count 28-29-30-31-32-33 stitches (= front piece), insert 1 marker in the next stitch, count 16-16-16-20-20-20 stitches (= sleeve), insert 1 marker in the next stitch, count 44-46-48-50-52-54 stitches (= back piece), insert 1 marker in the next stitch, count 16-16-16-20-20-20 stitches (= sleeve), insert 1 marker in the next stitch. There are 28-29-30-31-32-33 stitches left after the last marker (= front piece). Work stockinette stitch back and forth with 6 band stitches on each side. REMEMBER THE KNITTING GAUGE! AT THE SAME TIME on the first row from the right side begin to increase for RAGLAN – read description above. Increase by working A.1 over each marker-stitch (mid-stitch in A.1 should match the marker-stitch – start A.1 one stitch before the marker-stitch). Increase like this by repeating A.1 a total of 13-14-16-18-20-21 times in height = 344-364-400-444-480-500 stitches. On the next row from the right side increase by working A.2 over each marker-stitch (mid-stitch in A.2 should match the marker-stitch – start A.2 three stitches before the marker-stitch). Increase like this by repeating A.2 a total of 2-3-3-2-2-3 times in height = 360-388-424-460-496-524 stitches. On the next row from the right side increase 4-4-0-4-0-0 stitches – the increases are divided so you increase 1 stitch by each raglan-line in the sizes which have increases = 364-392-424-464-496-524 stitches. Continue with stockinette stitch without further increases and with 6 band stitches in garter stitch on each side until the piece measures 18-20-22-24-26-28 cm = 7"-8"-8¾"-9½"-10¼"-11" from the marker on the neck. On the next row divide for the body and sleeves as follows: Work the first 60-64-68-74-80-86 stitches (= front piece), place the next 68-74-82-90-94-96 stitches on 1 thread for the sleeve, cast on 8-8-10-10-12-12 stitches (= in side under sleeve), work 108-116-124-136-148-160 stitches (= back piece), place the next 68-74-82-90-94-96 stitches on 1 thread for the sleeve, cast on 8-8-10-10-12-12 stitches (= in side under sleeve), work the last 60-64-68-74-80-86 stitches. The body and sleeves are finished separately. THE PIECE IS NOW MEASURED FROM HERE! BODY: = 244-260-280-304-332-364 stitches. Insert 1 marker 64-68-73-79-86-92 stitches in form each side = 116-124-134-146-160-172 stitches between the markers on the back piece. Allow the markers to follow your work onwards; they are used when dividing for the split in each side. Work stockinette stitch back and forth with 6 band stitches in garter stitch on each side until the piece measures 18-18-18-17-17-17 cm = 7"-7"-7"-6¾"-6¾"-6¾" from the division – finish after a row from the wrong side. There is approx. 12 cm = 4¾" left to finished length – NOTE: The jacket will be approx. 3 cm = 1⅛" longer than this when worn – see sketch. Try the jacket on and work to desired length. Now divide the piece at each marker and the front and back pieces are finished separately to give a split in each side. LEFT FRONT PIECE (when worn): = 64-68-73-79-86-92 stitches. You now increase stitches so the rib is not tight. Work 1 row from the right side where you increase 15-17-15-18-20-23 stitches evenly spaced – remember DECREASE/INCREASE TIP = 79-85-88-97-106-115 stitches. Change to circular needle size 2.5 MM = US 1.5 and work rib as follows from the side: ROW 1 (wrong side): 3 edge stitches in garter stitch, * purl 1 twisted, knit 2 *, work from *-* until there are 7 stitches left, purl 1 twisted and 6 band stitches in garter stitch. ROW 2 (right side): 6 band stitches in garter stitch, * knit 1 twisted, purl 2 *, work from *-* until there are 4 stitches left, knit 1 twisted and 3 edge stitches in garter stitch. Repeat rows 1 and 2 until the rib measures 12 cm = 4¾". Bind off with knit from the right side – read BINDING-OFF TIP! The jacket measures approx. 51-53-55-57-59-61 cm = 20"-21"-21⅝"-22½"-23¼"-24" from the shoulder down, when measured flat. RIGHT FRONT PIECE: = 64-68-73-79-86-92 stitches. Work 1 row from the right side where you increase 15-17-15-18-20-23 stitches evenly spaced = 79-85-88-97-106-115 stitches. Change to circular needle size 2.5 MM = US 1.5 and work rib as follows from mid-front: ROW 1 (wrong side): 6 band stitches in garter stitch, * purl 1 twisted, knit 2 *, work from *-* until there are 4 stitches left, purl 1 twisted and 3 edge stitches in garter stitch. ROW 2 (right side): 3 edge stitches in garter stitch, * knit 1 twisted, purl 2 *, work from *-* until there are 7 stitches left, knit 1 twisted and 6 band stitches in garter stitch. Repeat rows 1 and 2 until the rib measures 12 cm = 4¾". Bind off with knit from the right side – remember BINDING-OFF TIP! BACK PIECE: = 116-124-134-146-160-172 stitches. Work 1 row from the right side where you increase 29-30-32-35-39-42 stitches evenly spaced = 145-154-166-181-199-214 stitches. Change to circular needle size 2.5 MM = US 1.5 and work rib as follows: ROW 1 (wrong side): 3 edge stitches in garter stitch, * purl 1 twisted, knit 2 *, work from *-* until there are 4 stitches left, purl 1 twisted and 3 edge stitches in garter stitch. ROW 2 (right side): 3 edge stitches in garter stitch, * knit 1 twisted, purl 2 *, work from *-* until there are 4 stitches left, knit 1 twisted and 3 edge stitches in garter stitch. Repeat rows 1 and 2 until the rib measures 12 cm = 4¾". Bind off with knit from the right side – remember BINDING-OFF TIP! SLEEVES: Place the 68-74-82-90-94-96 stitches from the thread on the one side of the piece on short circular needle size 3 MM = US 2.5 and knit up 1 stitch in each of the 8-8-10-10-12-12 stitches cast on under the sleeve = 76-82-92-100-106-108 stitches. Insert a marker thread in the middle of the 8-8-10-10-12-12 stitches under the sleeve. Allow the thread to follow your work onwards; it will be used when decreasing under the sleeve. Start the round at the marker thread and work stockinette stitch in the round. When the sleeve measures 3-3-3-2-2-2 cm = 1⅛"-1⅛"-1⅛"-¾"-¾"-¾" from the division, decrease 2 stitches under the sleeve – read DECREASE TIP. Decrease like this every 4-3-2-1½-1½-1½ cm = 1½"-1⅛"-¾"-½"-½"-½" a total of 9-11-15-18-19-19 times = 58-60-62-64-68-70 stitches. Continue working until the sleeve measures 37-35-34-33-31-30 cm = 14½"-13¾"-13⅜"-13"-12¼"-11¾" from the division (shorter measurements in larger sizes due to wider neck and longer yoke). There is approx. 8 cm = 3⅛" left to finished length; try the jacket on and work to desired length. Knit 1 round where you increase 14-12-13-14-13-14 stitches evenly spaced = 72-72-75-78-81-84 stitches. Change to double pointed needles size 2.5 MM = US 1.5 and work rib (knit 1 twisted, purl 1) for 8 cm = 3⅛". Bind off with knit – remember BINDING-OFF TIP. The sleeve measures approx. 45-43-42-42-40-39 cm = 17¾"-17"-16½"-16½"-15¾"-15¼" from the division. Work the other sleeve in the same way. ASSEMBLY: Fold the neck double to the inside, making sure the first 2 buttonholes lie on top of each other. Sew down. To avoid the neck being tight and rolling outwards, it is important the seam is elastic. Sew the openings at both ends of the neck with small stitches. Sew the buttons onto the left band. |
|||||||||||||||||||
Diagram explanations |
|||||||||||||||||||
|
|||||||||||||||||||

|
|||||||||||||||||||
|
Have you made this or any other of our designs? Tag your pictures in social media with #dropsdesign so we can see them! Do you need help with this pattern?You'll find tutorial videos, a Comments/Questions area and more by visiting the pattern on garnstudio.com. © 1982-2024 DROPS Design A/S. We reserve all rights. This document, including all its sub-sections, has copyrights. Read more about what you can do with our patterns at the bottom of each pattern on our site. |
|||||||||||||||||||


With over 40 years in knitting and crochet design, DROPS Design offers one of the most extensive collections of free patterns on the internet - translated to 17 languages. As of today we count 304 catalogs and 11422 patterns - 11417 of which are translated into English (US/in).
We work hard to bring you the best knitting and crochet have to offer, inspiration and advice as well as great quality yarns at incredible prices! Would you like to use our patterns for other than personal use? You can read what you are allowed to do in the Copyright text at the bottom of all our patterns. Happy crafting!
Comments / Questions (16)
Dodawać przerabiając schemat A.1 ponad każdym z oczek z markerem (oczko środkowe schematu A.1 powinno być to oczko z markerem – zacząć schemat A.1 jedno oczko przed oczkiem z markerem). Dodawać na przodzie i tyle? A co z tym jednym oczkiem, kiedy i gdzie ma być przerobione? Nie rozumiem za bardzo.
16.04.2024 - 08:20DROPS Design answered:
Witaj Edyto, schemat A.1 zaczyna się 1 oczko przed oczkiem z markerem, przerabiasz 1 oczko na prawo, a następnie przerabiasz oczko z markerem jak jest to opisane w legendzie do schematu (patrz odwrócony trójkąt), dalej przerabiasz 1 oczko prawe (zostało dodanych 6 oczek) w tym miejscu. Powtarzasz to samo przy każdym oczku z markerem. Pozdrawiamy!
16.04.2024 - 09:18Hejsa. Er det meningen at den skal stå åbent? Hvis man knapper den hele vejen ned laver den 8 taller. Den passer fint ellers
24.02.2024 - 15:39DROPS Design answered:
Hej Anja, ja hvis du vælge den størrelse med de mål som passer dig, så skal den absolut kunne knappes hele vejen ned :)
01.03.2024 - 14:14Bonjour, je ne comprends pas la différence de 4 mailles entre la fin du col doublé soit taille M = 140 m, et la répartition pour l'empiècement : 29 + 16 + 46 + 16 + 29 = 136 m. Merci pour votre réponse
02.02.2024 - 16:03DROPS Design answered:
Bonjour Mme Gueneau, les 4 mailles qui vous manquent sont celles dans lesquelles on a placé un marqueur, ce sont les 4 mailles des raglans. Dans ce modèle, les marqueurs sont placés dans la maille du raglan et pas entre les mailles. Bon tricot!
05.02.2024 - 07:48Je voudrais faire ce gilet en taille S mais avec les manches plus étroites. Comment adapter le raglan? De façon générale, je trouve vos modèles jolis mais souvent trop larges au niveau des manches lorsqu'on est petite et menue. Merci pour votre aide
10.11.2023 - 13:20DROPS Design answered:
Bonjour Mme Lamberg, nous ne sommes malheureusement pas en mesure de pouvoir adapter chacun de nos modèles à chaque demande, essayez d'adapter aux mesures souhaitées en fonction d'un modèle de tension analogue avec les mesures qui vous conviennent. Votre magasin devrait pouvoir vous aider, même par mail ou téléphone. Merci pour votre compréhension. Bon tricot!
10.11.2023 - 14:11Ich hab ein Problem mit den Raglanzunahmen, die Passe wird zu lang. Sind die Diagramme in Hin und Rückreihen angegeben? Also besteht a1 aus 8 Reihen oder aus 4 Reihen?
05.11.2023 - 22:24DROPS Design answered:
Liebe Katrin, die Diagramme zeigen alle Reihen, die Hin- sowie die Rück-Reihen, d A.1 ist 4 Reihen und A.2 2 Reihen. Viel Spaß beim stricken!
06.11.2023 - 09:13Bonjour, je souhaite tricoter ce modèle, mais avec une laine qui doit se tricoter avec des aiguilles n4. Comment dois je procéder ?
23.07.2023 - 18:51DROPS Design answered:
Bonjour, Vérifiez l'ÉCHANTILLON. Si l'ÉCHANTILLONcorrespond, vous pouvez utiliser ces instructions. Sinon, vous devrez recalculer le Modèle ; vous pouvez voir comment faire ici: https://www.garnstudio.com/lesson.php?id=25&cid=8. Bon tricot !
23.07.2023 - 20:34Wollte die Jacke in Baby Merino stricken, aber ich bin so weit weg von der Maschenprobe. Selbst mit Nadelstärke Nr. 4 hab ich 26 Maschen für 10 cm. Oder muss der Faden doppelt genommen werden?
12.07.2023 - 18:00DROPS Design answered:
Liebe Katrin. Diese Jacke wird nur mit 1 Faden gearbeitet. Versuchen Sie, die größere Größe zu verwenden, um die richtigen Maße zu erhalten. Viel Spass beim stricken!
20.07.2023 - 11:11Hallo! Beim Passe habe ich Nach der Abnahme 140 M wie in der Anleitung vorgegeben, doch nach dem Abzählen der Einteilung sind 5 Maschen über. Wie löse ich das am besten?
24.03.2023 - 07:41DROPS Design answered:
Liebe Frau Wehnsen, so werden die 140 M am Anfang der Passe verteilt: 29 M (linkes Vorderteil), 1 M mit Mark, 16 M (Ärmel), 1 M mit Mark, 46 M (Rückenteil), 1 M mit Mark, 16 M (Ärmel), 1 M mit Mark, 29 M (re. Vorderteil) = 29+1+16+1+46+1+16+1+29=140 M. Viel Spaß beim stricken!
24.03.2023 - 08:38Hej, har jag uppfattat ökningarna vid raglan rätt: Jag gör A1 16 ggr sedan efter dessa 16 ökningar A2. 3 ggr ?
15.03.2023 - 13:34DROPS Design answered:
Hej Eva. Ja i storlek L så är ökningarna till raglan så. Mvh DROPS Design
16.03.2023 - 11:17Hej, är det rätt att det blir så stora hål där jag stickar raglan (ökning med 7 m i en maska)? Jag stickar med garnet Baby Merino.
13.03.2023 - 17:00DROPS Design answered:
Hej Eva, ja det vil blive et større hul, se det sidste billede, så kan du se hvordan det ser ud i jakken vi har lavet :)
15.03.2023 - 10:23