
Popular categories
Looking for a yarn?


Comments / Questions (23)
![]() Frau Vogel wrote:
Frau Vogel wrote:
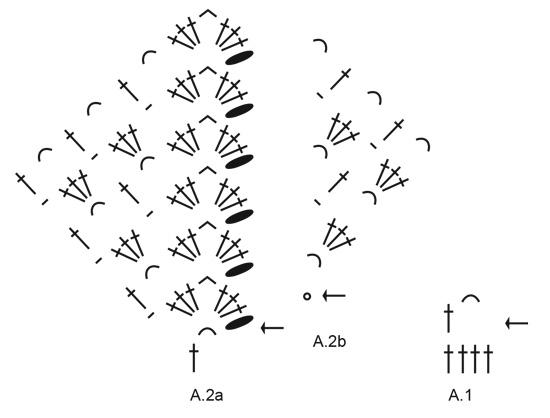
Hallo, ich habe bitte Fragen zur Halsblende bzw. Passe (Grösse S ): ich häkle 22x A.1 und habe somit am Ende der Runde 22 Bögen. Nun die erste Runde der Passe (Pfeilrunde) wie im Text beschrieben: 1x A2a,6x A3,1x A4,3x A3,1x A4,6x A3 -- Nun käme A2b. lt. Symboltext soll ich einfach A2a bis zum Ende stricken. Das passt aber nicht zum Muster der bereits gehäkelten Runde? ich habe noch 3 Bögen bis zum Rundenende übrig. Was mache ich falsch? Danke für Eure Hilfe.
20.03.2026 - 07:56DROPS Design answered:
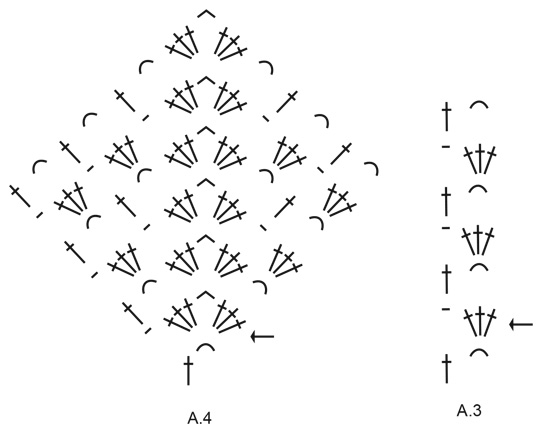
Liebe Frau Vogel, stimmt, bei der 1.Runde häkeln Sie nur A.2a, so am Ende der 1. Runde häkeln Sie A.2b nicht, ab 2. Runde beginnen Sie mit A.2a und enden Sie mit A.2b. Die 22 Luftmaschenbogen häkeln sie so: A.2a (= 1 Lmb), A.3 (= 6 Lmb), A.4 (1 Lmb), A.3 (3 Lmb), A.4 (1 Lmb), A.3 (6Lmb), A.4 (1 Lmb), A.3 (3 Lmb) = 1+6+1+3+1+6+1+3=22 Luftmaschenbogen bei der 1. Runde. Viel Spaß beim Häkeln!
20.03.2026 - 15:14
![]() Solveig wrote:
Solveig wrote:
Diagram A.2a viser tre luftmasker og herefter tre stangmasker = fire stangmasker - og det er jo kun i starten… resten af raglanudtagene har tre stangmasker. Har jeg forstået det forkert. Jeg mener, at tre luftmasker ERSTATTER en stangmaske - men sådan læser jeg ikke diagrammet. Jeg er på første omgang af bærestykket.
06.06.2025 - 22:10DROPS Design answered:
Hej Solveig, jo du kommer op på næste række med 3 luftmasker så længe du tager ud til raglan. Når du kommer ned til selve ryg og forstykke hækler du 3 lm for at komme op på næste række og her gælder HÆKLEINFORMATION :)
12.06.2025 - 08:14
![]() Sylvie GOUEY wrote:
Sylvie GOUEY wrote:
Bonjour, Je réalise ce modèle, j'ai fait le premier rang de l'empiècement en terminant le rang par une maille coulée dans la 3ème maille en l'air du tour précédent et là je suis bloquée je ne sais pas comment commencer le 2ème rang ? Merci pour votre réponse. Cordialement.
04.08.2024 - 11:29DROPS Design answered:
Bonjour Mme Gouey, vous avez donc crocheté le diagramme A.1 tout le tour, crochetez maintenant l'empiècement en suivant les diagrammes indiqué: A.2a, puis A.3, A.4, A.3, A.4, A.4,A4, A.4 en terminant par A.2b; A.2a et A.2b sont pour l'augmentation du raglan au début/fin du tour; A.4 pour l'augmentation du raglan à la transition manches/dos&devant et A.3 à crocheter entre les augmentations des raglans. Bon crochet!
05.08.2024 - 07:46
![]() Gail wrote:
Gail wrote:
Thanks for your previous reply. I should have been more specific. I was referring to the second row of A2a There are 3 treble stitches before the chain space. I slip stitch to join the round chain 3 to start the round, but then how do i get to the chain space to start row 3. Also when doing chart's A2a and A4 do all those stitches in the chart go into that one 3 chain space between the 2 sets of treble crochets every row? That a lot of stitches by the time you get to row 6 into one space.
21.07.2024 - 22:23DROPS Design answered:
Dear Gail, work it as the first round, that is, after the last treble stitch before the raglan line work directly onto the raglan chain space and work the chart. You don't need to work extra stitches. A.2 and A.4 show the raglan lines. The sides of the "fan-line" in both A.4 and A.2 are used to work repeats of A.3, which is the pattern between raglan lines. Part of these repeats is represented in the A.4 and A.2 charts, to contextualize them. The actual raglan-line is the middle fan, which is always the same: 3 treble stitches, 3 chain stitches, 3 treble stitches. Happy crochetting!
27.07.2024 - 19:29
![]() Gail wrote:
Gail wrote:
I'm trying to make this top but having a problem understanding how to start the row in A.2a. I joined with a slip stitch at the top of the chain of the previous row then chain 3, but I don't understand how to get to the first chain space. If I then do a slip stitch at the 3 treble sts to get to the chain space the chain 3 folds over. Is there a video anywhere how to do this?
11.07.2024 - 05:20DROPS Design answered:
Dear Gail, in the previous round with A.1 you worked several chain spaces separated by treble crochets. After the slip stitch, you will start the new round; the initial chain 3 is represented in the chart. So you start with chain 3 and immediately work inside the chain space, which is the first stitch of the previous round. There should be no 3 treble sts before the chain space. Happy crochetting!
16.07.2024 - 18:26
![]() Lorna wrote:
Lorna wrote:
So I’ve worked until dividing for the sleeves but my stitches are all slanted so the sleeves are in totally the wrong place. It doesn’t look straight like the picture. I haven’t changed my hook or tension and have had the correct number of stitches/spaces throughout. What am I doing wrong? Any help would be appreciated.
10.10.2022 - 15:26DROPS Design answered:
Dear Lorna, after division you should now work pattern as before following now only A.3 over all stitches - adjust the beginning of the round and the first round so that pattern will not be displaced. Happy crocheting!
10.10.2022 - 16:07
![]() Marianne Spruijt wrote:
Marianne Spruijt wrote:
Ik begrijp niet helemaal wat jullie bedoelen bij A2b: bij de eerste keer zijn er niet genoeg steken gemeerderd om A6b te haken (klopt)maar dan snap ik het niet wat bedoeld word met : verplaats op het einde de toer zoals uitgelegd op het begin van A2a?????
12.07.2022 - 12:54DROPS Design answered:
Dag Marianne,
Het staat inderdaad niet goed uitgelegd bij dit symbool. De bedoeling is dat je gewoon verder haakt met A.2a en pas op de volgende toer (wanneer er genoeg steken zijn) begint met A.2b. De omschrijving van het symbool heb ik inmiddels aangepast. Hopelijk is het zo duidelijk.
17.07.2022 - 12:31
![]() François wrote:
François wrote:
Bonjour, dans l'explication, au chapitre empiècement après les augmentations pour diviser le devant et derrière des manches, vous dites de faire 8 arceaux sous la manche et pour la deuxième manche vous dites 8 mailles en l'air. Je pense qu'il y a une erreur sur l'une des deux. Laquelle faut-il retenir 8 mailles ou 8 arceaux ? Merci de me renseigner. Christel
28.09.2020 - 11:52DROPS Design answered:
Bonjour Mme François, il faut faire 8 mailles en l'air sous les 2 manches, merci pour votre retour, les explications vont être corrigées de suite. Bon crochet!
28.09.2020 - 12:28
![]() Lucia wrote:
Lucia wrote:
Buongiorno, esiste una versione cardigan di questo modello? Grazie❣
24.05.2020 - 15:05DROPS Design answered:
Buongiorno Lucia. Purtroppo per questo modello non è prevista la versione cardigan. A questo link trova altri nostri cardigan all'uncinetto, che potrebbero piacerle. Buon lavoro!
24.05.2020 - 17:33
![]() Sonia wrote:
Sonia wrote:
Bonjour. Avez-vous des patrons au crochet pour gauchères, en français? Les croquis pour droitières sont trop difficiles à suivre... J'en cherche depuis des années et je n'ai jamais trouvé... :-( Merci!
18.05.2020 - 16:08DROPS Design answered:
Bonjour Sonia, nous sommes toutes droitières, je suis désolée, en revanche, cette leçon explique comment lire un diagramme et vous permettre peut-être de les adapter à votre façon de faire? Bonne chance!
19.05.2020 - 07:37
|
|||||||||||||||||||||||||
Charming Catch#charmingcatchtop |
|||||||||||||||||||||||||
 |
 |
||||||||||||||||||||||||
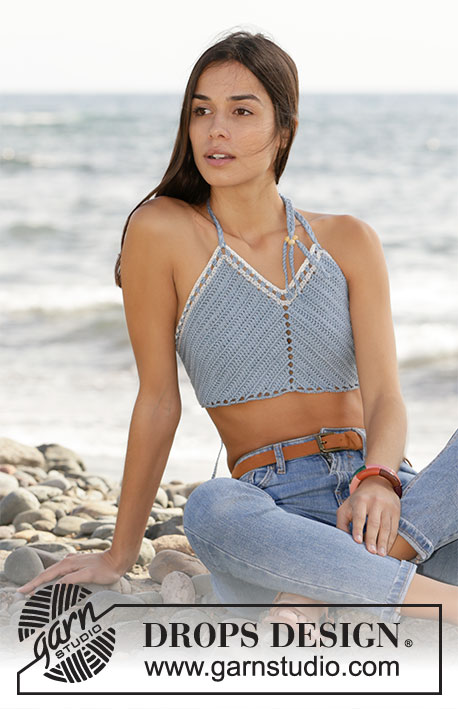
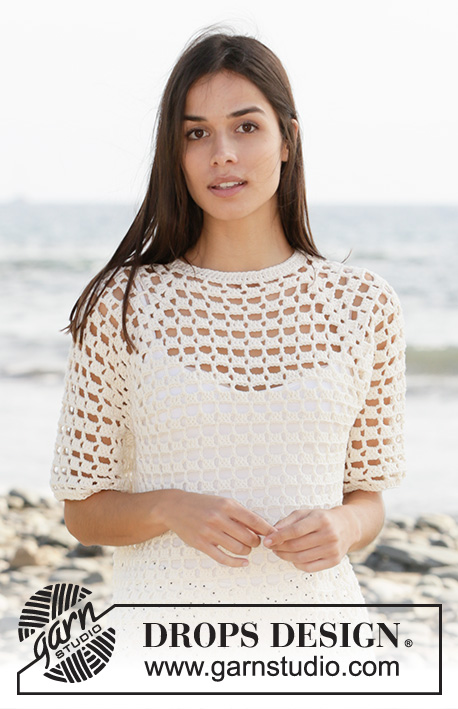
Crocheted sweater with raglan in DROPS Cotton Merino. Piece is crocheted top down with lace pattern and short sleeves. Size: S - XXXL
DROPS 211-7 |
|||||||||||||||||||||||||
|
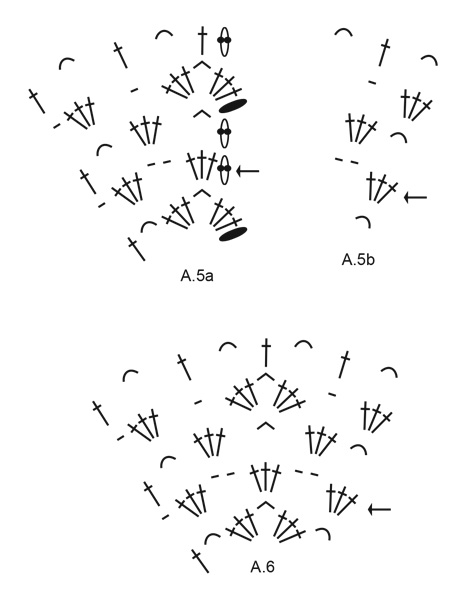
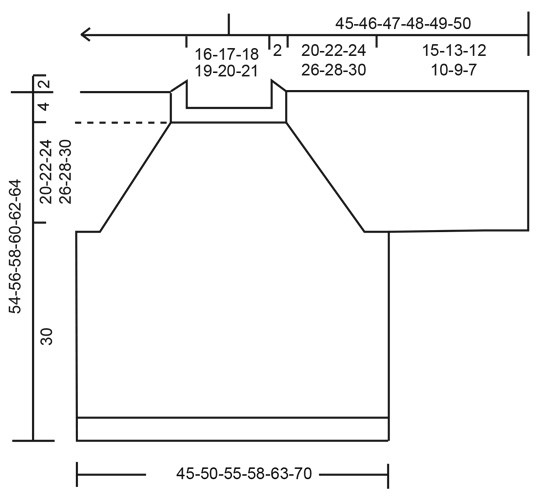
---------------------------------------------------------- EXPLANATION FOR THE PATTERN: ---------------------------------------------------------- CHAIN STITCH: If you work at the end of crochet hook the chain stitch will often be too tight 1 chain stitch should be just as long as 1 single/double crochet is wide. PATTERN: See diagrams A.1 to A.6. CROCHET INFORMATION: At beginning of every round with double crochets work 3 chain stitches, these chain stitches do not replace first double crochet on round. Finish round with 1 slip stitch in 3rd chain stitch at beginning of round. DECREASE TIP (evenly): To calculate how to decrease evenly, use the total number of stitches on round (e.g. 88 stitches), and divide stitches by number of decreases to be done (e.g. 11) = 8. In this example decrease by working every 7th and 8th stitch into 1 stitch as follows: Insert hook in next stitch, get yarn *, work from *-* 2 times in total, make 1 yarn over and pull yarn through all 3 loops on hook (= 1 stitch decreased). ---------------------------------------------------------- START THE PIECE HERE: ---------------------------------------------------------- SWEATER - SHORT OVERVIEW OF THE PIECE: Work in the round top down. First work neck edge and yoke. Then divide the piece into body and sleeves, which are finished separately. Then work a finishing edge around the neck edge while decreasing stitches to make the neck edge tighter. NECK EDGE: Work 88-88-88-96-96-104 chain stitches on hook size 4.5 mm = US 7 with Cotton Merino - read CHAIN STITCH, and form a ring with 1 slip stitch in first chain stitch worked. Work 1 double crochet in every chain stitch - read CROCHET INFO! Now work pattern as follows: Work A.1 22-22-22-24-24-26 times in total on round. Insert a marker in the 4th-4th-4th-5th-5th-5th chain stitch space on round (= on back piece), measure yoke from this marker! YOKE: Work pattern in the round as follows: Work A.2a around the first chain space (= increase raglan), A.3 over the next 6-6-6-7-7-8 chain spaces (= back piece), A.4 around next chain space (= increase raglan), A.3 over the next 3 chain spaces (= right sleeve), A.4 around next chain space (= increase raglan), A.3 over the next 6-6-6-7-7-8 chain spaces (= front piece), A.4 around next chain space (= increase raglan), A.3 over the next 3 chain spaces (= left sleeve), finish with A.2b. Continue in the round like this until the 6 rounds in diagrams have been work vertically. REMEMBER THE CROCHET GAUGE! Then repeat increase and the last 2 rounds in diagrams the same way 0-1-2-2-3-4 more times (i.e. until 6-8-10-10-12-14 rounds in total have been worked, counted from round with arrow in diagrams) – NOTE: The increase in size S is done when diagrams have been worked 1 time vertically. There are now 42-50-58-60-68-78 chain spaces on round + 1 chain space in every raglan (= 4 chain spaces) = 46-54-62-64-72-82 chain spaces in total. Now work pattern and increase as follows: Work A.5a (= increase raglan), A.3 until 1 chain space remains before next increase for raglan, A.6 (= increase raglan), A.3 until 1 chain space remains before next increase for raglan, A.6 (= increase raglan), A.3 until 1 chain space remains before next increase for raglan, A.6 (= increase raglan), A.3 until 1 chain space remains on round and finish with A.5b. Continue in the round like this until diagrams have been work. There are now 50-58-66-68-76-86 chain spaces on round. Now work pattern as before without increasing for raglan. I.e. repeat the last 2 rounds in A.3 until piece measures approx. 19-21-23-25-27-29 cm = 7½"-8¼"-9"-9¾"-10⅝"-11⅜" from marker – adjust to finish after last round in diagram. Approx. 1 cm = ⅜" remain on yoke until finished measurements. Now divide piece for body and sleeves as follows: Work 3 chain stitches (= beginning of round), work round with arrow in A.3 over the next 15-17-19-20-22-25 chain spaces (= back piece), skip the next 9-11-13-13-15-17 chain spaces (= sleeve), work 8-8-8-8-8-8 loose chain stitches (= in the side under sleeve), work A.3 over the next 16-18-20-21-23-26 chain spaces (= front piece), skip the next 9-11-13-13-15-17 chain spaces (= sleeve), work 8-8-8-8-8-8 loose chain stitches (= in the side under sleeve), work A.3 around last chain stitch on round, finish round with 1 slip stitch in 3rd chain stitch at the beginning of round. Then finish body and sleeves separately. NOW MEASURE THE PIECE FROM HERE! BODY: Now work pattern in the round as follows: Work 3 chain stitches – remember CROCHET INFO, continue pattern as before (i.e. A.3) in the round, but over the 8 loose chain stitches in the side under sleeve, work 2 repetitions of A.3 = 36-40-44-46-50-56 repetitions of A.3 on round. Continue in the round like this and repeat the last 2 rounds in A.3 until piece measures approx. 30 cm = 11¾" - adjust to finish after a round with 3 double crochet + 1 chain stitch (next to last round in A.3). Entire sweater measures approx. 54-56-58-60-62-64 cm = 21¼"-22"-22¾"-23⅝"-24⅜"-25¼" from shoulder and down. Cut and fasten the yarn. SLEEVES: Begin from right side and fasten strand with 1 slip stitch in the first of the 8 chain stitches in the side under sleeve. Begin on round with arrow in A.3 and work 2 repetitions around the 8 chain stitches under sleeve, continue in the round with A.3 – remember CROCHET INFO = 11-13-15-15-17-19 chain spaces. Continue in the round like this and repeat the last 2 rounds in A.3 until piece measures 15-13-12-10-9-7 cm = 6"-5⅛"-4¾"-4"-3½"-2¾" - adjust to finish after a round with 3 double crochet + 1 chain stitch (next to last round in A.3). Cut and fasten the yarn. Work the other sleeve the same way. NECK EDGE: Fasten strand with 1 slip stitch, work 1 chain stitch, then work 1 single crochet in every chain stitch on round while at the same time decreasing 11-8-5-10-6-11 stitches evenly – read DECREASE TIP = 77-80-83-86-90-93 single crochets. Cut and fasten the yarn. |
|||||||||||||||||||||||||
Diagram explanations |
|||||||||||||||||||||||||
|
|||||||||||||||||||||||||
 |
|||||||||||||||||||||||||
 |
|||||||||||||||||||||||||
 |
|||||||||||||||||||||||||
 |
|||||||||||||||||||||||||
Have you finished this pattern?Tag your pictures with #dropspattern #charmingcatchtop or submit them to the #dropsfan gallery. Do you need help with this pattern?You'll find 10 tutorial videos, a Comments/Questions area and more by visiting the pattern on garnstudio.com. © 1982-2026 DROPS Design A/S. We reserve all rights. This document, including all its sub-sections, has copyrights. Read more about what you can do with our patterns at the bottom of each pattern on our site. |
|||||||||||||||||||||||||


With over 40 years in knitting and crochet design, DROPS Design offers one of the most extensive collections of free patterns on the internet - translated to 17 languages. As of today we count 324 catalogs and 12290 patterns - 12280 of which are translated into English (US/in).
We work hard to bring you the best knitting and crochet have to offer, inspiration and advice as well as great quality yarns at incredible prices! Would you like to use our patterns for other than personal use? You can read what you are allowed to do in the Copyright text at the bottom of all our patterns. Happy crafting!
Post a comment to pattern DROPS 211-7
We would love to hear what you have to say about this pattern!
If you want to leave a question, please make sure you select the correct category in the form below, to speed up the answering process. Required fields are marked *.