
Popular categories
Looking for a yarn?


Comments / Questions (14)
![]() Marysa wrote:
Marysa wrote:
Er staat bovenin dat de Engelse patentsteek een steek is die afgehaald is met een omslag. In het patroon op bijv. naald 4 : maak een omslag, haal 1steek av af, 1 av Engelse patentsteek. Dat is dan toch 2 keer een omslag en 1av afhalen? Wat wordt er bedoeld? Ik hoop dat u het wat duidelijk kunt maken. Met vriendelijke groet, Marysa
06.04.2025 - 16:45DROPS Design answered:
Dag Marysa,
Het stond er inderdaad verkeerd. Het is de bedoeling dat je de Engelse patentsteek van naald 3 averecht breit. (Dus je breit de steek + omslag averecht.). Het is nu aangepast.
13.04.2025 - 10:24
![]() Maria wrote:
Maria wrote:
Cuando dice aumentar 4 puntos centrales pero se ven 3 en la foto??
15.01.2024 - 05:24DROPS Design answered:
Hola Maria, puedes ver la respuesta debajo.
22.01.2024 - 23:53
![]() Maria wrote:
Maria wrote:
Los aumentos centrales son de 4 puntos pero en la foto resultan de 3 en el lado derecho?
14.01.2024 - 21:11DROPS Design answered:
Hola Maria, el patrón es correcto: son 4 aumentos. Por lo tanto, de 1 punto salen 5. El punto central (3º) está marcado porque es el punto central del chal.
14.01.2024 - 23:22
![]() Gohlke wrote:
Gohlke wrote:
Hallo, eine Frage zu Ihrer schönen Anleitung: In den Reihen 10 und 14 werden in der Mitte Maschen zugenommen für die Formgebung. Warum werden in der Reihe 6 keine Maschen zugenommen?? Das wäre logisch, weil dann die Zunahme in der Mitte regelmäßig verteilt wären. In Ihrer Anleitung ist zwischen der 10. und 14. Reihe ein Zwischenraum von 3 Reihen und zwischen der 14. und 10. Reihe (bei Wiederholung) ein Zwischenraum von 7 Reihen. Danke im Voraus für eine Antwort.
01.12.2022 - 11:53
![]() Ariane wrote:
Ariane wrote:
Bonjour! C’est un modèle vraiment superbe et très amusant à réaliser. Petite question cependant: l’augmentation de 4 mailles dans la maille centrale doit s’effectuer aux rangs 10 et 14 (et au rang 2 seulement au début). Pourquoi pas une augmentation de 4 mailles au rang 6 également? Merci d’avance.
15.11.2022 - 00:33DROPS Design answered:
Bonjour Ariane et merci, on augmente les 4 mailles au milieu aux rangs 10 et 14 seulement pour obtenir la forme et les dimensions souhaitées. Bon tricot!
15.11.2022 - 09:36
![]() Pia Ashling wrote:
Pia Ashling wrote:
Hejsa ! Jeg har problemer med pind nr 3 - uanset hvordan jeg bærer mig ad, kan jeg ikke få det til at passe ? Jeg tror det er udtagningerne det går galt med for jeg kan ikke gennemskue hvornår jeg skal strikke en patentmaske dvs maske+ omslag og hvornår jeg skal strikke en udtagningsmaske uden omslag ? Hvordan ser man forskel ? Mvh, Pia A
01.08.2021 - 13:26DROPS Design answered:
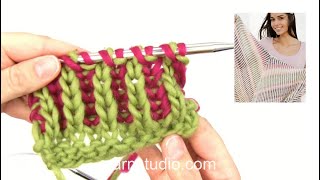
Hei Pia. En patentmaske er en maske (som er tatt løst av pinnen) med et tilhørende kast som masken strikkes sammen med (på neste pinne). På pinne med økning, er det ikke noe kast om maskene som er økt. Det betyr at disse maskene strikkes alene – uten kast. I oppskriften økes det på pinne 2, 4, 6, 8 osv, det er de pinnene det strikkes med Alpaca. Vi skal prøve å få laget en video på starten av dette sjalet. mvh DROPS design
16.08.2021 - 11:20
![]() Ineke wrote:
Ineke wrote:
Klopt het dat in de naalden 10 en 14 een averechte patentsteek moet worden gebreid? Er is nu 1 nld recht patent(nld9), daarna 3 nldn averecht patent( nld10 t/m12) dan weer 1 recht patent en weer 3 averecht patent. Terwijl het begin is 2 recht patent, 2 averecht patent. Het lijkt mij de bedoeling dat het 2 om 2 doorgaat, zodat je aan beide zijden strepen in rechte steken ziet. Dan zou in nld 10 en 14 de patentsteek recht gebreid moeten worden. Al vast hartelijk dank voor uw antwoord.
13.09.2020 - 14:06DROPS Design answered:
Dag Ineke,
Ja, ik denk inderdaad dat je gelijk hebt en dat naalden 10 en 14 in rechte Engelse patentsteek gebreid moeten worden. Ik zal het doorgeven aan de ontwerpafdeling om na te kijken en te corrigeren. Hopelijk kan je zo eerst verder.
18.11.2020 - 21:24
![]() Héliane Terache wrote:
Héliane Terache wrote:
Bonjour, Je souhaiterais avoir une précision : dans ce modèle, aux rangs 10 et 14, dans le corps du tricot, s'agit-il vraiment de tricoter les mailles côtes anglaises à l'envers ? Ne doivent-elles pas se tricoter - maille et son jeté - à l'endroit pour respecter la logique de la côte anglaise ? Sauf, bien sûr, si le châle ne suit pas l'exécution de la côte anglaise traditionnelle... Merci d'avance pour votre aide. Héliane Terache.
11.06.2020 - 14:35DROPS Design answered:
Bonjour Mme Terache, effectivement, on tricote ici en côtes anglaises bicolores, autrement dit, on va tricoter alternativement 2 rangs sur l'endroit et 2 rangs sur l'envers, les côtes anglaises vont donc se tricoter alternativement ensemble à l'endroit ou ensemble à l'envers en fonction du rang. cette vidéo montre comment tricoter ce type de côtes anglaises. Bon tricot!
11.06.2020 - 16:07
![]() Michelina wrote:
Michelina wrote:
Scialle infinity
26.02.2020 - 20:50
![]() Joop wrote:
Joop wrote:
Hoppas den är tillgänglig snart!!!!!
13.02.2020 - 11:08
|
|
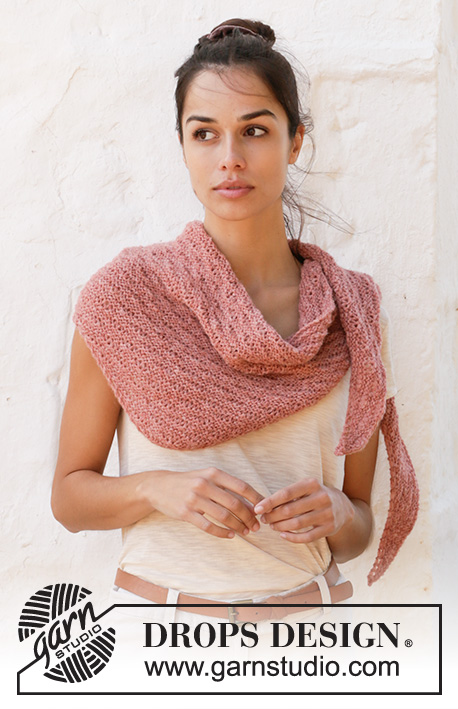
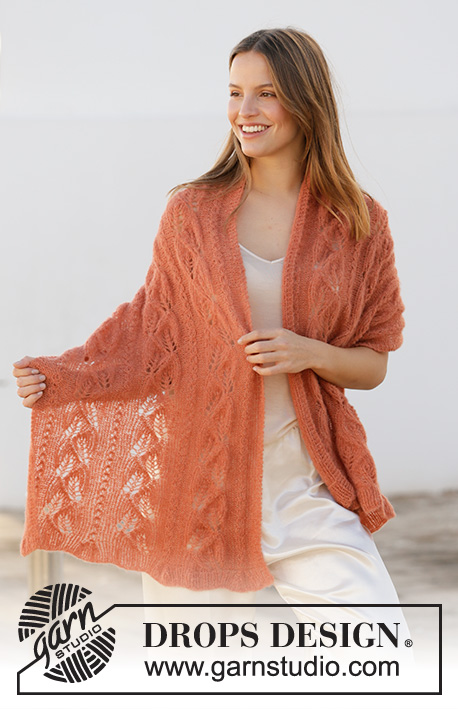
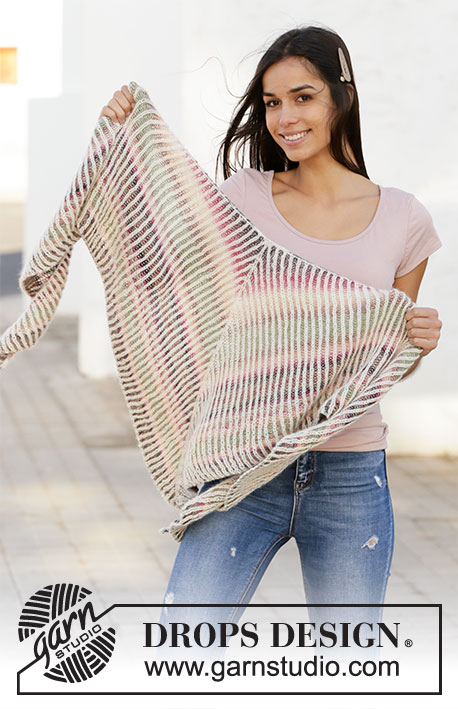
Sunset Hug#sunsethugshawl |
|
 |
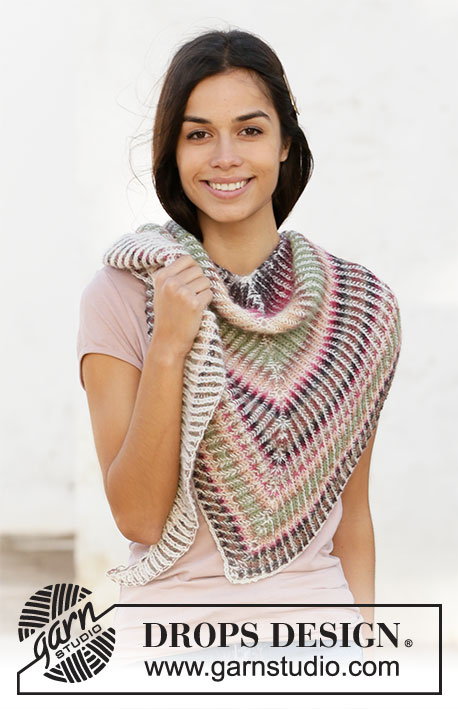 |
Knitted shawl with 2 colored English rib in DROPS Delight and DROPS Alpaca.
DROPS 211-20 |
|
|
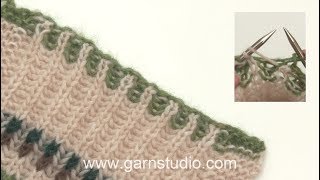
---------------------------------------------------------- EXPLANATION FOR THE PATTERN: ---------------------------------------------------------- ENGLISH RIB STITCH: An English rib stitch is a stitch (slipped loosely off the needle) with a yarn over the stitch is worked together with (on next row) - yarn is not counted as a separate stitch. NOTE! On row with increase there are no yarn overs around stitches increased. This means that these stitches as worked alone - without yarn overs. INCREASE 2 STITCHES FROM RIGHT SIDE: Knit yarn over and stitch together but wait to slip them off left needle, make 1 yarn over on right needle and knit stitch and yarn over together 1 more time = 3 stitches (= 2 stitches increased). INCREASE 2 STITCHES FROM WRONG SIDE: Purl yarn over and stitch together but wait to slip them off left needle, make 1 yarn over on right needle and purl stitch and yarn over together 1 more time = 3 stitches (= 2 stitches increased). INCREASE 4 STITCHES: * Knit yarn over and stitch together but wait to slip them off left needle, make 1 yarn over on right needle *, work from *-* 2 times in total , and knit stitch and yarn over together 1 more time = 5 stitches (= 4 stitches increased). ---------------------------------------------------------- START THE PIECE HERE: ---------------------------------------------------------- SHAWL - SHORT OVERVIEW OF THE PIECE: Work back and forth on circular needle, work top down. Work alternately with Delight and Alpaca. SHAWL: Cast on 7 stitches on circular needle size 4 mm = US 6 with Alpaca and work as follows: ROW 1 (= from wrong side): Knit 1 edge stitch, * make 1 yarn over, slip 1 stitch purlwise, knit 1 *, work from *-* until 2 stitches remain. Make 1 yarn over, slip 1 stitch purlwise. Knit 1 edge stitch. Turn piece. ROW 2 (= from right side): Knit 1 edge stitch, INCREASE 2 STITCHES FROM RIGHT SIDE in next stitch - read explanation above, make 1 yarn over, slip 1 stitch purlwise, INCREASE 4 STITCHES in next stitch - read explanation above (= middle stitch, insert a marker in this stitch and move it upwards when working. It will make it easier to see where to increase), make 1 yarn over, slip 1 stitch purlwise, INCREASE 2 STITCHES FROM RIGHT SIDE in next stitch. Knit 1 edge stitch (= 8 stitches increased in total). Do not turn piece, next row is also worked from right side. ROW 3 (= from right side): Switch to Delight. Read ENGLISH RIB STITCH in explanation above. Knit 1 edge stitch, * make 1 yarn over, slip 1 stitch purlwise, purl 1 English rib stitch *, work from *-* until 2 stitches remain on row. Make 1 yarn over, slip 1 stitch purlwise. Knit 1 edge stitch. Turn piece. ROW 4 (= from wrong side): Switch to Alpaca. Knit 1 edge stitch, INCREASE 2 STITCHES FROM WRONG SIDE in next stitch, * make 1 yarn over, slip 1 purlwise, purl 1 English rib stitch *, work from *-* until 3 stitches remain, make 1 yarn over, slip 1 stitch purlwise, INCREASE 2 STITCHES FROM WRONG SIDE in next stitch. Knit 1 edge stitch (= 4 stitches increased in total). Do not turn piece, next row is also worked from wrong side. ROW 5 (= wrong side): Switch to Delight. Knit 1 edge stitch, * make 1 yarn over, slip 1 stitch purlwise, knit 1 English rib stitch *, work from *-* until 2 stitches remain on row. Make 1 yarn over, slip 1 stitch purlwise. Knit 1 edge stitch. Turn piece. ROW 6 (= right side): Switch to Alpaca. Knit 1 edge stitch, INCREASE 2 STITCHES FROM RIGHT SIDE in next stitch, * make 1 yarn over, slip 1 purlwise, knit 1 English rib stitch *, work from *-* until 2 stitches remain, INCREASE 2 STITCHES FROM RIGHT SIDE in next stitch and knit 1 edge stitch (= 4 stitches increased in total). Do not turn piece, next row is also worked from right side. ROW 7 (= right side): Switch to Delight. Knit 1 edge stitch, * make 1 yarn over, slip 1 stitch purlwise, purl 1 English rib stitch *, work from *-* until 2 stitches remain on row. Make 1 yarn over, slip 1 stitch purlwise. Knit 1 edge stitch. Turn piece. REMEMBER THE KNITTING GAUGE! ROW 8 (= wrong side): Switch to Alpaca. Knit 1 edge stitch, INCREASE 2 STITCHES FROM WRONG SIDE in next stitch, * make 1 yarn over, slip 1 purlwise, purl 1 English rib stitch *, work from *-* until 2 stitches remain, make 1 yarn over, slip 1 stitch purlwise, INCREASE 2 STITCHES FROM WRONG SIDE in next stitch. Knit 1 edge stitch (= 4 stitches increased in total). Do not turn piece, next row is also worked from wrong side. ROW 9 (= wrong side): Switch to Delight. Knit 1 edge stitch, * make 1 yarn over, slip 1 stitch purlwise, knit 1 English rib stitch *, work from *-* until 2 stitches remain on row. Make 1 yarn over, slip 1 stitch purlwise. Knit 1 edge stitch. Turn piece. ROW 10 (= right side): Switch to Alpaca. Knit 1 edge stitch, INCREASE 2 STITCHES FROM RIGHT SIDE in next stitch, * make 1 yarn over, slip 1 purlwise, knit 1 English rib stitch *, work from *-* until 1 stitch remains before middle stitch, make 1 yarn over and slip 1 stitch purlwise, INCREASE 4 STITCHES in next stitch (= middle stitch), work from *-* until 3 stitches remain on row, make 1 yarn over, slip 1 stitch purlwise, INCREASE 2 STITCHES FROM RIGHT SIDE in next stitch. Knit 1 edge stitch (= 8 stitches increased in total). Do not turn piece, next row is also worked from right side. ROW 11 (= right side): Switch to Delight. Knit 1 edge stitch, * make 1 yarn over, slip 1 stitch purlwise, purl 1 English rib stitch *, work from *-* until 2 stitches remain on row. Make 1 yarn over, slip 1 stitch purlwise. Knit 1 edge stitch. Turn piece. ROW 12 (= from wrong side): Switch to Alpaca. Knit 1 edge stitch, INCREASE 2 STITCHES FROM WRONG SIDE in next stitch, * make 1 yarn over, slip 1 purlwise, purl 1 English rib stitch *, work from *-* until 3 stitches remain, make 1 yarn over, slip 1 stitch purlwise, INCREASE 2 STITCHES FROM WRONG SIDE in next stitch. Knit 1 edge stitch (= 4 stitches increased in total). Do not turn piece, next row is also worked from wrong side. ROW 13 (= wrong side): Switch to Delight. Knit 1 edge stitch, * make 1 yarn over, slip 1 stitch purlwise, knit 1 English rib stitch *, work from *-* until 2 stitches remain on row. Make 1 yarn over, slip 1 stitch purlwise. Knit 1 edge stitch. Turn piece. ROW 14 (= right side): Switch to Alpaca. Knit 1 edge stitch, INCREASE 2 STITCHES FROM RIGHT SIDE in next stitch, * make 1 yarn over, slip 1 purlwise, knit 1 English rib stitch *, work from *-* until 1 stitch remains before middle stitch, make 1 yarn over and slip 1 stitch purlwise, INCREASE 4 STITCHES in next stitch (= middle stitch), work from *-* until 3 stitches remain on row, make 1 yarn over, slip 1 stitch purlwise, INCREASE 2 STITCHES FROM RIGHT SIDE in next stitch. Knit 1 edge stitch (= 8 stitches increased in total). Do not turn piece, next row is also worked from right side. ROW 15 (= right side): Switch to Delight. Knit 1 edge stitch, * make 1 yarn over, slip 1 stitch purlwise, purl 1 English rib stitch *, work from *-* until 2 stitches remain on row. Make 1 yarn over, slip 1 stitch purlwise. Knit 1 edge stitch. Turn piece. Repeat rows 4-15 until piece measures approx. 56 cm = 22" measured along middle stitch. BIND-OFF: To avoid a tight bind-off edge, bind off yarn overs as separate stitches (so that 1 stitch + 1 stitch with yarn over becomes 3 stitches when binding off). If the edges still is tight use a larger needle size for bind-off. Fasten off. |
|
Have you finished this pattern?Tag your pictures with #dropspattern #sunsethugshawl or submit them to the #dropsfan gallery. Do you need help with this pattern?You'll find 9 tutorial videos, a Comments/Questions area and more by visiting the pattern on garnstudio.com. © 1982-2026 DROPS Design A/S. We reserve all rights. This document, including all its sub-sections, has copyrights. Read more about what you can do with our patterns at the bottom of each pattern on our site. |
|


With over 40 years in knitting and crochet design, DROPS Design offers one of the most extensive collections of free patterns on the internet - translated to 17 languages. As of today we count 325 catalogs and 12298 patterns - 12288 of which are translated into English (US/in).
We work hard to bring you the best knitting and crochet have to offer, inspiration and advice as well as great quality yarns at incredible prices! Would you like to use our patterns for other than personal use? You can read what you are allowed to do in the Copyright text at the bottom of all our patterns. Happy crafting!
Post a comment to pattern DROPS 211-20
We would love to hear what you have to say about this pattern!
If you want to leave a question, please make sure you select the correct category in the form below, to speed up the answering process. Required fields are marked *.