
Popular categories
Looking for a yarn?


Comments / Questions (11)
![]() Carina wrote:
Carina wrote:
Pues sí, existe una regla universal, para el que le interese, la IA la explica
09.03.2026 - 17:26
![]() Carina wrote:
Carina wrote:
Hola Existe alguna regla universal para poner marcadores para el raglan? Es decir, alguna proporción para cualquier número de puntos? Es que he puesto más puntos porque es para una muñeca más grande, y no sé bien dónde poner los marcadores. Gracias
13.02.2026 - 14:52DROPS Design answered:
Hola Carina, tienes 42 puntos entre los marcapuntos. Primero tienes 7 en media espalda, 8 en una manga, 13 en el delantero, 8 en la otra manga y 6 en la otra mitad de la espalda. Así que cada manga tiene 8 puntos y el delantero y espalda tienen 13. Si tienes más puntos, puedes usar esta cantidad indicada para calcular cómo ir aumentando puntos y ajustar según el tamaño de la muñeca.
16.02.2026 - 13:59
![]() Carina wrote:
Carina wrote:
Hola Existe alguna regla universal para poner marcadores para el raglan? Es decir, alguna proporción para cualquier número de puntos? Es que he puesto más puntos porque es para una muñeca más grande, y no sé bien dónde poner los marcadores. Gracias
01.02.2026 - 14:53DROPS Design answered:
Hola Carina, puedes ver la respuesta arriba.
23.02.2026 - 00:33
![]() Monica wrote:
Monica wrote:
Buonasera, questo tipo di progetto esiste per una bimba di 6 mesi? Si può adattare in qualche modo? Grazie
26.01.2026 - 21:03DROPS Design answered:
Buonasera Monica, nel sito DROPS può trovare tanti modelli di vestiti da bimba. Purtroppo in questa sede non ci è possibile adattare i modelli alle singole esigenze. Buon lavoro!
27.01.2026 - 20:20
![]() Rica Lommatzsch wrote:
Rica Lommatzsch wrote:
Wer kann mir das bitte erklären steh auf dem Schlauch 1 masche wie zum rechtsstricken abheben,1 Masche und die abgehoben Masche über die gestrickte ziehen
19.05.2025 - 14:21DROPS Design answered:
Liebe Frau Lommatzsch, in diesem Video können Sie mal schauen, wie man so strickt. Viel Spaß beim Stricken!
19.05.2025 - 16:00
![]() Mariska Lokin wrote:
Mariska Lokin wrote:
Waar kan ik het gebreide patroon van de pop vinden komt deze ook op pinterest te staan zodat je haar kunt breien gr mariska uit breda
12.12.2021 - 20:10
![]() Carmen Abelleira Lopez wrote:
Carmen Abelleira Lopez wrote:
Me confundi de nombre, en mi anterior consulta, lo siento. ¿ me gustaria conseguir el patrón en español de la muñeca CORA, para luego hacer los vestidos. Gracias
21.12.2019 - 13:06DROPS Design answered:
Ver la respuesta abajo
31.12.2019 - 19:45
![]() Miriam wrote:
Miriam wrote:
In der Anleitung steht : Maschen für die Arme stillegen. Das ist etwas verwirrend. Sollte es nicht eher "abketten" heißen? Hab sie stillgelegt und hab nach der Fertigstellung des Armes gesucht🙈
15.11.2019 - 16:45
![]() Uschi wrote:
Uschi wrote:
Hey, die Puppe ist Nr. 35-12 (gestrickt)
07.07.2019 - 13:49
![]() Martina wrote:
Martina wrote:
Entzückend! So eine Anleitung hätte ich sehr gerne auch für Babys/Kleinkinder!
07.07.2019 - 10:05
|
|||||||||||||
Summer Cora#dropssummercora |
|||||||||||||
 |
 |
||||||||||||
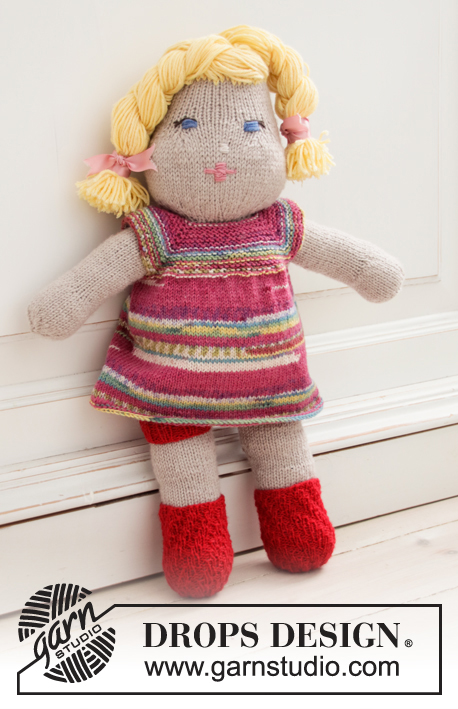
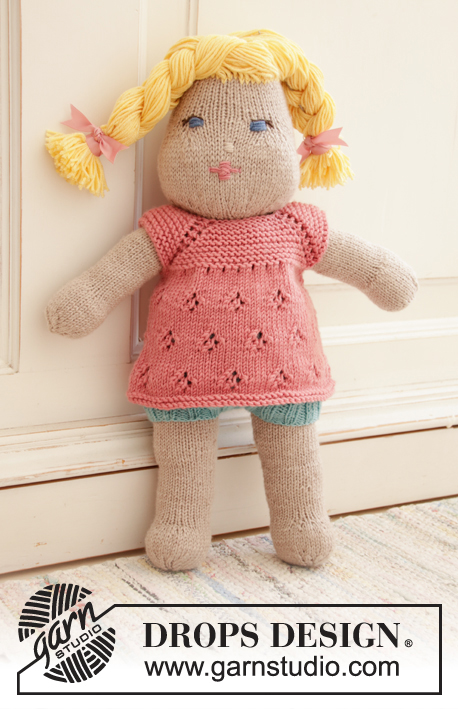
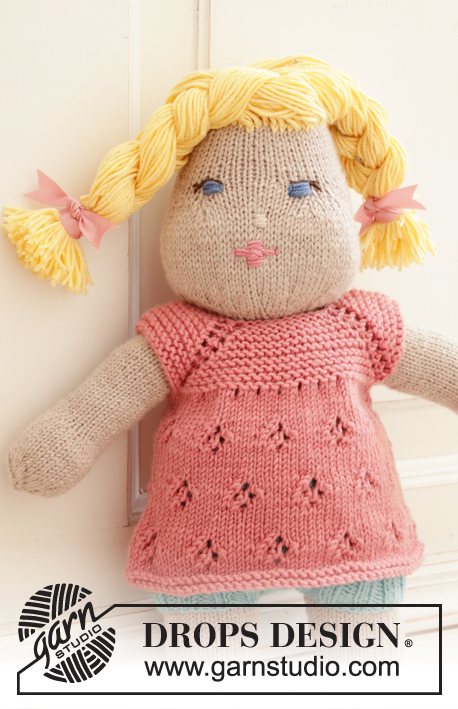
Knitted dress for doll in DROPS Merino Extra Fine. Piece is knitted top down with raglan, lace pattern and garter stitch.
DROPS Children 35-14 |
|||||||||||||
|
---------------------------------------------------------- EXPLANATION FOR THE PATTERN: ---------------------------------------------------------- GARTER STITCH (back and forth): 1 ridge = knit 2 rows. PATTERN: See diagram A.1. INCREASE TIP-1 (applies to raglan): Increase 1 stitch on each side of each marker. On next row knit yarn over to make holes. INCREASE TIP-2 (evenly): To calculate how to increase evenly, use the total number of stitches to be increased over (e.g. 14 stitches) and divide stitches by number of increases to be done (e.g. 7) = 2. In this example increase by making 1 yarn over after every other stitch. On next round knit the yarn overs to make holes. BUTTONHOLE: Decrease for buttonhole as follows: Work until 3 stitches remain on needle, knit 2 together, 1 yarn over, knit 1. On next row knit yarn over to make holes. ---------------------------------------------------------- START THE PIECE HERE: ---------------------------------------------------------- DRESS - SHORT OVERVIEW OF THE PIECE: Worked top down. Work first a yoke back and forth in garter stitch. Increase stitches evenly for skirt and continue in the round with lace pattern before working a ridge edge at the bottom. YOKE: Cast on 42 stitches on circular needle size 3.5 mm = US 4 with Merino Extra Fine. Work in GARTER STITCH - see explanation above, back and forth from mid back. Knit 1 row and insert 4 markers in piece as follows: Insert 1st marker in the 7th stitch, insert 2nd marker in the 15th stitch, insert 3rd marker in the 28th stitch and insert 4th marker in the 36th stitch. On next row, decrease for BUTTONHOLE - read explanation above. On next row increase for raglan as follows: Increase 1 stitch on each side of every marker - read INCREASE TIP-1, on every row from right side 8 times in total = 106 stitches. REMEMBER THE KNITTING GAUGE! Piece measures approx. 4 cm = 1½" from cast-on edge, work until piece measures 4 cm = 1½". Now divide piece for body and sleeves, and increase stitches evenly for skirt as follows: Knit 15 while in addition increasing 7 stitches evenly – read INCREASE TIP-2 (= half back piece) = 22 stitches, bind off the next 23 stitches for sleeve, knit 30 while in addition increasing 14 stitches evenly (= front piece) = 44 stitches, bind off the next 23 stitches for sleeve, knit 15 while in addition increasing 7 stitches evenly (= half back piece) = 22 stitches. There are 88 stitches on needle. Continue piece in the round from mid back. SKIRT: Insert 1 marker at beginning of round = mid back. Then work pattern A.1 in the round (= 11 repetitions in width). When diagram is worked 1 time vertically, displace at beginning of round with 4 stitches (knit the first 4 stitches and move marker here). Work A.1 1 time in the round in total vertically. When diagram is worked 1 time vertically, displace at beginning of round backwards with 4 stitches (stop round 4 stitches before marker and move marker here). Work A.1 1 time in the round in total vertically. Work diagram 3 times in total vertically, and piece measures approx. 11 cm = 4⅜" from where skirt was divided from sleeves. Work 2 ridges and bind off by knitting on next row. Cut and fasten the yarn. ASSEMBLY: Sew button on to opposite side of buttonhole. |
|||||||||||||
Diagram explanations |
|||||||||||||
|
|||||||||||||
 |
|||||||||||||
Have you finished this pattern?Tag your pictures with #dropspattern #dropssummercora or submit them to the #dropsfan gallery. Do you need help with this pattern?You'll find 22 tutorial videos, a Comments/Questions area and more by visiting the pattern on garnstudio.com. © 1982-2026 DROPS Design A/S. We reserve all rights. This document, including all its sub-sections, has copyrights. Read more about what you can do with our patterns at the bottom of each pattern on our site. |
|||||||||||||


With over 40 years in knitting and crochet design, DROPS Design offers one of the most extensive collections of free patterns on the internet - translated to 17 languages. As of today we count 324 catalogs and 12290 patterns - 12280 of which are translated into English (US/in).
We work hard to bring you the best knitting and crochet have to offer, inspiration and advice as well as great quality yarns at incredible prices! Would you like to use our patterns for other than personal use? You can read what you are allowed to do in the Copyright text at the bottom of all our patterns. Happy crafting!
Post a comment to pattern DROPS Children 35-14
We would love to hear what you have to say about this pattern!
If you want to leave a question, please make sure you select the correct category in the form below, to speed up the answering process. Required fields are marked *.