
Popular categories
Looking for a yarn?


Comments / Questions (37)
![]() Mette wrote:
Mette wrote:
I forhold til billedet ser det ikke ud som om der skal tages ud mens man strikker perlestrik ved ærmerne. Og vil det ikke give mest mening at man lukker de 4 masker perlestrik af inden man tager ud da ærmerne så passer bedre sammen når de skal sys. Ellers er der jo flere masker med perlestrik i den ene ende
25.08.2020 - 12:51DROPS Design answered:
Hej Mette, Det er de første og sidste 10 cm perlestrik som skal syes sammen til sidst. De 5 masker perlestrik er kun yderst i kanterne når du har taget ud og de skal syes sammen med de andre 5 masker perlestrik i den anden side. Så antal masker passer sammen når du syr sammen til sidst. Se skitsen nederst i opskriften. God fornøjelse!
27.08.2020 - 15:29
![]() Pauline Richards wrote:
Pauline Richards wrote:
Can I substitute the yarn used for a different weight? I like using medium 4
14.06.2020 - 23:18DROPS Design answered:
Dear Mrs Richards, please try our yarn converter to check every other alternatives - if you use a different weight, tension won't be the same and pattern will have to be recalculated - Read more about tension here. Happy knitting!
15.06.2020 - 09:54
![]() Solveig Østhagen wrote:
Solveig Østhagen wrote:
Finnes det en video for montering av denne? Jeg sliter med å skjønne skissen.
13.05.2020 - 20:16DROPS Design answered:
Hei Solveig. Vi har ingen monteringsvideo til denne vesten, men om du ser på den øverste skissen er det slik vesten ser ut før montering. Brett den dobbelt, slik at de venstre loddrette prikkete linjene sys sammen og de høyre loddrette prikkete linjene sys sammen. Du vil da få en hel søm som går fra underermen og under brystet på begge sidene av vesten (den prikkete linjen du ser på den nederste målskisse). God Fornøyelse!
18.05.2020 - 13:25
![]() Rosemarie wrote:
Rosemarie wrote:
Meine Frage lautet anders. Das Muster (Löcher) schaut beim fertigen Stück anders aus als das vorgegebene Strickmuster. Beim fertigen schaut es wie ein Viereck (Löcher) aber bei der Anleitung sind es drei übereinander liegende Löcher und eines daneben. Das ist doch kein gleiches Muster Danke über eine Antwort
22.11.2019 - 09:41DROPS Design answered:
Liebe Rosemarie, könnte Ihnen diese Video mal helfen? Das Lochmuster bzw die Löcher werden gleichfalls gestrickt - nur die Anzahl der glattgestrickten Maschen am Anfang/zwichen den Löchern kann ändern. Viel Spaß beim stricken!
22.11.2019 - 10:45
![]() Rosemarie wrote:
Rosemarie wrote:
Wieso schaut das gestrickte muster anders aus als die Vorlage, das ist doch kein viereck
21.11.2019 - 17:37DROPS Design answered:
Liebe Rosemarie, ganz am Anfang stricken Sie "gerade" bis die Arbeit 21-23-25-26 cm misst, dann schlagen Sie die Maschen für die Ärmel, und dann nehmen Sie bei 52-60-66-70 cm 1 Masche beidseitig zu, ketten die Maschen für die Ärmel ab und stricken Sie mit Zunahmen weiter, die Arbeit soll ungefähr (je nach der Größe) wie in der Maßskizze aussehen. Viel Spaß beim stricken!
22.11.2019 - 09:11
![]() Anita Thon wrote:
Anita Thon wrote:
Jeg skal strikke nestsiste størrelse av vesten, der den skal være totalt 96 cm lang.Dette stemmer ikke, når jeg først skal strikke til 66 sm og deretter 44 cm også 15 cm plus 10. I tillegg er det noe imellom. Dette blir tilsammen 135 cm??? Men på tegningen skal det kun være 96 cm i min størrelse? Jeg har til nå strikket de 66 cm og begynner nå på de 44?.? Hva er galt?
25.08.2019 - 12:08DROPS Design answered:
Hej. Det ska måles från olika ställen. 66 cm är från början av arbetet, 44 cm är från där du la upp nya maskor till ärmar. Det står i oppskriften var man ska måle från. Lycka till!
27.08.2019 - 09:23
![]() Helle Andersen wrote:
Helle Andersen wrote:
Jeg har spurgt indtil hvordan jeg kan gøre denne model længere. Det mener I ikke kan lade sig gøre. Så jeg vil høre om I har en opskrift I kan anbefale som jeg kan bruge i stedet for
07.07.2019 - 20:56DROPS Design answered:
Hej Helle, det er fordi det vil påvirke ærmerne... Men du kan jo altid strikke kanten længere ved hjælp af vendepinde, så det kun bliver selve længden det påvirker. Her ser du vores veste: vest God fornøjelse!
09.07.2019 - 11:13
![]() Helle Beier wrote:
Helle Beier wrote:
Hej. Jeg vil rigtig gerne lave denne model ca 30 cm længere bagpå. Men jeg er meget i tvivl om Hvor i forhold til udtagningerne jeg skal forlænge. Kan I hjælpe mig med det??
20.06.2019 - 20:23DROPS Design answered:
Hej Helle, vi kan desværre ikke hjælpe dig med det. Modellen er ikke så traditionel så man bare kan forlænge uden at det påvirker ærmerne... Held og lykke :)
05.07.2019 - 12:45
![]() Szénási Enikő wrote:
Szénási Enikő wrote:
Sziasztok! Még csak az elején vagyok a kötésnek, de a magyar fordítás hibás a rizsmintánál. A második sor helyesen: simára fordítottat, fordítottra simát kötünk. Kérlek javítsátok
23.05.2019 - 16:45DROPS Design answered:
Kedves Enikő! Köszönjük, a hiba javításra került! További sikeres kézimunkázást!
25.05.2019 - 10:36
![]() Helle Andersen wrote:
Helle Andersen wrote:
Er det muligt at få hjælp til omregning af maskeantal, når jeg gerne vil strikke den i DROPS air mix?
18.05.2019 - 10:22DROPS Design answered:
Hei Helle. Du kan strikke etter denne oppskriften om du strikker med 2 tråder DROPS Air, da dette skal gi tilsvarende strikkefasthet. Evt kan du strikke med 1 tråd Air, og 1 tråd av et annet garn i garngruppe C. Lag deg en strikkeprøve så du er sikker. Om du vil strikke med 1 tråd Air innebærer dette at alle maskeantall må regnes om etter ny strikkefasthet. Du må gjerne gjøre dette selv, men vi har dessverre ikke mulighet til å gjøre det for deg. Ta da utgangaspunkt i de ønskede målene, og gang med strikkefastheten i bredden (feks 120 cm x 1,7 maske per cm = 204 masker). God fornøyelse
20.05.2019 - 08:02
|
||||||||||||||||
Summer Cocoon#summercocoonjacket |
||||||||||||||||
 |
 |
|||||||||||||||
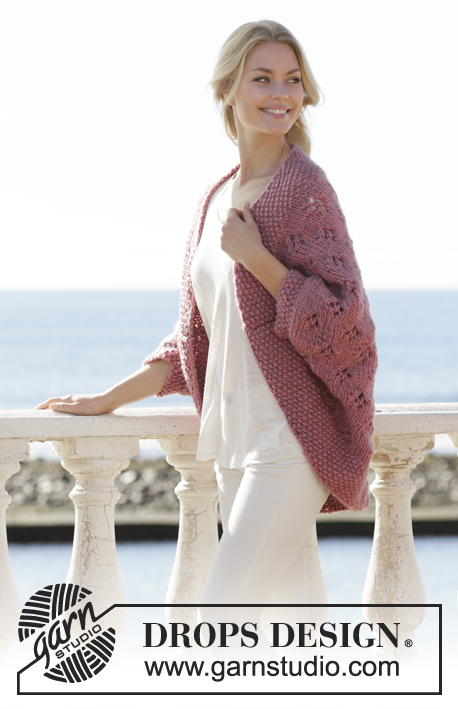
Knitted vest in DROPS Snow. The piece is worked back and forth with lace pattern and moss stitch. Sizes S - XXXL.
DROPS 202-35 |
||||||||||||||||
|
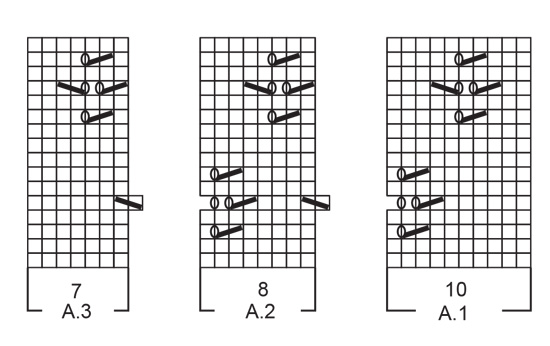
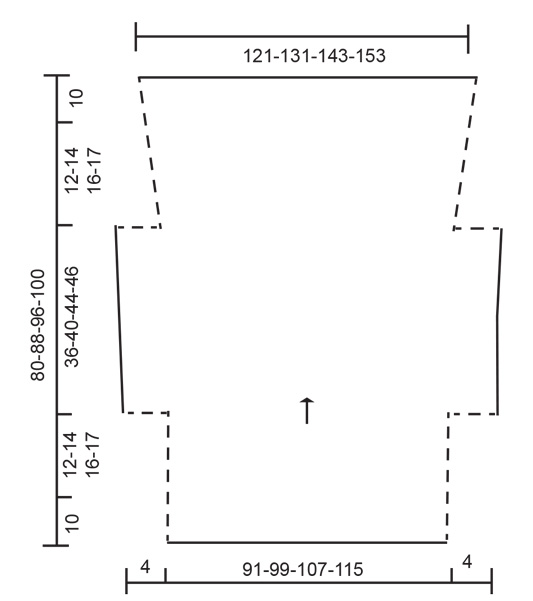
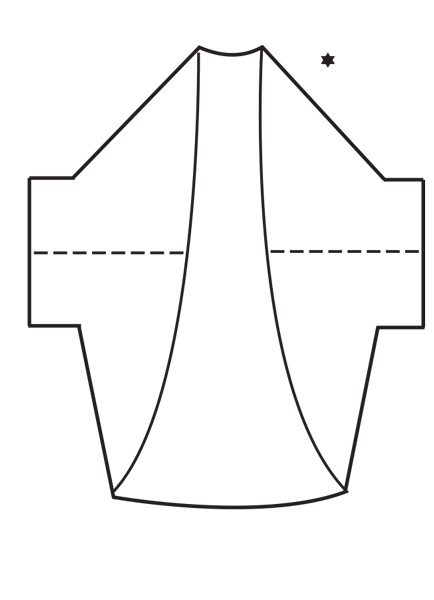
------------------------------------------------------- EXPLANATIONS FOR THE PIECE: ------------------------------------------------------- RIDGE/GARTER STITCH (worked back and forth): 1 ridge = Knit 2 rows. PATTERN: See diagrams A.1 to A.3. The diagrams show all the rows in the pattern seen from the right side. MOSS STITCH: ROW 1: * Knit 1, purl 1 *, work from *-*, until there is 1 stitch left on row, knit 1. ROW 2: Purl over knit and knit over purl. Repeat row 2. INCREASE TIP-1: All increases are worked from the right side! Increase 1 stitch inside the 5 moss stitches in each side. Increase 1 stitch by making 1 yarn over. On the next row (wrong side) purl the yarn overs twisted to avoid holes. Then work the new stitches in stockinette stitch – until there are enough stitches to work a complete repeat of the lace pattern on each side of the piece. NOTE: there should always be at least 2 stitches in stockinette stitch inside the 1 edge stitch in garter stitch, before working another repeat of lace pattern, as shown on row 13 in patterns A.1 and A.3. INCREASE TIP-2 (evenly spaced): To work out how to increase evenly, count the total number of stitches on the needle (e.g. 111 stitches) minus 1 edge stitch in garter stitch on each side (= 2 stitches) and divide the remaining stitches by the number of increases to be made (e.g. 10) = 10.9. In this example, increase by making 1 yarn over after approx. each 11th stitch. On the next row work the yarn overs twisted to avoid holes. ------------------------------------------------------- START THE PIECE HERE: ------------------------------------------------------- VEST - SHORT OVERVIEW OF THE PIECE: The piece is worked back and forth with circular needle, top down and sewn together in the sides under the sleeves. VEST: Cast on 91-99-107-115 stitches with circular needle size 9 mm = US 13 and Snow. Work MOSS STITCH - see description above, for 10 cm = 4" – adjust so that the next row is worked from the right side. Now work pattern as follows: 1 edge stitch in GARTER STITCH – read description above, A.1 over the next 10 stitches, A.2 until there are 8 stitches left on the row (= 9-10-11-12 repeats in width), A.3 over the next 7 stitches, 1 edge stitch in garter stitch. Continue this pattern back and forth. REMEMBER THE KNITTING GAUGE! When the piece measures 21-23-25-26 cm = 8¼"-9¾"-9¾"-10¼" cast on 4 new stitches at the end of the next 2 rows for sleeves = 99-107-115-123 stitches. Continue with pattern as follows: 5 stitches in moss stitch, pattern as before until there are 5 stitches left on row, 5 stitches in moss stitch. When the piece measures 52-60-66-70 cm = 20½"-23⅝"-26"-27½" increase 1 stitch inside the 5 stitches in moss stitch on each side - read INCREASE TIP-1. Increase like this every row from the right side a total of 10-10-11-11 times, AT THE SAME TIME when the piece measures 36-40-44-46 cm = 14¼"-15¾"-17¼"-18" from where you cast on stitches for the sleeves, bind off the first 4 stitches on the next 2 rows (= 1 edge stitch in each side. This edge stitch is worked in garter stitch). Continue increases inside 1 edge stitch in garter stitch in each side. When all increases are finished there are 111-119-129-137 stitches on the row. Continue with pattern and 1 edge stitch in garter stitch on each side until the piece measures 11-13-15-16 cm = 4⅜"-5⅛"-6"-6¼" from where stitches were bind off for sleeves – but adjust so that the pattern ends after a complete lace pattern in height (i.e. after row 8 or row 16 in the diagrams). If there is not room for a complete lace pattern in height, work stockinette stitch for a few rows before continuing as follows: Knit 1 row from the right side where you increase 10-12-14-16 stitches evenly spaced – read INCREASE TIP-2 = 121-131-143-153 stitches. Now work moss stitch back and forth over all stitches for 10 cm = 4". The piece measures approx. 80-88-96-100 cm = 31½"-34⅝"-37¾"-39⅜". Bind off, but to avoid the bind-off edge being tight make 1 yarn over after approx. each 4th stitch (the yarn overs are bind off as normal stitches). ASSEMBLY: Sew the under-sleeve and side seams in one go – see broken line on sketch. Sew inside the 1 edge stitch in garter stitch on each side. Cut and fasten the strand. |
||||||||||||||||
Diagram explanations |
||||||||||||||||
|
||||||||||||||||
 |
||||||||||||||||
 |
||||||||||||||||
 |
||||||||||||||||
Have you finished this pattern?Tag your pictures with #dropspattern #summercocoonjacket or submit them to the #dropsfan gallery. Do you need help with this pattern?You'll find 20 tutorial videos, a Comments/Questions area and more by visiting the pattern on garnstudio.com. © 1982-2026 DROPS Design A/S. We reserve all rights. This document, including all its sub-sections, has copyrights. Read more about what you can do with our patterns at the bottom of each pattern on our site. |
||||||||||||||||


With over 40 years in knitting and crochet design, DROPS Design offers one of the most extensive collections of free patterns on the internet - translated to 17 languages. As of today we count 325 catalogs and 12298 patterns - 12288 of which are translated into English (US/in).
We work hard to bring you the best knitting and crochet have to offer, inspiration and advice as well as great quality yarns at incredible prices! Would you like to use our patterns for other than personal use? You can read what you are allowed to do in the Copyright text at the bottom of all our patterns. Happy crafting!
Post a comment to pattern DROPS 202-35
We would love to hear what you have to say about this pattern!
If you want to leave a question, please make sure you select the correct category in the form below, to speed up the answering process. Required fields are marked *.