Comments / Questions (55)
![]() Aase Rohde wrote:
Aase Rohde wrote:
Jeg vil gerne høre om modellen ikke også findes i Børne str. 5/6 år, jeg ville gerne strikke den til mit barnebarn. Mvh. Aase
13.02.2022 - 14:39DROPS Design answered:
Hei Aase. Nei, vi har nok ikke en helt lik i barenstr. Men ta en titt DROPS Children 34-9. Kankje du liker den? mvh DROPS Design
14.02.2022 - 14:37
![]() Maj-Len Stenman wrote:
Maj-Len Stenman wrote:
Hej! Nu förstår jag inte!! På ärmarna ska det stickas mönsterraporter högst upp innan de sammanfogas med bålen. Men ska det bara stickas slätstickning på bålen?? På bilden ser det ju ut som.om.mönsterstickninggår ner en bit på bålen också!
08.12.2021 - 10:50DROPS Design answered:
Hej Maj-Len, jo som du ser hvis du klikker på nærbilledet, så skal du strikke en ekstra rapport på ærmet. God fornøjelse!
09.12.2021 - 09:32
![]() Margit Christensen wrote:
Margit Christensen wrote:
Tusind tak for det hurtige svar.
08.12.2021 - 09:45
![]() Margit Christensen wrote:
Margit Christensen wrote:
Tak for svaret på mit sidste spørgsmål, men jeg forstår ikke helt. Skal der ikke tages en maske ind på hver side i diagrammet i stedet for to i begyndelsen, og skal indtagningen ikke først påbegyndes , når den første halve er strikket, ellers passer mønsteret ikke over hinanden. På forhånd tag.
07.12.2021 - 15:01DROPS Design answered:
Hej Margit, på 15.pind i A.3B tager du ind i midten som du har gjort igennem hele diagrammet på hver 2.pind. På næste pind er de 2 masker trukket fra i diagrammet og de øvrige masker strikkes ifølge pind 16 i diagrammet.
08.12.2021 - 08:13
![]() Fillastre Sandrine wrote:
Fillastre Sandrine wrote:
Bonsoir je ne trouve pas le diagramme A1
28.11.2021 - 18:48DROPS Design answered:
Bonjour Mme Fillastre, le diagramme A.1 se compose de 2 parties pour deux groupes de tailles et se trouve après A.2 (et avant A.3): A.1A (se tricote sur 14 mailles en S, L et XXL et sur 12 m en M, XL et XXXL) et A.1B (se tricote sur 1 m dans toutes les tailles). Bon tricot!
29.11.2021 - 08:30
![]() Margit Christensen wrote:
Margit Christensen wrote:
Jeg forstår ikke diagram A3B. Fra pind 15 er der en maske mindre i hver side, men der står ikke noget om indtagning. Dog skal der være færre masker ved diagrammets slutning.
07.11.2021 - 15:00DROPS Design answered:
Hei Marit. Om du ser på rad 15 i diagrammet (A3B) og det midterste ikonet, så viser dette ikonet at her skal det felles 2 masker (ta 1 maske løs av pinnen som om den skulle strikkes rett, strikk 2 rett sammen, løft den løse masken over maskene som ble strikket sammen = 2 felt masker). Derfor vil det på neste rad i diagrammet vise 2 mindre masker. Altså du feller 2 masker hver gang du strikker diagrammet raden ut. mvh DROPS Design
08.11.2021 - 10:28
![]() Helinda wrote:
Helinda wrote:
Is there a size guide? How many sizes bigger to knit if felting a pattern? If felting a patterned design will I still see the pattern once felted?
27.05.2021 - 20:41DROPS Design answered:
Hi Helinda, There is a size chart at the bottom of the pattern. We do not recommend felting this pattern because, as you say, the pattern will disappear in the felting. Happy knitting!
28.05.2021 - 07:59
![]() Chloé Cai wrote:
Chloé Cai wrote:
Bonjour, j’ai fini de tricoter le gilet mais il roule en bas au dessus de la ligne de motif. Comment faites vous pour empêcher cela ? Merci d’avance
08.05.2021 - 22:21DROPS Design answered:
Bonjour Chloé, la méthode la plus courante consiste à bloquer un tricot afin de lui donner une forme précise. Pour plus d'infos, regardez le video ICI. Bon travail!
09.05.2021 - 22:22
![]() Avi wrote:
Avi wrote:
Hi, help pls, Knitting York and using cir needles 1st time - knitted up till York. Hope joining correctly: is there a gap left (underarm) to close with needle later? Is body and sleeves stitches being knitted all together? (Starting from right (front right panel 50 st,, right sleeve 70 st, then back, sleeve and left panel) Is the pattern for body start where sleeves one set of pattern finishes? On picture it looks aligned but mine doesn’t at this stage Avi
01.11.2020 - 13:36DROPS Design answered:
Dear Avi, yes body and sleeves will be worked together on the same needle (see video) for yoke - you will then work diagrams and decrease as shown in diagram. There will be a small hole under each armhole that you will sew together - see this video. Happy knitting!
02.11.2020 - 08:31
![]() Avi wrote:
Avi wrote:
Hi need help pls, knitting small size (on last para, Body) Work as before over the first 50-54-58-63-67-72 stitches and increase at the same time 1-6-2-6-2-6 stitches evenly over these stitches (= left front piece), bind off 4-6-6-6-10-12 stitches for armhole, work as before over the next 88-96-104-114-122-132 stitches and..........., work the remaining 49-53-57-62-66-71 stitches), Does this exclude band stitch x 10? the cast off is only for the both ends of back only, at this stage?
09.09.2020 - 15:39DROPS Design answered:
Dear Avi, the description includes all stitches, so in S: work 50 sts as before increasing 1 st (= there are now 51 sts), cast off the next 4 sts (2 sts before + 2 sts after 1st marker), work the next 88 sts as before for back piece inc 2 sts = (there are now 90 sts for back piece), cast off next 4 sts (= 2 sts before + 2 sts after marker), and work last 48 sts inc 1 st (= 49 sts). Happy knitting!
09.09.2020 - 16:26
Golden Fairy Cardigan#goldenfairycardigan |
|||||||||||||||||||
 |
 |
||||||||||||||||||
Knitted jacket in DROPS Cotton Merino or DROPS Lima. The piece is worked with round yoke and lace pattern. Sizes S - XXXL.
DROPS 195-23 |
|||||||||||||||||||
|
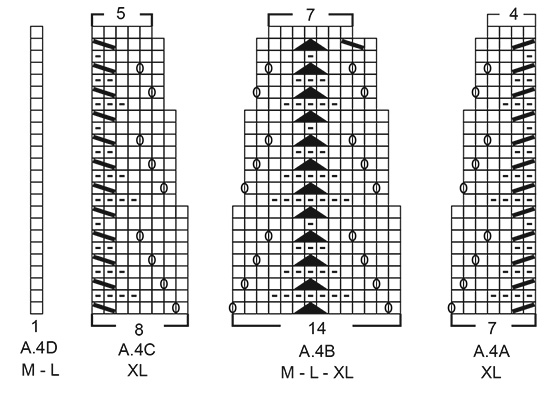
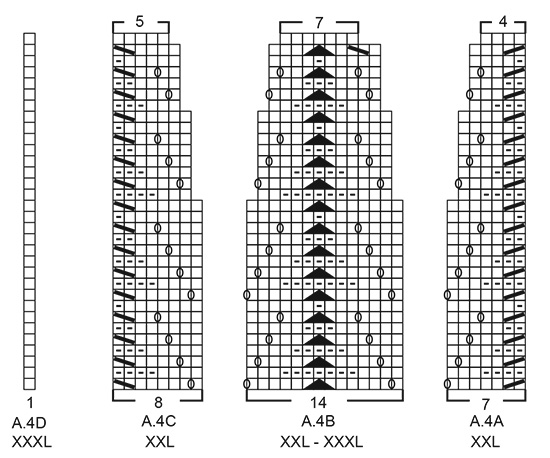
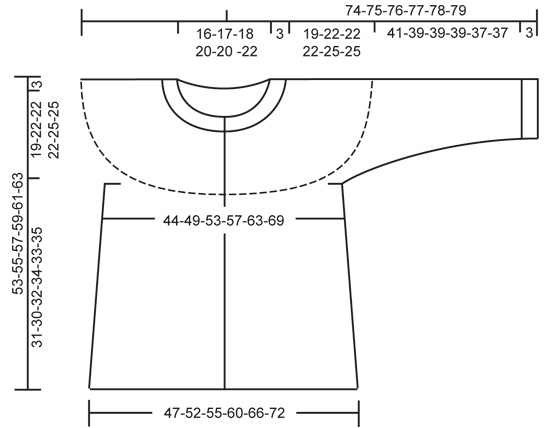
------------------------------------------------------- EXPLANATIONS FOR THE PATTERN: ------------------------------------------------------- RIDGE/GARTER STITCH (worked back and forth): 1 ridge = Knit 2 rows. PATTERN: See diagrams A.1 to A.4. Choose diagram for your size (applies to A.1 and A.4). The diagrams show all rows in the pattern seen from the right side. DECREASE/INCREASE TIP (evenly spaced): To work out how to decrease/increase evenly, count the total number of stitches on the needle (e.g. 249 stitches), minus the bands (e.g. 10 stitches) and divide the remaining stitches by the number of decreases/increases to be made (e.g. 6) = 39.8. In this example, decrease by knitting together approx. each 39th and 40th stitch. When increasing make 1 yarn over after approx. every 40th stitch; on the next row/round work the yarn overs twisted to avoid holes. Do not decrease/increase over the bands. DECREASE TIP (for sides of body): All decreases are made from the right side! Start 3 stitches before marker thread in side, knit 2 together, knit 2 (marker thread sits in between these 2 stitches), slip 1 stitch as if to knit, knit 1 and pass the slipped stitch over the knitted stitch (= 2 stitches decreased). INCREASE TIP (for mid under sleeves): Start 1 stitch before the marker thread, make 1 yarn over, knit 2 (marker thread sits between these 2 stitches), make 1 yarn over (= 2 stitches increased). On the next round knit the yarn overs twisted to avoid holes. Then work the increased stitches in stockinette stitch. BUTTONHOLES (bottom up): Work buttonholes on right band. 1 BUTTONHOLE = knit second and third stitch from the edge together and make 1 yarn over. On the next row knit the yarn over to leave a hole. Work buttonholes when piece measures: S: 8, 15, 22, 29, 36, 43 and 51 cm = 3⅛", 6", 8¾", 11⅜", 14¼", 17" and 20" M: 8, 15, 23, 30, 38, 45 and 53 cm = 3⅛", 6", 9", 11¾", 15", 17¾" and 21" L: 8, 16, 24, 32, 40, 48 and 55 cm = 3⅛", 6¼", 9½", 12½", 15¾", 19" and 21⅝" XL: 8, 15, 22, 29, 36, 43, 50 and 57 cm = 3⅛", 6", 8¾", 11 378", 14¼", 19¾" and 22½" XXL: 10, 17, 24, 31, 38, 45, 52 and 59 cm = 4", 6¾", 9½", 12¼", 15", 17¾", 20½" and 23¼" XXXL: 10, 17, 24, 31, 38, 45, 52 and 61 cm = 4", 6¾", 9½", 12¼", 15, 17¾", 20½" and 24" NOTE: The last of these 7-7-7-8-8-8 buttonholes is worked on the neck. ------------------------------------------------------- START THE PIECE HERE: ------------------------------------------------------- JACKET - SHORT OVERVIEW OF THE PIECE: The piece is worked back and forth with circular needle from mid front, bottom up as far as the armholes. The sleeves are worked in the round with double pointed needles/short circular needle bottom up. Body and sleeves are then placed on same circular needle and the yoke is finished working back and forth from mid front. BODY: Cast on 207-227-249-263-291-311 stitches (including 5 band stitches in each side towards mid front) with circular needle size 4 mm = US 6 and Cotton Merino. Change to circular needle size 3.5 mm = US 4 and work 2 RIDGES – read description above. Change back to circular needle size 4 mm = US 6 and work 2 rows stockinette stitch with 5 band stitches in garter stitch in each side. The next row is worked as follows from the right side: 5 band stitches in garter stitch, Work A.1A until there are 6 stitches left on row (= 14-18-17-21-20-25 repeats of 14-12-14-12-14-12 stitches), work A.1B (= 1 stitch) and finish with 5 band stitches in garter stitch. Continue this pattern. When A.1 has been completed, continue with stockinette stitch and 5 band stitches in garter stitch in each side. AT THE SAME TIME on the first row from the right side decrease 0-0-6-0-4-0 stitches evenly on row = 207-227-243-263-287-311 stitches REMEMBER THE KNITTING GAUGE! When the piece measures 8-8-8-8-10-10 cm = 3⅛"-3⅛"-3⅛"-3⅛"-4"-4" insert 2 marker threads in the piece as follows from the right side: First marker thread is inserted after the first 54-59-63-68-74-80 stitches on the row (= right front piece when garment is worn), 2nd marker thread after the next 98-108-116-126-138-150 stitches (= back piece). There are 55-60-64-69-75-81 stitches left on row after the 2nd marker thread (= left front piece – NOTE: There is 1 more stitch on the left front piece than the right because of the pattern which will later be worked on sleeves and yoke). On the next row from the right side work BUTTONHOLE on right band – read description above. AT THE SAME TIME decrease 1 stitch on each side of both marker threads - read DECREASE TIP (= 4 stitches decreased). Continue to decrease on each side of both marker threads every 8-8-8-9-9-9 cm = 3⅛"-3⅛"-3⅛"-3½"-3½"-3½" a total of 3 times in each side = 195-215-231-251-275-299 stitches. Continue working until the piece measures approx. 31-30-32-34-33-35 cm = 12¼"-11¾"-12½"-13⅜"-13"-13¾" (measured from bottom of the curve in A.1). The next row is worked as follows from the wrong side: Work as before over the first 50-54-58-63-67-72 stitches and increase at the same time 1-6-2-6-2-6 stitches evenly over these stitches (= left front piece), bind off 4-6-6-6-10-12 stitches for armhole, work as before over the next 88-96-104-114-122-132 stitches and increase 2-12-4-12-4-12 stitches evenly over these stitches (= back piece), bind off 4-6-6-6-10-12 stitches for armhole, work the remaining 49-53-57-62-66-71 stitches as before and increase 1-6-2-6-2-6 stitches evenly over these stitches (= right front piece). There are now 50-59-59-68-68-77 stitches on the right front piece, 90-108-108-126-126-144 stitches on the back piece and 51-60-60-69-69-78 stitches on the left front piece. Lay the piece to one side and work sleeves as described below. SLEEVE: Cast on 48-52-56-56-60-60 stitches with double pointed needles size 3.5 mm = US 4 and Cotton Merino. Knit 1 round. Then work rib in the round (= knit 2 / purl 2) for 3 cm = 1⅛". Knit 1 round where you decrease 6-8-10-10-10-8 stitches evenly on round = 42-44-46-46-50-52 stitches. Change to double pointed needles size 4 mm = US 6 and work stockinette stitch in the round. When the piece measures 10-8-11-11-9-9 cm = 4"-3⅛"-4⅜"-4⅜"-3½"-3½" insert 1 marker thread at the beginning of the round (= mid under sleeve). On the next round increase 2 stitches mid under sleeve - read INCREASE TIP. Increase like this every 2½-2½-1½-1½-1½-1½ cm = 1"-1"-½"-½"-½"-½" a total of 13-13-19-19-19-19 times = 68-70-84-84-88-90 stitches (change to short circular needle when necessary). Continue working until the piece measures 40-38-38-38-36-36 cm = 15¾"-15"-15"-15"-14¼"-14¼"- (increases mid under sleeve should now be finished and measurements are shorter in larger sizes due to longer yoke). Knit 1 round where you increase 8-8-12-12-12-12 stitches evenly on round = 76-78-96-96-100-102 stitches. The next round is worked as follows: Work 2-3-3-3-5-6 stitches in stockinette stitch, work A.2 over the next 72-72-90-90-90-90 stitches (= 4-4-5-5-5-5 repeats of 18 stitches) and finish with 2-3-3-3-5-6 stitches in stockinette stitch. Continue this pattern until you just have the last row in A.2 left to work. The last round is worked as follows: Bind off 2-3-3-3-5-6 stitches for armhole, work last row in A.2 over the next 72-72-90-90-90-90 stitches and bind off the remaining 2-3-3-3-5-6 stitches for armhole. The sleeve measures approx. 44-42-42-42-40-40 cm = 17¼"-16½"-16½"-16½"-15¾"-15¾" from the top down. Lay the piece to one side and work the other sleeve in the same way. YOKE: Place sleeves on same circular needle size 4 mm = US 6 as body, where you bind off stitches for armholes (without working the stitches) = 335-371-407-443-443-479 stitches on row. The first row is worked as follows from the right side: SIZES S, XL and XXL: 5 edge stitches in garter stitch, A.3A (= 9 stitches), work A.3B until there are 15 stitches left on row (= 17-23-23 repeats of 18 stitches), A.3C (= 10 stitches) and finish with 5 edge stitches in garter stitch. Continue this pattern (the pattern should match neatly on the sleeves too). When A.3 has been completed there are 263-347-347 stitches on the row. The next row is worked as follows from the right side: 5 edge stitches in garter stitch, work A.4A (= 7 stitches), A.4B until there are 13 stitches left on row (= 17-23-23 repeats of 14 stitches), A.4C (= 8 stitches) and finish with 5 edge stitches in garter stitch. Continue this pattern. When A.4 has been completed there are 138-180-180 stitches on row. Now go to ALL SIZES! SIZES M, L and XXXL: 5 edge stitches in garter stitch, work A.3B until there are 6 stitches left on row (= 20-22-26 repeats of 18 stitches), A.3D (= 1 stitch) and finish with 5 edge stitches in garter stitch. Continue this pattern (the pattern should match neatly on the sleeves too). When A.3 has been completed there are 291-319-375 stitches left on row. The next row is worked as follows from the right side: 5 edge stitches in garter stitch, work A.4B until there are 6 stitches left on row (= 20-22-26 repeats of 14 stitches), A.4D (= 1 stitch) and finish with 5 edge stitches in garter stitch. Continue this pattern. When A.4 has been completed there are 151-165-193 stitches on row. Now go to ALL SIZES! ALL SIZES: Knit 1 row from the right side where you decrease 30-39-49-56-56-61 stitches evenly on row – read DECREASE/INCREASE TIP = 108-112-116-124-124-132 stitches on row. The yoke now measures approx. 19-22-22-22-25-25 cm = 7½"-8¾"-8¾"-8¾"-9¾"-9¾" from where the sleeves and body were worked together. Now work NECK as described below. NECK: Change to circular needle size 3.5 mm = US 4 and work the next row as follows from the wrong side: 5 band stitches in garter stitch, * purl 2, knit 2 *, work from *-* until there are 7 stitches left on row, purl 2 and finish with 5 band stitches in garter stitch. Continue this rib for 3 cm = 1⅛" – remember the last buttonhole on right band. Then bind off loosely with garter stitch over garter stitch, knit over knit and purl over purl; to avoid the bind-off edge being tight you can bind off with circular needle size 4 mm = US 6. The whole jacket measures approx. 56-58-60-62-64-66 cm = 22"-22¾"-23⅝"-24⅜"-25¼"-16" from the shoulder down. ASSEMBLY: Sew openings under sleeves. Sew buttons onto left band. |
|||||||||||||||||||
Diagram explanations |
|||||||||||||||||||
|
|||||||||||||||||||
 |
|||||||||||||||||||
 |
|||||||||||||||||||
 |
|||||||||||||||||||
 |
|||||||||||||||||||
 |
|||||||||||||||||||
 |
|||||||||||||||||||
Have you finished this pattern?Tag your pictures with #dropspattern #goldenfairycardigan or submit them to the #dropsfan gallery. Do you need help with this pattern?You'll find 27 tutorial videos, a Comments/Questions area and more by visiting the pattern on garnstudio.com. © 1982-2025 DROPS Design A/S. We reserve all rights. This document, including all its sub-sections, has copyrights. Read more about what you can do with our patterns at the bottom of each pattern on our site. |
|||||||||||||||||||


Post a comment to pattern DROPS 195-23
We would love to hear what you have to say about this pattern!
If you want to leave a question, please make sure you select the correct category in the form below, to speed up the answering process. Required fields are marked *.