DROPS Cotton Merino
DROPS Cotton Merino
50% Wool, 50% Cotton
from 3.55 £ /50g
Get the yarn to make this pattern from 35.50£.

The yarn cost is calculated from the pattern’s smallest size and the yarn’s cheapest product type. Looking for an even better price? You might find it on the DROPS Deals!

DROPS Super Sale

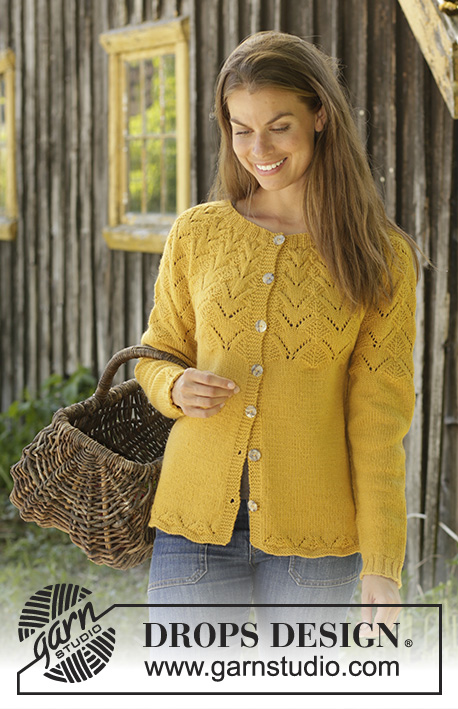
Golden Fairy Cardigan

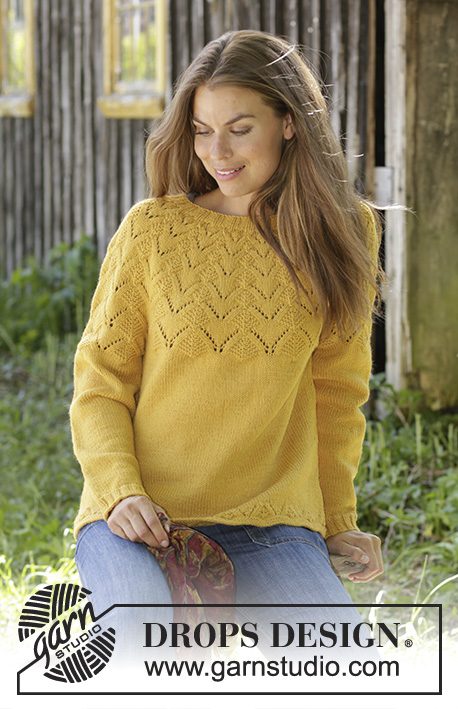
Knitted jacket in DROPS Cotton Merino or DROPS Lima. The piece is worked with round yoke and lace pattern. Sizes S - XXXL.

DROPS 195-23
DROPS Design: Pattern no cm-095
Yarn group B
-------------------------------------------------------

Sizes: S - M - L - XL - XXL - XXXL
Materials:
DROPS COTTON MERINO from Garnstudio (belongs to yarn group B)
500-550-600-650-700-800 g colour 15, mustard

Or use:
DROPS LIMA from Garnstudio (belongs to yarn group B)
550-600-650-700-800-850 g colour 2923, goldenrod

-------------------------------------------------------
ACCESSORIES FOR THE PIECE:

KNITTING TENSION:
21 stitches in width and 28 rows in height with stocking stitch = 10 x 10 cm.
1 repeat of A.2 (18 stitches) measures approx. 7½ cm in width.

NEEDLES:
DROPS DOUBLE POINTED NEEDLES SIZE 4 MM.
DROPS CIRCULAR NEEDLE SIZE 4 MM: length 40 cm and 80 cm for stocking stitch and lace pattern.
DROPS DOUBLE POINTED NEEDLES SIZE 3.5 MM.
DROPS CIRCULAR NEEDLE SIZE 3.5 MM: length 80 cm for rib.
The needle size is only a guide. If you have too many stitches on 10 cm, change to a larger needle size. If you have too few stitches on 10 cm, change to a smaller needle size.

DROPS MOTHER OF PEARL BUTTONS, Arched (white) NO 522: 7-7-7-8-8-8 items.

-------------------------------------------------------

-------------------------------------------------------

Alternative Yarn – See how to change yarns here
Yarn Groups A to F – Use the same pattern and change the yarn here
Yarn usage using an alternative yarn – Use our yarn converter here

-------------------------------------------------------

DROPS Cotton Merino
DROPS Cotton Merino
50% Wool, 50% Cotton
from 3.55 £ /50g
Get the yarn to make this pattern from 35.50£.

The yarn cost is calculated from the pattern’s smallest size and the yarn’s cheapest product type. Looking for an even better price? You might find it on the DROPS Deals!

DROPS Super Sale

SAVE 30% on 6 cotton favourites!
Valid until 12.04.2024

Pattern instructions

NOTE: This pattern is written in British English. All measurements in charts are in cm. For conversion from cm to inches - click here. There are different terms for crocheting in British and American English. If this pattern includes crochet, click for "crochet terms" here. For this pattern in American English, please click here.
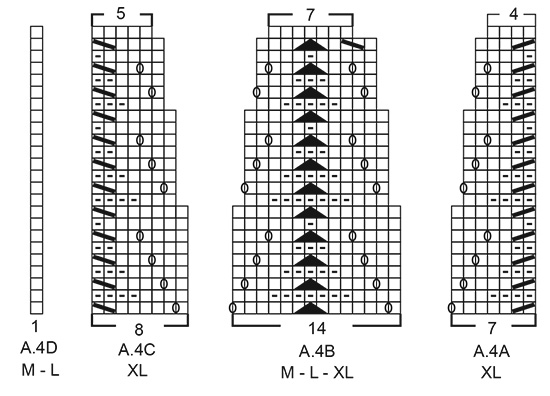
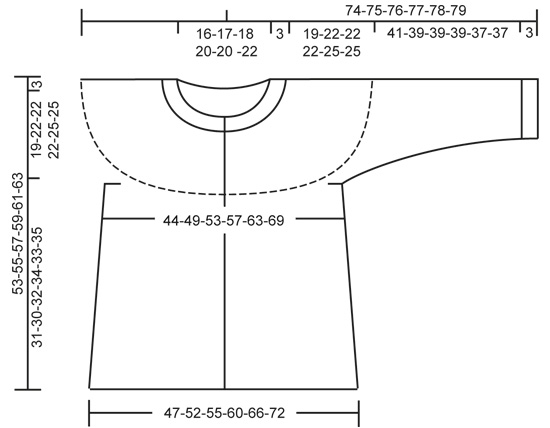
EXPLANATIONS FOR THE PATTERN:

-------------------------------------------------------

RIDGE/GARTER STITCH (worked back and forth):
1 ridge = Knit 2 rows.

PATTERN: 
See diagrams A.1 to A.4. Choose diagram for your size (applies to A.1 and A.4).
The diagrams show all rows in the pattern seen from the right side.

DECREASE/INCREASE TIP (evenly spaced):
To work out how to decrease/increase evenly, count the total number of stitches on the needle (e.g. 249 stitches), minus the bands (e.g. 10 stitches) and divide the remaining stitches by the number of decreases/increases to be made (e.g. 6) = 39.8.
In this example, decrease by knitting together approx. each 39th and 40th stitch. When increasing make 1 yarn over after approx. every 40th stitch; on the next row/round work the yarn overs twisted to avoid holes. Do not decrease/increase over the bands.

DECREASE TIP (for sides of body):
All decreases are made from the right side! 
Start 3 stitches before marker thread in side, knit 2 together, knit 2 (marker thread sits in between these 2 stitches), slip 1 stitch as if to knit, knit 1 and pass the slipped stitch over the knitted stitch (= 2 stitches decreased).

INCREASE TIP (for mid under sleeves):
Start 1 stitch before the marker thread, make 1 yarn over, knit 2 (marker thread sits between these 2 stitches), make 1 yarn over (= 2 stitches increased). On the next round knit the yarn overs twisted to avoid holes. Then work the increased stitches in stocking stitch

BUTTONHOLES (bottom up):
Work buttonholes on right band. 1 BUTTONHOLE = knit second and third stitch from the edge together and make 1 yarn over. On the next row knit the yarn over to leave a hole.
Work buttonholes when piece measures:
S: 8, 15, 22, 29, 36, 43 and 51 cm
M: 8, 15, 23, 30, 38, 45 and 53 cm
L: 8, 16, 24, 32, 40, 48 and 55 cm
XL: 8, 15, 22, 29, 36, 43, 50 and 57 cm
XXL: 10, 17, 24, 31, 38, 45, 52 and 59 cm
XXXL: 10, 17, 24, 31, 38, 45, 52 and 61 cm
NOTE: The last of these 7-7-7-8-8-8 buttonholes is worked on the neck.

-------------------------------------------------------

START THE PIECE HERE:

-------------------------------------------------------

JACKET - SHORT OVERVIEW OF THE PIECE:
The piece is worked back and forth with circular needle from mid front, bottom up as far as the armholes. The sleeves are worked in the round with double pointed needles/short circular needle bottom up. Body and sleeves are then placed on same circular needle and the yoke is finished working back and forth from mid front.

BODY:
Cast on 207-227-249-263-291-311 stitches (including 5 band stitches in each side towards mid front) with circular needle size 4 mm and Cotton Merino. Change to circular needle size 3.5 mm and work 2 RIDGES – read description above. Change back to circular needle size 4 mm and work 2 rows stocking stitch with 5 band stitches in garter stitch in each side.
The next row is worked as follows from the right side: 5 band stitches in garter stitch, Work A.1A until there are 6 stitches left on row (= 14-18-17-21-20-25 repeats of 14-12-14-12-14-12 stitches), work A.1B (= 1 stitch) and finish with 5 band stitches in garter stitch. Continue this pattern. When A.1 has been completed, continue with stocking stitch and 5 band stitches in garter stitch in each side. AT THE SAME TIME on the first row from the right side decrease 0-0-6-0-4-0 stitches evenly on row = 207-227-243-263-287-311 stitches REMEMBER THE KNITTING TENSION!
When the piece measures 8-8-8-8-10-10 cm insert 2 marker threads in the piece as follows from the right side: First marker thread is inserted after the first 54-59-63-68-74-80 stitches on the row (= right front piece when garment is worn), 2nd marker thread after the next 98-108-116-126-138-150 stitches (= back piece). There are 55-60-64-69-75-81 stitches left on row after the 2nd marker thread (= left front piece – NOTE: There is 1 more stitch on the left front piece than the right because of the pattern which will later be worked on sleeves and yoke).
On the next row from the right side work BUTTONHOLE on right band – read description above. AT THE SAME TIME decrease 1 stitch on each side of both marker threads - read DECREASE TIP (= 4 stitches decreased). Continue to decrease on each side of both marker threads every 8-8-8-9-9-9 cm a total of 3 times in each side = 195-215-231-251-275-299 stitches. Continue working until the piece measures approx. 31-30-32-34-33-35 cm (measured from bottom of the curve in A.1).
The next row is worked as follows from the wrong side: Work as before over the first 50-54-58-63-67-72 stitches and increase at the same time 1-6-2-6-2-6 stitches evenly over these stitches (= left front piece), cast off 4-6-6-6-10-12 stitches for armhole, work as before over the next 88-96-104-114-122-132 stitches and increase 2-12-4-12-4-12 stitches evenly over these stitches (= back piece), cast off 4-6-6-6-10-12 stitches for armhole, work the remaining 49-53-57-62-66-71 stitches as before and increase 1-6-2-6-2-6 stitches evenly over these stitches (= right front piece).
There are now 50-59-59-68-68-77 stitches on the right front piece, 90-108-108-126-126-144 stitches on the back piece and 51-60-60-69-69-78 stitches on the left front piece. Lay the piece to one side and work sleeves as described below.

SLEEVE:
Cast on 48-52-56-56-60-60 stitches with double pointed needles size 3.5 mm and Cotton Merino. Knit 1 round. Then work rib in the round (= knit 2 / purl 2) for 3 cm. Knit 1 round where you decrease 6-8-10-10-10-8 stitches evenly on round = 42-44-46-46-50-52 stitches. Change to double pointed needles size 4 mm and work stocking stitch in the round. When the piece measures 10-8-11-11-9-9 cm insert 1 marker thread at the beginning of the round (= mid under sleeve). On the next round increase 2 stitches mid under sleeve - read INCREASE TIP. Increase like this every 2½-2½-1½-1½-1½-1½ cm a total of 13-13-19-19-19-19 times = 68-70-84-84-88-90 stitches (change to short circular needle when necessary). Continue working until the piece measures 40-38-38-38-36-36 cm (increases mid under sleeve should now be finished and measurements are shorter in larger sizes due to longer yoke). Knit 1 round where you increase 8-8-12-12-12-12 stitches evenly on round = 76-78-96-96-100-102 stitches. The next round is worked as follows: Work 2-3-3-3-5-6 stitches in stocking stitch, work A.2 over the next 72-72-90-90-90-90 stitches (= 4-4-5-5-5-5 repeats of 18 stitches) and finish with 2-3-3-3-5-6 stitches in stocking stitch. Continue this pattern until you just have the last row in A.2 left to work. The last round is worked as follows: Cast off 2-3-3-3-5-6 stitches for armhole, work last row in A.2 over the next 72-72-90-90-90-90 stitches and cast off the remaining 2-3-3-3-5-6 stitches for armhole. The sleeve measures approx. 44-42-42-42-40-40 cm from the top down. Lay the piece to one side and work the other sleeve in the same way.

YOKE:
Place sleeves on same circular needle size 4 mm as body, where you cast off stitches for armholes (without working the stitches) = 335-371-407-443-443-479 stitches on row. The first row is worked as follows from the right side:
SIZES S, XL and XXL: 5 edge stitches in garter stitch, A.3A (= 9 stitches), work A.3B until there are 15 stitches left on row (= 17-23-23 repeats of 18 stitches), A.3C (= 10 stitches) and finish with 5 edge stitches in garter stitch. Continue this pattern (the pattern should match neatly on the sleeves too). When A.3 has been completed there are 263-347-347 stitches on the row. The next row is worked as follows from the right side: 5 edge stitches in garter stitch, work A.4A (= 7 stitches), A.4B until there are 13 stitches left on row (= 17-23-23 repeats of 14 stitches), A.4C (= 8 stitches) and finish with 5 edge stitches in garter stitch. Continue this pattern. When A.4 has been completed there are 138-180-180 stitches on row. Now go to ALL SIZES!
SIZES M, L and XXXL: 5 edge stitches in garter stitch, work A.3B until there are 6 stitches left on row (= 20-22-26 repeats of 18 stitches), A.3D (= 1 stitch) and finish with 5 edge stitches in garter stitch. Continue this pattern (the pattern should match neatly on the sleeves too). When A.3 has been completed there are 291-319-375 stitches left on row. The next row is worked as follows from the right side: 5 edge stitches in garter stitch, work A.4B until there are 6 stitches left on row (= 20-22-26 repeats of 14 stitches), A.4D (= 1 stitch) and finish with 5 edge stitches in garter stitch.
Continue this pattern. When A.4 has been completed there are 151-165-193 stitches on row. Now go to ALL SIZES!
ALL SIZES: Knit 1 row from the right side where you decrease 30-39-49-56-56-61 stitches evenly on row – read DECREASE/INCREASE TIP = 108-112-116-124-124-132 stitches on row. The yoke now measures approx. 19-22-22-22-25-25 cm from where the sleeves and body were worked together. Now work NECK as described below.

NECK:
Change to circular needle size 3.5 mm and work the next row as follows from the wrong side: 5 band stitches in garter stitch, * purl 2, knit 2 *, work from *-* until there are 7 stitches left on row, purl 2 and finish with 5 band stitches in garter stitch. Continue this rib for 3 cm – remember the last buttonhole on right band.
Then cast off loosely with garter stitch over garter stitch, knit over knit and purl over purl; to avoid the cast-off edge being tight you can cast off with circular needle size 4 mm. The whole jacket measures approx. 56-58-60-62-64-66 cm from the shoulder down.

ASSEMBLY:
Sew openings under sleeves. Sew buttons onto left band.

This pattern has been corrected.

Updated online: 05.12.2019
Schematic drawing updated.

Diagram

symbols = knit from right side, purl from wrong side
symbols = purl from right side, knit from wrong side
symbols = between 2 stitches make 1 yarn over
symbols = knit 2 together
symbols = slip 1 stitch as if to knit, knit 1 and pass the slipped stitch over the knitted stitch
symbols = slip 1 stitch as if to knit, knit 2 together and pass the slipped stitch over the knitted together stitches
diagram
diagram
diagram
diagram
diagram
diagram

Each of our patterns has specific tutorial videos to help you.

Do you have a question? See a list of frequently asked questions (FAQ)

Knitting tension is what determines the final measurements of your work, and is usually measured per 10 x 10 cm. It is provided like so: number of stitches in width x number of rows in height - eg: 19 stitches x 26 rows = 10 x 10 cm.

The knitting tension is very individual; some people knit/crochet loosely while others work tightly. You adjust the knitting tension with the needle size, which is why the suggested needle size is only meant as a guide! You need to adjust this (up or down) to ensure that YOUR knitting tension matches the knitting tension provided in the pattern. If you work with a different knitting tension than provided you will have a different yarn consumption, and your work will have different measurements than what the pattern suggests.

The knitting tension also determines which yarns can replace each other. As long as you achieve the same knitting tension you can replace one yarn with another.

See DROPS lesson: How to measure your tension/gauge

See DROPS video: How to make a gauge tension swatch

The required amount of yarn is provided in grams, eg: 450 g. To calculate how many balls you’ll need you first need to know how many grams are in 1 ball (25g, 50g or 100g). This information is available if you click on the individual yarn quality on our pages. Divide the amount required with the amount of each ball. For example, if each ball is 50g (the most common amount), the calculation will be as follows: 450 / 50 = 9 balls.

The important thing when changing from one yarn to another is that the knitting/crochet tension remains the same. This is so that the measurements of the finished piece will be the same as on the sketch provided. It is easier to achieve the same knitting tension using yarns from the same yarn group. It is also possible to work with multiple strands of a thinner yarn to achieve the knitting tension of a thicker one. Please try our yarn converter. We recommend you to always work a test swatch.

Please NOTE: when changing yarn the garment might have a different look and feel to the garment in the photo, due to individual properties and qualities of each yarn.

See DROPS lesson: Can I use a different yarn than the one mentioned in the pattern?

All our yarns are categorised into yarn groups (from A to F) according to thickness and knitting tension – group A contains the thinnest yarns and group F the thickest. This makes it easier for you to find alternative yarns to our patterns, should you wish to switch yarn. All yarns within the same group have a similar knitting tension and can easily replace each other. However, different yarn qualities have different structures and properties which will give the finished work a unique look and feel.

Click here for an overview of the yarns in each yarn group

At the top of all our patterns you’ll find a link to our yarn calculator, which is a helpful tool should you wish to use a different yarn than suggested. By filling in the yarn quality you wish to replace, the amount (in your size) and number of strands, the calculator will present good alternative yarns with the same knitting tension. Additionally it will tell you how much you’ll require in the new qualities and whether you’ll need to work with multiple strands. Most skeins are 50g (some are 25g or 100g).

If the pattern is worked with multiple colours, every colour will have to be calculated separately. Similarly, if the pattern is worked with several strands of different yarns (for example 1 strand Alpaca and 1 strand Kid-Silk) you will have to find alternatives for each, individually.

Click here to see our yarn calculator

Since different yarns have different qualities and textures we have chosen to keep the original yarn in our patterns. However, you can easily find options among our available qualities by using our yarn calculator, or simply pick a yarn from the same yarn group.

It is possible that some retailers still have discontinued yarns in stock, or that someone has a few skeins at home that they would like to find patterns for.

The yarn calculator will provide both alternative yarn as well as required amount in the new quality.

If you think it's hard to decide what size to make, it can be a good idea to measure a garment you own already and like the size of. Then you can pick the size by comparing those measures with the ones available in the pattern's size chart.

You'll find the size chart at the bottom of the pattern.

See DROPS lesson: How to read size chart

The needle size provided in the pattern serves only as a guide, the important thing is to follow the knitting tension. And since knitting tension is very individual, you will have to adjust the needle size to ensure that YOUR tension is the same as in the pattern – maybe you’ll have to adjust 1, or even 2 needle sizes, up or down to achieve the correct tension. For this, we recommend that you work test swatches.

Should you work with a different knitting tension than the one provided, the measurements of the finished garment might deviate from the measurement sketch.

See DROPS lesson: How to measure your tension/gauge

See DROPS video: How to make a tension/gauge swatch

Working a garment top-down provides more flexibility and room for personal adjustment. For example it is easier to try the garment on while working, as well as making adjustments to length of yoke and shoulder caps.

The instructions are carefully explaining every step, in the correct order. Diagrams are adjusted to the knitting direction and are worked as usual.

The diagram depicts all rows/rounds, and every stitch seen from the right side. It is read from bottom to top, from right to left. 1 square = 1 stitch.

When working back and forth, every other row is worked from the right side and every other row is worked from the wrong side. When working from the wrong side, the diagram will have to be worked reversed: from left to right, knit stitches are purled, purl stitches are knit etc.

When working in the round every round is worked from the right side and the diagram are worked from right to left on all rounds.

See DROPS lesson: How to read knitting diagrams

The diagram depicts all rows/rounds, and every stitch seen from the right side. It is worked from bottom to top, from right to left.

When working back and forth every other row is worked from the right side: from right to left and every other row is worked from the wrong side: from left to right.

When working in the round, every row in the diagram are worked from the right side, from right to left.

When working a circular diagram you start in the middle and work your way outwards, counter clockwise, row by row.

The rows usually start with a given number of chain stitches (equivalent to the height of the following stitch), this will either be depicted in the diagram or explained in the pattern.

See DROPS lesson: How to read crochet diagrams

Instructions for working several diagrams after each other on the same row/round, will often be written like so: “work A.1, A.2, A.3 a total of 0-0-2-3-4 times". This means you work A.1 once, then A.2 is worked once, and A.3 is repeated (in width) the number of times provided for your size – in this case like so: S = 0 times, M = 0 times, L=2 times, XL= 3 times and XXL = 4 times.

The diagrams are worked as usual: begin with the first row in A.1, then work the first row in A.2 etc.

See DROPS lesson: How to read knitting diagrams

See DROPS lesson: How to read crochet diagrams

The total width of the garment (from wrist-to-wrist) will be larger in the larger sizes, despite the actual sleeves being shorter. The larger sizes have longer sleeve caps and wider shoulders, so there will be a good fit in all sizes.

The measurement sketch/schematic drawing provides information regarding the full length of the garment. If it’s a jumper or a jacket the length is measured from the highest point on the shoulder closest to the neckline, and straight down to the bottom of the garment. It is NOT measured from the tip of shoulder. Similarly, the length of yoke is measured from the highest point on the shoulder and down to where yoke is split into body and sleeves.

On a jacket measures are never taken along bands, unless specifically stated. Always measure inside band stitches when measuring the length.

See DROPS lesson: How to read a schematic drawing

Diagrams are often repeated on the round or in height. 1 repeat is the diagram the way it appears in the pattern. If it says to work 5 repeats of A.1 in the round, then you work A.1 a total of 5 times after/next to each other in the round. If it says to work 2 repeats of A.1 vertically/in height you work the entire diagram once, then begin again at the start and work the entire diagram one more time.

Chain stitches are slightly narrower than other stitches and to avoid working the cast-on edge too tight, we simply chain more stitches to begin with. The stitch count will be adjusted on the following row to fit the pattern and measurement sketch.

The rib edge is more elastic and will contract slightly compared to, for example, stocking stitch. By increasing before the rib edge, you avoid a visible difference in width between the rib edge and the rest of the body.

It’s very easy to cast off too tightly, and by making yarn overs while casting off (and simultaneously casting these off) you avoid a too tight cast off edge.

See DROPS video: How to bind off with yarn overs (yo)

To achieve an even increase (or decrease) you can increase on, for example: every 3rd and 4th row alternately, like so: work 2 rows and increase on the 3rd row, work 3 rows and increase on the 4th. Repeat this until the increase is complete.

See DROPS lesson: Increase or decrease 1 st on every 3rd and 4th row alternately

Should you prefer to work in the round instead of back and forth, you may of course adjust the pattern. You’ll need to add steeks mid-front (usually 5 stitches), and follow the instructions. When you would normally turn and work from the wrong side, simply work across the steek and continue in the round. At the end you’ll cut the piece open, pick up stitches to work bands, and cover the cut edges.

See DROPS video: How to knit steeks and cut open

Should you prefer to work back and forth instead of in the round, you may of course adjust the pattern so you work the pieces separately and then assemble them at the end. Divide the stitches for the body in 2, add 1 edge stitch in each side (for sewing) and work the front and back pieces separately.

See DROPS lesson: Can I adapt a pattern for circular needles into straight needles?

Pattern repeats can vary slightly in the different sizes, in order to get the correct proportions. If you’re not working the exact same size as the garment in the photo, yours might deviate slightly. This has been carefully developed and adjusted so that the complete impression of the garment is the same in all sizes.

Make sure to follow instructions and diagrams for your size!

If you have found a pattern you like which is available in women’s size it’s not very difficult to convert it to men’s size. The biggest difference will be the length of sleeves and body. Start working on the women size that you think would fit across the chest. The additional length will be worked right before you cast off for the armhole/sleeve cap. If the pattern is worked top-down you can add the length right after the armhole or before the first decrease on sleeve.

Regarding additional yarn amount, this will depend on how much length you add, but it is better with a skein too many than too few.

All yarns will have excess fibres (from production) that might come off as lint or shedding. Brushed yarns (ie hairier yarns) have more of these loose, excess fibres, causing more shedding.

Shedding also depends on what is worn under or over the garment, and whether this pulls at the yarn fibres. It’s therefore not possible to guarantee that there will be no shedding

Below are some tips on how to get the best result when working with hairier yarns:

1. When the garment is finished (before you wash it) shake it vigorously so the looser hairs come off. NOTE: do NOT use a lint roller, brush or any method that pulls at the yarn.

2. Place the garment in a plastic bag and put it in your freezer - the temperature will cause the fibres to become less attached to each other, and excess fibres will come off easier.

3. Leave in the freezer for a few hours before taking it out and shaking it again.

4. Wash the garment according to the instructions on the yarn label.

Pilling is a natural process that happens to even the most exclusive of fibers. It's a natural sign of wear and tear that is hard to avoid, and that is most visible in high friction areas of your garment like a sweater's arms and cuffs.

You can make your garment look as new by removing the pilling, using a fabric comb or a pill/lint remover.

Still can't find the answer you need? Then scroll down and leave your question so one of our experts can try to help you. This will be done normally within 5 to 10 working days.
In the meantime, you can read the questions and answers that others have left to this pattern or join the DROPS Workshop on Facebook to get help from fellow knitters/crocheters!

You might also like...

Post a comment to pattern DROPS 195-23

We would love to hear what you have to say about this pattern!

If you want to leave a question, please make sure you select the correct category in the form below, to speed up the answering process. Required fields are marked *.

Comments / Questions (49)

country flag Ekaterina wrote:

Liebe, Redaktion, ich habe meine Fehler gefunden :) Die Anleitung ist in Ordnung Danke!

21.05.2023 - 17:51

country flag Ekaterina wrote:

Hallo, nach Anleitung sollte man für Größe S nach dem die Maschen für A1A und A1B verteilt sind 14 Raporte a 14 Maschen + 1 bekommen und 2 x 5 Randmaschen. Ich bekommen zum 2. Mal 15 Raporte a 14 Maschen + 1. + 2 x 5 Randmaschen und es bleibt 1 Masche übrig. Irgendetwas stimmt nicht und ich kann es mir nicht erklären. Stimmen die Zahlen in der Anleitung? Danke!

21.05.2023 - 14:43

DROPS Design answered:

Liebe Ekaterina, vor A.1 haben Sie 207 Maschen auf der Nadel, diese werden so gestrickt; 5 Blenden-Maschen, 14 Rapporte A.1A je 14 Maschen (= über die nächsten 196 Maschen); A.1B (= 1 Masche) und 5 Blenden-Maschen = 5+196+1+5=207 Maschen. Bei den Rückreihen stricken Sie: A.1B, A.1A wiederholen Sie und lesen Sie links nach rechts. Viel Spaß beim stricken!

22.05.2023 - 12:58

country flag Martina Giers wrote:

Hallo, lt. Anleitung soll bei den Ärmeln schon A2 gestrickt werden , bevor Rumpfteil und Ärmel auf eine Nadel kommen, beim Rumpfteil aber nicht. Auf der Abbildung sieht es aber aus als ob das Muster auf der gleichen Höhe beginnt.

01.03.2023 - 17:50

DROPS Design answered:

Liebe Frau Giers, genau A.2 wird bei der Ärmel schon gestrickt, man kann das nur ein bischen davon bei dem 3. Foto sehen. Viel Spaß beim stricken!

02.03.2023 - 10:34

country flag Aase Rohde wrote:

Jeg vil gerne høre om modellen ikke også findes i Børne str. 5/6 år, jeg ville gerne strikke den til mit barnebarn. Mvh. Aase

13.02.2022 - 14:39

DROPS Design answered:

Hei Aase. Nei, vi har nok ikke en helt lik i barenstr. Men ta en titt DROPS Children 34-9. Kankje du liker den? mvh DROPS Design

14.02.2022 - 14:37

country flag Maj-Len Stenman wrote:

Hej! Nu förstår jag inte!! På ärmarna ska det stickas mönsterraporter högst upp innan de sammanfogas med bålen. Men ska det bara stickas slätstickning på bålen?? På bilden ser det ju ut som.om.mönsterstickninggår ner en bit på bålen också!

08.12.2021 - 10:50

DROPS Design answered:

Hej Maj-Len, jo som du ser hvis du klikker på nærbilledet, så skal du strikke en ekstra rapport på ærmet. God fornøjelse!

09.12.2021 - 09:32

country flag Margit Christensen wrote:

Tusind tak for det hurtige svar.

08.12.2021 - 09:45

country flag Margit Christensen wrote:

Tak for svaret på mit sidste spørgsmål, men jeg forstår ikke helt. Skal der ikke tages en maske ind på hver side i diagrammet i stedet for to i begyndelsen, og skal indtagningen ikke først påbegyndes , når den første halve er strikket, ellers passer mønsteret ikke over hinanden. På forhånd tag.

07.12.2021 - 15:01

DROPS Design answered:

Hej Margit, på 15.pind i A.3B tager du ind i midten som du har gjort igennem hele diagrammet på hver 2.pind. På næste pind er de 2 masker trukket fra i diagrammet og de øvrige masker strikkes ifølge pind 16 i diagrammet.

08.12.2021 - 08:13

country flag Fillastre Sandrine wrote:

Bonsoir je ne trouve pas le diagramme A1

28.11.2021 - 18:48

DROPS Design answered:

Bonjour Mme Fillastre, le diagramme A.1 se compose de 2 parties pour deux groupes de tailles et se trouve après A.2 (et avant A.3): A.1A (se tricote sur 14 mailles en S, L et XXL et sur 12 m en M, XL et XXXL) et A.1B (se tricote sur 1 m dans toutes les tailles). Bon tricot!

29.11.2021 - 08:30

country flag Margit Christensen wrote:

Jeg forstår ikke diagram A3B. Fra pind 15 er der en maske mindre i hver side, men der står ikke noget om indtagning. Dog skal der være færre masker ved diagrammets slutning.

07.11.2021 - 15:00

DROPS Design answered:

Hei Marit. Om du ser på rad 15 i diagrammet (A3B) og det midterste ikonet, så viser dette ikonet at her skal det felles 2 masker (ta 1 maske løs av pinnen som om den skulle strikkes rett, strikk 2 rett sammen, løft den løse masken over maskene som ble strikket sammen = 2 felt masker). Derfor vil det på neste rad i diagrammet vise 2 mindre masker. Altså du feller 2 masker hver gang du strikker diagrammet raden ut. mvh DROPS Design

08.11.2021 - 10:28

country flag Helinda wrote:

Is there a size guide? How many sizes bigger to knit if felting a pattern? If felting a patterned design will I still see the pattern once felted?

27.05.2021 - 20:41

DROPS Design answered:

Hi Helinda, There is a size chart at the bottom of the pattern. We do not recommend felting this pattern because, as you say, the pattern will disappear in the felting. Happy knitting!

28.05.2021 - 07:59